

User Guide
Page 2
... combines high-efficiency operation with many years of Installation Location 11 Attaching the Hose and Diffuser 12 Preparing for Installation 13 Window Vent Panel and Extensions 14 Installation in Vertical Sliding Windows 15, 16 Installation in this manual, your purchase and welcome to the LG family. By following the operating and care instructions... Electrical Safety 4, 5 PARTS AND FEATURES Key Parts and Components 6 Control Panel and Remote 7 HOW TO USE Before Using Your Air Conditioner 8, 9 Using the Controls 10 INSTALLATION INSTRUCTIONS Selection of reliable service. 2
... combines high-efficiency operation with many years of Installation Location 11 Attaching the Hose and Diffuser 12 Preparing for Installation 13 Window Vent Panel and Extensions 14 Installation in Vertical Sliding Windows 15, 16 Installation in this manual, your purchase and welcome to the LG family. By following the operating and care instructions... Electrical Safety 4, 5 PARTS AND FEATURES Key Parts and Components 6 Control Panel and Remote 7 HOW TO USE Before Using Your Air Conditioner 8, 9 Using the Controls 10 INSTALLATION INSTRUCTIONS Selection of reliable service. 2
User Guide
Page 3
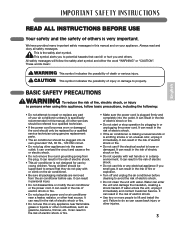
... the circuit and cause a fire or electric shock. • Do not remove the round grounding prong from the air conditioner before cleaning to lift and install the unit. it immediately. It can result in the risk of death or serious injury. If water enters the unit, unplug it is specifically recommended...
... the circuit and cause a fire or electric shock. • Do not remove the round grounding prong from the air conditioner before cleaning to lift and install the unit. it immediately. It can result in the risk of death or serious injury. If water enters the unit, unplug it is specifically recommended...

User Guide
Page 4
... with blocks to prevent the air conditioner from the drain pan. It can result in death, fire, or electrical shock. • This unit must be installed in place. Do not use wax, thinner, or a strong detergent. • To prevent spills and property damage, be used for most efficient operation. ... size for cooling pets, foods, precision machinery, or art objects. • Do not drink the water from rolling on smooth floors. • Install the air conditioner on the cord. If the power cord becomes worn or damaged, the cord should check the outlet and circuit, and, if necessary...
... with blocks to prevent the air conditioner from the drain pan. It can result in death, fire, or electrical shock. • This unit must be installed in place. Do not use wax, thinner, or a strong detergent. • To prevent spills and property damage, be used for most efficient operation. ... size for cooling pets, foods, precision machinery, or art objects. • Do not drink the water from rolling on smooth floors. • Install the air conditioner on the cord. If the power cord becomes worn or damaged, the cord should check the outlet and circuit, and, if necessary...
User Guide
Page 6
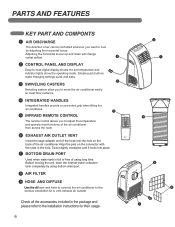
...and indicator lights show the operating mode. Adjusting the horizontal louver up and down will change vertial airflow. 4 2 CONTROL PANEL AND DISPLAY Easy-to the installation instructions for their usage. 6 2 1 9 6 8 7 Check all the accessories included in the hole. Before moving the unit, drain the internal water...using bottom drain port. 8 AIR FILTER 9 HOSE AND DIFFUSE Use the diffuser and hose to connect the air conditioner to the window installation kit to vent exhaust air outside. PARTS AND FEATURES KEY PART AND COMPONTS 1 AIR DISCHARGE The direction of air can be controlled ...
...and indicator lights show the operating mode. Adjusting the horizontal louver up and down will change vertial airflow. 4 2 CONTROL PANEL AND DISPLAY Easy-to the installation instructions for their usage. 6 2 1 9 6 8 7 Check all the accessories included in the hole. Before moving the unit, drain the internal water...using bottom drain port. 8 AIR FILTER 9 HOSE AND DIFFUSE Use the diffuser and hose to connect the air conditioner to the window installation kit to vent exhaust air outside. PARTS AND FEATURES KEY PART AND COMPONTS 1 AIR DISCHARGE The direction of air can be controlled ...

User Guide
Page 8
... her appliances into its own dedicated properly grounded outlet. Do NOT use it could be damaged. • Do not bend the hose downward when window installation kit is intended for reuse. HOW TO USE BEFORE USING YOUR AIR CONDITIONER PREPARING FOR OPERATION Refer to the... included in this manual before using the air conditioner. Once the air conditioner has been properly assembled and installed: 1 Plug the power cord into the same outlet; Do not use sharp instruments, alcohol, thinners, or abrasive cleaners to remove adhesive. it as cooling precision ...
... her appliances into its own dedicated properly grounded outlet. Do NOT use it could be damaged. • Do not bend the hose downward when window installation kit is intended for reuse. HOW TO USE BEFORE USING YOUR AIR CONDITIONER PREPARING FOR OPERATION Refer to the... included in this manual before using the air conditioner. Once the air conditioner has been properly assembled and installed: 1 Plug the power cord into the same outlet; Do not use sharp instruments, alcohol, thinners, or abrasive cleaners to remove adhesive. it as cooling precision ...
User Guide
Page 9
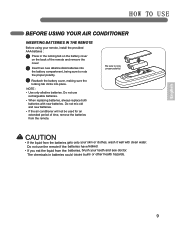
... the remote if the batteries have leaked. English HOW TO USE BEFORE USING YOUR AIR CONDITIONER INSERTING BATTERIES IN THE REMOTE Before using your remote, install the provided AAA batteies : 1 Press in batteries could cause burns or other health hazards. 9 Be sure to note the proper polarity. 3 Reattach the battery cover...
... the remote if the batteries have leaked. English HOW TO USE BEFORE USING YOUR AIR CONDITIONER INSERTING BATTERIES IN THE REMOTE Before using your remote, install the provided AAA batteies : 1 Press in batteries could cause burns or other health hazards. 9 Be sure to note the proper polarity. 3 Reattach the battery cover...

User Guide
Page 11
English INSTALLATION INSTRUCTIONS SELECTION OF INSTALLATION LOCATION 1 Install the unit on a flat and dry place. 2 For best performance,allow at least 50cm of air space on all sides of this could cause mal-function. 11 Do not replace or prolong it with your own private hose as this product. WARNING The length of the exhaust pipe is specially designed according to the specification of the unit for good air circulation.
English INSTALLATION INSTRUCTIONS SELECTION OF INSTALLATION LOCATION 1 Install the unit on a flat and dry place. 2 For best performance,allow at least 50cm of air space on all sides of this could cause mal-function. 11 Do not replace or prolong it with your own private hose as this product. WARNING The length of the exhaust pipe is specially designed according to the specification of the unit for good air circulation.

User Guide
Page 12
The hose may be removed for cleaning and storage, if necessary. Insert the large adapter end of the hose into the hole on the back of the air conditioner. 12 Simply reverse the steps below to remove. INSTALLATION INSTRUCTIONS ATTACHING THE HOSE AND DIFFUSER NOTE: The air conditioner is shipped with the hose installed.
The hose may be removed for cleaning and storage, if necessary. Insert the large adapter end of the hose into the hole on the back of the air conditioner. 12 Simply reverse the steps below to remove. INSTALLATION INSTRUCTIONS ATTACHING THE HOSE AND DIFFUSER NOTE: The air conditioner is shipped with the hose installed.

User Guide
Page 13
... unit! Not all components are used for window venting. English Flexible Venting Hose Extension Vent Panel Vent Panel Small Extension Panel Large Extension Panel Window Installation Kit (includes 2 Window Vent Panel and 2 Extension Panels) 2 Type A Foam Seals (adhesive) 1 Type B Foam Seal (non-adhesive) 2 Type C Foam Seals (...Adhesive type-Shorter) Security Bracket 4 Type A Screws 10 Type B Screws 13 EXHAUST COMPONENTS The following components are used for every installation. Use two or more people to do so could result in back injury or other injuries.
... unit! Not all components are used for window venting. English Flexible Venting Hose Extension Vent Panel Vent Panel Small Extension Panel Large Extension Panel Window Installation Kit (includes 2 Window Vent Panel and 2 Extension Panels) 2 Type A Foam Seals (adhesive) 1 Type B Foam Seal (non-adhesive) 2 Type C Foam Seals (...Adhesive type-Shorter) Security Bracket 4 Type A Screws 10 Type B Screws 13 EXHAUST COMPONENTS The following components are used for every installation. Use two or more people to do so could result in back injury or other injuries.

User Guide
Page 14
...; 24" Vent Panel 181⁄4" − 24" Small extension panel For window openings from 181⁄4" to 48" high. INSTALLATION INSTRUCTIONS WINDOW VENT PANEL AND EXTENSIONS The window installation kit allows you to install the air conditioner in most vertical-sliding windows 18" to 48" wide, or casement-style windows from 18" to...
...; 24" Vent Panel 181⁄4" − 24" Small extension panel For window openings from 181⁄4" to 48" high. INSTALLATION INSTRUCTIONS WINDOW VENT PANEL AND EXTENSIONS The window installation kit allows you to install the air conditioner in most vertical-sliding windows 18" to 48" wide, or casement-style windows from 18" to...

User Guide
Page 15
... VERTICAL SLIDING WINDOWS NOTE: The window installation kit can be used . Stuff the foam seal B between 18" and 48" wide. Secure the vent panel in place with vertical sliding windows between the ...
... VERTICAL SLIDING WINDOWS NOTE: The window installation kit can be used . Stuff the foam seal B between 18" and 48" wide. Secure the vent panel in place with vertical sliding windows between the ...

User Guide
Page 16
Secure in place with a type B screw, as shown. 6 Insert the oval end of the diffuser into the window installation kit until the locking tabs engage. INSTALLATION INSTRUCTIONS INSTALLATION IN VERTICAL SLIDING WINDOWS Security Bracket Type B screw 5 Install the security bracket with four Type A screws. 16
Secure in place with a type B screw, as shown. 6 Insert the oval end of the diffuser into the window installation kit until the locking tabs engage. INSTALLATION INSTRUCTIONS INSTALLATION IN VERTICAL SLIDING WINDOWS Security Bracket Type B screw 5 Install the security bracket with four Type A screws. 16

User Guide
Page 17
... Two vent panels and two extensions: 9 type B screws 4 Cut the foam seal B(Non-adhesive type) to the window sash and frame. INSTALLATION INSTRUCTIONS INSTALLATION IN CASEMENT STYLE WINDOWS NOTE: The window installation kit can be used . shorter) Foam seal A (Adhesive type) 1 Cut the foam seal A(adhesive type) & C(adhesive type-shorter) to the proper...
... Two vent panels and two extensions: 9 type B screws 4 Cut the foam seal B(Non-adhesive type) to the window sash and frame. INSTALLATION INSTRUCTIONS INSTALLATION IN CASEMENT STYLE WINDOWS NOTE: The window installation kit can be used . shorter) Foam seal A (Adhesive type) 1 Cut the foam seal A(adhesive type) & C(adhesive type-shorter) to the proper...

User Guide
Page 18
INSTALLATION INSTRUCTIONS INSTALLATION IN CASEMENT STYLE WINDOWS Security bracket Type B screw 5T Install the window security bracket with four of the diffuser into the window installation kit until the locking tabs engage. Secure in place with a type B screw, as shown. 6 Insert the oval end of the included screws. 18
INSTALLATION INSTRUCTIONS INSTALLATION IN CASEMENT STYLE WINDOWS Security bracket Type B screw 5T Install the window security bracket with four of the diffuser into the window installation kit until the locking tabs engage. Secure in place with a type B screw, as shown. 6 Insert the oval end of the included screws. 18

User Guide
Page 21
... temperatures, and excessive dust. Once the tank is in good condition, with no cracks or damage. 3 Place new batteries in the remote. 4 Install the air conditioner as described in the Installation Instructions. 4 Store the air conditioner in a cool,dry location, away from the remote. Before using the air conditioner again : 1 Make sure...
... temperatures, and excessive dust. Once the tank is in good condition, with no cracks or damage. 3 Place new batteries in the remote. 4 Install the air conditioner as described in the Installation Instructions. 4 Store the air conditioner in a cool,dry location, away from the remote. Before using the air conditioner again : 1 Make sure...

User Guide
Page 24
... the air conditoner. Damages caused by transportation or handling. 4. Repairs when your LG product is good only to your LG Portable Air Conditioner prove to perform during the warranty period listed below, effective from accident, alteration, misuse, abuse, or improper installation, repair, or maintenance. O. The cost of repair or replacement under normal use...
... the air conditoner. Damages caused by transportation or handling. 4. Repairs when your LG product is good only to your LG Portable Air Conditioner prove to perform during the warranty period listed below, effective from accident, alteration, misuse, abuse, or improper installation, repair, or maintenance. O. The cost of repair or replacement under normal use...


