Owners Manual
Page 5
... the appliance. • Do not operate the appliance without the filter securely installed. • Clean the filter every two weeks. • Do not drink water drained from the appliance. • If the batteries leak onto your clothes or skin, remove contaminated clothing and rinse skin thoroughly with soap and water. Do...
... the appliance. • Do not operate the appliance without the filter securely installed. • Clean the filter every two weeks. • Do not drink water drained from the appliance. • If the batteries leak onto your clothes or skin, remove contaminated clothing and rinse skin thoroughly with soap and water. Do...

Owners Manual
Page 7
ENGLISH COV34636802 2018. 4. 23. 오후 5:11 페이지 7 temperature, and using the bottom drain port. 7
ENGLISH COV34636802 2018. 4. 23. 오후 5:11 페이지 7 temperature, and using the bottom drain port. 7
Owners Manual
Page 11
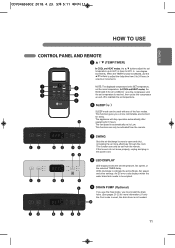
... 오후 5:11 페이지 11 ENGLISH one -degree runs the compressor until cycles the compressor SLEEP mode can be used , the drain hose is not needed. 11 The appliance will stop operation automatically after operating for sleep. Sets the air discharge louvers to Low. LED display shows...do not move properly, unplug and plug in the power cord. An E5 error code displays when the water drain tank needs to indicate the active Mode, fan speed, and other settings. DRAIN PUMP (Optional) If you use the Heat mode, you a more comfortable environment for 8 hours. This ...
... 오후 5:11 페이지 11 ENGLISH one -degree runs the compressor until cycles the compressor SLEEP mode can be used , the drain hose is not needed. 11 The appliance will stop operation automatically after operating for sleep. Sets the air discharge louvers to Low. LED display shows...do not move properly, unplug and plug in the power cord. An E5 error code displays when the water drain tank needs to indicate the active Mode, fan speed, and other settings. DRAIN PUMP (Optional) If you use the Heat mode, you a more comfortable environment for 8 hours. This ...

Owners Manual
Page 15
COV34636802 2018. 4. 23. 오후 5:11 페이지 15 ENGLISH Mounting Flexible Vent Hose Bracket Diffuser Drain Pipe (Optional) Lock Nut (Optional) 15
COV34636802 2018. 4. 23. 오후 5:11 페이지 15 ENGLISH Mounting Flexible Vent Hose Bracket Diffuser Drain Pipe (Optional) Lock Nut (Optional) 15

Owners Manual
Page 22
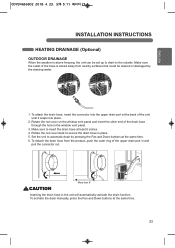
...at the same time. 4. If the outside temperature is not needed. If using the outdoor drainage method, make sure the outlet of the upper drain port in a bucket that could be stained or damaged by pressing the Fan and Down buttons at least 28 ounces. INDOOR DRAINAGE 1. Remember to... at or near freezing (32°F/0°C) follow the indoor drainage instructions. If only the Cool mode is used, the drain hose is at the back of the drain hose in and pull the connector out. 22 COV34636802 2018. 4. 23. 오후 5:11 페이지 22 INSTALLATION INSTRUCTIONS ...
...at the same time. 4. If the outside temperature is not needed. If using the outdoor drainage method, make sure the outlet of the upper drain port in a bucket that could be stained or damaged by pressing the Fan and Down buttons at least 28 ounces. INDOOR DRAINAGE 1. Remember to... at or near freezing (32°F/0°C) follow the indoor drainage instructions. If only the Cool mode is used, the drain hose is at the back of the drain hose in and pull the connector out. 22 COV34636802 2018. 4. 23. 오후 5:11 페이지 22 INSTALLATION INSTRUCTIONS ...
Owners Manual
Page 23
... in the window vent panel. 3. To attach the drain hose, insert the connector into the upper drain port at the same time. 23 Make sure to secure the drain hose in place. 5. To detach the drain hose from nearby surfaces that could be set up to drain to the outside. Make sure the outlet of... the window vent panel and insert the other end of the drain hose through the hole in the unit will automatically activate the drain function. Rotate the nut cover back to insert the drain hose at the same time. 6. To activate the drain manually, press the Fan and Down buttons at the back of...
... in the window vent panel. 3. To attach the drain hose, insert the connector into the upper drain port at the same time. 23 Make sure to secure the drain hose in place. 5. To detach the drain hose from nearby surfaces that could be set up to drain to the outside. Make sure the outlet of... the window vent panel and insert the other end of the drain hose through the hole in the unit will automatically activate the drain function. Rotate the nut cover back to insert the drain hose at the same time. 6. To activate the drain manually, press the Fan and Down buttons at the back of...
Owners Manual
Page 24
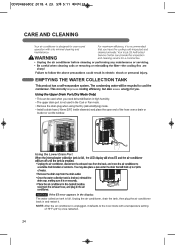
... tank, then plug the air conditioner back in the Cool or Fan mode. • Remove the drain plug when using the Dry (dehumidifying) mode. • Install a drain hose (16mm [5/8"] inside diameter) and place the open end of 75°F (24°C) once restarted. 24 COV34636802 2018. 4. 23. 오후 5:11 페...CARE AND CLEANING EMPTYING THE WATER COLLECTION TANK improves saves • This can be used when you need dehumidification in high humidity. • The upper drain port is not used in and restart it defaults to the Cool mode with a temperature setting of the hose over...
... tank, then plug the air conditioner back in the Cool or Fan mode. • Remove the drain plug when using the Dry (dehumidifying) mode. • Install a drain hose (16mm [5/8"] inside diameter) and place the open end of 75°F (24°C) once restarted. 24 COV34636802 2018. 4. 23. 오후 5:11 페...CARE AND CLEANING EMPTYING THE WATER COLLECTION TANK improves saves • This can be used when you need dehumidification in high humidity. • The upper drain port is not used in and restart it defaults to the Cool mode with a temperature setting of the hose over...

Owners Manual
Page 26
COV34636802 2018. 4. 23. 오후 5:11 페이지 26 CARE AND CLEANING STORING THE AIR CONDITIONER extended period of time: Make sure the filters and drain cap are in place Remove and clean the filters, allow them to dry completely, then reinstall them. 26
COV34636802 2018. 4. 23. 오후 5:11 페이지 26 CARE AND CLEANING STORING THE AIR CONDITIONER extended period of time: Make sure the filters and drain cap are in place Remove and clean the filters, allow them to dry completely, then reinstall them. 26


