Owner's Manual
Page 6
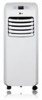
...DISCHARGE The direction of the air conditioner.Align the pins on the connector with the slots in the package and please refer to the installation instructions for their usage. 7 6 6 Before moving the unit, drain the internal water collection tank completely by adjusting the horizontal louver....using bottom drain port. 7 AIR FILTER 8 HOSE AND DIFFUSE Use the diffuser and hose to connect the air conditioner to the 5 window installation kit to adjust the temperature and operate most floor surfaces. 4 INFRAED REMOTE CONTROL The remote control allows you want to -read digital display...
...DISCHARGE The direction of the air conditioner.Align the pins on the connector with the slots in the package and please refer to the installation instructions for their usage. 7 6 6 Before moving the unit, drain the internal water collection tank completely by adjusting the horizontal louver....using bottom drain port. 7 AIR FILTER 8 HOSE AND DIFFUSE Use the diffuser and hose to connect the air conditioner to the 5 window installation kit to adjust the temperature and operate most floor surfaces. 4 INFRAED REMOTE CONTROL The remote control allows you want to -read digital display...
Owner's Manual
Page 8
... use as cooling precision equipment, food, pets, plants, artwork, etc. They could be damaged. • Do not bend the hose downward when window installation kit is intended for purposes such as a consumer comfort appliance. IMPORTANT: • Do not remain in the direct airflow from the air conditioner. •... enclosed spaces with a damp cloth. HOW TO USE BEFORE USING YOUR AIR CONDITIONER PREPARING FOR OPERATION Refer to the Installation Instructions included in this manual before using the air conditioner. Once the air conditioner has been properly assembled and...
... use as cooling precision equipment, food, pets, plants, artwork, etc. They could be damaged. • Do not bend the hose downward when window installation kit is intended for purposes such as a consumer comfort appliance. IMPORTANT: • Do not remain in the direct airflow from the air conditioner. •... enclosed spaces with a damp cloth. HOW TO USE BEFORE USING YOUR AIR CONDITIONER PREPARING FOR OPERATION Refer to the Installation Instructions included in this manual before using the air conditioner. Once the air conditioner has been properly assembled and...
Owner's Manual
Page 13
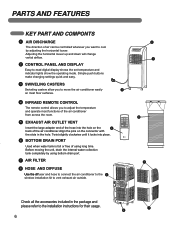
... could result in back injury or other injuries. Failure to lift and install the unit! EXHAUST COMPONENTS The following components are used for every installation. English Flexible Venting Hose Extension Vent Panel Vent Panel Small Extension Panel Large Extension Panel Window Installation Kit (includes 2 Window Vent Panel and 2 Extension Panels) 2 Type A Foam Seals (adhesive) 1 Type B Foam...
... could result in back injury or other injuries. Failure to lift and install the unit! EXHAUST COMPONENTS The following components are used for every installation. English Flexible Venting Hose Extension Vent Panel Vent Panel Small Extension Panel Large Extension Panel Window Installation Kit (includes 2 Window Vent Panel and 2 Extension Panels) 2 Type A Foam Seals (adhesive) 1 Type B Foam...
Owner's Manual
Page 14
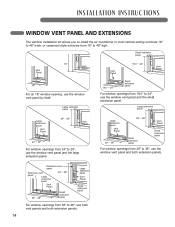
...; 29" Vent Panel 24" − 29" For window openings from 24" to 48" high. INSTALLATION INSTRUCTIONS WINDOW VENT PANEL AND EXTENSIONS The window installation kit allows you to install the air conditioner in most vertical-sliding windows 18" to 48" wide, or casement-style windows from 18" to 29", use the window vent panel and the large extension panel. Large...
...; 29" Vent Panel 24" − 29" For window openings from 24" to 48" high. INSTALLATION INSTRUCTIONS WINDOW VENT PANEL AND EXTENSIONS The window installation kit allows you to install the air conditioner in most vertical-sliding windows 18" to 48" wide, or casement-style windows from 18" to 29", use the window vent panel and the large extension panel. Large...
Owner's Manual
Page 15
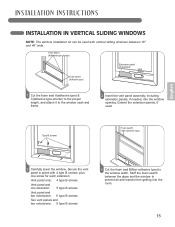
Stuff the foam seal B between 18" and 48" wide. INSTALLATION INSTRUCTIONS INSTALLATION IN VERTICAL SLIDING WINDOWS NOTE: The window installation kit can be used . Foam seal C (Adhesive type-shorter) Foam seal A (Adhesive type) Extension panel (if required) Vent Panel 1 Cut the foam seal A(adhesive type) & C(adhesive ...
Stuff the foam seal B between 18" and 48" wide. INSTALLATION INSTRUCTIONS INSTALLATION IN VERTICAL SLIDING WINDOWS NOTE: The window installation kit can be used . Foam seal C (Adhesive type-shorter) Foam seal A (Adhesive type) Extension panel (if required) Vent Panel 1 Cut the foam seal A(adhesive type) & C(adhesive ...
Owner's Manual
Page 16
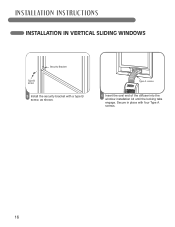
Secure in place with a type B screw, as shown. 6 Insert the oval end of the diffuser into the window installation kit until the locking tabs engage. INSTALLATION INSTRUCTIONS INSTALLATION IN VERTICAL SLIDING WINDOWS Security Bracket Type B screw 5 Install the security bracket with four Type A screws. 16
Secure in place with a type B screw, as shown. 6 Insert the oval end of the diffuser into the window installation kit until the locking tabs engage. INSTALLATION INSTRUCTIONS INSTALLATION IN VERTICAL SLIDING WINDOWS Security Bracket Type B screw 5 Install the security bracket with four Type A screws. 16
Owner's Manual
Page 17
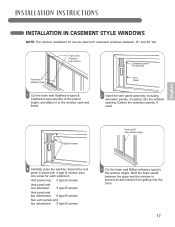
..., including extension panels, if needed, into the room. 17 Type B screws Foam seal B (Non-adhesive type) English 3 Carefully close the window. Foam seal C (Adhesive type- INSTALLATION INSTRUCTIONS INSTALLATION IN CASEMENT STYLE WINDOWS NOTE: The window installation kit can be used . shorter) Foam seal A (Adhesive type) 1 Cut the foam seal A(adhesive type) & C(adhesive type-shorter) to the proper...
..., including extension panels, if needed, into the room. 17 Type B screws Foam seal B (Non-adhesive type) English 3 Carefully close the window. Foam seal C (Adhesive type- INSTALLATION INSTRUCTIONS INSTALLATION IN CASEMENT STYLE WINDOWS NOTE: The window installation kit can be used . shorter) Foam seal A (Adhesive type) 1 Cut the foam seal A(adhesive type) & C(adhesive type-shorter) to the proper...
Owner's Manual
Page 18
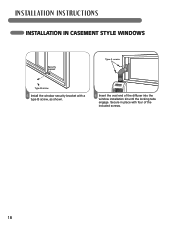
INSTALLATION INSTRUCTIONS INSTALLATION IN CASEMENT STYLE WINDOWS Security bracket Type B screw 5 Install the window security bracket with four of the diffuser into the window installation kit until the locking tabs engage. Secure in place with a type B screw, as shown. 6 Insert the oval end of the included screws. 18
INSTALLATION INSTRUCTIONS INSTALLATION IN CASEMENT STYLE WINDOWS Security bracket Type B screw 5 Install the window security bracket with four of the diffuser into the window installation kit until the locking tabs engage. Secure in place with a type B screw, as shown. 6 Insert the oval end of the included screws. 18
Specification
Page 2
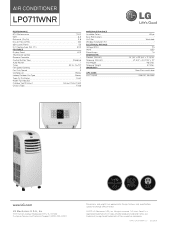
... Only (1.5M) Fixed MATERIALS/FINISHES Available Colors Easy-Roll Casters Air Filter Window Installation Kit ELECTRICAL RATINGS Voltage/50Hz Watts Rated Amps DIMENSIONS Product (WxHxD) Shipping (WxHxD) Net Weight Shipping Weight WARRANTY UPC CODE LP0711WNR White • Washable • 115 820 7.6 13 7/8" x 29 ... and weights are trademarks or registered trademarks of LG Corp. HAAC-LP0711WNR-SS 03/28/11 All rights reserved. "LG Life's Good" is a registered trademark of their respective companies. AIR CONDITIONER LP0711WNR PERFORMANCE BTU Performance EER Dehumid. (Pts/Hr)...
... Only (1.5M) Fixed MATERIALS/FINISHES Available Colors Easy-Roll Casters Air Filter Window Installation Kit ELECTRICAL RATINGS Voltage/50Hz Watts Rated Amps DIMENSIONS Product (WxHxD) Shipping (WxHxD) Net Weight Shipping Weight WARRANTY UPC CODE LP0711WNR White • Washable • 115 820 7.6 13 7/8" x 29 ... and weights are trademarks or registered trademarks of LG Corp. HAAC-LP0711WNR-SS 03/28/11 All rights reserved. "LG Life's Good" is a registered trademark of their respective companies. AIR CONDITIONER LP0711WNR PERFORMANCE BTU Performance EER Dehumid. (Pts/Hr)...


