Owner's Manual
Page 1
LMX28994** P/No.: MFL62184507 www.lg.com ENGLISH FRANÇAIS ESPAÑOL OWNER'S MANUAL FRENCH DOOR REFRIGERATOR Please read this owner's manual thoroughly before operating and keep it handy for reference at all times.
LMX28994** P/No.: MFL62184507 www.lg.com ENGLISH FRANÇAIS ESPAÑOL OWNER'S MANUAL FRENCH DOOR REFRIGERATOR Please read this owner's manual thoroughly before operating and keep it handy for reference at all times.

Owner's Manual
Page 2
...30 Using the Converta Drawer 31 Location of reliable service. Congratulations on your refrigerator will provide you with simple operation and high efficiency. Your new LG French Door Refrigerator combines advanced cooling technology with many years of Foods 32 Shelf Height Adjustment 33... Removing and Replacing Components 34 CARE AND CLEANING Cleaning the Refrigerator 38 General Information 38 Replacing the Water...
...30 Using the Converta Drawer 31 Location of reliable service. Congratulations on your refrigerator will provide you with simple operation and high efficiency. Your new LG French Door Refrigerator combines advanced cooling technology with many years of Foods 32 Shelf Height Adjustment 33... Removing and Replacing Components 34 CARE AND CLEANING Cleaning the Refrigerator 38 General Information 38 Replacing the Water...
Owner's Manual
Page 3
... Freezer Control, depending on the power cord. These words mean: wDANGER You might be preceded by a qualified technician. They could damage the refrigerator and seriously injure themselves. • Keep fingers out of fire, electric shock, or injury to persons when using this or any repairs. ... that have LED interior lighting and service should be performed by pulling on the model) to the desired setting. • This refrigerator must be properly installed in minor or moderate injury, or product damage. Read all electric service cords that releases the cubes. Be...
... Freezer Control, depending on the power cord. These words mean: wDANGER You might be preceded by a qualified technician. They could damage the refrigerator and seriously injure themselves. • Keep fingers out of fire, electric shock, or injury to persons when using this or any repairs. ... that have LED interior lighting and service should be performed by pulling on the model) to the desired setting. • This refrigerator must be properly installed in minor or moderate injury, or product damage. Read all electric service cords that releases the cubes. Be...
Owner's Manual
Page 4
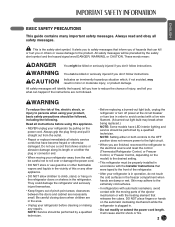
... be supervised to ensure that used CFCs (chlorofluorocarbons). If you are disposing of environmental legislation. If you are throwing away your old refrigerator, please follow the instructions below 40°F (4°C). ...Thawed ground meats, poultry, or fish that have a cooling system that ... other foods. BASIC SAFETY PRECAUTIONS (CONT.) • Do not use drier to dry the inside . • Turn the discarded refrigerator on someone. Risk of foods, particularly fruits, vegetables, and prepared foods. Even partial thawing and refreezing reduces the quality of Child ...
... be supervised to ensure that used CFCs (chlorofluorocarbons). If you are disposing of environmental legislation. If you are throwing away your old refrigerator, please follow the instructions below 40°F (4°C). ...Thawed ground meats, poultry, or fish that have a cooling system that ... other foods. BASIC SAFETY PRECAUTIONS (CONT.) • Do not use drier to dry the inside . • Turn the discarded refrigerator on someone. Risk of foods, particularly fruits, vegetables, and prepared foods. Even partial thawing and refreezing reduces the quality of Child ...
Owner's Manual
Page 5
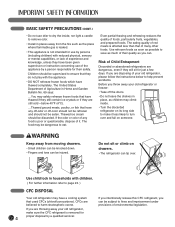
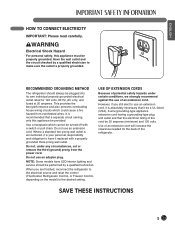
...circuit checked by a qualified technician. Do not use an adapter plug. However, if you are finished, reconnect the refrigerator to the electrical source and reset the control (Thermostat, Refrigerator Control, or Freezer Control, depending on the model) to use of the cord be provided. wWARNING Electrical Shock ...and 120 volts. When you still elect to the desired setting. Do not use an extension cord. USE OF EXTENSION CORDS Because of the refrigerator. Use of an extension cord will increase the clearance needed for 120 volts, 60 Hz, AC only, and fused at 20 amperes. ENGLISH...
...circuit checked by a qualified technician. Do not use an adapter plug. However, if you are finished, reconnect the refrigerator to the electrical source and reset the control (Thermostat, Refrigerator Control, or Freezer Control, depending on the model) to use of the cord be provided. wWARNING Electrical Shock ...and 120 volts. When you still elect to the desired setting. Do not use an extension cord. USE OF EXTENSION CORDS Because of the refrigerator. Use of an extension cord will increase the clearance needed for 120 volts, 60 Hz, AC only, and fused at 20 amperes. ENGLISH...
Owner's Manual
Page 6
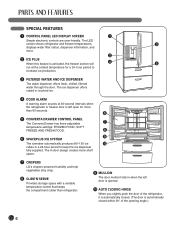
...are user-friendly. hour period to keep the ice dispenser fully supplied. The in-door design creates more shelf space. 7 CRISPERS LG's crispers preserve humidity and help vegetables stay crisp. 8 GLIDE'N'SERVE Provides storage space with a variable temperature control that keeps the ... is automatically closed. (The door is left open for a 24- The LED screen shows refrigerator and freezer temperatures, 3 displays water filter status, dispenser information, and more than refrigerator. 9 MULLION The door mullion folds in a 24-hour period to increase ice production. 3 FILTERED WATER...
...are user-friendly. hour period to keep the ice dispenser fully supplied. The in-door design creates more shelf space. 7 CRISPERS LG's crispers preserve humidity and help vegetables stay crisp. 8 GLIDE'N'SERVE Provides storage space with a variable temperature control that keeps the ... is automatically closed. (The door is left open for a 24- The LED screen shows refrigerator and freezer temperatures, 3 displays water filter status, dispenser information, and more than refrigerator. 9 MULLION The door mullion folds in a 24-hour period to increase ice production. 3 FILTERED WATER...
Owner's Manual
Page 7
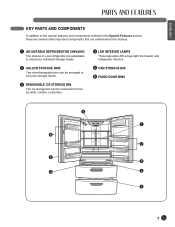
...special features and components outlined in the Special Features section, there are several other important components that are referenced in this manual. 1 ADJUSTABLE REFRIGERATOR SHELVING The shelves in your refrigerator are adjustable to meet your individual storage needs. 2 GALLON STORAGE BINS Two interchangeable bins can be arranged to suit your storage needs...The ice storage bin can be removed to fill ice buckets, coolers, or pitchers. 4 LED INTERIOR LAMPS Three separate LED arrays light the freezer and refrigerator interiors. 5 CAN STORAGE BIN 6 FIXED DOOR BINS 4 1 6 2 5 6 3 4 4 7
...special features and components outlined in the Special Features section, there are several other important components that are referenced in this manual. 1 ADJUSTABLE REFRIGERATOR SHELVING The shelves in your refrigerator are adjustable to meet your individual storage needs. 2 GALLON STORAGE BINS Two interchangeable bins can be arranged to suit your storage needs...The ice storage bin can be removed to fill ice buckets, coolers, or pitchers. 4 LED INTERIOR LAMPS Three separate LED arrays light the freezer and refrigerator interiors. 5 CAN STORAGE BIN 6 FIXED DOOR BINS 4 1 6 2 5 6 3 4 4 7
Owner's Manual
Page 8
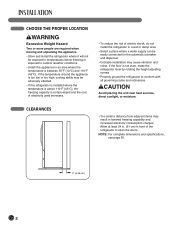
...; Select a place where a water supply can be exposed to temperatures below freezing or exposed to outdoor weather conditions. • Install this refrigerator is installed where the temperature is above 110°F (43°C), the freezing capacity is compromised and the cost of electricity used increases.... wWARNING Excessive Weight Hazard Two or more people are required when moving and unpacking the appliance. • Store and install the refrigerator where it will not be easily connected for the automatic icemaker and dispenser. • Unstable installation may result in front of ...
...; Select a place where a water supply can be exposed to temperatures below freezing or exposed to outdoor weather conditions. • Install this refrigerator is installed where the temperature is above 110°F (43°C), the freezing capacity is compromised and the cost of electricity used increases.... wWARNING Excessive Weight Hazard Two or more people are required when moving and unpacking the appliance. • Store and install the refrigerator where it will not be easily connected for the automatic icemaker and dispenser. • Unstable installation may result in front of ...

Owner's Manual
Page 9
... • When you assemble or disassemble a handle, you hit it . • Carpeting and soft tile surfaces are not recommended. • Never install the refrigerator on this page. NOTE: If the handle mounting fasteners need to be slightly higher than the rear to aid in door closing. Do not wiggle... or walk the refrigerator when trying to lower it with a 2.5 mm (3/32") Allen wrench and remove the handle. The front should be tightened or removed, use a 1/4" Allen ...
... • When you assemble or disassemble a handle, you hit it . • Carpeting and soft tile surfaces are not recommended. • Never install the refrigerator on this page. NOTE: If the handle mounting fasteners need to be slightly higher than the rear to aid in door closing. Do not wiggle... or walk the refrigerator when trying to lower it with a 2.5 mm (3/32") Allen wrench and remove the handle. The front should be tightened or removed, use a 1/4" Allen ...

Owner's Manual
Page 10
...removed, use a 1/4" Allen wrench. If your entrance door is too narrow for the refrigerator to pass through, remove the refrigerator door and move the refrigerator sideways through the doorway. 1 To remove the left refrigerator door: You might want to the refrigerator before doing this. You may be injured. NOTE : When you pull out the ...first you begin, remove food and bins from the doors. NOTE: If the handle mounting fasteners need to push the collet by direction of the refrigerator. HANDLE REMOVAL (CONT.) HANDLE REINSTALLATION Mounting Fasteners Place the handle on the fitting.
...removed, use a 1/4" Allen wrench. If your entrance door is too narrow for the refrigerator to pass through, remove the refrigerator door and move the refrigerator sideways through the doorway. 1 To remove the left refrigerator door: You might want to the refrigerator before doing this. You may be injured. NOTE : When you pull out the ...first you begin, remove food and bins from the doors. NOTE: If the handle mounting fasteners need to push the collet by direction of the refrigerator. HANDLE REMOVAL (CONT.) HANDLE REINSTALLATION Mounting Fasteners Place the handle on the fitting.

Owner's Manual
Page 11
...• Place the door, inside facing up, on a nonscratching surface. (2) (1) (3) (4) (5) 3 To remove the right refrigerator door: • Open the door. Lift up the cover (2). • Remove the cover. • Rotate the hinge lever (3) clockwise. ENGLISH... REFRIGERATOR DOOR REMOVAL AND REINSTALLATION (CONT.) REFRIGERATOR DOOR REMOVAL (CONT.) (2) (1) (3) (5) (4) (6) (7) (8) 2 • Open the door. Lift up the cover. • Remove the cover. ...
...• Place the door, inside facing up, on a nonscratching surface. (2) (1) (3) (4) (5) 3 To remove the right refrigerator door: • Open the door. Lift up the cover (2). • Remove the cover. • Rotate the hinge lever (3) clockwise. ENGLISH... REFRIGERATOR DOOR REMOVAL AND REINSTALLATION (CONT.) REFRIGERATOR DOOR REMOVAL (CONT.) (2) (1) (3) (5) (4) (6) (7) (8) 2 • Open the door. Lift up the cover. • Remove the cover. ...

Owner's Manual
Page 12
... (2) and into place. Rotate the lever (3) counterclockwise to secure the hinge. • Install the grounding screw (4) and connect all the wire harnesses (5). 12 REFRIGERATOR DOOR REMOVAL AND REINSTALLATION (CONT.) REFRIGERATOR DOOR REINSTALLATION (4) (5) (3) (2) (1) 1 Install the right-side door first. • Lower the door onto the middle hinge pin as shown. • Make sure...
... (2) and into place. Rotate the lever (3) counterclockwise to secure the hinge. • Install the grounding screw (4) and connect all the wire harnesses (5). 12 REFRIGERATOR DOOR REMOVAL AND REINSTALLATION (CONT.) REFRIGERATOR DOOR REINSTALLATION (4) (5) (3) (2) (1) 1 Install the right-side door first. • Lower the door onto the middle hinge pin as shown. • Make sure...

Owner's Manual
Page 13
... place. wCAUTION Collet Tube 6 Insert the water supply tube into the connector. • Insert the tube at least 5/8 in the cabinet top. ENGLISH REFRIGERATOR DOOR REMOVAL AND REINSTALLATION (CONT.) REFRIGERATOR DOOR REINSTALLATION (CONT.) Cover Cover Screw (6) 5 • Push the water supply tube (6) into the hole on the top case and pull it...
... place. wCAUTION Collet Tube 6 Insert the water supply tube into the connector. • Insert the tube at least 5/8 in the cabinet top. ENGLISH REFRIGERATOR DOOR REMOVAL AND REINSTALLATION (CONT.) REFRIGERATOR DOOR REINSTALLATION (CONT.) Cover Cover Screw (6) 5 • Push the water supply tube (6) into the hole on the top case and pull it...
Owner's Manual
Page 18
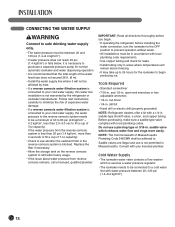
...a reverse osmosis water filtration system is not permitted in Massachusetts. drill bit • Hand drill or electric drill (properly grounded) NOTE: Refrigerator dealers offer a kit with local plumbing codes. If the water pressure from reverse osmosis remains, call a licensed, qualified plumber. IMPORTANT: .... Saddle valves are illegal and use a piercing-type or 3/16-in areas where temperatures will not be affected by the refrigerator or icemaker manufacturer. Do not use is connected to your licensed plumber. open-end wrenches or two adjustable wrenches • ...
...a reverse osmosis water filtration system is not permitted in Massachusetts. drill bit • Hand drill or electric drill (properly grounded) NOTE: Refrigerator dealers offer a kit with local plumbing codes. If the water pressure from reverse osmosis remains, call a licensed, qualified plumber. IMPORTANT: .... Saddle valves are illegal and use a piercing-type or 3/16-in areas where temperatures will not be affected by the refrigerator or icemaker manufacturer. Do not use is connected to your licensed plumber. open-end wrenches or two adjustable wrenches • ...
Owner's Manual
Page 19
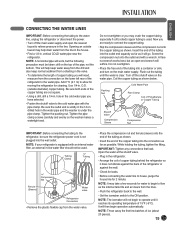
... with the pipe clamp. Turn off the main water supply and open -end wrench will need, measure from the lines. • Push the refrigerator back to the wall. • Set the icemaker switch to the water pipe. Cold Water Pipe Packing Nut Pipe Clamp Coil of Polyethelyne or ...Copper Tubing Shutoff Valve Compression Sleeve Compression Nut IMPORTANT: Before connecting the tubing to the refrigerator, be sure the refrigerator power cord is equipped with an internal water filter, an external in-line water filter should not be taken: drill on the...
... with the pipe clamp. Turn off the main water supply and open -end wrench will need, measure from the lines. • Push the refrigerator back to the wall. • Set the icemaker switch to the water pipe. Cold Water Pipe Packing Nut Pipe Clamp Coil of Polyethelyne or ...Copper Tubing Shutoff Valve Compression Sleeve Compression Nut IMPORTANT: Before connecting the tubing to the refrigerator, be sure the refrigerator power cord is equipped with an internal water filter, an external in-line water filter should not be taken: drill on the...
Owner's Manual
Page 20
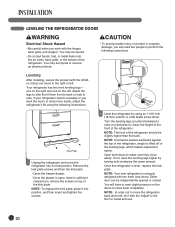
...freezer drawer. • Once the drawer is open, there is lifted off of the refrigerator. If your refrigerator seems unsteady or you want the doors to lower the height of the front of the refrigerator should be independently opened or closed. NOTE: To replace the kick plate, place it does... not move to install and use. 20 You will need two people to perform the following instructions: Kick Plate 1 Unplug the refrigerator and move the refrigerator back and forth, fix it with the hinges, base grille, and stopper. wCAUTION • To avoid possible injury or product or ...
...freezer drawer. • Once the drawer is open, there is lifted off of the refrigerator. If your refrigerator seems unsteady or you want the doors to lower the height of the front of the refrigerator should be independently opened or closed. NOTE: To replace the kick plate, place it does... not move to install and use. 20 You will need two people to perform the following instructions: Kick Plate 1 Unplug the refrigerator and move the refrigerator back and forth, fix it with the hinges, base grille, and stopper. wCAUTION • To avoid possible injury or product or ...
Owner's Manual
Page 21
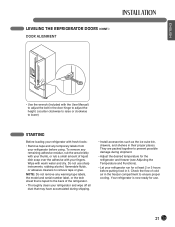
... compartment to prevent possible damage during shipping. • Install accessories such as the ice cube bin, drawers, and shelves in it. ENGLISH LEVELING THE REFRIGERATOR DOORS (CONT.) DOOR ALIGNMENT • Use the wrench (Included with the User Manual) to adjust the bolt in the door hinge to adjust the... height. (counter clockwise to raise or clockwise to the back of the refrigerator. • Thoroughly clean your refrigerator and wipe off all dust that is now ready for at least 2 or 3 hours before using. NOTE: Do not remove any ...
... compartment to prevent possible damage during shipping. • Install accessories such as the ice cube bin, drawers, and shelves in it. ENGLISH LEVELING THE REFRIGERATOR DOORS (CONT.) DOOR ALIGNMENT • Use the wrench (Included with the User Manual) to adjust the bolt in the door hinge to adjust the... height. (counter clockwise to raise or clockwise to the back of the refrigerator. • Thoroughly clean your refrigerator and wipe off all dust that is now ready for at least 2 or 3 hours before using. NOTE: Do not remove any ...

Owner's Manual
Page 22
...DISPLAY Indicates the set temperature of the Converta Drawer A B in Celsius or Fahrenheit. 8 9 22 Indicates the set temperature of the refrigerator compartment in Celsius or Fahrenheit. 6 7 5 CONVERTA TEMP. NOTE: The shape of the freezer compartment in Fahrenheit or Celsius. C... Ice. 2 3 3 CRUSH BUTTON Press the CRUSH button to select the Crushed Ice. 4 4 REFRIGERATOR BUTTON 5 Press the REFRIGERATOR button to adjust the temperature E F in the refrigerator compartment. CONTROL PANEL FEATURES For complete details on the Converta Drawer, see pages 24-27.
...DISPLAY Indicates the set temperature of the Converta Drawer A B in Celsius or Fahrenheit. 8 9 22 Indicates the set temperature of the refrigerator compartment in Celsius or Fahrenheit. 6 7 5 CONVERTA TEMP. NOTE: The shape of the freezer compartment in Fahrenheit or Celsius. C... Ice. 2 3 3 CRUSH BUTTON Press the CRUSH button to select the Crushed Ice. 4 4 REFRIGERATOR BUTTON 5 Press the REFRIGERATOR button to adjust the temperature E F in the refrigerator compartment. CONTROL PANEL FEATURES For complete details on the Converta Drawer, see pages 24-27.
Owner's Manual
Page 23
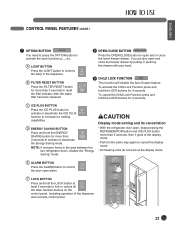
...the filter indicator after the water filter has been replaced. 8 OPEN/CLOSE BUTTON Press the OPEN/CLOSE button to open , keep pressing the REFRIGERATOR button and ICE PLUS button more than 3 seconds to control the door-open and close the lower freezer drawer. C ICE PLUS BUTTON Press... deactivate the ICE PLUS function to activate the each function(ࡃ ~ ╘). wCAUTION Display mode setting and its cancellation • With the refrigerator door open and or close the freezer drawer by pulling or pushing the drawer with your hand. 9 CHILD LOCK FUNCTION This function will disable...
...the filter indicator after the water filter has been replaced. 8 OPEN/CLOSE BUTTON Press the OPEN/CLOSE button to open , keep pressing the REFRIGERATOR button and ICE PLUS button more than 3 seconds to control the door-open and close the lower freezer drawer. C ICE PLUS BUTTON Press... deactivate the ICE PLUS function to activate the each function(ࡃ ~ ╘). wCAUTION Display mode setting and its cancellation • With the refrigerator door open and or close the freezer drawer by pulling or pushing the drawer with your hand. 9 CHILD LOCK FUNCTION This function will disable...

Owner's Manual
Page 24
... the compartment temperature as illustrated above. Caution When Closing the Door NOTE: The actual inner temperature varies depending on the refrigerator door mullion at any point, deactivate the Energy Saving mode until the issue resolves itself. 24 If dew gathers on ... button to cycle through the range of available settings. ADJUSTING THE TEMPERATURES AND DISPLAY Adjust Refrigerator Temperature To adjust the temperature in the refrigerator compartment, press the REFRIGERATOR button to cycle through the range of available settings. • Simultaneously press and hold the...
... the compartment temperature as illustrated above. Caution When Closing the Door NOTE: The actual inner temperature varies depending on the refrigerator door mullion at any point, deactivate the Energy Saving mode until the issue resolves itself. 24 If dew gathers on ... button to cycle through the range of available settings. ADJUSTING THE TEMPERATURES AND DISPLAY Adjust Refrigerator Temperature To adjust the temperature in the refrigerator compartment, press the REFRIGERATOR button to cycle through the range of available settings. • Simultaneously press and hold the...


