Owner's Manual
Page 3
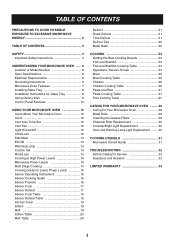
... OVEN ...... 6 Location of Model Number 6 Oven Specifications 6 Electrical Requirements 6 Grounding Instructions 6 Microwave Oven Features 7 Installing Glass Tray 8 Installation Instructions for Glass Tray 9 Using Oblong Dish 9 Control Panel Features 10 USING YOUR MICROWAVE OVEN 12 Learn About Your Microwave Oven 12 Clock 12 Vent Auto Time Set 12 Vent Fan 12 Light Hi...
... OVEN ...... 6 Location of Model Number 6 Oven Specifications 6 Electrical Requirements 6 Grounding Instructions 6 Microwave Oven Features 7 Installing Glass Tray 8 Installation Instructions for Glass Tray 9 Using Oblong Dish 9 Control Panel Features 10 USING YOUR MICROWAVE OVEN 12 Learn About Your Microwave Oven 12 Clock 12 Vent Auto Time Set 12 Vent Fan 12 Light Hi...
Owner's Manual
Page 7
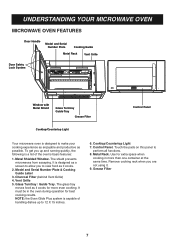
... Number Plate Cooking Guide Metal Rack Vent Grille Door Safety Lock System Window with Metal Shield Glass Turntray Guide Tray Grease Filter Cooktop/Countertop Light Control Panel Your microwave oven is designed to view food as it cooks. 2. It must be in more even cooking. NOTE: the Even Glide Plus system is... more than one container at the same time. Metal Shielded Window. The shield prevents microwaves from escaping. Model and Serial Number Plate & Cooking Guide Label 3. Control Panel. Touch the pads on this panel to 12 X 15 inches. 6. Grease Filter 7
... Number Plate Cooking Guide Metal Rack Vent Grille Door Safety Lock System Window with Metal Shield Glass Turntray Guide Tray Grease Filter Cooktop/Countertop Light Control Panel Your microwave oven is designed to view food as it cooks. 2. It must be in more even cooking. NOTE: the Even Glide Plus system is... more than one container at the same time. Metal Shielded Window. The shield prevents microwaves from escaping. Model and Serial Number Plate & Cooking Guide Label 3. Control Panel. Touch the pads on this panel to 12 X 15 inches. 6. Grease Filter 7
Owner's Manual
Page 10
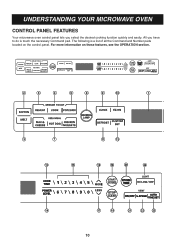
UNDERSTANDING YOUR MICROWAVE OVEN CONTROL PANEL FEATURES Your microwave oven control panel lets you have to do is a list of all the Command and Number pads located on these features, see the OPERATION section. 2 5 4 6 8 9 10 1 3 7 11 12 13 15 16 18 20 24 14 17 19 21 22 23 10 For more information on the control panel. The following is touch the necessary Command pad. All you select the desired cooking function quickly and easily.
UNDERSTANDING YOUR MICROWAVE OVEN CONTROL PANEL FEATURES Your microwave oven control panel lets you have to do is a list of all the Command and Number pads located on these features, see the OPERATION section. 2 5 4 6 8 9 10 1 3 7 11 12 13 15 16 18 20 24 14 17 19 21 22 23 10 For more information on the control panel. The following is touch the necessary Command pad. All you select the desired cooking function quickly and easily.
Owner's Manual
Page 12
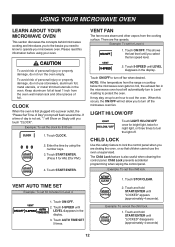
...microwave oven. The Child Lock feature is not set, ":" will not allow you are five speeds. Child Lock prevents accidental programming when wiping the control panel. Touch 5-SPEED until LEVEL 4 appears in the oven. Touch ON/OFF. VENT AUTO TIME SET Example: To set the clock for Level ...SPEED until LEVEL 4 appears in the microwave oven hood will flash several time. To avoid risk of day is also useful when cleaning the control panel. Touch STOP/CLEAR. 2. Touch ON/OFF to turn the light off fan when desired. If a time of personal injury or property damage,...
...microwave oven. The Child Lock feature is not set, ":" will not allow you are five speeds. Child Lock prevents accidental programming when wiping the control panel. Touch 5-SPEED until LEVEL 4 appears in the oven. Touch ON/OFF. VENT AUTO TIME SET Example: To set the clock for Level ...SPEED until LEVEL 4 appears in the microwave oven hood will flash several time. To avoid risk of day is also useful when cleaning the control panel. Touch STOP/CLEAR. 2. Touch ON/OFF to turn the light off fan when desired. If a time of personal injury or property damage,...

Owner's Manual
Page 28
Use only mild, nonabrasive soaps or a mild detergent. Over time, stains can damage the control panel and the interior and exterior oven surfaces. 28 This is normal. To clean Glass tray, Rotating ring and Guide tray, wash in the oven for 2 ...to 3 minutes. for heavily soiled areas use a mild cleanser and scouring sponge. Steam will soften the soil. For exterior surfaces and control panel: Use a soft cloth with warm, sudsy water and a sponge or soft cloth. Apply the spray glass cleaner to keep the areas clean where the door...
Use only mild, nonabrasive soaps or a mild detergent. Over time, stains can damage the control panel and the interior and exterior oven surfaces. 28 This is normal. To clean Glass tray, Rotating ring and Guide tray, wash in the oven for 2 ...to 3 minutes. for heavily soiled areas use a mild cleanser and scouring sponge. Steam will soften the soil. For exterior surfaces and control panel: Use a soft cloth with warm, sudsy water and a sponge or soft cloth. Apply the spray glass cleaner to keep the areas clean where the door...
Owner's Manual
Page 32
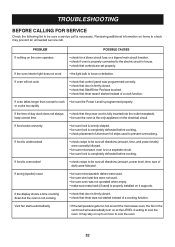
... undercooked • check recipe to the electric circuit in the vent hood will not cook • check that control panel was programmed correctly. • check that door is firmly closed . • check that controls are set properly. TROUBLESHOOTING BEFORE CALLING FOR SERVICE Check the following list to cook • be sure the Power...
... undercooked • check recipe to the electric circuit in the vent hood will not cook • check that control panel was programmed correctly. • check that door is firmly closed . • check that controls are set properly. TROUBLESHOOTING BEFORE CALLING FOR SERVICE Check the following list to cook • be sure the Power...


