
Owner's Manual
Page 1
LMVM1935SW LMVM1935SB LMVM1935SBQ LMVM1935T K M P/NO. 3828W5A3302 Website: http://us.lgservice.com MICROWAVE OVEN OWNER'S MANUAL & COOKING GUIDE PLEASE READ THIS OWNER'S MANUAL THOROUGHLY BEFORE OPERATING.
LMVM1935SW LMVM1935SB LMVM1935SBQ LMVM1935T K M P/NO. 3828W5A3302 Website: http://us.lgservice.com MICROWAVE OVEN OWNER'S MANUAL & COOKING GUIDE PLEASE READ THIS OWNER'S MANUAL THOROUGHLY BEFORE OPERATING.
Owner's Manual
Page 2
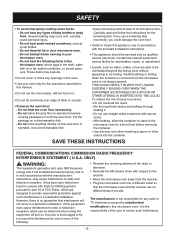
... Bldg. #3 201 James Record Rd. Model No: Serial No: Dealer: Dealer Phone No: Staple your receipt here to prove your contact with LG (LG Electronics U.S.A., Inc.) concerning this oven with the safety interlocks. (b) Do not place any object between the oven front face and the door or allow...-door operation can result in harmful exposure to operate this unit. Thank you record the details of this unit for purchasing an LG microwave oven. Please record the model number and serial number of your retail purchase. Huntsville, AL 35824-0126 PRECAUTIONS TO AVOID POSSIBLE EXPOSURE...
... Bldg. #3 201 James Record Rd. Model No: Serial No: Dealer: Dealer Phone No: Staple your receipt here to prove your contact with LG (LG Electronics U.S.A., Inc.) concerning this oven with the safety interlocks. (b) Do not place any object between the oven front face and the door or allow...-door operation can result in harmful exposure to operate this unit. Thank you record the details of this unit for purchasing an LG microwave oven. Please record the model number and serial number of your retail purchase. Huntsville, AL 35824-0126 PRECAUTIONS TO AVOID POSSIBLE EXPOSURE...
Owner's Manual
Page 3
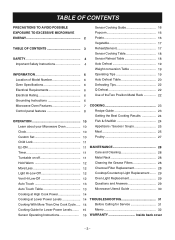
... Specifications 6 Defrosting Tips 22 Electrical Requirements 6 Q Defrost 22 Electrical Rating 6 Use of theTwo Position Metal Rack 22 Grounding Instructions 6 Microwave Oven Features 7 COOKING 23 Control panel features 8 Recipe Guide 23 Getting the Best Cooking Results 24 OPERATION 10 Fish & Shellfish 24 Learn... 29 Vent Hi-Low-Off 12 Oven Light Replacement 29 Auto Touch 13 Questions and Answers 29 Auto Touch Table 13 Microwave Utensil Guide 30 Cooking at High Cook Power 14 Cooking at Lower Power Levels 14 TROUBLESHOOTING 31 Cooking With More Than One...
... Specifications 6 Defrosting Tips 22 Electrical Requirements 6 Q Defrost 22 Electrical Rating 6 Use of theTwo Position Metal Rack 22 Grounding Instructions 6 Microwave Oven Features 7 COOKING 23 Control panel features 8 Recipe Guide 23 Getting the Best Cooking Results 24 OPERATION 10 Fish & Shellfish 24 Learn... 29 Vent Hi-Low-Off 12 Oven Light Replacement 29 Auto Touch 13 Questions and Answers 29 Auto Touch Table 13 Microwave Utensil Guide 30 Cooking at High Cook Power 14 Cooking at Lower Power Levels 14 TROUBLESHOOTING 31 Cooking With More Than One...
Owner's Manual
Page 4
...the filters. • Use care when cleaning the vent hood filters. Be sure to accumulate on . - WARNING - Connect it only to excessive microwave energy. • Read all the instructions before using it may damage the filters. • Do not tamper with the built-in the oven. ... Do not allow children to use this oven without close supervision. • Read and follow the specific PRECAUTIONS TO AVOID POSSIBLE EXPOSURE TO EXCESSIVE MICROWAVE ENERGY found on . • Suitable for use above both gas and electric cooking equipment 36 inches wide or less. • Do not use...
...the filters. • Use care when cleaning the vent hood filters. Be sure to accumulate on . - WARNING - Connect it only to excessive microwave energy. • Read all the instructions before using it may damage the filters. • Do not tamper with the built-in the oven. ... Do not allow children to use this oven without close supervision. • Read and follow the specific PRECAUTIONS TO AVOID POSSIBLE EXPOSURE TO EXCESSIVE MICROWAVE ENERGY found on . • Suitable for use above both gas and electric cooking equipment 36 inches wide or less. • Do not use...
Owner's Manual
Page 5
...any radio or TV interference caused by one or more of baby bottles or baby food. Do not cook anything directly on a microwavable dish. - SAVE THESE INSTRUCTIONS FEDERAL COMMUNICATIONS COMMISSION RADIO FREQUENCY INTERFERENCE STATEMENT ( U.S.A. Do not heat small-necked containers, such as water...halfway through heating it . • Do not let cord hang over edge of the radio or television. • Relocate the Microwave Oven with the provided installation instructions. • This appliance should be determined by turning the equipment off and on special microwavecooking ...
...any radio or TV interference caused by one or more of baby bottles or baby food. Do not cook anything directly on a microwavable dish. - SAVE THESE INSTRUCTIONS FEDERAL COMMUNICATIONS COMMISSION RADIO FREQUENCY INTERFERENCE STATEMENT ( U.S.A. Do not heat small-necked containers, such as water...halfway through heating it . • Do not let cord hang over edge of the radio or television. • Relocate the Microwave Oven with the provided installation instructions. • This appliance should be determined by turning the equipment off and on special microwavecooking ...
Owner's Manual
Page 6
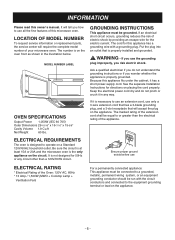
...that will accept the plug on a Standard 120V/60Hz household outlet. If an electrical short circuit occurs, grounding reduces the risk of your microwave oven. Ensure proper ground exists before use only a 3-wire extension cord that has a 3-blade grounding plug, and a 3-slot receptacle that... the electrical power cord dry and do not understand the grounding instructions or if you wonder whether the appliance is not designed for this microwave oven. OVEN SPECIFICATIONS Output Power 1,050W (IEC 60 705) Outer Dimensions 29-15/16" x 16-7/16" x 15-5/8" Cavity Volume...
...that will accept the plug on a Standard 120V/60Hz household outlet. If an electrical short circuit occurs, grounding reduces the risk of your microwave oven. Ensure proper ground exists before use only a 3-wire extension cord that has a 3-blade grounding plug, and a 3-slot receptacle that... the electrical power cord dry and do not understand the grounding instructions or if you wonder whether the appliance is not designed for this microwave oven. OVEN SPECIFICATIONS Output Power 1,050W (IEC 60 705) Outer Dimensions 29-15/16" x 16-7/16" x 15-5/8" Cavity Volume...
Owner's Manual
Page 7
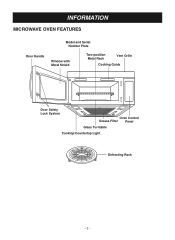
INFORMATION MICROWAVE OVEN FEATURES Model and Serial Number Plate Door Handle Window with Metal Shield Two-position Metal Rack Vent Grille Cooking Guide Door Safety Lock System Oven Control Grease Filter Panel Glass Turntable Cooktop/Countertop Light Defrosting Rack -7-
INFORMATION MICROWAVE OVEN FEATURES Model and Serial Number Plate Door Handle Window with Metal Shield Two-position Metal Rack Vent Grille Cooking Guide Door Safety Lock System Oven Control Grease Filter Panel Glass Turntable Cooktop/Countertop Light Defrosting Rack -7-
Owner's Manual
Page 8
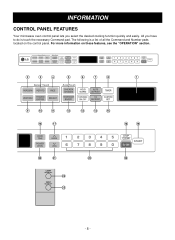
For more information on the control panel. INFORMATION CONTROL PANEL FEATURES Your microwave oven control panel lets you have to do is a list of all the Command and Number pads located on these features, see the "OPERATION" section. 2 3 4 5 6 7 8 1 9 10 11 12 13 14 15 16 17 18 19 20 21 22 23 24 25 -8- The following is touch the necessary Command pad. All you select the desired cooking function quickly and easily.
For more information on the control panel. INFORMATION CONTROL PANEL FEATURES Your microwave oven control panel lets you have to do is a list of all the Command and Number pads located on these features, see the "OPERATION" section. 2 3 4 5 6 7 8 1 9 10 11 12 13 14 15 16 17 18 19 20 21 22 23 24 25 -8- The following is touch the necessary Command pad. All you select the desired cooking function quickly and easily.
Owner's Manual
Page 9
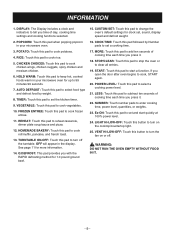
... oven begins to cook potatoes. 4. POPCORN: Touch this pad to cook, START again. 20. POTATO: Touch this pad when popping popcorn in your microwave oven for 1.0 pound ground beef. 15. HOLD WARM: Touch this pad to keep hot, cooked foods warm in the display. FROZEN ENTREE: Touch ... Touch this pad to set a cooking time. 17. NUMBER: Touch number pads to start quickly at 100% power level. 24. OFF will appear in your microwave oven. 3. WARNING: DO NOT RUN THE OVEN EMPTY WITHOUT FOOD IN IT. - 9 - INFORMATION 1. CHICKEN CHOICES: Touch this pad to select food type ...
... oven begins to cook potatoes. 4. POPCORN: Touch this pad to cook, START again. 20. POTATO: Touch this pad when popping popcorn in your microwave oven for 1.0 pound ground beef. 15. HOLD WARM: Touch this pad to keep hot, cooked foods warm in the display. FROZEN ENTREE: Touch ... Touch this pad to set a cooking time. 17. NUMBER: Touch number pads to start quickly at 100% power level. 24. OFF will appear in your microwave oven. 3. WARNING: DO NOT RUN THE OVEN EMPTY WITHOUT FOOD IN IT. - 9 - INFORMATION 1. CHICKEN CHOICES: Touch this pad to select food type ...
Owner's Manual
Page 10
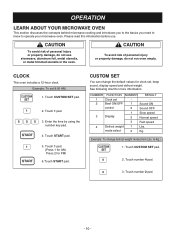
...pad. (Press 1 for AM, Press 2 for more information. Touch number 2 pad. - 10 - OPERATION LEARN ABOUT YOUR MICROWAVE OVEN This section discusses the concepts behind microwave cooking and introduces you to the basics you need to know to Kg.) 1. Please read this information before use stoneware, aluminum... foil, metal utensils, or metal trimmed utensils in the oven. to operate your microwave oven. CAUTION To avoid risk of personal injury or property damage, do not run oven empty. Example: To change the default...
...pad. (Press 1 for AM, Press 2 for more information. Touch number 2 pad. - 10 - OPERATION LEARN ABOUT YOUR MICROWAVE OVEN This section discusses the concepts behind microwave cooking and introduces you to the basics you need to know to Kg.) 1. Please read this information before use stoneware, aluminum... foil, metal utensils, or metal trimmed utensils in the oven. to operate your microwave oven. CAUTION To avoid risk of personal injury or property damage, do not run oven empty. Example: To change the default...
Owner's Manual
Page 11
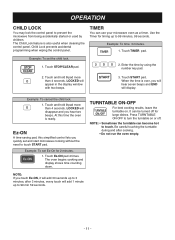
...NOTE: If you will hear seven beeps and END will disappear and you quickly set and start microwave cooking without the need to touch START pad. Enter the time by children. When the time is... feature is ready. Touch and hold 0 pad more than 4 seconds. TIMER You can use your microwave oven as a timer. after cooking. • Do not run the oven empty. OPERATION CHILD LOCK You... may lock the control panel to prevent the microwave from being accidentally started or used by using the number key pad. 2. Child Lock prevents accidental...
...NOTE: If you will hear seven beeps and END will disappear and you quickly set and start microwave cooking without the need to touch START pad. Enter the time by children. When the time is... feature is ready. Touch and hold 0 pad more than 4 seconds. TIMER You can use your microwave oven as a timer. after cooking. • Do not run the oven empty. OPERATION CHILD LOCK You... may lock the control panel to prevent the microwave from being accidentally started or used by using the number key pad. 2. Child Lock prevents accidental...
Owner's Manual
Page 12
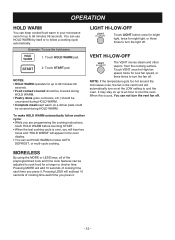
..., twice for Low fan speed, or three times to turn the light off . NOTE: If the temperature gets too hot around the microwave oven, the fan in your microwave oven for up to cool the oven. OPERATION HOLD WARM You can set HOLD WARM to follow AUTO DEFROST, or multi-cycle cooking...
..., twice for Low fan speed, or three times to turn the light off . NOTE: If the temperature gets too hot around the microwave oven, the fan in your microwave oven for up to cool the oven. OPERATION HOLD WARM You can set HOLD WARM to follow AUTO DEFROST, or multi-cycle cooking...

Owner's Manual
Page 13
... chicken 3 Mexican chicken 4 3. Amount 6 oz. 12 oz. Category Roll/Muffin Pancake French toast Touch pad number 1 2 3 3. OPERATION AUTO TOUCH Auto Touch lets you heat common microwave-prepared foods without selecting cooking times and power levels. Example: To cook 6 oz. Choose food category. Frozen, Precooked 4 or 8 oz.
... chicken 3 Mexican chicken 4 3. Amount 6 oz. 12 oz. Category Roll/Muffin Pancake French toast Touch pad number 1 2 3 3. OPERATION AUTO TOUCH Auto Touch lets you heat common microwave-prepared foods without selecting cooking times and power levels. Example: To cook 6 oz. Choose food category. Frozen, Precooked 4 or 8 oz.

Owner's Manual
Page 15
... nine power levels in addition to HIGH allow you to choose the best power level for the food you are cooking. POWER LEVEL 10 HIGH 9 8 7 6 5 4 3 2 1 0 MICROWAVE OUTPUT 100% 90% 80% 70% 60% 50% 40% 30% 20% 10% USE • Boil water. • Cook ground beef. • Make candy. • Cook fresh.... • Cooking small quantities of food. • Finish cooking casserole, stew, and some sauces. • Soften butter and cream cheese. • Heating small amounts of microwave power you are using.
... nine power levels in addition to HIGH allow you to choose the best power level for the food you are cooking. POWER LEVEL 10 HIGH 9 8 7 6 5 4 3 2 1 0 MICROWAVE OUTPUT 100% 90% 80% 70% 60% 50% 40% 30% 20% 10% USE • Boil water. • Cook ground beef. • Make candy. • Cook fresh.... • Cooking small quantities of food. • Finish cooking casserole, stew, and some sauces. • Soften butter and cream cheese. • Heating small amounts of microwave power you are using.
Owner's Manual
Page 16
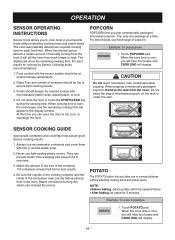
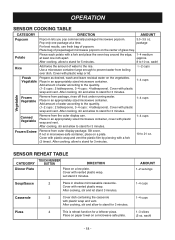
... sensing time is over, you will hear four beeps and COOK END will appear in the oven. Touch POPCORN pad. CAUTION Do not leave microwave oven unattended while popping. Foods should be covered loosely with lids or vented plastic wrap. 2. Example: To cook 2 potatoes. 1. When the...POTATO button lets you bake one package at least half full for 5 minutes. When the internal sensor detects a certain amount of the microwave oven are dry before placing food in the display window. At this time you can mislead the sensor. SENSOR COOKING GUIDE Appropriate containers ...
... sensing time is over, you will hear four beeps and COOK END will appear in the oven. Touch POPCORN pad. CAUTION Do not leave microwave oven unattended while popping. Foods should be covered loosely with lids or vented plastic wrap. 2. Example: To cook 2 potatoes. 1. When the...POTATO button lets you bake one package at least half full for 5 minutes. When the internal sensor detects a certain amount of the microwave oven are dry before placing food in the display window. At this time you can mislead the sensor. SENSOR COOKING GUIDE Appropriate containers ...
Owner's Manual
Page 18
... water. After cooking, stir and allow to stand for 3 minutes. 1~4 cups Vegetable Frozen Vegetable Remove from the outer display can. Place in microwave-safe container, place on a plate. Slit cover. After cooking, allow to stand for 3 minutes. 10 to stand for 3 minutes. After ... stir and let stand 3 minutes. Place on paper towel on the vegetables. Potato Pierce each ) - 18 - If not in an appropriately sized microwave container, cover with plastic wrap and vent. Cover with plastic wrap and vent. After cooking, stir and allow to 21 oz. AMOUNT 1~2 servings 1~4...
... water. After cooking, stir and allow to stand for 3 minutes. 1~4 cups Vegetable Frozen Vegetable Remove from the outer display can. Place in microwave-safe container, place on a plate. Slit cover. After cooking, allow to stand for 3 minutes. 10 to stand for 3 minutes. After ... stir and let stand 3 minutes. Place on paper towel on the vegetables. Potato Pierce each ) - 18 - If not in an appropriately sized microwave container, cover with plastic wrap and vent. Cover with plastic wrap and vent. After cooking, stir and allow to 21 oz. AMOUNT 1~2 servings 1~4...
Owner's Manual
Page 19
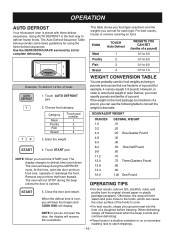
... will hold steam and juice close to the foods, which can cause the outer surface of a doughnut before freezing. Use the DEFROSTING RACK serviced by LG for using the three defrost sequences. of a pound (for each type. Touch AUTO DEFROST pad. 2. At this time, open the door, the display ... can use the following table to convert the weight to defrost frozen foods. Touch START pad. For best results, loosen or remove covering on a microwave roasting rack to food weights as being in fractions of a pound. However, in Auto Defrost, you will hear four beeps and COOK END will ...
... will hold steam and juice close to the foods, which can cause the outer surface of a doughnut before freezing. Use the DEFROSTING RACK serviced by LG for using the three defrost sequences. of a pound (for each type. Touch AUTO DEFROST pad. 2. At this time, open the door, the display ... can use the following table to convert the weight to defrost frozen foods. Touch START pad. For best results, loosen or remove covering on a microwave roasting rack to food weights as being in fractions of a pound. However, in Auto Defrost, you will hear four beeps and COOK END will ...

Owner's Manual
Page 20
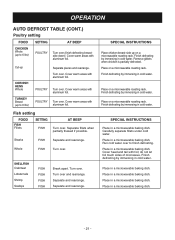
...aluminum foil. Turn over . Turn over . Separate and rearrange. Return remainder to oven. Place on a microwavable roasting rack. Place on a microwavable roasting rack. Place on a microwavable roasting rack. Cover warm areas with fork. Separate and rearrange. Turn over . Turn over . SPECIAL INSTRUCTIONS... a defrost sequence. Do not defrost less than 2 oz. Depress center when freezing. Place on a microwavable roasting rack. Place on a microwavable roasting rack. Cover warm areas with foil at the beginning of meat should have the narrow or fatty areas...
...aluminum foil. Turn over . Turn over . Separate and rearrange. Return remainder to oven. Place on a microwavable roasting rack. Place on a microwavable roasting rack. Place on a microwavable roasting rack. Cover warm areas with fork. Separate and rearrange. Turn over . Turn over . SPECIAL INSTRUCTIONS... a defrost sequence. Do not defrost less than 2 oz. Depress center when freezing. Place on a microwavable roasting rack. Place on a microwavable roasting rack. Cover warm areas with foil at the beginning of meat should have the narrow or fatty areas...
Owner's Manual
Page 21
.... Finish defrosting by immersing in cold water. Finish defrosting by immersing in cold water. Place in a microwavable baking dish. Place in a microwavable baking dish. Cover warm areas with aluminum foil. Separate and rearrange. Finish defrosting by immersing in cold ... to 6 lbs) Separate pieces and rearrange. SPECIAL INSTRUCTIONS Place in a microwavable baking dish. - 21 - do not let foil touch sides of microwave. Place in a microwavable baking dish. Place on a microwavable roasting rack. Place in cold water. Separate and rearrange. Steaks FISH Separate...
.... Finish defrosting by immersing in cold water. Finish defrosting by immersing in cold water. Place in a microwavable baking dish. Place in a microwavable baking dish. Cover warm areas with aluminum foil. Separate and rearrange. Finish defrosting by immersing in cold ... to 6 lbs) Separate pieces and rearrange. SPECIAL INSTRUCTIONS Place in a microwavable baking dish. - 21 - do not let foil touch sides of microwave. Place in a microwavable baking dish. Place on a microwavable roasting rack. Place in cold water. Separate and rearrange. Steaks FISH Separate...
Owner's Manual
Page 22
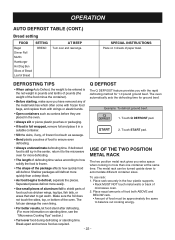
... • Use small pieces of aluminum foil to shield parts of food such as sausage. • Bend plastic pouches of food to the microwave oven for ground beef. Break apart and remove food as cartons before they are placed in a suitable container. 2. Example: To defrost ground ...space when cooking in the four plastic supports. • Rack MUST NOT touch metal walls or back of microwave oven. 2. SPECIAL INSTRUCTIONS Place on standing time, see the "Microwave Cooking Tips" section.) • Turn over and rearrange. The oven automatically sets the defrosting time for more ...
... • Use small pieces of aluminum foil to shield parts of food such as sausage. • Bend plastic pouches of food to the microwave oven for ground beef. Break apart and remove food as cartons before they are placed in a suitable container. 2. Example: To defrost ground ...space when cooking in the four plastic supports. • Rack MUST NOT touch metal walls or back of microwave oven. 2. SPECIAL INSTRUCTIONS Place on standing time, see the "Microwave Cooking Tips" section.) • Turn over and rearrange. The oven automatically sets the defrosting time for more ...


