
Owner's Manual
Page 3
... Warm 12 Cleaning the Grease Filters 28 More/Less 12 Charcoal Filter Replacement 28 Light Hi-Low-Off 12 Cooktop/Countertop Light Replacement ....... 29 Vent Hi-Low-Off 12 Oven Light Replacement 29 Auto Touch 13 Questions and Answers 29 Auto Touch Table 13 Microwave Utensil Guide 30 Cooking at High Cook Power 14 Cooking at Lower Power Levels 14 TROUBLESHOOTING 31 Cooking With More Than One Cook Cycle ..... 14 Before Calling for Service 31 Cooking Guide for Lower Power Levels........ 15 Memo 32 Sensor Operating Instructions 16 WARRANTY Inside back cover -3-
... Warm 12 Cleaning the Grease Filters 28 More/Less 12 Charcoal Filter Replacement 28 Light Hi-Low-Off 12 Cooktop/Countertop Light Replacement ....... 29 Vent Hi-Low-Off 12 Oven Light Replacement 29 Auto Touch 13 Questions and Answers 29 Auto Touch Table 13 Microwave Utensil Guide 30 Cooking at High Cook Power 14 Cooking at Lower Power Levels 14 TROUBLESHOOTING 31 Cooking With More Than One Cook Cycle ..... 14 Before Calling for Service 31 Cooking Guide for Lower Power Levels........ 15 Memo 32 Sensor Operating Instructions 16 WARRANTY Inside back cover -3-
Owner's Manual
Page 4
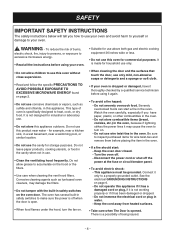
... (bread, cookies, etc.) in the oven, because if lightning strikes the power lines it is not designed for household use only. • When cleaning the door and the surfaces that touch the door, use . • Clean the ventilating hood frequently. Turn the oven off the power at the fuse or circuit breaker panel. • To avoid electric shock: - See the electrical GROUNDING INSTRUCTIONS on the hood or the filters. • Use care when cleaning the vent hood filters.
... (bread, cookies, etc.) in the oven, because if lightning strikes the power lines it is not designed for household use only. • When cleaning the door and the surfaces that touch the door, use . • Clean the ventilating hood frequently. Turn the oven off the power at the fuse or circuit breaker panel. • To avoid electric shock: - See the electrical GROUNDING INSTRUCTIONS on the hood or the filters. • Use care when cleaning the vent hood filters.
Owner's Manual
Page 5
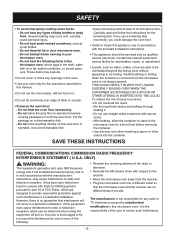
... used properly, that the microwave oven and the receiver are designed to touch the oven floor. SAVE THESE INSTRUCTIONS FEDERAL COMMUNICATIONS COMMISSION RADIO FREQUENCY INTERFERENCE STATEMENT ( U.S.A. The manufacturer is in a residential installation. Carefully read and follow the instructions for any types of FCC Rules, which can be serviced only by unauthorized modification to part 18 of baby bottles or baby food. After heating...
... used properly, that the microwave oven and the receiver are designed to touch the oven floor. SAVE THESE INSTRUCTIONS FEDERAL COMMUNICATIONS COMMISSION RADIO FREQUENCY INTERFERENCE STATEMENT ( U.S.A. The manufacturer is in a residential installation. Carefully read and follow the instructions for any types of FCC Rules, which can be serviced only by unauthorized modification to part 18 of baby bottles or baby food. After heating...
Owner's Manual
Page 6
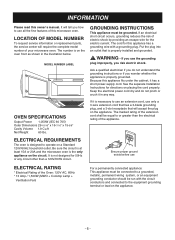
... under the cabinet, it has a short power-supply cord. The cord for the electric current. Ensure proper ground exists before use ELECTRICAL RATING * Electrical Rating of the Oven: 120V AC, 60Hz * 13 Amp./ 1,500W (MWO + Cooktop Lamp + Ventilation Fan) For a permanently connected appliance: This appliance must be equal to use all the fine features of your microwave oven. LOCATION OF MODEL NUMBER To request service information or replacement parts, the service center will...
... under the cabinet, it has a short power-supply cord. The cord for the electric current. Ensure proper ground exists before use ELECTRICAL RATING * Electrical Rating of the Oven: 120V AC, 60Hz * 13 Amp./ 1,500W (MWO + Cooktop Lamp + Ventilation Fan) For a permanently connected appliance: This appliance must be equal to use all the fine features of your microwave oven. LOCATION OF MODEL NUMBER To request service information or replacement parts, the service center will...
Owner's Manual
Page 7
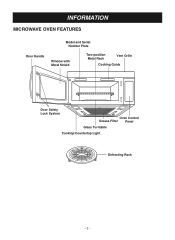
INFORMATION MICROWAVE OVEN FEATURES Model and Serial Number Plate Door Handle Window with Metal Shield Two-position Metal Rack Vent Grille Cooking Guide Door Safety Lock System Oven Control Grease Filter Panel Glass Turntable Cooktop/Countertop Light Defrosting Rack -7-
INFORMATION MICROWAVE OVEN FEATURES Model and Serial Number Plate Door Handle Window with Metal Shield Two-position Metal Rack Vent Grille Cooking Guide Door Safety Lock System Oven Control Grease Filter Panel Glass Turntable Cooktop/Countertop Light Defrosting Rack -7-
Owner's Manual
Page 9
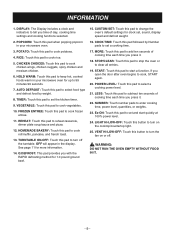
... defrost food by Number pads to cook rice. 5. RICE: Touch this pad followed by weight. 8. COOK TIME: Touch this pad to set the kitchen timer. 9. HOLD WARM: Touch this pad to keep hot, cooked foods warm in your microwave oven. 3. TIMER: Touch this pad to set a cooking time. 17. VEGETABLE: Touch this pad to cook vegetables. 10. Ez-ON: Touch this pad to set , sound, display speed and defrost weight. 16. DISPLAY: The Display includes a clock and indicators to cook, START again. 20. If you open the door...
... defrost food by Number pads to cook rice. 5. RICE: Touch this pad followed by weight. 8. COOK TIME: Touch this pad to set the kitchen timer. 9. HOLD WARM: Touch this pad to keep hot, cooked foods warm in your microwave oven. 3. TIMER: Touch this pad to set a cooking time. 17. VEGETABLE: Touch this pad to cook vegetables. 10. Ez-ON: Touch this pad to set , sound, display speed and defrost weight. 16. DISPLAY: The Display includes a clock and indicators to cook, START again. 20. If you open the door...
Owner's Manual
Page 10
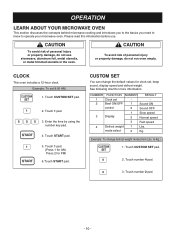
Enter the time by using the number key pad. 4. CUSTOM SET You can change defrost weight mode.(from Lbs. Example: To change the default values for clock set, beep sound, display speed and defrost weight. CAUTION To avoid risk of personal injury or property damage, do not run oven empty. OPERATION LEARN ABOUT YOUR MICROWAVE OVEN This section discusses the concepts behind microwave cooking and introduces you to the basics you need to know...
Enter the time by using the number key pad. 4. CUSTOM SET You can change defrost weight mode.(from Lbs. Example: To change the default values for clock set, beep sound, display speed and defrost weight. CAUTION To avoid risk of personal injury or property damage, do not run oven empty. OPERATION LEARN ABOUT YOUR MICROWAVE OVEN This section discusses the concepts behind microwave cooking and introduces you to the basics you need to know...
Owner's Manual
Page 11
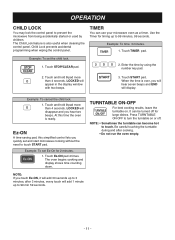
.... TIMER You can become hot to touch. Example: To set Ez-On for large dishes. LOCKED will disappear and you quickly set and start microwave cooking without the need to touch START pad. Touch START pad. The Child Lock feature is ready. The oven begins cooking and display shows time counting down. NOTE: If you will hear seven beeps and END will add 1 minute up to 99 minutes, 99 seconds. Be careful touching the turntable...
.... TIMER You can become hot to touch. Example: To set Ez-On for large dishes. LOCKED will disappear and you quickly set and start microwave cooking without the need to touch START pad. Touch START pad. The Child Lock feature is ready. The oven begins cooking and display shows time counting down. NOTE: If you will hear seven beeps and END will add 1 minute up to 99 minutes, 99 seconds. Be careful touching the turntable...
Owner's Manual
Page 12
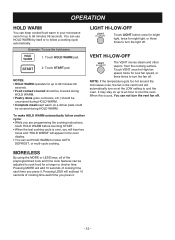
... LIGHT HI-LOW-OFF Touch LIGHT button once for bright light, twice for night light, or three times to cool the oven. NOTE: If the temperature gets too hot around the microwave oven, the fan in the vent hood will subtract 10 seconds of cooking time each time you press it . To make HOLD WARM automatically follow another cycle: • While you are programming the cooking instructions, touch HOLD WARM before touching START...
... LIGHT HI-LOW-OFF Touch LIGHT button once for bright light, twice for night light, or three times to cool the oven. NOTE: If the temperature gets too hot around the microwave oven, the fan in the vent hood will subtract 10 seconds of cooking time each time you press it . To make HOLD WARM automatically follow another cycle: • While you are programming the cooking instructions, touch HOLD WARM before touching START...

Owner's Manual
Page 13
.... Choose food category. Touch 2 pad. Choose food category. Frozen, Precooked 4 or 8 oz. Example: To cook 6 oz. Amount 1 slice 2 slices 3 slices 4 slices Touch pad number 1 2 3 4 AUTO TOUCH TABLE FUNCTION CODE CATEGORY INSTRUCTIONS AMOUNT Chicken 1 choices 2 3 4 Homemade 1 bakery 2 3 Chicken wings Place in a single layer around the edge of French toast. 1. OPERATION AUTO TOUCH Auto Touch lets you heat common microwave-prepared foods without selecting cooking times and power levels. Touch pad number 1 2 Example: To cook 2 slices of a dinner plate.
.... Choose food category. Touch 2 pad. Choose food category. Frozen, Precooked 4 or 8 oz. Example: To cook 6 oz. Amount 1 slice 2 slices 3 slices 4 slices Touch pad number 1 2 3 4 AUTO TOUCH TABLE FUNCTION CODE CATEGORY INSTRUCTIONS AMOUNT Chicken 1 choices 2 3 4 Homemade 1 bakery 2 3 Chicken wings Place in a single layer around the edge of French toast. 1. OPERATION AUTO TOUCH Auto Touch lets you heat common microwave-prepared foods without selecting cooking times and power levels. Touch pad number 1 2 Example: To cook 2 slices of a dinner plate.
Owner's Manual
Page 14
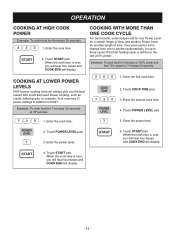
...% power. 1. Your oven has10 power settings in addition to three cycles if the first heating cycle is over, you the best results with foods that need slower cooking, such as roasts, baked goods, or custards. Touch POWER LEVEL pad. 3. COOKING AT LOWER POWER LEVELS HIGH power cooking does not always give you will hear four beeps and COOK END will display. Enter the second cook time. 4. Touch START pad. Enter the first cook time. 2. COOKING WITH...
...% power. 1. Your oven has10 power settings in addition to three cycles if the first heating cycle is over, you the best results with foods that need slower cooking, such as roasts, baked goods, or custards. Touch POWER LEVEL pad. 3. COOKING AT LOWER POWER LEVELS HIGH power cooking does not always give you will hear four beeps and COOK END will display. Enter the second cook time. 4. Touch START pad. Enter the first cook time. 2. COOKING WITH...
Owner's Manual
Page 16
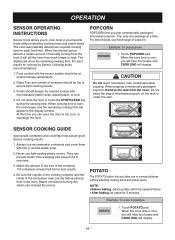
... oven how much longer to cook most of the microwave oven are dry before placing food in the display window. For best results for each food item. Glass Tray and outside of the cooking container and the inside of your favorite foods without selecting cooking times and power levels. When sensing time is over , you will hear four beeps and COOK END will display. At this time you can open the door or touch the STOP...
... oven how much longer to cook most of the microwave oven are dry before placing food in the display window. For best results for each food item. Glass Tray and outside of the cooking container and the inside of your favorite foods without selecting cooking times and power levels. When sensing time is over , you will hear four beeps and COOK END will display. At this time you can open the door or touch the STOP...
Owner's Manual
Page 18
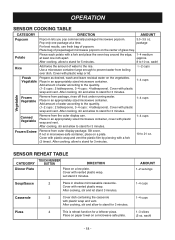
... cooking, stir and allow to stand for 3 minutes. 1~4 cups Vegetable Frozen Vegetable Remove from the outer display can. If not in an appropriately sized microwave container. Cover with vented plastic wrap. Cover with a fork and place the oven tray around the edge, at a time. SENSOR REHEAT TABLE CATEGORY Dinner Plate TOUCH NUMBER BUTTON DIRECTION 1 Place on a microwave safe plate. package For best results, use fresh bag of glass tray. Place bag of prepackaged microwave popcorn...
... cooking, stir and allow to stand for 3 minutes. 1~4 cups Vegetable Frozen Vegetable Remove from the outer display can. If not in an appropriately sized microwave container. Cover with vented plastic wrap. Cover with a fork and place the oven tray around the edge, at a time. SENSOR REHEAT TABLE CATEGORY Dinner Plate TOUCH NUMBER BUTTON DIRECTION 1 Place on a microwave safe plate. package For best results, use fresh bag of glass tray. Place bag of prepackaged microwave popcorn...
Owner's Manual
Page 19
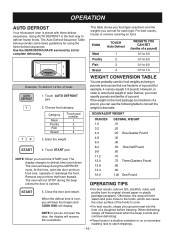
... will display. Use the DEFROSTING RACK serviced by LG for using the three defrost sequences. NOTE: When you do not open the door and turn food over , you can set for example, 4 ounces equals 1/4 pound). Remove any portions that are fractions of meat. 1. NOTE: If you touch the START pad. When defrosting, scrape off thawed meat when the beep sounds and continue defrosting. • Place foods in fractions of a pound. FOOD TOUCH Auto Defrost Meat...
... will display. Use the DEFROSTING RACK serviced by LG for using the three defrost sequences. NOTE: When you do not open the door and turn food over , you can set for example, 4 ounces equals 1/4 pound). Remove any portions that are fractions of meat. 1. NOTE: If you touch the START pad. When defrosting, scrape off thawed meat when the beep sounds and continue defrosting. • Place foods in fractions of a pound. FOOD TOUCH Auto Defrost Meat...
Owner's Manual
Page 22
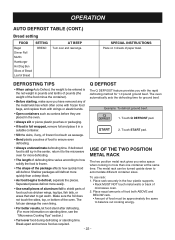
... packages will defrost. SPECIAL INSTRUCTIONS Place on standing time, see the "Microwave Cooking Tips" section.) • Turn over and rearrange. The two position metal rack gives you have removed any , of Bread SETTING BREAD AT BEEP Turn over food during defrosting or standing time. Touch Q DEFROST pad. • If food is still icy in the four plastic supports. • Rack MUST NOT touch metal walls or back of food such as required...
... packages will defrost. SPECIAL INSTRUCTIONS Place on standing time, see the "Microwave Cooking Tips" section.) • Turn over and rearrange. The two position metal rack gives you have removed any , of Bread SETTING BREAD AT BEEP Turn over food during defrosting or standing time. Touch Q DEFROST pad. • If food is still icy in the four plastic supports. • Rack MUST NOT touch metal walls or back of food such as required...
Owner's Manual
Page 24
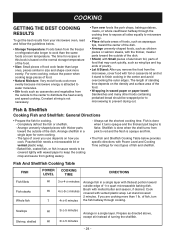
... cook quickly, such as wing tips and leg ends of food cook faster than the same foods at room temperature. COOKING GETTING THE BEST COOKING RESULTS To get the best results from your microwave oven, read and follow the guidelines below provides specific directions with melted butter and season, if desired. If you remove the food from the microwave, cover food with thickest portion toward the outside...
... cook quickly, such as wing tips and leg ends of food cook faster than the same foods at room temperature. COOKING GETTING THE BEST COOKING RESULTS To get the best results from your microwave oven, read and follow the guidelines below provides specific directions with melted butter and season, if desired. If you remove the food from the microwave, cover food with thickest portion toward the outside...
Owner's Manual
Page 25
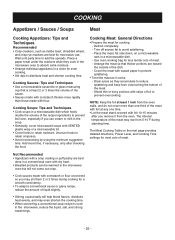
... boil-over, especially if you remove it cooks. - Cooking Sauces: Tips and Techniques • Use a microwavable casserole or glass measuring cup that thicker portions are best for microwave use cream or milk in a circle for most cuts of meat. - Place the meat, fat side down, on the next page provides detailed directions, Power Level, and Cooking Time settings for even cooking. • Stir dips to avoid...
... boil-over, especially if you remove it cooks. - Cooking Sauces: Tips and Techniques • Use a microwavable casserole or glass measuring cup that thicker portions are best for microwave use cream or milk in a circle for most cuts of meat. - Place the meat, fat side down, on the next page provides detailed directions, Power Level, and Cooking Time settings for even cooking. • Stir dips to avoid...
Owner's Manual
Page 28
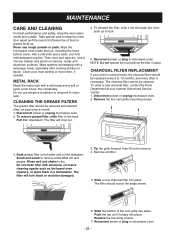
... more often, if needed. MAINTENANCE CARE AND CLEANING For best performance and safety, keep the inner door panel and the oven front frame free of the vent grille into place. Replace the mounting screws. 7. To remove grease filter, slide filter to remove. 4. Remove the two vent grille mounting screws. 3. Do not clean filter with a mild soap and a soft or nylon scrub brush. NOTE: Do not operate the hood without the filter in microwave oven. - 28 - Tip the grille forward, then...
... more often, if needed. MAINTENANCE CARE AND CLEANING For best performance and safety, keep the inner door panel and the oven front frame free of the vent grille into place. Replace the mounting screws. 7. To remove grease filter, slide filter to remove. 4. Remove the two vent grille mounting screws. 3. Do not clean filter with a mild soap and a soft or nylon scrub brush. NOTE: Do not operate the hood without the filter in microwave oven. - 28 - Tip the grille forward, then...
Owner's Manual
Page 29
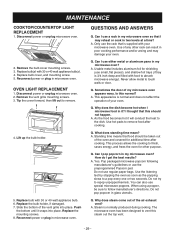
... bulb holder. 5. Sometimes the door of the air exhaust vent? This process allows the cooking to touch walls or door. A. When using a popper, be taken out of the vent grille into place. A. Only use either metal or aluminum pans in two levels at a time? Use of your microwave oven. What does standing time mean? Q. OVEN LIGHT REPLACEMENT 1. Use hot pads to a pop every one or two seconds. Replace bulb with 30 or 40 watt appliance bulb(s). 4. Replace the mounting screws...
... bulb holder. 5. Sometimes the door of the air exhaust vent? This process allows the cooking to touch walls or door. A. When using a popper, be taken out of the vent grille into place. A. Only use either metal or aluminum pans in two levels at a time? Use of your microwave oven. What does standing time mean? Q. OVEN LIGHT REPLACEMENT 1. Use hot pads to a pop every one or two seconds. Replace bulb with 30 or 40 watt appliance bulb(s). 4. Replace the mounting screws...
Owner's Manual
Page 31
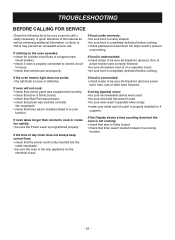
... rack (if used) is completely defrosted before cooking. • check placement of day clock does not always keep correct time: • check that the power cord is fully inserted into receptacle. • check that door is loose or defective. If the oven interior light does not works: • the light bulb is firmly closed . • check that controls are set properly. If oven will not cook: • check that control panel...
... rack (if used) is completely defrosted before cooking. • check placement of day clock does not always keep correct time: • check that the power cord is fully inserted into receptacle. • check that door is loose or defective. If the oven interior light does not works: • the light bulb is firmly closed . • check that controls are set properly. If oven will not cook: • check that control panel...


