
Specification
Page 2
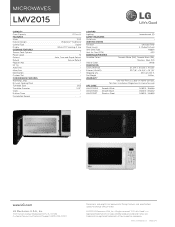
... Design, features and specifications subject to change without notice. © 2010 LG Electronics USA, Inc. All other product and brand names are approximate. MICROWAVES LMV2015 CAPACITY Oven Capacity FEATURES Watts Exterior Design Control Type Display COOKING FEATURES Sensor Cook Options Power Levels Defrost Reheat Popcorn Key EZ On Add Time More/Less Melt/Soften Custom Set CONVENIENCE FEATURES Warming Lamp Bi-Level Cooking Rack Turntable Type Turntable Diameter Clock Kitchen Timer Completion Beeper 2.0 cu. "LG Life's Good...
... Design, features and specifications subject to change without notice. © 2010 LG Electronics USA, Inc. All other product and brand names are approximate. MICROWAVES LMV2015 CAPACITY Oven Capacity FEATURES Watts Exterior Design Control Type Display COOKING FEATURES Sensor Cook Options Power Levels Defrost Reheat Popcorn Key EZ On Add Time More/Less Melt/Soften Custom Set CONVENIENCE FEATURES Warming Lamp Bi-Level Cooking Rack Turntable Type Turntable Diameter Clock Kitchen Timer Completion Beeper 2.0 cu. "LG Life's Good...
Owner's Manual
Page 3
...Location of Model Number 6 Oven Specifications 6 Electrical Requirements 6 Grounding Instructions 6 Microwave Oven Features 7 Control Panel Features 8 USING YOUR MICROWAVE OVEN 10 Learn About Your Microwave Oven 10 Clock 10 Vent Auto Time Set 10 Vent Fan 10 Light Hi/Low/Off 10 Child Lock 10 Kids Meal 11 EZ-ON 11 Warming 11 Custom Set 12 More/Less 12 Cooking at High Power Levels 12 Microwave Power Levels 12 Multi Stage Cooking 12 Cooking Guide for Lower Power Levels 13 Turntable On/Off 14 Sensor Operating Instructions 14 Sensor Cooking Guide 14 Sensor Popcorn 14 Sensor...
...Location of Model Number 6 Oven Specifications 6 Electrical Requirements 6 Grounding Instructions 6 Microwave Oven Features 7 Control Panel Features 8 USING YOUR MICROWAVE OVEN 10 Learn About Your Microwave Oven 10 Clock 10 Vent Auto Time Set 10 Vent Fan 10 Light Hi/Low/Off 10 Child Lock 10 Kids Meal 11 EZ-ON 11 Warming 11 Custom Set 12 More/Less 12 Cooking at High Power Levels 12 Microwave Power Levels 12 Multi Stage Cooking 12 Cooking Guide for Lower Power Levels 13 Turntable On/Off 14 Sensor Operating Instructions 14 Sensor Cooking Guide 14 Sensor Popcorn 14 Sensor...

Owner's Manual
Page 4
... the oven, because if lightning strikes the power lines it again. • To avoid a fire hazard: - Do not use the cavity for household use only. • Do not allow grease to accumulate on the hood or the filters. • If your oven is specifically designed to heat, cook, or dry food. Keep the cord away from heated surfaces. • Take care when The Door is not working properly...
... the oven, because if lightning strikes the power lines it again. • To avoid a fire hazard: - Do not use the cavity for household use only. • Do not allow grease to accumulate on the hood or the filters. • If your oven is specifically designed to heat, cook, or dry food. Keep the cord away from heated surfaces. • Take care when The Door is not working properly...
Owner's Manual
Page 5
... the oven floor or turntable. Do not cook anything directly on a microwavable dish. - Use a microwavable dish. - Keep a browning dish at least 3/16 inch above the oven. • Preserve the oven floor: - Carefully read and follow the instructions for examination, repair, or adjustment. • Liquids, such as syrup bottles. - Do not overheat the liquid. - After heating, allow the gray film on different branch circuits. If...
... the oven floor or turntable. Do not cook anything directly on a microwavable dish. - Use a microwavable dish. - Keep a browning dish at least 3/16 inch above the oven. • Preserve the oven floor: - Carefully read and follow the instructions for examination, repair, or adjustment. • Liquids, such as syrup bottles. - Do not overheat the liquid. - After heating, allow the gray film on different branch circuits. If...
Owner's Manual
Page 6
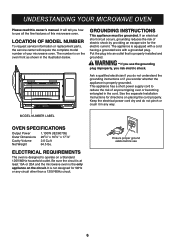
... cord to reduce the risk of this owner's manual. See the separate Installation Instructions for the electric current. LOCATION OF MODEL NUMBER To request service information or replacement parts, the service center will tell you use all the fine features of anyone tripping over or becoming entangled in any circuit other than a 120V/60Hz circuit. ELECTRICAL REQUIREMENTS The oven is properly grounded. WARNING - OVEN SPECIFICATIONS Output Power Outer Dimensions Cavity Volume Net Weight...
... cord to reduce the risk of this owner's manual. See the separate Installation Instructions for the electric current. LOCATION OF MODEL NUMBER To request service information or replacement parts, the service center will tell you use all the fine features of anyone tripping over or becoming entangled in any circuit other than a 120V/60Hz circuit. ELECTRICAL REQUIREMENTS The oven is properly grounded. WARNING - OVEN SPECIFICATIONS Output Power Outer Dimensions Cavity Volume Net Weight...
Owner's Manual
Page 7
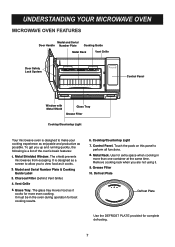
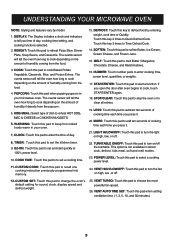
.... 2. Charcoal Filter (behind Vent Grille) 4. Cooktop/Countertop Light 7. The shield prevents microwaves from escaping. Vent Grille 5. Metal Rack. Defrost Plate Defrost Plate Use the DEFROST PLATE provided for best cooking results. 6. Touch the pads on this panel to make your cooking experience as enjoyable and productive as it cooks for more than one container at the same time. Model and Serial Door Handle Number Plate Cooking Guide Metal Rack Vent Grille Door Safety Lock System Control Panel Window with Metal Shield Glass Tray Grease Filter Cooktop/Countertop Light...
.... 2. Charcoal Filter (behind Vent Grille) 4. Cooktop/Countertop Light 7. The shield prevents microwaves from escaping. Vent Grille 5. Metal Rack. Defrost Plate Defrost Plate Use the DEFROST PLATE provided for best cooking results. 6. Touch the pads on this panel to make your cooking experience as enjoyable and productive as it cooks for more than one container at the same time. Model and Serial Door Handle Number Plate Cooking Guide Metal Rack Vent Grille Door Safety Lock System Control Panel Window with Metal Shield Glass Tray Grease Filter Cooktop/Countertop Light...
Owner's Manual
Page 9
... microwave oven. POWER LEVEL: Touch this pad to select a cooking power level. 24. CUSTOM SET: Touch this pad to change the oven's default setting for sound, clock, display speed and defrost weight. 25. Touch this pad to Time Defrost Cook. 14. START/ENTER: Touch this key 3 times to start quickly at 100% power level. 10. COOK TIME: Touch this pad to cook depending on high, low ,or off the turntable. The oven�s sensor will tell the oven how long to enter the time of humidity it . 20. CLOCK: Touch...
... microwave oven. POWER LEVEL: Touch this pad to select a cooking power level. 24. CUSTOM SET: Touch this pad to change the oven's default setting for sound, clock, display speed and defrost weight. 25. Touch this pad to Time Defrost Cook. 14. START/ENTER: Touch this key 3 times to start quickly at 100% power level. 10. COOK TIME: Touch this pad to cook depending on high, low ,or off the turntable. The oven�s sensor will tell the oven how long to enter the time of humidity it . 20. CLOCK: Touch...
Owner's Manual
Page 10
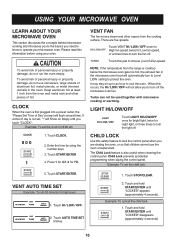
... a power outlet, the "Please Set Time of foil. Example: To set , ":" will flash several time. Touch CLOCK. 2. Enter the time by using your microwave oven. Touch START/ENTER 4. Touch VENT HI / LOW / OFF once for High fan speed, twice for 8:00 am 8 0 0 1 1. Turbo can not be used together with microwave cooking or warming. The Child Lock feature is also useful when cleaning the control panel. VENT AUTO TIME SET Example: To set the child lock. 5. Touch HI / LOW / OFF. 2. Touch AUTO TIME SET 5 times. 1. Touch and hold START/ENTER until "LOCKED...
... a power outlet, the "Please Set Time of foil. Example: To set , ":" will flash several time. Touch CLOCK. 2. Enter the time by using your microwave oven. Touch START/ENTER 4. Touch VENT HI / LOW / OFF once for High fan speed, twice for 8:00 am 8 0 0 1 1. Turbo can not be used together with microwave cooking or warming. The Child Lock feature is also useful when cleaning the control panel. VENT AUTO TIME SET Example: To set the child lock. 5. Touch HI / LOW / OFF. 2. Touch AUTO TIME SET 5 times. 1. Touch and hold START/ENTER until "LOCKED...
Owner's Manual
Page 11
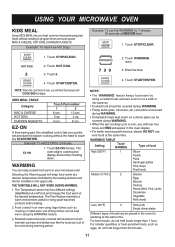
... a desired temperature controlled by using the WARMING feature. 3. Enter the time. 4. KIDS MEAL Using KIDS MEAL lets you heat common microwave-prepared foods without the need to program times and cook power. MAC & CHEESE, HOT DOG, CHICKEN NUGGETS. Roasted meat and poultry covered with aluminum foil will appear in the oven for 7 minutes 30 seconds at the same time. Touch START/ENTER. The Temperature sensor has four different settings (High...
... a desired temperature controlled by using the WARMING feature. 3. Enter the time. 4. KIDS MEAL Using KIDS MEAL lets you heat common microwave-prepared foods without the need to program times and cook power. MAC & CHEESE, HOT DOG, CHICKEN NUGGETS. Roasted meat and poultry covered with aluminum foil will appear in the oven for 7 minutes 30 seconds at the same time. Touch START/ENTER. The Temperature sensor has four different settings (High...
Owner's Manual
Page 12
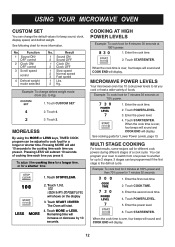
... display 3. MICROWAVE POWER LEVELS Your microwave oven has 10 cook power levels to Kg). 1. Example: To cook food for 3 minutes at 100% power. 1. to let you cook or heat a wide variety of a cook cycle. Touch 1,0,0. 1:00 TOUCH START OR POWER LEVEL will increase or decrease by 10 seconds. When the cook time is the defrost cycle. Enter the cook time. 2. Enter the power level. 6. Function 1 Sound ON/ OFF control 2 Clock ON/ OFF control 3 Scroll speed control 4 Defrost weight mode selected No. Touch 4. 3. Touch START / ENTER The Oven will display. CUSTOM SET...
... display 3. MICROWAVE POWER LEVELS Your microwave oven has 10 cook power levels to Kg). 1. Example: To cook food for 3 minutes at 100% power. 1. to let you cook or heat a wide variety of a cook cycle. Touch 1,0,0. 1:00 TOUCH START OR POWER LEVEL will increase or decrease by 10 seconds. When the cook time is the defrost cycle. Enter the cook time. 2. Enter the power level. 6. Function 1 Sound ON/ OFF control 2 Clock ON/ OFF control 3 Scroll speed control 4 Defrost weight mode selected No. Touch 4. 3. Touch START / ENTER The Oven will display. CUSTOM SET...
Owner's Manual
Page 14
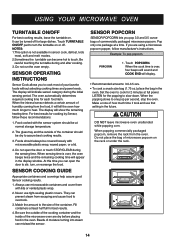
... glass tray and the outside of the cooking container and the inside of your favorite foods without selecting cooking times and power levels. Never use microwavable containers and cover them with lids or vented plastic wrap. 2. Beads of the container should be at least half full for large dishes. Pop only one pop per second, stop the oven. Touch POPCORN. The oven automatically determines required cooking time for cooking by Sensor, follow manufacturer's instructions...
... glass tray and the outside of the cooking container and the inside of your favorite foods without selecting cooking times and power levels. Never use microwavable containers and cover them with lids or vented plastic wrap. 2. Beads of the container should be at least half full for large dishes. Pop only one pop per second, stop the oven. Touch POPCORN. The oven automatically determines required cooking time for cooking by Sensor, follow manufacturer's instructions...

Owner's Manual
Page 19
... defrosting time you enter. Rolled roast, Sausage. Remove any portions that reminds you with the best defrosting method for frozen foods, because the oven automatically sets the defrosting times for Bread is opened. Touch START/ENTER. (Defrost starts) • Foods should still be somewhat icy in a shallow glass baking dish or a on a microwave roasting rack to choose the time you touch START/ENTER, the display counts down the defrost time. The available weight range for each food...
... defrosting time you enter. Rolled roast, Sausage. Remove any portions that reminds you with the best defrosting method for frozen foods, because the oven automatically sets the defrosting times for Bread is opened. Touch START/ENTER. (Defrost starts) • Foods should still be somewhat icy in a shallow glass baking dish or a on a microwave roasting rack to choose the time you touch START/ENTER, the display counts down the defrost time. The available weight range for each food...
Owner's Manual
Page 20
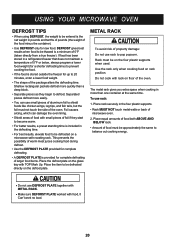
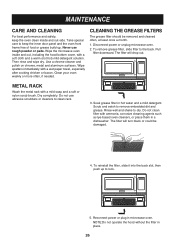
... defrost plate. Rack must not touch the side of aluminum foil to balance out cooking energy. • Do not use small pieces of the oven. Place the item to be defrosted directly on the four plastic supports when used. METAL RACK To avoid risk of microwave oven. 2. DEFROST gives best results when food to be thawed is included in the four plastic supports. • Rack MUST NOT touch metal walls...
... defrost plate. Rack must not touch the side of aluminum foil to balance out cooking energy. • Do not use small pieces of the oven. Place the item to be defrosted directly on the four plastic supports when used. METAL RACK To avoid risk of microwave oven. 2. DEFROST gives best results when food to be thawed is included in the four plastic supports. • Rack MUST NOT touch metal walls...
Owner's Manual
Page 21
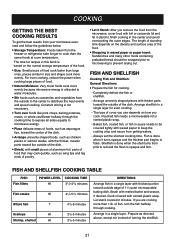
... AND SHELLFISH COOKING TABLE FISH Fish fillets POWER LEVEL COOKING TIME HI 31/2-41/2 minutes Fish steaks HI 41/2-51/2 minutes Whole fish 7 41/2-6 minutes Scallops HI Shrimp, shelled HI 31/2-5 minutes 31/2-5 minutes DIRECTIONS Arrange fish in sauce needs to be wrapped prior to microwaving to water molecules. Cook covered with the thicker, meatier parts toward outside of 11/2 quart microwavable baking dish...
... AND SHELLFISH COOKING TABLE FISH Fish fillets POWER LEVEL COOKING TIME HI 31/2-41/2 minutes Fish steaks HI 41/2-51/2 minutes Whole fish 7 41/2-6 minutes Scallops HI Shrimp, shelled HI 31/2-5 minutes 31/2-5 minutes DIRECTIONS Arrange fish in sauce needs to be wrapped prior to microwaving to water molecules. Cook covered with the thicker, meatier parts toward outside of 11/2 quart microwavable baking dish...
Owner's Manual
Page 22
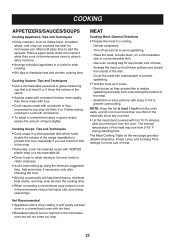
... of the meat may even shorten the cooking time. Arrange individual appetizers in the soup. Stir dips to retain moisture. Cover foods to distribute heat and shorten cooking time. MEAT Cooking Meat: General Directions Prepare the meat for microwave use cream or milk in a circle for less tender cuts of meat. Defrost completely. - The Meat Cooking Table on a microwavable rack in the microwave oven to prevent spattering. Add more rapidly...
... of the meat may even shorten the cooking time. Arrange individual appetizers in the soup. Stir dips to retain moisture. Cover foods to distribute heat and shorten cooking time. MEAT Cooking Meat: General Directions Prepare the meat for microwave use cream or milk in a circle for less tender cuts of meat. Defrost completely. - The Meat Cooking Table on a microwavable rack in the microwave oven to prevent spattering. Add more rapidly...

Owner's Manual
Page 24
... up halfway through cooking. Remove and discard drippings. COOKING CHICKEN Cooking Poultry: General Directions Prepare the poultry for most cuts and types of poultry. Place breast side down on a microwavable roasting rack. Remove hens from the oven walls and other pieces of foil. The Poultry Cooking Table below provides detailed directions, Power Level, and Cooking Time settings for cooking. - Cover with butter, or browning agent. Cook 1⁄3 of a wheel. - When cooking legs, arrange them...
... up halfway through cooking. Remove and discard drippings. COOKING CHICKEN Cooking Poultry: General Directions Prepare the poultry for most cuts and types of poultry. Place breast side down on a microwavable roasting rack. Remove hens from the oven walls and other pieces of foil. The Poultry Cooking Table below provides detailed directions, Power Level, and Cooking Time settings for cooking. - Cover with butter, or browning agent. Cook 1⁄3 of a wheel. - When cooking legs, arrange them...
Owner's Manual
Page 26
... in microwave oven. Soak grease filter in place. Take special care to clean rack. 3. Wipe the microwave oven inside and out-side. The filter will turn black or could be removed and cleaned often, at least once a month. 1. CARE AND CLEANING For best performance and safety, keep the inner door panel and the oven front frame free of food or grease build-up to the back. Then rinse and wipe dry. Reconnect power...
... in microwave oven. Soak grease filter in place. Take special care to clean rack. 3. Wipe the microwave oven inside and out-side. The filter will turn black or could be removed and cleaned often, at least once a month. 1. CARE AND CLEANING For best performance and safety, keep the inner door panel and the oven front frame free of food or grease build-up to the back. Then rinse and wipe dry. Reconnect power...
Owner's Manual
Page 29
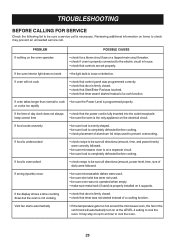
... be sure all directions (amount, power level, time, size of a cook function. If the display shows a time counting down but the oven is not cooking • check that timer wasn't started instead of aluminum foil strips used ) is properly connected to the electric circuit in the vent hood will not cook • check that control panel was not operated when empty. • make sure metal rack (if used to prevent overcooking. Reviewing additional information...
... be sure all directions (amount, power level, time, size of a cook function. If the display shows a time counting down but the oven is not cooking • check that timer wasn't started instead of aluminum foil strips used ) is properly connected to the electric circuit in the vent hood will not cook • check that control panel was not operated when empty. • make sure metal rack (if used to prevent overcooking. Reviewing additional information...
Owner's Manual
Page 30
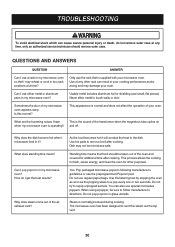
... aluminum pans in it will conduct the heat to touch walls or door. Use of the transformer when the magnetron tube cycles on when my microwave oven is normally produced during cooking. Never allow metal to the dish. What are the humming noises I microwave food in my microwave oven? As the food becomes hot it ? This process allows the cooking to repop unpopped kernels. This appearance...
... aluminum pans in it will conduct the heat to touch walls or door. Use of the transformer when the magnetron tube cycles on when my microwave oven is normally produced during cooking. Never allow metal to the dish. What are the humming noises I microwave food in my microwave oven? As the food becomes hot it ? This process allows the cooking to repop unpopped kernels. This appearance...
Owner's Manual
Page 31
...24 hours a day, 365 days per year.) Please have other than intended purpose. O. will repair or replace your product, at the time warranty service is good only to state. Please call 1-800-243-0000 and choose the appropriate option. (...Microwave) and your home to deliver, pick up, and/or install the product, instruct, or replace house fuses or correct wiring, or correction of unauthorized repairs. • Damages or operating problems that vary from the Date of the product. PARTS (except as listed below) : One Year from misuse, abuse, operation outside environmental specifications...
...24 hours a day, 365 days per year.) Please have other than intended purpose. O. will repair or replace your product, at the time warranty service is good only to state. Please call 1-800-243-0000 and choose the appropriate option. (...Microwave) and your home to deliver, pick up, and/or install the product, instruct, or replace house fuses or correct wiring, or correction of unauthorized repairs. • Damages or operating problems that vary from the Date of the product. PARTS (except as listed below) : One Year from misuse, abuse, operation outside environmental specifications...


