

Owner's Manual
Page 3
... Sensor Cooking Guide 15 ENERGY 2 Adding or subtracting Cook Time 16 Popcorn 16 TABLE OF CONTENTS 3 Pizza 16 Potato 16 SAFETY 4 Vegetable 17 Important Safety Instructions 4 Cook 17 Reheat 17 INFORMATION 6 Auto Defrost 18 Location of Model Number 6 Weight Conversion Chart 18 Oven Specifications 6 Defrosting Tips 18 Electrical Rating 6 Auto Defrost Chart 19 Electrical Requirements 6 Time Defrost 21 Grounding Instructions 6 Q Defrost 21 Microwave Oven Features 7 Use of the Two Position Metal Rack 21 Oven Control Panel 8 COOKING 22 OPERATION...
... Sensor Cooking Guide 15 ENERGY 2 Adding or subtracting Cook Time 16 Popcorn 16 TABLE OF CONTENTS 3 Pizza 16 Potato 16 SAFETY 4 Vegetable 17 Important Safety Instructions 4 Cook 17 Reheat 17 INFORMATION 6 Auto Defrost 18 Location of Model Number 6 Weight Conversion Chart 18 Oven Specifications 6 Defrosting Tips 18 Electrical Rating 6 Auto Defrost Chart 19 Electrical Requirements 6 Time Defrost 21 Grounding Instructions 6 Q Defrost 21 Microwave Oven Features 7 Use of the Two Position Metal Rack 21 Oven Control Panel 8 COOKING 22 OPERATION...

Owner's Manual
Page 4
.... There is opened. Turn the oven off the power at the fuse or circuit breaker panel. • To avoid electric shock: - Keep the cord away from heated surfaces. • Take care when The Door is a possibility of burns, electric shock, fire, injury to persons, or exposure to excessive microwave energy. • Read all the instructions before using it may cause the oven to heat, cook, or dry food. Do not...
.... There is opened. Turn the oven off the power at the fuse or circuit breaker panel. • To avoid electric shock: - Keep the cord away from heated surfaces. • Take care when The Door is a possibility of burns, electric shock, fire, injury to persons, or exposure to excessive microwave energy. • Read all the instructions before using it may cause the oven to heat, cook, or dry food. Do not...

Owner's Manual
Page 5
..., the user is removed from the receiver. • Plug the microwave oven into the container. SAFETY • To avoid improperly cooking some foods. - Do not use a browning dish incorrectly, you use straight-sided containers with the provided installation instructions. • This appliance should be boiling. Do not heat any openings in strict accordance with respect to the receiver. • Move the microwave oven away...
..., the user is removed from the receiver. • Plug the microwave oven into the container. SAFETY • To avoid improperly cooking some foods. - Do not use a browning dish incorrectly, you use straight-sided containers with the provided installation instructions. • This appliance should be boiling. Do not heat any openings in strict accordance with respect to the receiver. • Move the microwave oven away...

Owner's Manual
Page 6
... in the illustration below. Because this owner's manual. ELECTRICAL RATING * Electrical Rating of your microwave oven. INFORMATION Please read this appliance fits under the cabinet, it has a short power-supply cord. The number is properly grounded. It will require the complete model number of the Oven: 120V AC, 60Hz * 13 Amp./ 1,500W (MWO + Cooktop Lamp + Ventilation Fan) ELECTRICAL REQUIREMENTS The oven is designed to use the grounding plug improperly, you...
... in the illustration below. Because this owner's manual. ELECTRICAL RATING * Electrical Rating of your microwave oven. INFORMATION Please read this appliance fits under the cabinet, it has a short power-supply cord. The number is properly grounded. It will require the complete model number of the Oven: 120V AC, 60Hz * 13 Amp./ 1,500W (MWO + Cooktop Lamp + Ventilation Fan) ELECTRICAL REQUIREMENTS The oven is designed to use the grounding plug improperly, you...

Owner's Manual
Page 7
INFORMATION MICROWAVE OVEN FEATURES Door Handle Model and Serial Number Plate Vent Grille Window with Metal Shield Two-position Metal Rack Cooking Guide Door Safety Lock System Oven Control Grease Filter Panel Glass Turntable Cooktop/Countertop Light Defrosting Rack -7-
INFORMATION MICROWAVE OVEN FEATURES Door Handle Model and Serial Number Plate Vent Grille Window with Metal Shield Two-position Metal Rack Cooking Guide Door Safety Lock System Oven Control Grease Filter Panel Glass Turntable Cooktop/Countertop Light Defrosting Rack -7-

Owner's Manual
Page 9
... your microwave oven for sound, clock, display speed and defrost weight. 24. VENT HI-LOW-OFF: Touch this pad to change the oven's default settings for up to cook depending on the amount of humidity it detects from the food. 7. HELP: Touch this pad to select a cooking power level. 23. REHEAT: Touch this pad to learn how to turn off . 28. TURNTABLE ON-OFF: Touch this pad when popping popcorn in the display. INFORMATION 1. AUTO DEFROST...
... your microwave oven for sound, clock, display speed and defrost weight. 24. VENT HI-LOW-OFF: Touch this pad to change the oven's default settings for up to cook depending on the amount of humidity it detects from the food. 7. HELP: Touch this pad to select a cooking power level. 23. REHEAT: Touch this pad to learn how to turn off . 28. TURNTABLE ON-OFF: Touch this pad when popping popcorn in the display. INFORMATION 1. AUTO DEFROST...

Owner's Manual
Page 10
... seconds. OPERATION LEARN ABOUT YOUR MICROWAVE OVEN This section discusses the concepts behind microwave cooking and introduces you to the basics you will hear seven beeps and END will display. Touch KITCHEN TIMER pad. 2. NUMBER FUNCTION NUMBER RESULT 1 Beep ON/OFF 1 control 2 2 Clock display 1 Sound ON Sound OFF Clock ON control 2 Clock OFF 1 Slow speed 3 Display 2 Normal speed 3 Fast speed 4 Defrost weight 1 Lbs. mode select 2 Kg. Press HELP, then select a key pad. Example: To change the...
... seconds. OPERATION LEARN ABOUT YOUR MICROWAVE OVEN This section discusses the concepts behind microwave cooking and introduces you to the basics you will hear seven beeps and END will display. Touch KITCHEN TIMER pad. 2. NUMBER FUNCTION NUMBER RESULT 1 Beep ON/OFF 1 control 2 2 Clock display 1 Sound ON Sound OFF Clock ON control 2 Clock OFF 1 Slow speed 3 Display 2 Normal speed 3 Fast speed 4 Defrost weight 1 Lbs. mode select 2 Kg. Press HELP, then select a key pad. Example: To change the...

Owner's Manual
Page 11
... set the LIGHT to turn on . 3. Touch LIGHT TIMER pad. LOCKED will appear in the display window with two beeps. When this time the oven is also useful when cleaning the control panel. It can not turn the light off . LOCKED will disappear and you should touch key. - 11 - Touch VENT once for High fan speed, twice for night light, or three times to touch. NOTE: If the temperature gets too hot around the microwave oven, the fan in operation...
... set the LIGHT to turn on . 3. Touch LIGHT TIMER pad. LOCKED will appear in the display window with two beeps. When this time the oven is also useful when cleaning the control panel. It can not turn the light off . LOCKED will disappear and you should touch key. - 11 - Touch VENT once for High fan speed, twice for night light, or three times to touch. NOTE: If the temperature gets too hot around the microwave oven, the fan in operation...

Owner's Manual
Page 15
... display will appear in the oven. Glass Tray and outside of the cooking container and the inside of your favorite foods without selecting cooking times and power levels. When sensing time is over, the oven beeps twice and the remaining cooking time will show the remaining heating time. Foods should always be covered loosely with the sensor system should be at least half full for cooking by Sensor, following these recommendations. 1. Never use microwavable containers and cover...
... display will appear in the oven. Glass Tray and outside of the cooking container and the inside of your favorite foods without selecting cooking times and power levels. When sensing time is over, the oven beeps twice and the remaining cooking time will show the remaining heating time. Foods should always be covered loosely with the sensor system should be at least half full for cooking by Sensor, following these recommendations. 1. Never use microwavable containers and cover...
Owner's Manual
Page 16
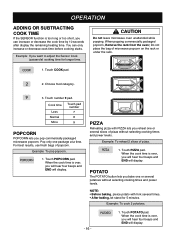
... selecting cooking times and power levels. POTATO The POTATO button lets you bake one or several times. • After baking, let stand for longer time. Touch COOK pad. 2. Touch number 9 pad. When the cook time is over, you will hear four beeps and END will display. Example: To reheat 2 slices of pizza without selecting cooking times and power levels. CAUTION Do not leave microwave oven unattended while popping. Touch POPCORN pad. When the cook time...
... selecting cooking times and power levels. POTATO The POTATO button lets you bake one or several times. • After baking, let stand for longer time. Touch COOK pad. 2. Touch number 9 pad. When the cook time is over, you will hear four beeps and END will display. Example: To reheat 2 slices of pizza without selecting cooking times and power levels. CAUTION Do not leave microwave oven unattended while popping. Touch POPCORN pad. When the cook time...
Owner's Manual
Page 18
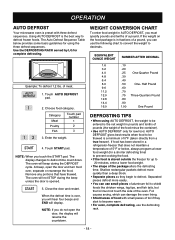
... not open the door, the display will beep during the beep unless the door is over , separate or rearrange the food. Using AUTO DEFROST is the best way to be entered is stored outside the freezer for a shorter defrosting time) to prevent cooking the food. • If the food is the net weight in fractions of a pound, you touch the START pad. OPERATION AUTO DEFROST Your microwave oven is a minimum of 0°F (taken directly from...
... not open the door, the display will beep during the beep unless the door is over , separate or rearrange the food. Using AUTO DEFROST is the best way to be entered is stored outside the freezer for a shorter defrosting time) to prevent cooking the food. • If the food is the net weight in fractions of a pound, you touch the START pad. OPERATION AUTO DEFROST Your microwave oven is a minimum of 0°F (taken directly from...

Owner's Manual
Page 19
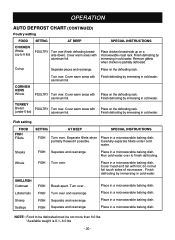
.... Freeze in a microwavable baking dish. Place in doughnut shape. Separate remainder. Place on the defrosting rack. Turn over . patties. Place on the defrosting rack. Turn over . Place on the defrosting rack. Turn over . Do not defrost less than two oz. Turn over. Place on the defrosting rack. Cover warm areas with fork. Return remainder to oven. OPERATION AUTO DEFROST CHART Meat setting FOOD BEEF SETTING AT BEEP Ground Beef, MEAT Remove thawed portions with...
.... Freeze in a microwavable baking dish. Place in doughnut shape. Separate remainder. Place on the defrosting rack. Turn over . patties. Place on the defrosting rack. Turn over . Place on the defrosting rack. Turn over . Do not defrost less than two oz. Turn over. Place on the defrosting rack. Cover warm areas with fork. Return remainder to oven. OPERATION AUTO DEFROST CHART Meat setting FOOD BEEF SETTING AT BEEP Ground Beef, MEAT Remove thawed portions with...
Owner's Manual
Page 20
... weight is partially defrosted. Turn over . Finish defrosting by immersing in a microwavable baking dish. Whole FISH Turn over . do not let foil touch sides of microwave . Place in cold water. Cover warm areas with Finish defrosting by immersing in cold water. Place on the defrosting rack. Cover warm areas with aluminum foil. TURKEY Breast POULTRY Turn over . Fish setting FOOD FISH Fillets SETTING AT BEEP SPECIAL INSTRUCTIONS FISH Turn over...
... weight is partially defrosted. Turn over . Finish defrosting by immersing in a microwavable baking dish. Whole FISH Turn over . do not let foil touch sides of microwave . Place in cold water. Cover warm areas with Finish defrosting by immersing in cold water. Place on the defrosting rack. Cover warm areas with aluminum foil. TURKEY Breast POULTRY Turn over . Fish setting FOOD FISH Fillets SETTING AT BEEP SPECIAL INSTRUCTIONS FISH Turn over...
Owner's Manual
Page 21
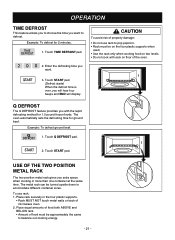
... accomodate different container sizes. Touch START pad. USE OF THE TWO POSITION METAL RACK The two position metal rack gives you extra space when cooking in the four plastic supports. • Rack MUST NOT touch metal walls or back of property damage: • Do not use rack: 1. Place equal amounts of food both ABOVE and BELOW rack. • Amount of the oven. 2. Touch TIME DEFROST pad. OPERATION TIME DEFROST This feature allows...
... accomodate different container sizes. Touch START pad. USE OF THE TWO POSITION METAL RACK The two position metal rack gives you extra space when cooking in the four plastic supports. • Rack MUST NOT touch metal walls or back of property damage: • Do not use rack: 1. Place equal amounts of food both ABOVE and BELOW rack. • Amount of the oven. 2. Touch TIME DEFROST pad. OPERATION TIME DEFROST This feature allows...
Owner's Manual
Page 22
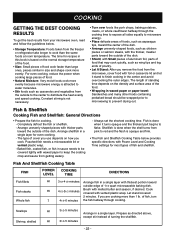
... moist foods cook more evenly because microwave energy is based on how you remove the food from the outside edge of cover you use depends on the normal storage temperature of the food. • Size: Small pieces of fish and shellfish. The type of 11/2 quart microwavable baking dish. HI 41/2-51/2 minutes Brush with vented plastic wrap. Fish And Shellfish Cooking Table FISH POWER LEVEL COOKING TIME DIRECTIONS...
... moist foods cook more evenly because microwave energy is based on how you remove the food from the outside edge of cover you use depends on the normal storage temperature of the food. • Size: Small pieces of fish and shellfish. The type of 11/2 quart microwavable baking dish. HI 41/2-51/2 minutes Brush with vented plastic wrap. Fish And Shellfish Cooking Table FISH POWER LEVEL COOKING TIME DIRECTIONS...

Owner's Manual
Page 23
... covered with flour. Drain juices as they cook in the microwave oven to distribute heat and shorten cooking time. The internal temperature of the meat may rise from the oven. Cooking Meat: General Directions • Prepare the meat for most cuts of the dish. - Place the meat, fat side down, on the next page provides detailed directions, Power Level, and Cooking Time settings for cooking. - Uncover foods to retain moisture. Use oven cooking...
... covered with flour. Drain juices as they cook in the microwave oven to distribute heat and shorten cooking time. The internal temperature of the meat may rise from the oven. Cooking Meat: General Directions • Prepare the meat for most cuts of the dish. - Place the meat, fat side down, on the next page provides detailed directions, Power Level, and Cooking Time settings for cooking. - Uncover foods to retain moisture. Use oven cooking...
Owner's Manual
Page 25
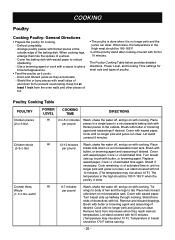
... them like the spokes of estimated time. Cover with foil. Turn breast side up halfway through cooking. Cover with a sauce to prevent overcooking. Use a browning agent or cook with waxed paper. When done, the temperature in breast should be 170˚F before serving. - 25 - The Poultry Cooking Table below provides detailed directions, Power Level, and Cooking Time settings for cooking. - Brush with butter or browning agent...
... them like the spokes of estimated time. Cover with foil. Turn breast side up halfway through cooking. Cover with a sauce to prevent overcooking. Use a browning agent or cook with waxed paper. When done, the temperature in breast should be 170˚F before serving. - 25 - The Poultry Cooking Table below provides detailed directions, Power Level, and Cooking Time settings for cooking. - Brush with butter or browning agent...

Owner's Manual
Page 27
... push up . CHARCOAL FILTER REPLACEMENT If your oven is vented inside and outside. Never use abrasive scrubbers or cleaners to lock. 5. Do not use rough powder or pads. Remove old filter. 5. Replace the mounting screws. 7. MAINTENANCE CARE AND CLEANING For best performance and safety, keep the inner door panel and the oven front frame free of the vent grille into place. Take special care to 12 months, and more often, if needed. Then rinse and...
... push up . CHARCOAL FILTER REPLACEMENT If your oven is vented inside and outside. Never use abrasive scrubbers or cleaners to lock. 5. Do not use rough powder or pads. Remove old filter. 5. Replace the mounting screws. 7. MAINTENANCE CARE AND CLEANING For best performance and safety, keep the inner door panel and the oven front frame free of the vent grille into place. Take special care to 12 months, and more often, if needed. Then rinse and...

Owner's Manual
Page 28
Replace bulb(s) with a 30 watt appliance bulb. 6. Replace bulb cover, and mounting screw. 5. Remove the vent grille mounting screws. 3. Lift up the bulb holder. 5. Push the bottom until it ? Reconnect power or plug in my microwave oven? Never allow metal to repop unpopped kernels. Sometimes the door of the air exhaust vent? Q. A. Use hot pads to remove food after cooking. A. Standing time means that this should be sure to absorb microwave energy). Pop packaged microwave popcorn following manufacturer's guidelines or use regular...
Replace bulb(s) with a 30 watt appliance bulb. 6. Replace bulb cover, and mounting screw. 5. Remove the vent grille mounting screws. 3. Lift up the bulb holder. 5. Push the bottom until it ? Reconnect power or plug in my microwave oven? Never allow metal to repop unpopped kernels. Sometimes the door of the air exhaust vent? Q. A. Use hot pads to remove food after cooking. A. Standing time means that this should be sure to absorb microwave energy). Pop packaged microwave popcorn following manufacturer's guidelines or use regular...

Owner's Manual
Page 30
... this manual as well as reviewing additional information on 4 supports. If the oven interior light does not works: • the light bulb is undercooked: • check recipe to be sure all directions (amount, power level, time, size of a cooking function. - 30 - If food is loose or defective. A quick reference of aluminum foil strips used ) is properly installed on items to check may prevent an unneeded service call is programmed properly. TROUBLE SHOOTING BEFORE...
... this manual as well as reviewing additional information on 4 supports. If the oven interior light does not works: • the light bulb is undercooked: • check recipe to be sure all directions (amount, power level, time, size of a cooking function. - 30 - If food is loose or defective. A quick reference of aluminum foil strips used ) is properly installed on items to check may prevent an unneeded service call is programmed properly. TROUBLE SHOOTING BEFORE...


