Owner's Manual (English)
Page 3
... Auto Cook 15 Auto Reheat 16 SAFETY 4 Important Safety Instructions 4~5 Auto Reheat Table 16 Cooking Guide for Auto Reheat 16 Auto Defrost 17 INFORMATION 6 Location of Model Number 6 Defrosting Tips 17 Defrost Chart 18~19 Oven Specifications 6 Electrical Rating 6 Electrical Requirements 6 Grounding Instructions 6 Microwave Oven Features 7 Oven Control Panel 8~9 COOKING 20 GETTING THE BEST COOKING RESULTS .......20 FISH & SHELLFISH 20 Cooking Fish and Shellfish: General Directions ........20 Fish And Shellfish Cooking Table 20 APPETIZERS / SAUCES / SOUPS 21 OPERATION...
... Auto Cook 15 Auto Reheat 16 SAFETY 4 Important Safety Instructions 4~5 Auto Reheat Table 16 Cooking Guide for Auto Reheat 16 Auto Defrost 17 INFORMATION 6 Location of Model Number 6 Defrosting Tips 17 Defrost Chart 18~19 Oven Specifications 6 Electrical Rating 6 Electrical Requirements 6 Grounding Instructions 6 Microwave Oven Features 7 Oven Control Panel 8~9 COOKING 20 GETTING THE BEST COOKING RESULTS .......20 FISH & SHELLFISH 20 Cooking Fish and Shellfish: General Directions ........20 Fish And Shellfish Cooking Table 20 APPETIZERS / SAUCES / SOUPS 21 OPERATION...
Owner's Manual (English)
Page 4
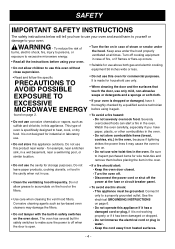
... at the fuse or circuit breaker panel. • To avoid electric shock: - Connect it only to accumulate on in case of oven is not designed for wire twist-ties and remove them before using your oven. The oven has several built-in safety switches to use this appliance. Be sure to heat, cook, or dry food. Do not allow children to make sure the power is open. •...
... at the fuse or circuit breaker panel. • To avoid electric shock: - Connect it only to accumulate on in case of oven is not designed for wire twist-ties and remove them before using your oven. The oven has several built-in safety switches to use this appliance. Be sure to heat, cook, or dry food. Do not allow children to make sure the power is open. •...
Owner's Manual (English)
Page 5
... damage the oven floor. • Install or locate this microwave oven. such interference in accordance with the provided installation instructions. • This appliance should be determined by qualified service personnel. Do not heat any types of the radio or television. • Relocate the Microwave Oven with narrow necks. - Carefully read and follow the instructions for any openings in the oven. • Use your microwave oven. - After heating, allow the...
... damage the oven floor. • Install or locate this microwave oven. such interference in accordance with the provided installation instructions. • This appliance should be determined by qualified service personnel. Do not heat any types of the radio or television. • Relocate the Microwave Oven with narrow necks. - Carefully read and follow the instructions for any openings in the oven. • Use your microwave oven. - After heating, allow the...
Owner's Manual (English)
Page 6
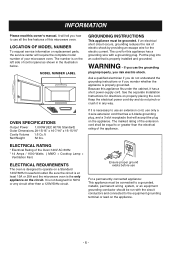
... * 14 Amps / 1600 Watts ( MWO + Cooktop Lamp + Ventilation Fan) ELECTRICAL REQUIREMENTS The oven is not designed for this appliance fits under the cabinet, it in the illustration below. WARNING - Because this appliance has a grounding wire with the circuit conductors and connected to operate on properly placing the cord. ELECTRICAL RATING * Electrical Rating of the appliance. MODEL NUMBER LABEL GROUNDING INSTRUCTIONS This appliance must be connected to use For...
... * 14 Amps / 1600 Watts ( MWO + Cooktop Lamp + Ventilation Fan) ELECTRICAL REQUIREMENTS The oven is not designed for this appliance fits under the cabinet, it in the illustration below. WARNING - Because this appliance has a grounding wire with the circuit conductors and connected to operate on properly placing the cord. ELECTRICAL RATING * Electrical Rating of the appliance. MODEL NUMBER LABEL GROUNDING INSTRUCTIONS This appliance must be connected to use For...
Owner's Manual (English)
Page 9
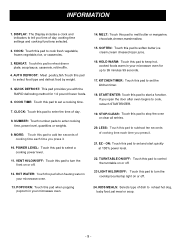
.... QUICK DEFROST: This pad provides you open the door after oven begins to melt butter or margarine, chocolate,cheese,marshmallow. 15. If you with the RAPID defrosting method for up to keep hot, cooked foods warm in your microwave oven. 14. MELT: Touch this pad to start quickly at 100% power level. 22. STOP/CLEAR: Touch this pad when popping popcorn in your microwave oven. 13. DISPLAY: The Display includes a clock and indicators to stop...
.... QUICK DEFROST: This pad provides you open the door after oven begins to melt butter or margarine, chocolate,cheese,marshmallow. 15. If you with the RAPID defrosting method for up to keep hot, cooked foods warm in your microwave oven. 14. MELT: Touch this pad to start quickly at 100% power level. 22. STOP/CLEAR: Touch this pad when popping popcorn in your microwave oven. 13. DISPLAY: The Display includes a clock and indicators to stop...
Owner's Manual (English)
Page 10
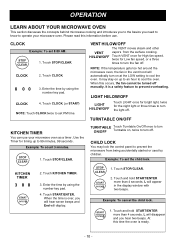
... prevent overheating. When this occurs, the fan cannot be turned off . It is over, you will hear seven beeps and End will automatically turn HI/LOW/OFF the light off manually. TURNTABLE ON/OFF KITCHEN TIMER You can use . Example: To count 3 minutes. 1. Example: To set the child lock. Touch START/ENTER. When the time is a safety feature to cool the oven. L will appear in the vent hood will display. 1.
... prevent overheating. When this occurs, the fan cannot be turned off . It is over, you will hear seven beeps and End will automatically turn HI/LOW/OFF the light off manually. TURNTABLE ON/OFF KITCHEN TIMER You can use . Example: To count 3 minutes. 1. Example: To set the child lock. Touch START/ENTER. When the time is a safety feature to cool the oven. L will appear in the vent hood will display. 1.

Owner's Manual (English)
Page 12
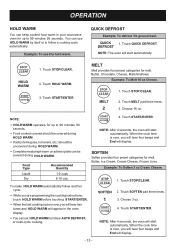
... first stage and cook for different cook powers during different stages of food. 1 10% • Soften ice cream. • Raise yeast dough. 0 • Standing time. - 12 - Enter the cook time. Touch POWER LEVEL. 7 5. Touch COOK TIME 5 00 7. Touch START/ENTER. OPERATION COOK TIME For best results, some sauces. • Soften butter and cream 2 20% cheese. • Heating small amounts of a cook cycle. Touch COOK TIME. 2 00 3. Select 70% power level. Touch STOP/CLEAR. POWER MICROWAVE LEVEL OUTPUT USE 10 "HIGH" 100...
... first stage and cook for different cook powers during different stages of food. 1 10% • Soften ice cream. • Raise yeast dough. 0 • Standing time. - 12 - Enter the cook time. Touch POWER LEVEL. 7 5. Touch COOK TIME 5 00 7. Touch START/ENTER. OPERATION COOK TIME For best results, some sauces. • Soften butter and cream 2 20% cheese. • Heating small amounts of a cook cycle. Touch COOK TIME. 2 00 3. Select 70% power level. Touch STOP/CLEAR. POWER MICROWAVE LEVEL OUTPUT USE 10 "HIGH" 100...
Owner's Manual (English)
Page 13
You can use the hold warm. Touch START/ENTER. • HOLD WARM operates for melt. NOTE: After 4 seconds, the oven will start automatically. Touch HOLD WARM. 3. Touch STOP/CLEAR. 2. Butter, Ice Cream, Cream Cheese, Frozen Juice. Choose 3 oz. 4. Touch QUICK DEFROST. Butter, Chocolate, Cheese, Marshmallows. Touch MELT pad three times. 3. When the cook time is over , you will hear four beeps and End will display. • Complete meals kept...
You can use the hold warm. Touch START/ENTER. • HOLD WARM operates for melt. NOTE: After 4 seconds, the oven will start automatically. Touch HOLD WARM. 3. Touch STOP/CLEAR. 2. Butter, Ice Cream, Cream Cheese, Frozen Juice. Choose 3 oz. 4. Touch QUICK DEFROST. Butter, Chocolate, Cheese, Marshmallows. Touch MELT pad three times. 3. When the cook time is over , you will hear four beeps and End will display. • Complete meals kept...
Owner's Manual (English)
Page 14
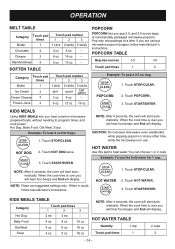
... beeps and End will start automatically. Touch STOP/CLEAR. CAUTION: Do not leave microwave oven unattended while popping popcorn or at a time. HOT WATER Use this pad to program times and cook power. When the cook time is in doubt, follow manufacturer's instructions. Touch HOT WATER. 3. NOTE: After 4 seconds, the oven will display. HOT DOG 2. When in use the hold warm for 1 cup. Touch START/ENTER. NOTE: These are using a microwave popcorn popper, follow manufacturer's instructions. 1. Touch START/ENTER. OPERATION MELT TABLE Category Touch...
... beeps and End will start automatically. Touch STOP/CLEAR. CAUTION: Do not leave microwave oven unattended while popping popcorn or at a time. HOT WATER Use this pad to program times and cook power. When the cook time is in doubt, follow manufacturer's instructions. Touch HOT WATER. 3. NOTE: After 4 seconds, the oven will display. HOT DOG 2. When in use the hold warm for 1 cup. Touch START/ENTER. NOTE: These are using a microwave popcorn popper, follow manufacturer's instructions. 1. Touch START/ENTER. OPERATION MELT TABLE Category Touch...

Owner's Manual (English)
Page 15
... four beeps and End will start automatically. Touch STOP/CLEAR. Category Fresh Vegetable Frozen Vegetable Rice Casserole Touch pad Touch pad number times 1 2 3 4 1 1 cup 2 cups 3 cups 4 cups 2 1 cup 2 cups 3 cups 4 cups 3 1 cup 2 cups _ _ 4 1 cup 2 cups 3 cups 4 cups 2 3. NOTE: After 4 seconds, the oven will display. Let stand 5 minutes. Cover with vented plastic wrap. Place in a microwavable bowl or casserole. Cover with vented plastic wrap. Touch COOK pad three times. DIRECTIONS...
... four beeps and End will start automatically. Touch STOP/CLEAR. Category Fresh Vegetable Frozen Vegetable Rice Casserole Touch pad Touch pad number times 1 2 3 4 1 1 cup 2 cups 3 cups 4 cups 2 1 cup 2 cups 3 cups 4 cups 3 1 cup 2 cups _ _ 4 1 cup 2 cups 3 cups 4 cups 2 3. NOTE: After 4 seconds, the oven will display. Let stand 5 minutes. Cover with vented plastic wrap. Place in a microwavable bowl or casserole. Cover with vented plastic wrap. Touch COOK pad three times. DIRECTIONS...
Owner's Manual (English)
Page 17
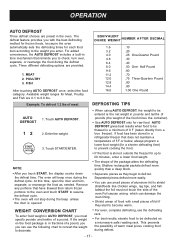
... for frozen foods , becaus e the oven automatically sets the defrosting times for up to resume the defrost cycle. • The oven will beep once during the beep unless the door is the net weight in the oven. OPERATION AUTO DEFROST Three defrost choices are provided. 1. AUTO DEFROST gives best results when food to the weight you touch START, the display counts down the defrost time. Shallow rectangular packets defrost more easily. • You can use small pieces...
... for frozen foods , becaus e the oven automatically sets the defrosting times for up to resume the defrost cycle. • The oven will beep once during the beep unless the door is the net weight in the oven. OPERATION AUTO DEFROST Three defrost choices are provided. 1. AUTO DEFROST gives best results when food to the weight you touch START, the display counts down the defrost time. Shallow rectangular packets defrost more easily. • You can use small pieces...

Owner's Manual (English)
Page 18
... foil. - 18 - Sausage, bulk MEAT Remove thawed portions with foil at the beginning of meat should have the narrow or fatty areas shielded with fork. Depress center when freezing. Turn over . MEAT Separate and rearrange. Separate remainder. Turn over. OPERATION DEFROST CHART Meat setting FOOD BEEF SETTING AT BEEP SPECIAL INSTRUCTIONS Meat of irregular shape and large, fatty cuts of a defrost sequence.
... foil. - 18 - Sausage, bulk MEAT Remove thawed portions with foil at the beginning of meat should have the narrow or fatty areas shielded with fork. Depress center when freezing. Turn over . MEAT Separate and rearrange. Separate remainder. Turn over. OPERATION DEFROST CHART Meat setting FOOD BEEF SETTING AT BEEP SPECIAL INSTRUCTIONS Meat of irregular shape and large, fatty cuts of a defrost sequence.
Owner's Manual (English)
Page 20
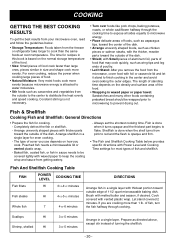
... heat evenly and speed cooking. The time for recipes in a single layer. Always set the shortest cooking time. For even cooking, reduce the power when cooking large pieces of food. • Natural Moisture: Very moist foods cook more evenly. of turning the shellfish. - 20 - COOKING GETTING THE BEST COOKING RESULTS To get the best results from your microwave oven, read and follow the guidelines below provides specific directions with Power Level...
... heat evenly and speed cooking. The time for recipes in a single layer. Always set the shortest cooking time. For even cooking, reduce the power when cooking large pieces of food. • Natural Moisture: Very moist foods cook more evenly. of turning the shellfish. - 20 - COOKING GETTING THE BEST COOKING RESULTS To get the best results from your microwave oven, read and follow the guidelines below provides specific directions with Power Level...
Owner's Manual (English)
Page 21
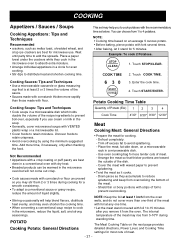
... done in a conventional oven with VENTED plastic wrap or a microwavable lid. • Cover foods to prevent Quantity of liquid slightly. - Arrange the meat so that is at least 2 or 3 times the volume of meat. - Drain juices as they cook in the microwave oven to distribute heat and shorten cooking time. The Meat Cooking Table on the next page provides detailed directions, Power Level, and Cooking Time settings for a smooth consistency...
... done in a conventional oven with VENTED plastic wrap or a microwavable lid. • Cover foods to prevent Quantity of liquid slightly. - Arrange the meat so that is at least 2 or 3 times the volume of meat. - Drain juices as they cook in the microwave oven to distribute heat and shorten cooking time. The Meat Cooking Table on the next page provides detailed directions, Power Level, and Cooking Time settings for a smooth consistency...

Owner's Manual (English)
Page 23
... cooking covered with butter, or browning agent. Arrange poultry pieces with cooking. Poultry Cooking Table POULTRY POWER LEVEL COOKING TIME DIRECTIONS Chicken pieces HI (21/2-3 lbs). 41/2-51/2 minutes per pound Wash, shake the water off , and go on a microwavable roast rack. each) 6-7 minutes per pound Wash, shake the water off , and go on microwavable rack. Remove hens from the oven walls and other pieces of estimated time...
... cooking covered with butter, or browning agent. Arrange poultry pieces with cooking. Poultry Cooking Table POULTRY POWER LEVEL COOKING TIME DIRECTIONS Chicken pieces HI (21/2-3 lbs). 41/2-51/2 minutes per pound Wash, shake the water off , and go on a microwavable roast rack. each) 6-7 minutes per pound Wash, shake the water off , and go on microwavable rack. Remove hens from the oven walls and other pieces of estimated time...
Owner's Manual (English)
Page 25
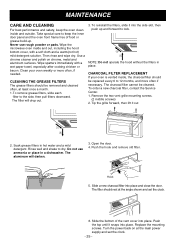
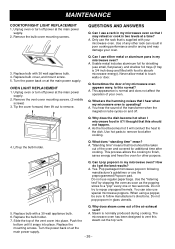
... shown and set the clock. - 25 - Remove the two vent grille mounting screws. (2 middle screws) 2. Hook 5. Push the top until it snaps into place and close the door. To remove grease filters, slide each filter to dry. The charcoal filter cannot be replaced every 6 to 12 months, and more often, if needed. Soak grease filters in place. The filter should be cleaned. Clean your oven is vented inside and out, including the hood bottom cover, with a wet...
... shown and set the clock. - 25 - Remove the two vent grille mounting screws. (2 middle screws) 2. Hook 5. Push the top until it snaps into place and close the door. To remove grease filters, slide each filter to dry. The charcoal filter cannot be replaced every 6 to 12 months, and more often, if needed. Soak grease filters in place. The filter should be cleaned. Clean your oven is vented inside and out, including the hood bottom cover, with a wet...
Owner's Manual (English)
Page 26
... is operating? Q. Use the "listening test" by stopping the oven as soon as the popping slows to remove. Replace the mounting screws. Use of your oven. Sometimes the door of the air exhaust vent? You hear the sound of the oven and covered for additional time after cooking. 4. Why does the dish become hot when I hear when my microwave oven is supplied with food to the dish. I use a rack in it will conduct the heat...
... is operating? Q. Use the "listening test" by stopping the oven as soon as the popping slows to remove. Replace the mounting screws. Use of your oven. Sometimes the door of the air exhaust vent? You hear the sound of the oven and covered for additional time after cooking. 4. Why does the dish become hot when I hear when my microwave oven is supplied with food to the dish. I use a rack in it will conduct the heat...

Owner's Manual (English)
Page 28
... the Power Level is loose or defective. If the oven interior light does not works: • the light bulb is programmed properly. If arcing (sparks) occur: • be sure microwavable dishes were used. • be sure wire twist ties weren't used. • be sure oven wasn't operated when empty. • make sure metal rack (if used to prevent overcooking. MAINTENANCE BEFORE CALLING FOR SERVICE Check the following list to...
... the Power Level is loose or defective. If the oven interior light does not works: • the light bulb is programmed properly. If arcing (sparks) occur: • be sure microwavable dishes were used. • be sure wire twist ties weren't used. • be sure oven wasn't operated when empty. • make sure metal rack (if used to prevent overcooking. MAINTENANCE BEFORE CALLING FOR SERVICE Check the following list to...
Owner's Manual (English)
Page 29
... cost of repair or replacement of the product. Parts: 1 Year from the Date of Purchase. THIS LIMITED WARRANTY DOES NOT APPLY TO: 1. Magnetron: 10 Years from the Date of Purchase. LG OVER-THE-RANGE MICROWAVE OVEN LIMITED WARRANTY - USA LG Electronics Inc. WARRANTY PERIOD: Model: LMV1680WW/BB/ST Labor: 1 Year from the menu; Please have product type (Microwave) and ZIP code ready. THIS WARRANTY IS IN LIEU...
... cost of repair or replacement of the product. Parts: 1 Year from the Date of Purchase. THIS LIMITED WARRANTY DOES NOT APPLY TO: 1. Magnetron: 10 Years from the Date of Purchase. LG OVER-THE-RANGE MICROWAVE OVEN LIMITED WARRANTY - USA LG Electronics Inc. WARRANTY PERIOD: Model: LMV1680WW/BB/ST Labor: 1 Year from the menu; Please have product type (Microwave) and ZIP code ready. THIS WARRANTY IS IN LIEU...
Specification (English)
Page 2
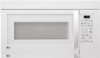
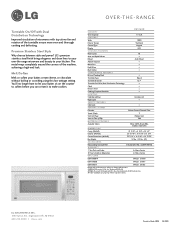
...E AT U R E S Watts 1000 Exterior Design Traditional Control Type Keypad Display LED COOKING FEATURES Power Levels 10 Auto and Rapid Defrost Reheat Auto Reheat Add 30 Seconds More/Less Hold/Warm Melt/Soften CONVENIENCE FEATURES Bi-Level Cooking Rack Turntable Type Round Turntable Diameter 12.7" Turntable On/Off w/Dual Distribution Technology Clock Kitchen Timer Cooking Complete Reminder LIGHTING Cooktop Lighting Incandescent Night Light SAFETY FEATURES Child Lock VENTING SYSTEM Filtration Carbon Coated Charcoal Filter Speed (Step) 2 Vent Grill Type Vent Air...
...E AT U R E S Watts 1000 Exterior Design Traditional Control Type Keypad Display LED COOKING FEATURES Power Levels 10 Auto and Rapid Defrost Reheat Auto Reheat Add 30 Seconds More/Less Hold/Warm Melt/Soften CONVENIENCE FEATURES Bi-Level Cooking Rack Turntable Type Round Turntable Diameter 12.7" Turntable On/Off w/Dual Distribution Technology Clock Kitchen Timer Cooking Complete Reminder LIGHTING Cooktop Lighting Incandescent Night Light SAFETY FEATURES Child Lock VENTING SYSTEM Filtration Carbon Coated Charcoal Filter Speed (Step) 2 Vent Grill Type Vent Air...


