
Owners Manual
Page 3
... out Ventilation 10 Glass touch Controller 10 Clock 10 Child Lock 10 Light Hi/Low/Off 11 Energy Saving 11 Turntable On/Off 11 Vent On/Off 11 Vent 4 Speed 11 Add 30 Sec 11 Microwave Power Levels 12 Custom Set 12 Multi -Stage Cooking 12 12 Cooking Guide for Sensor Cook...
... out Ventilation 10 Glass touch Controller 10 Clock 10 Child Lock 10 Light Hi/Low/Off 11 Energy Saving 11 Turntable On/Off 11 Vent On/Off 11 Vent 4 Speed 11 Add 30 Sec 11 Microwave Power Levels 12 Custom Set 12 Multi -Stage Cooking 12 12 Cooking Guide for Sensor Cook...
Owners Manual
Page 4
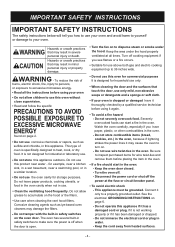
... all times. CAUTION Hazards or unsafe practices that may result in safety switches on the hood or the filters. • Use care when cleaning the vent hood filters. Do not allow children to use this oven without close supervision. • Read and follow the specific PRECAUTIONS TO AVOID POSSIBLE EXPOSURE TO...
... all times. CAUTION Hazards or unsafe practices that may result in safety switches on the hood or the filters. • Use care when cleaning the vent hood filters. Do not allow children to use this oven without close supervision. • Read and follow the specific PRECAUTIONS TO AVOID POSSIBLE EXPOSURE TO...
Owners Manual
Page 7
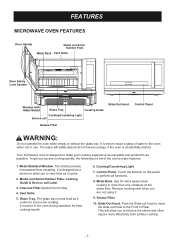
...of the oven's basic features: 1. FEATURES MICROWAVE OVEN FEATURES Door Handle Model and Serial Number Plate Metal Rack Vent Grille Door Safety Lock System Window with Metal Shield Glass Tray Cooking Guide Cooktop/Countertop Light Serivce call Label 3. Metal Shielded ...Window. Vent Grille 5. The glass tray moves food as it . 9. Charcoal Filter (behind Vent Grille) 4. This will safely absorb all functions. 8. Control Panel. Use for extra space when ...
...of the oven's basic features: 1. FEATURES MICROWAVE OVEN FEATURES Door Handle Model and Serial Number Plate Metal Rack Vent Grille Door Safety Lock System Window with Metal Shield Glass Tray Cooking Guide Cooktop/Countertop Light Serivce call Label 3. Metal Shielded ...Window. Vent Grille 5. The glass tray moves food as it . 9. Charcoal Filter (behind Vent Grille) 4. This will safely absorb all functions. 8. Control Panel. Use for extra space when ...
Owners Manual
Page 9
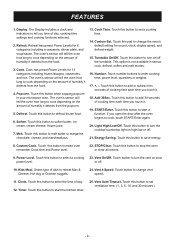
.... Touch button to reheat Mac & Cheese, Hot dog or Chicken nuggets. 24. The oven's sensor will tell the oven how long to change vent speed. 11. Cook Time. Touch this button to cook, touch START/Enter again. 20. Number. Clock. FEATURES 1. The Display includes a clock... 12. START/Enter. Touch this button to start the kitchen timer. 25. STOP/Clear. Touch this button to select a cooking 23. Vent On/Off. Kids Meal. Vent 4 Speed. Touch button to enter cooking time, power level, quantities or weights. 17. +, -. Touch this button to enter the time...
.... Touch button to reheat Mac & Cheese, Hot dog or Chicken nuggets. 24. The oven's sensor will tell the oven how long to change vent speed. 11. Cook Time. Touch this button to cook, touch START/Enter again. 20. Number. Clock. FEATURES 1. The Display includes a clock... 12. START/Enter. Touch this button to start the kitchen timer. 25. STOP/Clear. Touch this button to select a cooking 23. Vent On/Off. Kids Meal. Vent 4 Speed. Touch button to enter cooking time, power level, quantities or weights. 17. +, -. Touch this button to enter the time...
Owners Manual
Page 11
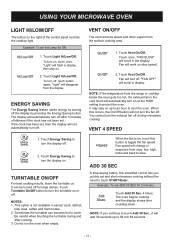
...4 times. Fan will automatically turn off . Touch Turntable On/Off button to 99 min 59 seconds. - 11 - The display will turn off . VENT ON/OFF The vent removes steam and other vapors from the display. When this occurs, the On/Off button will change in sensor cook, defrost, kids meal, soften... then stay on slow speed. 2. ADD 30 SEC A time-saving button, this button to touch START/Enter. To turn off for ON 1. Touch Vent On/Off. The oven begins cooking and the display shows time counting down. Example: To set ADD 30 SEC for 2 minutes. TURNTABLE ON/OFF For...
...4 times. Fan will automatically turn off . Touch Turntable On/Off button to 99 min 59 seconds. - 11 - The display will turn off . VENT ON/OFF The vent removes steam and other vapors from the display. When this occurs, the On/Off button will change in sensor cook, defrost, kids meal, soften... then stay on slow speed. 2. ADD 30 SEC A time-saving button, this button to touch START/Enter. To turn off for ON 1. Touch Vent On/Off. The oven begins cooking and the display shows time counting down. Example: To set ADD 30 SEC for 2 minutes. TURNTABLE ON/OFF For...
Owners Manual
Page 14
... or reheat function, use Cook Time to heat. When the internal sensor detects a certain amount of the container should be covered loosely with lids or vented plastic wrap. 2. The glass tray and the outside of the cooking container and the inside of moisture turning into steam can mislead the sensor. 5. At...
... or reheat function, use Cook Time to heat. When the internal sensor detects a certain amount of the container should be covered loosely with lids or vented plastic wrap. 2. The glass tray and the outside of the cooking container and the inside of moisture turning into steam can mislead the sensor. 5. At...
Owners Manual
Page 15
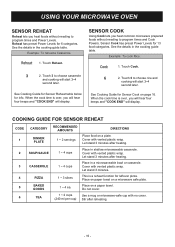
...casserole. COOKING GUIDE FOR SENSOR REHEAT CODE 1 CATEGORY DINNER PLATE RECOMMENDED AMOUNTS 1 ~ 2 servings DIRECTIONS Place food on a paper towel. Cover with vented plastic wrap. Touch 6 to choose rice and cooking will display. Let stand 3 minutes. 4 PIZZA 1 ~ 3 slices This is over , ...needing to choose casserole and cooking will display. Place on a plate. Touch Reheat. Let stand 3 minutes after reheating. - 15 - Cover with vented plastic wrap. See Cooking Guide for 6 categories. Cover with no cover. (240 ml per cup) Stir after heating. 3 CASSEROLE 1 ~ ...
...casserole. COOKING GUIDE FOR SENSOR REHEAT CODE 1 CATEGORY DINNER PLATE RECOMMENDED AMOUNTS 1 ~ 2 servings DIRECTIONS Place food on a paper towel. Cover with vented plastic wrap. Touch 6 to choose rice and cooking will display. Let stand 3 minutes. 4 PIZZA 1 ~ 3 slices This is over , ...needing to choose casserole and cooking will display. Place on a plate. Touch Reheat. Let stand 3 minutes after reheating. - 15 - Cover with vented plastic wrap. See Cooking Guide for 6 categories. Cover with no cover. (240 ml per cup) Stir after heating. 3 CASSEROLE 1 ~ ...
Owners Manual
Page 16
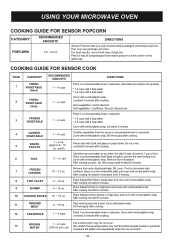
...oven 3 minutes. 8 FISH FILLET 4 ~ 16 oz. 9 SHRIMP 4 ~ 16 oz. 10 CHICKEN PIECES 16 ~ 32 oz. each) Pierce skin with vented plastic wrap. After cooking, let stand 2 minutes. Do not cover. (Be careful! After cooking, let stand in a microwaveable bowl or casserole. Sometimes liquids ...heated in microwave-safe container, place on paper towel. Cover with a fork and place on a microwaveable plate and cover with vented plastic wrap. After cooking, let stand 2 minutes. USING YOUR MICROWAVE OVEN COOKING GUIDE FOR SENSOR POPCORN CATEGORY POPCORN RECOMMENDED AMOUNTS 2.0...
...oven 3 minutes. 8 FISH FILLET 4 ~ 16 oz. 9 SHRIMP 4 ~ 16 oz. 10 CHICKEN PIECES 16 ~ 32 oz. each) Pierce skin with vented plastic wrap. After cooking, let stand 2 minutes. Do not cover. (Be careful! After cooking, let stand in a microwaveable bowl or casserole. Sometimes liquids ...heated in microwave-safe container, place on paper towel. Cover with a fork and place on a microwaveable plate and cover with vented plastic wrap. After cooking, let stand 2 minutes. USING YOUR MICROWAVE OVEN COOKING GUIDE FOR SENSOR POPCORN CATEGORY POPCORN RECOMMENDED AMOUNTS 2.0...
Owners Manual
Page 20
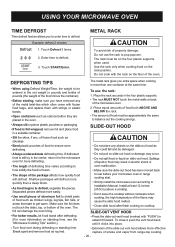
...start . • Strictly install the microwave oven according to ensure even defrosting. • Always underestimate defrosting time. SLIDE-OUT VENT HOOD • Press the slide-out vent hood (marked with the rack on the floor of food such as rquired. Enter time to defrost. The rack must be ...clicks into place. • Extension of liquid or food may occur. • Do not spill food or liquid on cooktop. Spillage of the slide-out vent hood allows more information on the rack position. Touch Defrost 3 times. 2 0 0 2. Use the rack only when cooking food on standing time, see...
...start . • Strictly install the microwave oven according to ensure even defrosting. • Always underestimate defrosting time. SLIDE-OUT VENT HOOD • Press the slide-out vent hood (marked with the rack on the floor of food such as rquired. Enter time to defrost. The rack must be ...clicks into place. • Extension of liquid or food may occur. • Do not spill food or liquid on cooktop. Spillage of the slide-out vent hood allows more information on the rack position. Touch Defrost 3 times. 2 0 0 2. Use the rack only when cooking food on standing time, see...
Owners Manual
Page 21
Poached fish needs a microwavable lid or vented plastic wrap. - HI 41/2-51/2 minutes Brush with waxed paper to keep the coating crisp and the sauce from getting watery. - The time for even ... TIPS GETTING THE BEST COOKING RESULTS To get the best results from your microwave oven, read and follow the guidelines below provides specific directions with vented plastic wrap.
Poached fish needs a microwavable lid or vented plastic wrap. - HI 41/2-51/2 minutes Brush with waxed paper to keep the coating crisp and the sauce from getting watery. - The time for even ... TIPS GETTING THE BEST COOKING RESULTS To get the best results from your microwave oven, read and follow the guidelines below provides specific directions with vented plastic wrap.
Owners Manual
Page 22
... time to retain crispness. • Avoid overcooking by using the minimum suggested time. Uncover foods to add the spreads. Shield thin or bony portions with VENTED plastic wrap or a microwavable lid. • Cover foods to retain moisture. Defrost completely. - Trim off excess fat to avoid splattering. - Cooking Sauces: Tips and Techniques...
... time to retain crispness. • Avoid overcooking by using the minimum suggested time. Uncover foods to add the spreads. Shield thin or bony portions with VENTED plastic wrap or a microwavable lid. • Cover foods to retain moisture. Defrost completely. - Trim off excess fat to avoid splattering. - Cooking Sauces: Tips and Techniques...

Owners Manual
Page 23
... defrosted (4 oz. each ) 2 links HI 4 links 6 links 10 links (8 oz. each) 2 chops 4 chops POWER LEVEL COOKING TIME DIRECTIONS Form patties with waxed paper. Cover with vented plastic 18-20 minutes wrap. RARE(135°F) Turn meat over halfway through cooking. Let stand covered with waxed 12-13 minutes paper. 5 per pound...
... defrosted (4 oz. each ) 2 links HI 4 links 6 links 10 links (8 oz. each) 2 chops 4 chops POWER LEVEL COOKING TIME DIRECTIONS Form patties with waxed paper. Cover with vented plastic 18-20 minutes wrap. RARE(135°F) Turn meat over halfway through cooking. Let stand covered with waxed 12-13 minutes paper. 5 per pound...
Owners Manual
Page 25
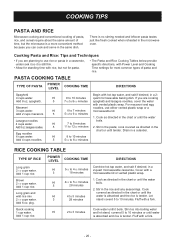
... and the rice is tender. For macaroni and egg noodles, use rice or pasta in the chart or until the HI 4 to use either vented plastic wrap or a microwavable lid. 1. Brown 2 1/2 cups water. PASTA COOKING TABLE TYPE OF PASTA POWER LEVEL COOKING TIME DIRECTIONS Spaghetti 4 ...cups water. HI Add 2 cups macaroni. 5 Lasagna noodles 4 cups water. Add 1 cup rice. Fluff with vented plastic wrap. Add 6 oz. Add 1 cup rice. Fluff with a fork. There is no stirring needed and leftover pasta tastes just like fresh ...
... and the rice is tender. For macaroni and egg noodles, use rice or pasta in the chart or until the HI 4 to use either vented plastic wrap or a microwavable lid. 1. Brown 2 1/2 cups water. PASTA COOKING TABLE TYPE OF PASTA POWER LEVEL COOKING TIME DIRECTIONS Spaghetti 4 ...cups water. HI Add 2 cups macaroni. 5 Lasagna noodles 4 cups water. Add 1 cup rice. Fluff with vented plastic wrap. Add 6 oz. Add 1 cup rice. Fluff with a fork. There is no stirring needed and leftover pasta tastes just like fresh ...
Owners Manual
Page 26
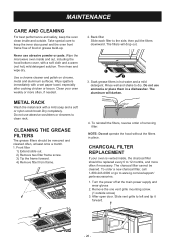
... go to keep the oven clean inside and outside screw) 3. Turn the power off at least once a month. 1. Take special care to www.lg.com/us/support/ parts-accessories. 1. Then rinse and wipe dry. METAL RACK Wash the metal rack with a wet paper towel, especially after cooking.... 2) Remove two filter frame screw. 3) Tip the frame forward. 4) Remove filter from frame. 2. The aluminum will drop out. 1 2 3. Clean your oven is vented inside and out, including the hood bottom cover, with a soft cloth and a warm (not hot) mild detergent solution. The charcoal filter cannot be replaced every...
... go to keep the oven clean inside and outside screw) 3. Turn the power off at least once a month. 1. Take special care to www.lg.com/us/support/ parts-accessories. 1. Then rinse and wipe dry. METAL RACK Wash the metal rack with a wet paper towel, especially after cooking.... 2) Remove two filter frame screw. 3) Tip the frame forward. 4) Remove filter from frame. 2. The aluminum will drop out. 1 2 3. Clean your oven is vented inside and out, including the hood bottom cover, with a soft cloth and a warm (not hot) mild detergent solution. The charcoal filter cannot be replaced every...
Owners Manual
Page 27
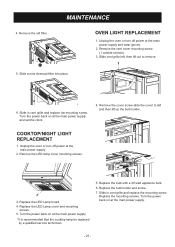
.... Remove the LED lamp cover mounting screws. 2 1 3. Replace the LED Lamp board. 4. Replace the LED Lamp cover and mounting screws. 5. Slide vent grille left and then lift up the bulb holder. COOKTOP/NIGHT LIGHT REPLACEMENT 1. Remove the old filter. 1 2 5. Remove the... vent cover mounting screw. (1 outside screws) 3. Replace the bulb with a 30 watt appliance bulb. 6. Slide in vent grille and replace the mounting screw. OVEN LIGHT REPLACEMENT 1. Turn the power back on at the main...
.... Remove the LED lamp cover mounting screws. 2 1 3. Replace the LED Lamp board. 4. Replace the LED Lamp cover and mounting screws. 5. Slide vent grille left and then lift up the bulb holder. COOKTOP/NIGHT LIGHT REPLACEMENT 1. Remove the old filter. 1 2 5. Remove the... vent cover mounting screw. (1 outside screws) 3. Replace the bulb with a 30 watt appliance bulb. 6. Slide in vent grille and replace the mounting screw. OVEN LIGHT REPLACEMENT 1. Turn the power back on at the main...
Owners Manual
Page 28
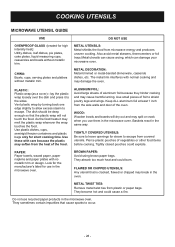
... paper plates with normal cooking and may break in the oven. DO NOT USE METAL UTENSILS: Metal shields the food from plastic or paper bags. Vent plastic wrap by turning back one edge slightly to allow excess steam to shield poultry legs and wings. ALUMINUM FOIL: Avoid large sheets of aluminum...
... paper plates with normal cooking and may break in the oven. DO NOT USE METAL UTENSILS: Metal shields the food from plastic or paper bags. Vent plastic wrap by turning back one edge slightly to allow excess steam to shield poultry legs and wings. ALUMINUM FOIL: Avoid large sheets of aluminum...
Owners Manual
Page 29
...for additional time after cooking. This appearance is operating? I microwave food in my microwave oven? Sometimes the door of the air exhaust vent? Why does the dish become hot when I thought that this should be sure to repop unpopped kernels. Do not use the preprogrammed ...my microwave oven so that food should not happen. Never allow metal to a "pop" every one or two seconds. Is this steam out the top vent. Q. Yes. FAQS FREQUENTLY ASKED QUESTIONS Q. Can I use a rack in glass utensils. A. You hear the sound of your oven. Q. As the...
...for additional time after cooking. This appearance is operating? I microwave food in my microwave oven? Sometimes the door of the air exhaust vent? Why does the dish become hot when I thought that this should be sure to repop unpopped kernels. Do not use the preprogrammed ...my microwave oven so that food should not happen. Never allow metal to a "pop" every one or two seconds. Is this steam out the top vent. Q. Yes. FAQS FREQUENTLY ASKED QUESTIONS Q. Can I use a rack in glass utensils. A. You hear the sound of your oven. Q. As the...


