

Owner's Manual
Page 31
...effective only when used in the Operating Guide, accident, vermin, fire, flood, improper installation, acts of God, unauthorized modification or ... repair or replacement under these excluded circumstances shall be submitted at LG's option, if it proves to be defective in material or... : http://us .lgservice.com TO CONTACT LG ELECTRONICS BY MAIL: LG Customer Interactive Center P. O. LG WILL NOT BE LIABLE FOR ANY INCIDENTAL, ...other than intended purpose. LG MICROWAVE OVEN LIMITED WARRANTY - A copy of your Sales Receipt to deliver, pick up, and/or install the product, instruct,...
...effective only when used in the Operating Guide, accident, vermin, fire, flood, improper installation, acts of God, unauthorized modification or ... repair or replacement under these excluded circumstances shall be submitted at LG's option, if it proves to be defective in material or... : http://us .lgservice.com TO CONTACT LG ELECTRONICS BY MAIL: LG Customer Interactive Center P. O. LG WILL NOT BE LIABLE FOR ANY INCIDENTAL, ...other than intended purpose. LG MICROWAVE OVEN LIMITED WARRANTY - A copy of your Sales Receipt to deliver, pick up, and/or install the product, instruct,...
Installation Instructions
Page 11
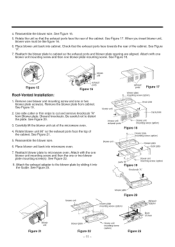
...ireS. eeFigure18. See Figure 21. 5. Reassemble the blower wire. 6. See Figure 22. 8. blower unit Figure 15 Roof-Vented Installation: exhaust ports Figure 16 exhaust ports Figure 17 blower plate ___ m£unting screw (option) 1. Remove one blower unit mounting ... Figure 20 blower unit _'__ _j o '?-. ...... Remove the blower plate from Blower plate. Discard knockouts. Place blower unit back into the Guide. Reattach blower plate to cut and remove knockouts "A" from cabinet. blower unit blower plate 31ate blower unit exhauspt orts _ blower unit mountinsgcrew(option...
...ireS. eeFigure18. See Figure 21. 5. Reassemble the blower wire. 6. See Figure 22. 8. blower unit Figure 15 Roof-Vented Installation: exhaust ports Figure 16 exhaust ports Figure 17 blower plate ___ m£unting screw (option) 1. Remove one blower unit mounting ... Figure 20 blower unit _'__ _j o '?-. ...... Remove the blower plate from Blower plate. Discard knockouts. Place blower unit back into the Guide. Reattach blower plate to cut and remove knockouts "A" from cabinet. blower unit blower plate 31ate blower unit exhauspt orts _ blower unit mountinsgcrew(option...

Installation Instructions
Page 15
Before using the screws to attach the plate to continue. After completing the installation of the box cutout for installation. • Return to step 5, item 3 to the wall. Figure 30 Exhaust Adapter _ Damper Slide exhaust adapter into the house duct. Take ... it will assure proper alignment for the rear wall duct. • Attach the exhaust adapter to assure the damper hinge is installed so that the damper swings freely. • Carefully guide the exhaust adapter, now attached to the mounting plate, into guideson rear panel. ___r_"_ /¢_" _J _, __,__%z._ __ "_ _1...
Before using the screws to attach the plate to continue. After completing the installation of the box cutout for installation. • Return to step 5, item 3 to the wall. Figure 30 Exhaust Adapter _ Damper Slide exhaust adapter into the house duct. Take ... it will assure proper alignment for the rear wall duct. • Attach the exhaust adapter to assure the damper hinge is installed so that the damper swings freely. • Carefully guide the exhaust adapter, now attached to the mounting plate, into guideson rear panel. ___r_"_ /¢_" _J _, __,__%z._ __ "_ _1...


