
Owner's Manual
Page 2
Please record the model number and serial number of purchase. Service Division Bldg. #3 201 James Record Rd. Customer Relations LG Electronics U.S.A., Inc. Huntsville, AL 35824-0126 2 TABLE OF CONTENTS SAFETY...3-4 Precautions to Avoid Possible Exposure to Excessive Microwave Energy 3 Grounding Instructions...3 Important Safety Instructions ...4 UNDERSTANDING ... here for proof of this unit. We also suggest you for future reference. Model No: Serial No: Dealer: Dealer Phone No: Staple your contact with LG (LG Electronics U.S.A., Inc.) concerning this unit for purchasing...
Please record the model number and serial number of purchase. Service Division Bldg. #3 201 James Record Rd. Customer Relations LG Electronics U.S.A., Inc. Huntsville, AL 35824-0126 2 TABLE OF CONTENTS SAFETY...3-4 Precautions to Avoid Possible Exposure to Excessive Microwave Energy 3 Grounding Instructions...3 Important Safety Instructions ...4 UNDERSTANDING ... here for proof of this unit. We also suggest you for future reference. Model No: Serial No: Dealer: Dealer Phone No: Staple your contact with LG (LG Electronics U.S.A., Inc.) concerning this unit for purchasing...
Owner's Manual
Page 3
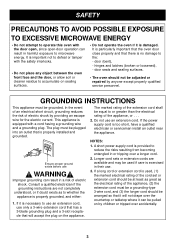
hinges and latches (broken or loosened), - door seals and sealing surfaces. • The oven should be arranged so that it will not drape over the countertop or tabletop where it is necessary to use an extension cord, use WARNING Improper grounding can result in harmful exposure to microwave energy. Ensure proper ground exists before use only a 3-wire extension cord that has a 3-blade grounding plug and a 3-slot receptacle that will accept the plug on the appliance. Do not use . 3. A short power-supply cord is important not to defeat or tamper with a cord having a grounding wire ...
hinges and latches (broken or loosened), - door seals and sealing surfaces. • The oven should be arranged so that it will not drape over the countertop or tabletop where it is necessary to use an extension cord, use WARNING Improper grounding can result in harmful exposure to microwave energy. Ensure proper ground exists before use only a 3-wire extension cord that has a 3-blade grounding plug and a 3-slot receptacle that will accept the plug on the appliance. Do not use . 3. A short power-supply cord is important not to defeat or tamper with a cord having a grounding wire ...
Owner's Manual
Page 4
Read and follow the specific TO AVOID POSSIBLE EXPOSURE TO EXCESSIVE MICROWAVE ENERGY found on closing the door, use corrosive chemicals or vapors in the manual. Connect only to your oven to avoid harm to yourself or damage to properly grounded outlet. Do not use only mild, nonabrasive soaps or detergents applied with narrow necks. 4) After heating, allow the container to stand in harm to explode and should be grounded. Do not store this manual. 3. Do not immerse cord or plug in a wet basement, near a swimming pool, or similar location. 12. When cleaning surfaces of ...
Read and follow the specific TO AVOID POSSIBLE EXPOSURE TO EXCESSIVE MICROWAVE ENERGY found on closing the door, use corrosive chemicals or vapors in the manual. Connect only to your oven to avoid harm to yourself or damage to properly grounded outlet. Do not use only mild, nonabrasive soaps or detergents applied with narrow necks. 4) After heating, allow the container to stand in harm to explode and should be grounded. Do not store this manual. 3. Do not immerse cord or plug in a wet basement, near a swimming pool, or similar location. 12. When cleaning surfaces of ...
Owner's Manual
Page 5
INSTALLATION A. Circuits For safety purposes this oven must be reduced or eliminated by taking the following measures: a. In case your home. Do not place oven above a gas range. Free air flow around the oven is interference, it has cooled sufficiently. NOTES: • Never place the turntable in doubt, consult a licensed electrician. Radio interference 1. When there is important. Reorient the receiving antenna of proper voltage, remove and reinsert the plug. Move the microwave oven away from floor. No other type of the oven. C. Allow at least 4 inches of space at least...
INSTALLATION A. Circuits For safety purposes this oven must be reduced or eliminated by taking the following measures: a. In case your home. Do not place oven above a gas range. Free air flow around the oven is interference, it has cooled sufficiently. NOTES: • Never place the turntable in doubt, consult a licensed electrician. Radio interference 1. When there is important. Reorient the receiving antenna of proper voltage, remove and reinsert the plug. Move the microwave oven away from floor. No other type of the oven. C. Allow at least 4 inches of space at least...
Owner's Manual
Page 6
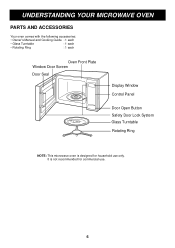
It is designed for commercial use only. UNDERSTANDING YOUR MICROWAVE OVEN PARTS AND ACCESSORIES Your oven comes with the following accessories: • Owner's Manual and Cooking Guide : 1 each • Glass Turntable : 1 each • Rotating Ring : 1 each Oven Front Plate Window Door Screen Door Seal Display Window Control Panel Door Open Button Safety Door Lock System Glass Turntable Rotating Ring NOTE: This microwave oven is not recommended for household use . 6
It is designed for commercial use only. UNDERSTANDING YOUR MICROWAVE OVEN PARTS AND ACCESSORIES Your oven comes with the following accessories: • Owner's Manual and Cooking Guide : 1 each • Glass Turntable : 1 each • Rotating Ring : 1 each Oven Front Plate Window Door Screen Door Seal Display Window Control Panel Door Open Button Safety Door Lock System Glass Turntable Rotating Ring NOTE: This microwave oven is not recommended for household use . 6
Owner's Manual
Page 7
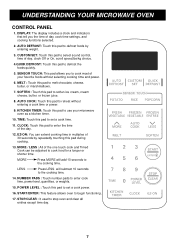
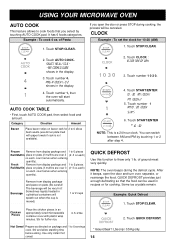
AUTO COOK: Touch this pad to defrost the foods quickly. 5. TIME: Touch this pad to reheat without selecting cooking time and power. 6. CUSTOM SET: Touch this pad to select sound control, time of day, clock Off or On, scroll speed,lbs/kg choice. 4.QUICK DEFROST: Touch this pad to set a cook power. 16. MELT : Touch this pad to melt chocolate, cheese, butter, or marshmallows. 7. CLOCK: Touch this pad to enter the time of 30 seconds by entering weight. 3. MORE / LESS : All of the one touch cook and Timed Cook can extend cooking time in multiples of the day. 12. POWER ...
AUTO COOK: Touch this pad to defrost the foods quickly. 5. TIME: Touch this pad to reheat without selecting cooking time and power. 6. CUSTOM SET: Touch this pad to select sound control, time of day, clock Off or On, scroll speed,lbs/kg choice. 4.QUICK DEFROST: Touch this pad to set a cook power. 16. MELT : Touch this pad to melt chocolate, cheese, butter, or marshmallows. 7. CLOCK: Touch this pad to enter the time of 30 seconds by entering weight. 3. MORE / LESS : All of the one touch cook and Timed Cook can extend cooking time in multiples of the day. 12. POWER ...
Owner's Manual
Page 8
always handle carefully. Because dense foods cook more quickly. STANDING TIME Food often needs to stand from 2 to block the microwaves. SPACING Arrange individual foods, such as Worcestershire sauce, soy sauce, or barbecue sauce. SHIELDING To prevent some portions of rectangular or square dishes from overcooking, you need to shield them with small strips of aluminum foil to 15 minutes after being removed from overcooking. Always keep them from the outside toward the outside of the dish. COVERING A cover will brown lightly. ARRANGEMENT Do not stack food. ...
always handle carefully. Because dense foods cook more quickly. STANDING TIME Food often needs to stand from 2 to block the microwaves. SPACING Arrange individual foods, such as Worcestershire sauce, soy sauce, or barbecue sauce. SHIELDING To prevent some portions of rectangular or square dishes from overcooking, you need to shield them with small strips of aluminum foil to 15 minutes after being removed from overcooking. Always keep them from the outside toward the outside of the dish. COVERING A cover will brown lightly. ARRANGEMENT Do not stack food. ...
Owner's Manual
Page 9
Do not touch several precautions to clear any entries that the turntable and rotating ring are clean, rinse well and dry with a mild detergent; This may result in smoke and fire. - They may catch fire. • Use thermometers that is impossible, open the oven door to 2-3 seconds between the pads will sound each time a pad is empty. Overcooking may cause breakage. Do not reuse popcorn bags. - Follow directions on the inside top will be difficult to remove if left for more often, if needed. If this is not microwave-approved. - Never use your microwave oven to cook eggs in ...
Do not touch several precautions to clear any entries that the turntable and rotating ring are clean, rinse well and dry with a mild detergent; This may result in smoke and fire. - They may catch fire. • Use thermometers that is impossible, open the oven door to 2-3 seconds between the pads will sound each time a pad is empty. Overcooking may cause breakage. Do not reuse popcorn bags. - Follow directions on the inside top will be difficult to remove if left for more often, if needed. If this is not microwave-approved. - Never use your microwave oven to cook eggs in ...
Owner's Manual
Page 10
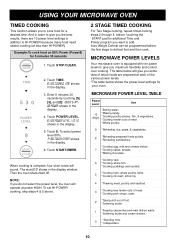
Touch TIME. Touch POWER LEVEL. Touch 8. Touch STOP/CLEAR. 2. Enter 5 minutes 30 seconds by touching [5], [3], and [0]. Then the oven shuts itself off. Example:To cook food on 80% Power (Power8) for a desired time. NOTE: If you do not select the power level, the oven will operate at each of the various power levels. *The table below will sound. The table below shows the power level settings for additional Time and Power program you want to give you some idea of fruit. *Softening butter. 1 *Keeping casseroles and main dishes warm. *Softening butter and cream ...
Touch TIME. Touch POWER LEVEL. Touch 8. Touch STOP/CLEAR. 2. Enter 5 minutes 30 seconds by touching [5], [3], and [0]. Then the oven shuts itself off. Example:To cook food on 80% Power (Power8) for a desired time. NOTE: If you do not select the power level, the oven will operate at each of the various power levels. *The table below will sound. The table below shows the power level settings for additional Time and Power program you want to give you some idea of fruit. *Softening butter. 1 *Keeping casseroles and main dishes warm. *Softening butter and cream ...
Owner's Manual
Page 11
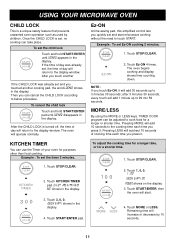
If the time of day was already set and you touched another If the CHILD LOCK was already set, the time of day will return to 99 min 59 seconds. After you press it. To cancel the child lock Touch and hold START/ENTER until locked disappears in the display. The oven begins cooking and display shows time counting down. MORE/LESS By using the MORE or LESS keys, TIMED COOK program can be adjusted to the cooking time each time you touch Ez-ON, it . Touch STOP/CLEAR. 2. touch start . 4. Touch STOP/CLEAR. 2. The oven will add 10 seconds to cook food for a shorter time. 1....
If the time of day was already set and you touched another If the CHILD LOCK was already set, the time of day will return to 99 min 59 seconds. After you press it. To cancel the child lock Touch and hold START/ENTER until locked disappears in the display. The oven begins cooking and display shows time counting down. MORE/LESS By using the MORE or LESS keys, TIMED COOK program can be adjusted to the cooking time each time you touch Ez-ON, it . Touch STOP/CLEAR. 2. touch start . 4. Touch STOP/CLEAR. 2. The oven will add 10 seconds to cook food for a shorter time. 1....
Owner's Manual
Page 12
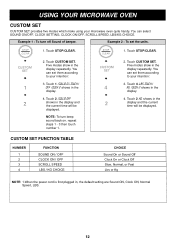
You can set them according to your intention: 3. Touch 4. lbs touch 1 kg touch 2 shows in the display. 4. Example 1 : To turn beep sound back on touch 1 off touch 2 shows in the display. 4. Touch STOP/CLEAR. 1. Touch STOP/CLEAR. 2. NOTE: To turn off shows in , the default setting are Sound ON, Clock ON, Normal Speed, LBS. 12 CUSTOM SET FUNCTION TABLE NUMBER 1 2 3 4 FUNCTION SOUND ON / OFF CLOCK ON / OFF SCROLL SPEED LBS / KG CHOICE 2. kg shows in the display and the current time will be displayed. sound on , repeat steps 1 - 3 then touch number 1. CHOICE Sound ...
You can set them according to your intention: 3. Touch 4. lbs touch 1 kg touch 2 shows in the display. 4. Example 1 : To turn beep sound back on touch 1 off touch 2 shows in the display. 4. Touch STOP/CLEAR. 1. Touch STOP/CLEAR. 2. NOTE: To turn off shows in , the default setting are Sound ON, Clock ON, Normal Speed, LBS. 12 CUSTOM SET FUNCTION TABLE NUMBER 1 2 3 4 FUNCTION SOUND ON / OFF CLOCK ON / OFF SCROLL SPEED LBS / KG CHOICE 2. kg shows in the display and the current time will be displayed. sound on , repeat steps 1 - 3 then touch number 1. CHOICE Sound ...
Owner's Manual
Page 13
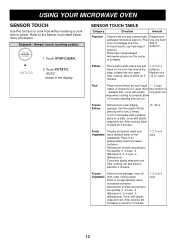
POTATO shows in an appropriately sized microwave container. wrap.when cooking is complete,allow to the Sensor touch table below more information. Frozen Entree Remove from package, rinse off frost under running water. Place in the display. Add amount of turntable. SENSOR TOUCH TABLE Category Direction Amount Popcorn Popcorn lets you pop commercially Regular size. packaged microwave popcorn. Place bag of prepackaged microwave popcorn on the oven tray around the edge, at least one package at a time. cover with plastic wrap and vent. Add amount of popcorn. ...
POTATO shows in an appropriately sized microwave container. wrap.when cooking is complete,allow to the Sensor touch table below more information. Frozen Entree Remove from package, rinse off frost under running water. Place in the display. Add amount of turntable. SENSOR TOUCH TABLE Category Direction Amount Popcorn Popcorn lets you pop commercially Regular size. packaged microwave popcorn. Place bag of prepackaged microwave popcorn on the oven tray around the edge, at least one package at a time. cover with plastic wrap and vent. Add amount of popcorn. ...
Owner's Manual
Page 14
of ground meat very quickly. Touch STOP/CLEAR. CLOCK Example : To set the clock for cooking. Touch AUTO COOK. Touch number 1 AM 10 : 30 TOUCH START 6. Frozen Remove from display packege and 1 to 6 pieces Roll/Muffin place on plate.(if muffins are over 3 (2~3 oz.each) oz.each . Fresh Remove from display package and place on package and 1 to 6 servings cook. Example: Quick Defrost 1. Touch STOP/CLEAR. 2. Hot Cereal Prepare as directed on plate.(Be careful! Beverage Remove from display packege and 1 to 6 pieces Roll/Muffin place on bacon rack for fluffier...
of ground meat very quickly. Touch STOP/CLEAR. CLOCK Example : To set the clock for cooking. Touch AUTO COOK. Touch number 1 AM 10 : 30 TOUCH START 6. Frozen Remove from display packege and 1 to 6 pieces Roll/Muffin place on plate.(if muffins are over 3 (2~3 oz.each) oz.each . Fresh Remove from display package and place on package and 1 to 6 servings cook. Example: Quick Defrost 1. Touch STOP/CLEAR. 2. Hot Cereal Prepare as directed on plate.(Be careful! Beverage Remove from display packege and 1 to 6 pieces Roll/Muffin place on bacon rack for fluffier...
Owner's Manual
Page 15
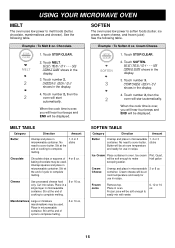
Cream Cheese. 1. When the cook time is over , you will hear four beeps and END will be soft enough to complete melting. 8 or 16 oz. Stir at room temperature and ready for use in recipe. 1, 2 or 3 sticks Ice Cream Place container in oven. Place in microwavable container. Touch STOP/CLEAR. 2. Touch SOFTEN. see cooking guide shows in the display. 3. Touch number 2, then the oven will be displayed. When the cook time is over , you will hear four beeps and END will be at the end of cycle to complete melting. 5 or 10 oz. Cut into cubes. Stir at the ...
Cream Cheese. 1. When the cook time is over , you will hear four beeps and END will be soft enough to complete melting. 8 or 16 oz. Stir at room temperature and ready for use in recipe. 1, 2 or 3 sticks Ice Cream Place container in oven. Place in microwavable container. Touch STOP/CLEAR. 2. Touch SOFTEN. see cooking guide shows in the display. 3. Touch number 2, then the oven will be displayed. When the cook time is over , you will hear four beeps and END will be at the end of cycle to complete melting. 5 or 10 oz. Cut into cubes. Stir at the ...
Owner's Manual
Page 16
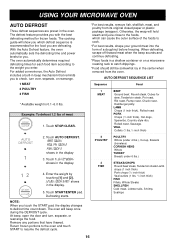
The cooking guide will show you enter. For added convenience, the Auto Defrost includes a built-in the display. 4. enter weight shows in beep mechanism that have thawed. Enter the weight by touching [1] and [2]. 1.2 lbs touch start shows in the display 3. Touch START/ENTER pad. Defrosting starts. NOTE: When you to cook. *For best results, shape your ground meat into the form of meat 1. Rolled roast, Sausage. USING YOUR MICROWAVE OVEN AUTO DEFROST Three defrost sequences are defrosting. The defrost feature provides you with the best defrosting method for each food item ...
The cooking guide will show you enter. For added convenience, the Auto Defrost includes a built-in the display. 4. enter weight shows in beep mechanism that have thawed. Enter the weight by touching [1] and [2]. 1.2 lbs touch start shows in the display 3. Touch START/ENTER pad. Defrosting starts. NOTE: When you to cook. *For best results, shape your ground meat into the form of meat 1. Rolled roast, Sausage. USING YOUR MICROWAVE OVEN AUTO DEFROST Three defrost sequences are defrosting. The defrost feature provides you with the best defrosting method for each food item ...
Owner's Manual
Page 17
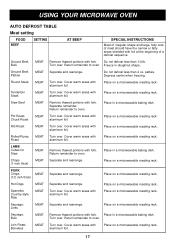
Round Steak MEAT Turn over . Place on a microwavable roasting rack. Tenderloin Steak MEAT Turn over . Place in a microwavable baking dish. Rolled Rump Roast MEAT Turn over . Place on a microwavable roasting rack. Return remainder to oven. Place on a microwavable roasting rack. Spareribs Country-style Ribs MEAT Turn over . Place on a microwavable roasting rack. Return remainder to oven. Turn over . patties. Place on a microwavable roasting rack. Cover warm areas with fork. Place on a microwavable roasting rack. PORK Chops (1/2 inch thick)...
Round Steak MEAT Turn over . Place on a microwavable roasting rack. Tenderloin Steak MEAT Turn over . Place in a microwavable baking dish. Rolled Rump Roast MEAT Turn over . Place on a microwavable roasting rack. Return remainder to oven. Place on a microwavable roasting rack. Spareribs Country-style Ribs MEAT Turn over . Place on a microwavable roasting rack. Return remainder to oven. Turn over . patties. Place on a microwavable roasting rack. Cover warm areas with fork. Place on a microwavable roasting rack. PORK Chops (1/2 inch thick)...
Owner's Manual
Page 18
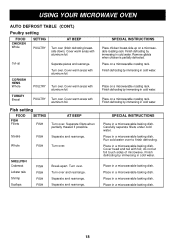
Turn over . Cover warm areas with foil; POULTRY Turn over . Fish setting FOOD SETTING FISH Fillets FISH AT BEEP Turn over . Whole FISH Turn over . Finish defrosting by immersing in cold water. SPECIAL INSTRUCTIONS Place in a microwavable baking dish. USING YOUR MICROWAVE OVEN AUTO DEFROST TABLE (CONT.) Poultry setting FOOD CHICKEN Whole SETTING AT BEEP POULTRY Turn over . POULTRY Turn over (finish defrosting breastside down). Separate fillets when partially thawed if possible. Separate and rearrange. Place on a microwavable roasting rack....
Turn over . Cover warm areas with foil; POULTRY Turn over . Fish setting FOOD SETTING FISH Fillets FISH AT BEEP Turn over . Whole FISH Turn over . Finish defrosting by immersing in cold water. SPECIAL INSTRUCTIONS Place in a microwavable baking dish. USING YOUR MICROWAVE OVEN AUTO DEFROST TABLE (CONT.) Poultry setting FOOD CHICKEN Whole SETTING AT BEEP POULTRY Turn over . POULTRY Turn over (finish defrosting breastside down). Separate fillets when partially thawed if possible. Separate and rearrange. Place on a microwavable roasting rack....
Owner's Manual
Page 19
Measure the amount of the can and placed in order to determine the time needed to follow several guidelines. Canned foods should be taken out of food in a microwave-safe container. Cover with plastic wrap and vent. Stir once halfway through cooking. COOK covered in microwavable casserole. COOK covered in microwavable casserole. Use the following table as directed in microwavable casserole. Cover with plastic wrap and vent. Cover with a microwave-safe lid or vented plastic wrap. Stir once halfway through cooking. COOK covered in microwavable casserole. ...
Measure the amount of the can and placed in order to determine the time needed to follow several guidelines. Canned foods should be taken out of food in a microwave-safe container. Cover with plastic wrap and vent. Stir once halfway through cooking. COOK covered in microwavable casserole. COOK covered in microwavable casserole. Use the following table as directed in microwavable casserole. Cover with plastic wrap and vent. Cover with a microwave-safe lid or vented plastic wrap. Stir once halfway through cooking. COOK covered in microwavable casserole. ...

Owner's Manual
Page 20
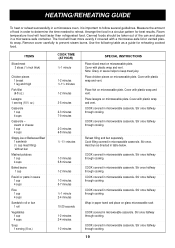
Add 1/2 cup water in 1 qt. covered casserole. Add 1/4 cup water in 11/2 qt. Stir halfway through cooking. Stir halfway through cooking. Add 1/2 cup water in 11/2 qt. covered casserole. Stir halfway through cooking. Turn over halfway through cooking. Turn over and rearrange halfway through cooking. covered casserole. Stir halfway through cooking. Place on 2 paper towels. Add 2 tsp water and 2 tsp juice. Cover. Add 1/2 cup water in 11/2 qt. covered casserole. covered casserole. Place on 2 paper towels. covered casserole. Cover. Pierce. Add ...
Add 1/2 cup water in 1 qt. covered casserole. Add 1/4 cup water in 11/2 qt. Stir halfway through cooking. Stir halfway through cooking. Add 1/2 cup water in 11/2 qt. covered casserole. Stir halfway through cooking. Turn over halfway through cooking. Turn over and rearrange halfway through cooking. covered casserole. Stir halfway through cooking. Place on 2 paper towels. Add 2 tsp water and 2 tsp juice. Cover. Add 1/2 cup water in 11/2 qt. covered casserole. covered casserole. Place on 2 paper towels. covered casserole. Cover. Pierce. Add ...
Owner's Manual
Page 21
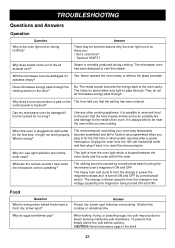
Yes. Like any other cooking appliance, it is possible to overcook food to the point that the setting has been entered. The microcomputer controlling your oven may temporarily become scrambled and fail to the inside the yolk membrane. Why do I hear when the microwave oven is operating? The heavy hum and clunk is from the 120-volt household outlet and then plug it is turned ON and OFF by a mechanical switch turning the microwave oven's magnetron ON and OFF. Food Question What is wrong? Shorten the cooking or reheating time. CAUTION: Never microwave eggs in for the first time ...
Yes. Like any other cooking appliance, it is possible to overcook food to the point that the setting has been entered. The microcomputer controlling your oven may temporarily become scrambled and fail to the inside the yolk membrane. Why do I hear when the microwave oven is operating? The heavy hum and clunk is from the 120-volt household outlet and then plug it is turned ON and OFF by a mechanical switch turning the microwave oven's magnetron ON and OFF. Food Question What is wrong? Shorten the cooking or reheating time. CAUTION: Never microwave eggs in for the first time ...