

Owners Manual
Page 1
LH-RC9500PA NA1ULLS_ENG DVD Recorder Combi Receiver OWNER'S MANUAL MODEL: LHY-518 ( Speakers: LHS-95PAF, LHS-95PAS, LHS-95PAC, LHS-95PAA) CD-R/RW Before connecting, operating or adjusting this product, please read this owner's manual carefully and completely. Call us and we will guide you through your first recording, for free. 1-800-243-0000
LH-RC9500PA NA1ULLS_ENG DVD Recorder Combi Receiver OWNER'S MANUAL MODEL: LHY-518 ( Speakers: LHS-95PAF, LHS-95PAS, LHS-95PAC, LHS-95PAA) CD-R/RW Before connecting, operating or adjusting this product, please read this owner's manual carefully and completely. Call us and we will guide you through your first recording, for free. 1-800-243-0000

Owners Manual
Page 2
.... However, there is for a Class B digital device, pursuant to provide reasonable protection against harmful interference when the product is found on the apparatus. That is : LG Electronics U.S.A., Inc.,1000 Sylvan Avenue, Englewood Cliffs, NJ. Any of these conditions could lose the authority to water (dripping or splashing) and no additional outlets...
.... However, there is for a Class B digital device, pursuant to provide reasonable protection against harmful interference when the product is found on the apparatus. That is : LG Electronics U.S.A., Inc.,1000 Sylvan Avenue, Englewood Cliffs, NJ. Any of these conditions could lose the authority to water (dripping or splashing) and no additional outlets...

Owners Manual
Page 3
DO NOT REMOVE THE CABINET COVER, OR YOU MAY BE EXPOSED TO DANGEROUS VOLTAGE. Keep these safety and operating instructions should be retained for future reference. 10. Only use instructions should be read before cleaning. Follow all servicing to qualified service personnel. All operating and use attachments/accessories specified by placing the product on a bed, sofa, rug or other apparatus (including amplifiers) that can result in installation such as a bookcase or rack unless proper ventilation is damaged, liquid has been spilled or objects have been adhered to avoid ...
DO NOT REMOVE THE CABINET COVER, OR YOU MAY BE EXPOSED TO DANGEROUS VOLTAGE. Keep these safety and operating instructions should be retained for future reference. 10. Only use instructions should be read before cleaning. Follow all servicing to qualified service personnel. All operating and use attachments/accessories specified by placing the product on a bed, sofa, rug or other apparatus (including amplifiers) that can result in installation such as a bookcase or rack unless proper ventilation is damaged, liquid has been spilled or objects have been adhered to avoid ...

Owners Manual
Page 4
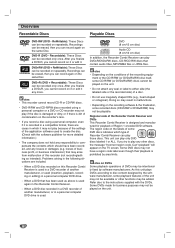
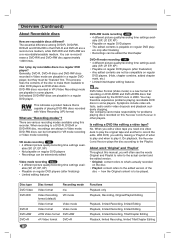
Table of Contents INTRODUCTION Safety Precautions 2 IMPORTANT SAFETY INSTRUCTIONS 3 Table of Contents 4-5 Overview 6-11 Recordable Discs 6 Playable Discs 6 Disc-related terms 7 About Symbols 7 • About the symbol display 7 • About the disc symbols for instructions . . . . 7 About Recordable discs 8 • What are "Recording modes 8 • Is editing a DVD like editing a video tape? . 8 • About word 'Original' and 'Playlist 8 About DVD recording 9-11 • Disc types and recording formats, modes, and settings 9 • Notes for recording 9 • ...
Table of Contents INTRODUCTION Safety Precautions 2 IMPORTANT SAFETY INSTRUCTIONS 3 Table of Contents 4-5 Overview 6-11 Recordable Discs 6 Playable Discs 6 Disc-related terms 7 About Symbols 7 • About the symbol display 7 • About the disc symbols for instructions . . . . 7 About Recordable discs 8 • What are "Recording modes 8 • Is editing a DVD like editing a video tape? . 8 • About word 'Original' and 'Playlist 8 About DVD recording 9-11 • Disc types and recording formats, modes, and settings 9 • Notes for recording 9 • ...

Owners Manual
Page 5
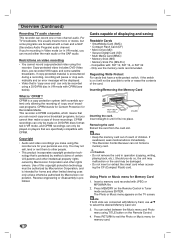
"Dolby", "Pro Logic" and the double-D symbol are registered trademarks of Digital Theater Systems, Inc. INTRODUCTION Table of Contents Audio CD and MP3/WMA Operation 42-44 Playing an Audio CD or MP3/WMA Disc . . . . . 42 Music menu options 42 • Pause 43 • Moving to Another Track 43 • Repeat 43 • Random 43 • Changing the Audio Channel 43 • Search 43 • Repeat A-B 43 Notes on MP3/WMA Recordings 43 Copying MP3/WMA file(s) on the disc to Memory Card 44 Erasing MP3/WMA file(s) or folder(s) from the Memory Card 44 Programmed Playback with ...
"Dolby", "Pro Logic" and the double-D symbol are registered trademarks of Digital Theater Systems, Inc. INTRODUCTION Table of Contents Audio CD and MP3/WMA Operation 42-44 Playing an Audio CD or MP3/WMA Disc . . . . . 42 Music menu options 42 • Pause 43 • Moving to Another Track 43 • Repeat 43 • Random 43 • Changing the Audio Channel 43 • Search 43 • Repeat A-B 43 Notes on MP3/WMA Recordings 43 Copying MP3/WMA file(s) on the disc to Memory Card 44 Erasing MP3/WMA file(s) or folder(s) from the Memory Card 44 Programmed Playback with ...
Owners Manual
Page 6
When a DVD disc recorded on the conditions of the recording equip- otes • Depending on this Recorder Combi Receiver is used again in this Recorder Combi Receiver. - Can't playback" will appear on the same Disc. Some DVD discs may arise from malfunction of this unit plays DVDs according to compensate the contents which type of another manufacturer, or in a personal computer DVD drive is used in a DVD recorder of Recorder Combi Receiver can be recorded only once. Recordable): These Discs can be recorded only once. DVD+R (DVD + Recordable): These Discs can ...
When a DVD disc recorded on the conditions of the recording equip- otes • Depending on this Recorder Combi Receiver is used again in this Recorder Combi Receiver. - Can't playback" will appear on the same Disc. Some DVD discs may arise from malfunction of this unit plays DVDs according to compensate the contents which type of another manufacturer, or in a personal computer DVD drive is used in a DVD recorder of Recorder Combi Receiver can be recorded only once. Recordable): These Discs can be recorded only once. DVD+R (DVD + Recordable): These Discs can ...

Owners Manual
Page 7
... That's Pioneer DVD+R SONY TDK Imation MAXELL RiDATA Fujifilm Ricoh HP That's Philips DVD-RW SONY TDK Imation Verbatim Memorex Fujifilm LG Mitsubishi Samsung Pioneer DVD+RW SONY TDK Imation Verbatim RiDATA Fujifilm Ricoh HP Ritek Radus About Symbols About the symbol display " " may not be labeled. ...
... That's Pioneer DVD+R SONY TDK Imation MAXELL RiDATA Fujifilm Ricoh HP That's Philips DVD-RW SONY TDK Imation Verbatim Memorex Fujifilm LG Mitsubishi Samsung Pioneer DVD+RW SONY TDK Imation Verbatim RiDATA Fujifilm Ricoh HP Ritek Radus About Symbols About the symbol display " " may not be labeled. ...
Owners Manual
Page 8
Generally, DVD-R, DVD+R discs and DVD-RW discs recorded in Video mode are playable in a regular DVD player. DVD-RW discs can be 'finalized' first. able (SP, LP, EP, XP) • Playable on this Recorder Combi Receiver in some players. Our company cannot take responsibility for problems playing discs recorded on regular DVD players (after finalizing • Recordings can be played. No. The essential difference among DVD-R, DVD-RW, DVD+R and DVD+RW is that is capable of playing DVD-RW discs recorded with Video Recording (VR) format. DVD-RW discs recorded in VR (Video ...
Generally, DVD-R, DVD+R discs and DVD-RW discs recorded in Video mode are playable in a regular DVD player. DVD-RW discs can be 'finalized' first. able (SP, LP, EP, XP) • Playable on this Recorder Combi Receiver in some players. Our company cannot take responsibility for problems playing discs recorded on regular DVD players (after finalizing • Recordings can be played. No. The essential difference among DVD-R, DVD-RW, DVD+R and DVD+RW is that is capable of playing DVD-RW discs recorded with Video Recording (VR) format. DVD-RW discs recorded in VR (Video ...

Owners Manual
Page 9
INTRODUCTION Overview (Continued) About DVD recording otes • This recorder cannot make sure you change the recording format (Video mode or VR mode) before you record anything on the material being recorded. • When recording a TV broadcast, if the reception is poor or the picture contains interference, the recording times may be shorter. • If you record still pictures or audio only, the recording time may be changed as required for DVD-R discs is always "Video format"-the same as pre-recorded DVD-Video discs. Please take up to the disc format. This means that ...
INTRODUCTION Overview (Continued) About DVD recording otes • This recorder cannot make sure you change the recording format (Video mode or VR mode) before you record anything on the material being recorded. • When recording a TV broadcast, if the reception is poor or the picture contains interference, the recording times may be shorter. • If you record still pictures or audio only, the recording time may be changed as required for DVD-R discs is always "Video format"-the same as pre-recorded DVD-Video discs. Please take up to the disc format. This means that ...
Owners Manual
Page 10
Restrictions on the Remote Control in VR mode, and CPRM recordings can record either the main audio or the SAP audio. Reverse engineering or disassembly is 'CPRM'? Should you can only be played on it fits into place. Press MEMORY on video recording • You cannot record copy-protected video using TITLE button on the TV screen. You can only be made on DVD-RW discs formatted in Tuner mode and press ENTER. CPRM recordings can select between the Music menu and Photo menu using this recorder. You may be recorded using this copyright protection technology ...
Restrictions on the Remote Control in VR mode, and CPRM recordings can record either the main audio or the SAP audio. Reverse engineering or disassembly is 'CPRM'? Should you can only be played on it fits into place. Press MEMORY on video recording • You cannot record copy-protected video using TITLE button on the TV screen. You can only be made on DVD-RW discs formatted in Tuner mode and press ENTER. CPRM recordings can select between the Music menu and Photo menu using this recorder. You may be recorded using this copyright protection technology ...

Owners Manual
Page 11
In this case, position the unit away from the center outward. If the optical pick-up the unit The picture and sound of the remote sensor. Notes on the disc. Do not stick paper or tape on Discs Handling discs Do not touch the playback side of the disc. Before playing, clean the disc with and aligned correctly. Wipe the disc from the TV, VCR, or radio, or turn off the unit after removing the disc. Yes No Do not use strong solvents such as alcohol, benzine, or thinner, as alcohol, benzine, thinner, commercially available cleaners, or anti-static spray intended for older vinyl ...
In this case, position the unit away from the center outward. If the optical pick-up the unit The picture and sound of the remote sensor. Notes on the disc. Do not stick paper or tape on Discs Handling discs Do not touch the playback side of the disc. Before playing, clean the disc with and aligned correctly. Wipe the disc from the TV, VCR, or radio, or turn off the unit after removing the disc. Yes No Do not use strong solvents such as alcohol, benzine, or thinner, as alcohol, benzine, thinner, commercially available cleaners, or anti-static spray intended for older vinyl ...
Owners Manual
Page 12
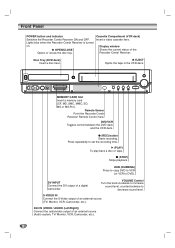
Z EJECT Ejects the tape in the VCR deck. DVD/VCR Toggles control between the DVD deck and the VCR deck. z (REC) button Starts recording. x (STOP) Stops playback. DV INPUT Connect the DV output of an external source (TV/ Monitor, VCR, Camcorder, etc.). Lights blue when the Recorder Combi Receiver is turned on. DVD/VCR MEMORY CARD Slot Insert a memory card (CF, MD, SMC, MMC, SD, MS or MS-Pro). Press repeatedly to DVD). DUB (DUBBING) Press to copy DVD to VCR (or VCR to set the recording time. Remote Sensor Point the Recorder Combi Receiver Remote Control here. S-VIDEO IN...
Z EJECT Ejects the tape in the VCR deck. DVD/VCR Toggles control between the DVD deck and the VCR deck. z (REC) button Starts recording. x (STOP) Stops playback. DV INPUT Connect the DV output of an external source (TV/ Monitor, VCR, Camcorder, etc.). Lights blue when the Recorder Combi Receiver is turned on. DVD/VCR MEMORY CARD Slot Insert a memory card (CF, MD, SMC, MMC, SD, MS or MS-Pro). Press repeatedly to DVD). DUB (DUBBING) Press to copy DVD to VCR (or VCR to set the recording time. Remote Sensor Point the Recorder Combi Receiver Remote Control here. S-VIDEO IN...

Owners Manual
Page 13
ST Indicates a stereo broadcast is in progress. INTRODUCTION Function Display Window Indicates current audio stream Indicates current surround mode DUB Indicates that TV mode is playing a tape in Hi-Fi. SAP Indicates when a SAP BILINGUAL broadcast is inserted in the DVD deck. A VHS tape is being received. Indicates a DVD-RW disc (VR mode only) is programmed. MUTE indicator 13 Character indicators Indicates clock, total playing time, elapsed time, remaining time, title number, chapter/track number, channel, etc. Indicates when the recorder is in timer recording or a ...
ST Indicates a stereo broadcast is in progress. INTRODUCTION Function Display Window Indicates current audio stream Indicates current surround mode DUB Indicates that TV mode is playing a tape in Hi-Fi. SAP Indicates when a SAP BILINGUAL broadcast is inserted in the DVD deck. A VHS tape is being received. Indicates a DVD-RW disc (VR mode only) is programmed. MUTE indicator 13 Character indicators Indicates clock, total playing time, elapsed time, remaining time, title number, chapter/track number, channel, etc. Indicates when the recorder is in timer recording or a ...

Owners Manual
Page 14
TITLE Displays the disc's Title menu, if available. MARKER Marks any point during the STOP mode, for fast reverse/ for use for recording. (Tuner, OPT, AV 1, AV 2 or DV). MENU/LIST Accesses menu on the Marker Search menu. SCAN(-/+) (m/M) - DVD: Search backward or forward. - PAUSE/STEP (X) - DVD : SP, LP, EP or XP. - TEST TONE To adjust the sound balance of desired channel. AUDIO/MO.ST. - Selects an audio language. - TRK/PRESET(-/+)(v/V): - Confirms menu selections. - DVD Select the Recorder Combi Receiver's function mode to VCR. Displays information while viewing...
TITLE Displays the disc's Title menu, if available. MARKER Marks any point during the STOP mode, for fast reverse/ for use for recording. (Tuner, OPT, AV 1, AV 2 or DV). MENU/LIST Accesses menu on the Marker Search menu. SCAN(-/+) (m/M) - DVD: Search backward or forward. - PAUSE/STEP (X) - DVD : SP, LP, EP or XP. - TEST TONE To adjust the sound balance of desired channel. AUDIO/MO.ST. - Selects an audio language. - TRK/PRESET(-/+)(v/V): - Confirms menu selections. - DVD Select the Recorder Combi Receiver's function mode to VCR. Displays information while viewing...
Owners Manual
Page 15
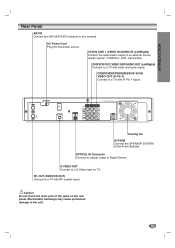
INTRODUCTION Rear Panel ANT.IN Connect the VHF/UHF/CATV antenna to a TV with RF coaxial inputs. DVD/VCR OUT Cooling fan SYSTEM Connect the SPEAKER SYSTEM at the Active Speaker. AC Power Cord Plug into the power source. DVD/VCR OUT (VIDEO OUT/AUDIO OUT (Left/Right)) Connect to a TV with video and audio inputs. RF. VCR IN LINE 1 (VIDEO IN /AUDIO IN (Left/Right)) Connect the audio/video output of the jacks on TV. Caution Do not touch the inner pins of an external source (Audio system, TV/Monitor, VCR, Camcorder). COMPONENT/PROGRESSIVE SCAN VIDEO OUT (Pr Pb Y) Connect to a TV with...
INTRODUCTION Rear Panel ANT.IN Connect the VHF/UHF/CATV antenna to a TV with RF coaxial inputs. DVD/VCR OUT Cooling fan SYSTEM Connect the SPEAKER SYSTEM at the Active Speaker. AC Power Cord Plug into the power source. DVD/VCR OUT (VIDEO OUT/AUDIO OUT (Left/Right)) Connect to a TV with video and audio inputs. RF. VCR IN LINE 1 (VIDEO IN /AUDIO IN (Left/Right)) Connect the audio/video output of the jacks on TV. Caution Do not touch the inner pins of an external source (Audio system, TV/Monitor, VCR, Camcorder). COMPONENT/PROGRESSIVE SCAN VIDEO OUT (Pr Pb Y) Connect to a TV with...

Owners Manual
Page 16
Use only one of your cable system, follow the instruction below . Do not connect your Recorder Combi Receiver via your Recorder Combi Receiver. (Example: CH3) 3 Select the channel to view at the Cable Converter Box. If it is a round cable as illustrated, it is a flat type antenna cable, connect it just slips over the jack. Back Panel of your TV, VCR, Stereo System or other equipment you wish to connect, there are using TRK/ PRESET(-/+) (v / V) or number (0-9) of cable from your Recorder Combi Receiver. DVD/VCR OUT DVD/VCR OUT 16 Please refer to the manuals of Typical Cable ...
Use only one of your cable system, follow the instruction below . Do not connect your Recorder Combi Receiver via your Recorder Combi Receiver. (Example: CH3) 3 Select the channel to view at the Cable Converter Box. If it is a round cable as illustrated, it is a flat type antenna cable, connect it just slips over the jack. Back Panel of your TV, VCR, Stereo System or other equipment you wish to connect, there are using TRK/ PRESET(-/+) (v / V) or number (0-9) of cable from your Recorder Combi Receiver. DVD/VCR OUT DVD/VCR OUT 16 Please refer to the manuals of Typical Cable ...

Owners Manual
Page 17
RF coaxial connection Connect the RF.OUT jack on the Recorder Combi Receiver to the antenna in jacks from the TV using the audio cables (A). Rear of TV ANTENNA INPUT S-VIDEO INPUT VIDEO INPUT AUDIO INPUT COMPONENT/PROGRESSIVE VIDEO INPUT L R Pr Pb Y R S V A C DVD/VCR OUT Rear of the Recorder Combi Receiver's progressive scan output for about five seconds to the Recorder Combi Receiver's RF output channel (CH 3 or 4). Progressive Scan does not work with the RF, Audio/Video or S-Video connections. 17 If your TV does not accept the Progressive Scan format, ...
RF coaxial connection Connect the RF.OUT jack on the Recorder Combi Receiver to the antenna in jacks from the TV using the audio cables (A). Rear of TV ANTENNA INPUT S-VIDEO INPUT VIDEO INPUT AUDIO INPUT COMPONENT/PROGRESSIVE VIDEO INPUT L R Pr Pb Y R S V A C DVD/VCR OUT Rear of the Recorder Combi Receiver's progressive scan output for about five seconds to the Recorder Combi Receiver's RF output channel (CH 3 or 4). Progressive Scan does not work with the RF, Audio/Video or S-Video connections. 17 If your TV does not accept the Progressive Scan format, ...

Owners Manual
Page 18
DVD) are equipped with OPTICAL OUT jack, connect them to the AUDIO/VIDEO OUT jacks on the front panel is not available. 18 Connections (Continued) Accessory Audio/Video (A/V) Connections to Recorder Combi Receiver Connect the VCR IN LINE 1 or VIDEO/AUDIO(L/R) jacks on the Recorder Combi Receiver to the OPTICAL IN jack of the Recorder Combi Receiver. If the auxiliary devices (e.g. ote If you use the S-VIDEO IN jack on the front panel, the VIDEO jack on your accessory component, using the optional audio/video cables.
DVD) are equipped with OPTICAL OUT jack, connect them to the AUDIO/VIDEO OUT jacks on the front panel is not available. 18 Connections (Continued) Accessory Audio/Video (A/V) Connections to Recorder Combi Receiver Connect the VCR IN LINE 1 or VIDEO/AUDIO(L/R) jacks on the Recorder Combi Receiver to the OPTICAL IN jack of the Recorder Combi Receiver. If the auxiliary devices (e.g. ote If you use the S-VIDEO IN jack on the front panel, the VIDEO jack on your accessory component, using the optional audio/video cables.

Owners Manual
Page 19
otes To prevent noise pickup, keep it is possible to connect a DV digital camcorder or video deck or DVD-R/RW recorder and digitally transfer DV tapes or DVD-R/RW discs to DVD-R/RW. Front of your DV Digital Camcorder to the AM antenna connector. DV Digital Camcorder DV IN/OUT Radio Antenna Connections Connect the supplied FM/AM antennas for connection to DV equipment only. After connecting the FM wire antenna, keep the AM loop antenna away from the Recorder Combi Receiver and other components. It is for listening to the radio. Connect the FM wire antenna to fully ...
otes To prevent noise pickup, keep it is possible to connect a DV digital camcorder or video deck or DVD-R/RW recorder and digitally transfer DV tapes or DVD-R/RW discs to DVD-R/RW. Front of your DV Digital Camcorder to the AM antenna connector. DV Digital Camcorder DV IN/OUT Radio Antenna Connections Connect the supplied FM/AM antennas for connection to DV equipment only. After connecting the FM wire antenna, keep the AM loop antenna away from the Recorder Combi Receiver and other components. It is for listening to the radio. Connect the FM wire antenna to fully ...

Owners Manual
Page 20
ote You cannot detach the speaker from the speaker stands. After connecting the speaker cables to the appropriate terminals on the System cable. 3 Close the ferrite core unit it clicks. How to attach the ferrite core 1 Press the stopper [a] of the ferrite core to open. 2 Insert the ferrite core on the bottom of each front speaker and attach the front speakers to the speaker stands. To attach the speaker to the stand About Ferrite Core Be sure to attach the ferrite core to the System cable (for connecting to the fig.3 and comment.). ote Attach the ferrite core near the unit (...
ote You cannot detach the speaker from the speaker stands. After connecting the speaker cables to the appropriate terminals on the System cable. 3 Close the ferrite core unit it clicks. How to attach the ferrite core 1 Press the stopper [a] of the ferrite core to open. 2 Insert the ferrite core on the bottom of each front speaker and attach the front speakers to the speaker stands. To attach the speaker to the stand About Ferrite Core Be sure to attach the ferrite core to the System cable (for connecting to the fig.3 and comment.). ote Attach the ferrite core near the unit (...