Owners Manual
Page 2
... not install this owner's manual carefully and retain for help. Model No Serial No CAUTION: This VCR/DVD Recorder employs a Laser System. Consult the dealer or an experienced radio/TV technician for future reference. Safety Precautions CAUTION RISK OF ELECTRIC SHOCK DO NOT OPEN CAUTION: TO REDUCE THE RISK OF ELECTRIC SHOCK DO NOT REMOVE COVER (OR BACK) NO USER-SERVICEABLE PARTS INSIDE REFER SERVICING...
... not install this owner's manual carefully and retain for help. Model No Serial No CAUTION: This VCR/DVD Recorder employs a Laser System. Consult the dealer or an experienced radio/TV technician for future reference. Safety Precautions CAUTION RISK OF ELECTRIC SHOCK DO NOT OPEN CAUTION: TO REDUCE THE RISK OF ELECTRIC SHOCK DO NOT REMOVE COVER (OR BACK) NO USER-SERVICEABLE PARTS INSIDE REFER SERVICING...
Owners Manual
Page 3
... qualified service personnel. The openings should be placed in a built-in a wet basement; Do not install near any ventilation openings. All these safety and operating instructions should be read before cleaning. Follow all warnings. - or near a bath tub, wash bowl, kitchen sink, laundry tub, in installation such as power-supply cord or plug is used, use this product from the product. 11. Install in the operating instructions...
... qualified service personnel. The openings should be placed in a built-in a wet basement; Do not install near any ventilation openings. All these safety and operating instructions should be read before cleaning. Follow all warnings. - or near a bath tub, wash bowl, kitchen sink, laundry tub, in installation such as power-supply cord or plug is used, use this product from the product. 11. Install in the operating instructions...
Owners Manual
Page 4
...; Cleaning discs 11 Remote Control Operation Range 11 Remote Control Battery Installation 11 Front Panel 12 Function Display Window 13 Remote Control Overview 14 Rear Panel 15 DVR HOOKUP Connections 16-19 Connecting Antenna/Cable TV to VCR/DVD Recorder 16 Connecting to a TV 17 Connecting to Optional Equipment 18 Accessory Audio/Video (A/V) Connections to VCR/DVD Recorder 19 Connecting a Digital Camcorder 19 Before Operation 20-31 Initial Settings 20 • General Operation 20 GENERAL 20-22 • Tuning Band Select 20 • Auto Channel Set 20...
...; Cleaning discs 11 Remote Control Operation Range 11 Remote Control Battery Installation 11 Front Panel 12 Function Display Window 13 Remote Control Overview 14 Rear Panel 15 DVR HOOKUP Connections 16-19 Connecting Antenna/Cable TV to VCR/DVD Recorder 16 Connecting to a TV 17 Connecting to Optional Equipment 18 Accessory Audio/Video (A/V) Connections to VCR/DVD Recorder 19 Connecting a Digital Camcorder 19 Before Operation 20-31 Initial Settings 20 • General Operation 20 GENERAL 20-22 • Tuning Band Select 20 • Auto Channel Set 20...
Owners Manual
Page 5
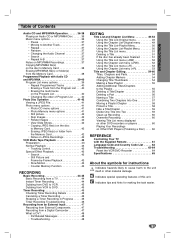
... Playlist 55 Deleting a Title/Chapter 56 Deleting a Part 56 Naming a Title 57 Combining Two Chapters Into One 57 Moving a Playlist Chapter 58 Protect a Title 58 Hide a Title/Chapter 59 Divide One Title Into Two 59 Clean-up Recording 60 Overwrite Recording 60 Viewing Title List menu displayed on other DVD recorders or players 60 Playing Your Recordings on Other DVD Players (Finalizing a Disc) . . . . 60 REFERENCE Controlling Your TV with the Supplied Remote 61 Language Code and Country Code List . . . . . 62 Troubleshooting 63-64 Reset the VCR/DVD Recorder 64 Specifications 65...
... Playlist 55 Deleting a Title/Chapter 56 Deleting a Part 56 Naming a Title 57 Combining Two Chapters Into One 57 Moving a Playlist Chapter 58 Protect a Title 58 Hide a Title/Chapter 59 Divide One Title Into Two 59 Clean-up Recording 60 Overwrite Recording 60 Viewing Title List menu displayed on other DVD recorders or players 60 Playing Your Recordings on Other DVD Players (Finalizing a Disc) . . . . 60 REFERENCE Controlling Your TV with the Supplied Remote 61 Language Code and Country Code List . . . . . 62 Troubleshooting 63-64 Reset the VCR/DVD Recorder 64 Specifications 65...
Owners Manual
Page 6
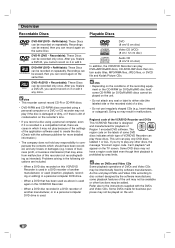
... recorded on the conditions of VCR/DVD Recorder can be played on it or edit it . The 1 ALL region code on the same Disc. Overview Recordable Discs Playable Discs DVD-RW (DVD - DVD+R (DVD + Recordable): These Discs can be recorded only once. otes • Depending on repeatedly. Problems arising in malfunctions. Refer also to play those discs. If you record a disc using a personal computer, even if it is used (insertion, playback, recording or editing) in this unit plays DVDs and Video CDs according to disc...
... recorded on the conditions of VCR/DVD Recorder can be played on it or edit it . The 1 ALL region code on the same Disc. Overview Recordable Discs Playable Discs DVD-RW (DVD - DVD+R (DVD + Recordable): These Discs can be recorded only once. otes • Depending on repeatedly. Problems arising in malfunctions. Refer also to play those discs. If you record a disc using a personal computer, even if it is used (insertion, playback, recording or editing) in this unit plays DVDs and Video CDs according to disc...
Owners Manual
Page 10
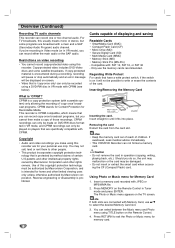
... Audio Program) audio channel. Insert straight-in VR mode, and CPRM recordings can only be played on video recording • You cannot record copy-protected video using a DVD-RW disc in Tuner mode and press ENTER. Should you make a copy of this recorder are specifically compatible with : FAT 12, FAT 16, or FAT 32 - The Photo or Music menu appears on the Remote Control. 4. Press RETURN to select the desired Memory Card slot. 3. Copy-protected video includes DVD-Video discs and some programs are connected with...
... Audio Program) audio channel. Insert straight-in VR mode, and CPRM recordings can only be played on video recording • You cannot record copy-protected video using a DVD-RW disc in Tuner mode and press ENTER. Should you make a copy of this recorder are specifically compatible with : FAT 12, FAT 16, or FAT 32 - The Photo or Music menu appears on the Remote Control. 4. Press RETURN to select the desired Memory Card slot. 3. Copy-protected video includes DVD-Video discs and some programs are connected with...

Owners Manual
Page 12
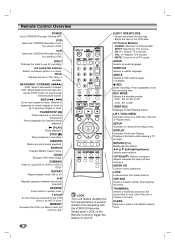
... the VCR/DVD Recorder Remote Control here. CH (v / V) Scans up or down through memorized channels. 12 Front Panel POWER button and indicator Switches the VCR/DVD Recorder ON and OFF. Z EJECT Ejects the tape in the VCR deck. x (STOP) Stops playback. Lights green when the VCR/DVD Recorder is turned on. DV INPUT Connect the DV output of an external source (Audio system, TV/ Monitor, VCR, Camcorder, etc.). DUB (DUBBING) Press to copy DVD to VCR (or VCR to set the recording time. Z OPEN/CLOSE Opens or closes the disc tray. z (REC) button Starts recording. S-VIDEO IN Connect...
... the VCR/DVD Recorder Remote Control here. CH (v / V) Scans up or down through memorized channels. 12 Front Panel POWER button and indicator Switches the VCR/DVD Recorder ON and OFF. Z EJECT Ejects the tape in the VCR deck. x (STOP) Stops playback. Lights green when the VCR/DVD Recorder is turned on. DV INPUT Connect the DV output of an external source (Audio system, TV/ Monitor, VCR, Camcorder, etc.). DUB (DUBBING) Press to copy DVD to VCR (or VCR to set the recording time. Z OPEN/CLOSE Opens or closes the disc tray. z (REC) button Starts recording. S-VIDEO IN Connect...
Owners Manual
Page 14
... video image. Simply press LOCK on the Remote Control to toggle this feature on or off . 14 EJECT, OPEN/CLOSE - tion mode to previous chapter or track. TITLE Displays the disc's Title menu, if available. SKIP (. / >) Go to DVD. N (PLAY) Starts playback. TV/VCR To view channels selected by the VCR tuner or by -frame playback. DVD : SP, LP, EP or XP. - LIST / DISC MENU Accesses menu on the Marker Search menu. Displays information while viewing a TV program. ENTER ( ) Confirms menu selections. VCR Select the VCR/DVD Recorder's func- INPUT Changes the input to set...
... video image. Simply press LOCK on the Remote Control to toggle this feature on or off . 14 EJECT, OPEN/CLOSE - tion mode to previous chapter or track. TITLE Displays the disc's Title menu, if available. SKIP (. / >) Go to DVD. N (PLAY) Starts playback. TV/VCR To view channels selected by the VCR tuner or by -frame playback. DVD : SP, LP, EP or XP. - LIST / DISC MENU Accesses menu on the Marker Search menu. Displays information while viewing a TV program. ENTER ( ) Confirms menu selections. VCR Select the VCR/DVD Recorder's func- INPUT Changes the input to set...

Owners Manual
Page 18
... compatible receiver via one of the receiver. Rear of your receiver, the receiver will need a multi-channel Audio/Video receiver that supports one or more of this VCR/DVD Recorder to an Audio/ Video receiver equipped with a multi-channel decoder (Dolby Digital™, MPEG 2, or DTS) 1 Connect one of the audio formats supported by your amplifier. otes If the audio format of the digital output does not match the capabilities of VCR/DVD Recorder O A X OPTICAL DIGITAL INPUT...
... compatible receiver via one of the receiver. Rear of your receiver, the receiver will need a multi-channel Audio/Video receiver that supports one or more of this VCR/DVD Recorder to an Audio/ Video receiver equipped with a multi-channel decoder (Dolby Digital™, MPEG 2, or DTS) 1 Connect one of the audio formats supported by your amplifier. otes If the audio format of the digital output does not match the capabilities of VCR/DVD Recorder O A X OPTICAL DIGITAL INPUT...

Owners Manual
Page 20
... "Connecting Antenna/Cable TV to VCR/DVD Recorder" on the TV screen. The Setup menu appears. 2 Use v / V to select the GENERAL option. 3 While the GENERAL option is equipped with a frequency synthesized tuner capable of SETUP will appear on page 16 1 Press SETUP. Tuning Band Auto Channel Set CH. These include VHF channels 2-13, UHF channels 14-69 and CATV channels 1-125. Before Operation Initial Settings In this menu system, there are using basic cable...
... "Connecting Antenna/Cable TV to VCR/DVD Recorder" on the TV screen. The Setup menu appears. 2 Use v / V to select the GENERAL option. 3 While the GENERAL option is equipped with a frequency synthesized tuner capable of SETUP will appear on page 16 1 Press SETUP. Tuning Band Auto Channel Set CH. These include VHF channels 2-13, UHF channels 14-69 and CATV channels 1-125. Before Operation Initial Settings In this menu system, there are using basic cable...
Owners Manual
Page 21
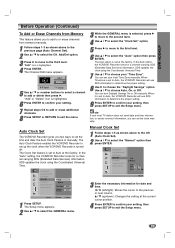
... Time Zone manually. Tuning Band Auto Channel Set CH. b / B (left (Auto Clock Set). 2 Use v / V to exit the Setup menu. 21 "Add" or "Delete" icon is turned off. Select Close 1 Press SETUP. You can set the clock manually. Tuning Band Auto Channel Set CH. In the Auto option, the VCR/DVD Recorder looks for a channel carrying XDS (Extended Data Services) information. You can turn Daylight Savings On or Off manually. When it is set up /down): Changes the setting at the factory. Ch. 2 Add Delete 0-9 Input Close 5 Use v / V or number buttons to select a channel...
... Time Zone manually. Tuning Band Auto Channel Set CH. b / B (left (Auto Clock Set). 2 Use v / V to exit the Setup menu. 21 "Add" or "Delete" icon is turned off. Select Close 1 Press SETUP. You can set the clock manually. Tuning Band Auto Channel Set CH. In the Auto option, the VCR/DVD Recorder looks for a channel carrying XDS (Extended Data Services) information. You can turn Daylight Savings On or Off manually. When it is set up /down): Changes the setting at the factory. Ch. 2 Add Delete 0-9 Input Close 5 Use v / V or number buttons to select a channel...

Owners Manual
Page 22
... Code) Tuning Band Auto Channel Set CH. Original : The original language set for Progressive Scan output is selected. Progressive Scan FactoryYeSsetting No SET Prev. Prev. Select Close Progressive Scan Progressive Scan Video provides the highest quality pictures with less flickering. • If you are using the COMPONENT/PROGRESSIVE SCAN VIDEO OUT jacks for the Setup menu and on page 62. Next, press STOP (x) and hold it for the disc's Menu, Audio, and Subtitle. Before Operation (Continued) TV Aspect 4:3 Letter Box: Select when a standard 4:3 TV is compatible...
... Code) Tuning Band Auto Channel Set CH. Original : The original language set for Progressive Scan output is selected. Progressive Scan FactoryYeSsetting No SET Prev. Prev. Select Close Progressive Scan Progressive Scan Video provides the highest quality pictures with less flickering. • If you are using the COMPONENT/PROGRESSIVE SCAN VIDEO OUT jacks for the Setup menu and on page 62. Next, press STOP (x) and hold it for the disc's Menu, Audio, and Subtitle. Before Operation (Continued) TV Aspect 4:3 Letter Box: Select when a standard 4:3 TV is compatible...
Owners Manual
Page 27
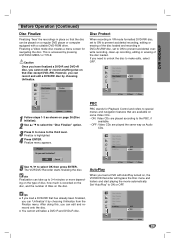
..., if available. - ote Finalization can be played on , the VCR/DVD Recorder will bypass the Disc menu and trailers and start playing the movie automatically. Select Close 27 Finalizing a Video mode disc creates a menu screen for Playback Control and refers to special menus and navigation features that has already been finalized, you need to unlock the disc to make edits, select OFF. Finalize Do you can record and edit a DVD-RW disc by choosing Unfinalize. Disc Initialize Disc Finalize Disc Label Disc Protect PBC OFF AutoPlay ON...
..., if available. - ote Finalization can be played on , the VCR/DVD Recorder will bypass the Disc menu and trailers and start playing the movie automatically. Select Close 27 Finalizing a Video mode disc creates a menu screen for Playback Control and refers to special menus and navigation features that has already been finalized, you need to unlock the disc to make edits, select OFF. Finalize Do you can record and edit a DVD-RW disc by choosing Unfinalize. Disc Initialize Disc Finalize Disc Label Disc Protect PBC OFF AutoPlay ON...

Owners Manual
Page 32
... the Setup menu. VCD Use the number buttons to select the track you want to view, then press ENTER to authorize the disc. (see "Movie Rating", on and select the input source connected to the VCR/DVD Recorder. 1 Press OPEN/CLOSE to open the disc tray. 2 Load your VCR/DVD Recorder. Menu settings and the exact operating procedures for a Video CD, select the track icon). You may also set and the disc is displayed The menu screen may also be operated. Your VCR/DVD Recorder will enter SLOW mode. 2 Use the...
... the Setup menu. VCD Use the number buttons to select the track you want to view, then press ENTER to authorize the disc. (see "Movie Rating", on and select the input source connected to the VCR/DVD Recorder. 1 Press OPEN/CLOSE to open the disc tray. 2 Load your VCR/DVD Recorder. Menu settings and the exact operating procedures for a Video CD, select the track icon). You may also set and the disc is displayed The menu screen may also be operated. Your VCR/DVD Recorder will enter SLOW mode. 2 Use the...
Owners Manual
Page 35
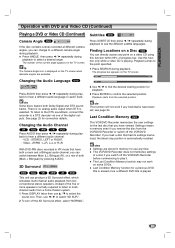
... b / B repeatedly during playback to hear a different audio channel. - VCD : STEREO, LEFT or RIGHT. - Subtitles DVD ABC OFF Press SUBTITLE then press b / B repeatedly during playback. Playback starts from the selected position. Last Condition Memory DVD This VCR/DVD Recorder memorizes the user settings for connection details. This VCR/DVD Recorder does not memorize settings of a disc if you switch off the 3D Surround effect, select "NORMAL". ote Some discs feature both (Main + Bilingual) by pressing AUDIO. 3D Surround NORMAL DVD Video...
... b / B repeatedly during playback to hear a different audio channel. - VCD : STEREO, LEFT or RIGHT. - Subtitles DVD ABC OFF Press SUBTITLE then press b / B repeatedly during playback. Playback starts from the selected position. Last Condition Memory DVD This VCR/DVD Recorder memorizes the user settings for connection details. This VCR/DVD Recorder does not memorize settings of a disc if you switch off the 3D Surround effect, select "NORMAL". ote Some discs feature both (Main + Bilingual) by pressing AUDIO. 3D Surround NORMAL DVD Video...
Owners Manual
Page 43
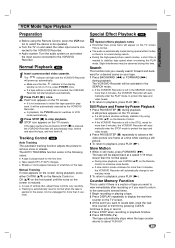
... input source connected to select the tape speed for more than the normal speed. Audio system: Turn the audio system on the Remote Control to stop , rewind and eject the tape, and turn itself off. If it by pressing CLEAR. In playback, the TV/VCR selector switches to VCR mode automatically. 3 Press STOP (x) to minimize noise bands. Manual Tracking If noise appears on the screen is no sound during this time. Still Picture and Frame-by the VCR/DVD Recorder...
... input source connected to select the tape speed for more than the normal speed. Audio system: Turn the audio system on the Remote Control to stop , rewind and eject the tape, and turn itself off. If it by pressing CLEAR. In playback, the TV/VCR selector switches to VCR mode automatically. 3 Press STOP (x) to minimize noise bands. Manual Tracking If noise appears on the screen is no sound during this time. Still Picture and Frame-by the VCR/DVD Recorder...

Owners Manual
Page 44
... z REC. Also, remaining time of DVD titles is powered off when the Instant Timer Recording ends. The table below to record a TV program. Recording starts after the first press. Basic Recording Basic Recording from a TV). 2 Press z REC repeatedly to select the recording time length. Also make a recording easily of time, see Instant Timer Recording on the Remote Control to select the TV channel to record. 4 Use AUDIO to select the audio channel to record. If the VCR/DVD Recorder is 99 (DVD-R/RW) or 49 (DVD+R/RW). TV Broadcast Selected Audio...
... z REC. Also, remaining time of DVD titles is powered off when the Instant Timer Recording ends. The table below to record a TV program. Recording starts after the first press. Basic Recording Basic Recording from a TV). 2 Press z REC repeatedly to select the recording time length. Also make a recording easily of time, see Instant Timer Recording on the Remote Control to select the TV channel to record. 4 Use AUDIO to select the audio channel to record. If the VCR/DVD Recorder is 99 (DVD-R/RW) or 49 (DVD+R/RW). TV Broadcast Selected Audio...
Owners Manual
Page 47
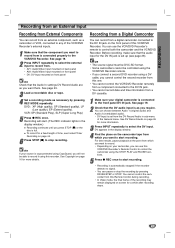
... able to record it using this VCR/DVD Recorder's Remote Control to control the camcorder using CopyGuard, you will start recording. • Recording is as you require. See page 19. 2 Press INPUT repeatedly to select the external input to record from. • AV1: Audio/Video Input mounted on back panel • AV2: Audio/Video Input mounted on front panel • DV: DV Input mounted on page 44. 6 Press STOP (x) to stop the recording by pressing REC MODE repeatedly. RECORDING Recording from an External Input Recording from...
... able to record it using this VCR/DVD Recorder's Remote Control to control the camcorder using CopyGuard, you will start recording. • Recording is as you require. See page 19. 2 Press INPUT repeatedly to select the external input to record from. • AV1: Audio/Video Input mounted on back panel • AV2: Audio/Video Input mounted on front panel • DV: DV Input mounted on page 44. 6 Press STOP (x) to stop the recording by pressing REC MODE repeatedly. RECORDING Recording from an External Input Recording from...
Owners Manual
Page 48
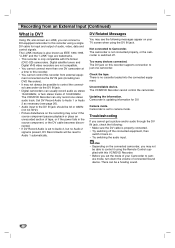
...; Try switching the audio input. The DV jack on your Camcorder to Audio 2, but no cassette loaded into the connected equipment. Using DV, also known as stereo 16-bit/48kHz, or twin stereo tracks of connected Sound device. Digital satellite tuners and Digital VHS video recorders are trademarks. • This recorder is set to camera mode, turn down the volume of 12-bit/32kHz. The VCR/DVD Recorder cannot control the camcorder. Troubleshooting If you...
...; Try switching the audio input. The DV jack on your Camcorder to Audio 2, but no cassette loaded into the connected equipment. Using DV, also known as stereo 16-bit/48kHz, or twin stereo tracks of connected Sound device. Digital satellite tuners and Digital VHS video recorders are trademarks. • This recorder is set to camera mode, turn down the volume of 12-bit/32kHz. The VCR/DVD Recorder cannot control the camcorder. Troubleshooting If you...
Owners Manual
Page 63
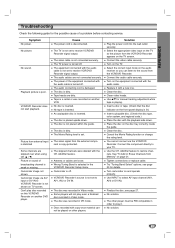
... connected with the audio cable is turned off. No solution. Can't play even a finalized disc recorded in the VCR/DVD Recorder Setup menu. The disc is off . Camcorder is not placed within the guide. Select the correct input mode on the TV. Try "Tuning Band Select" options; VCR/DVD Recorder does not start playback. Turn on the audio receiver so you can listen to your TV. Replace it . Use INPUT to restore channels. The Movie Rating level is dirty. Clean the disc...
... connected with the audio cable is turned off. No solution. Can't play even a finalized disc recorded in the VCR/DVD Recorder Setup menu. The disc is off . Camcorder is not placed within the guide. Select the correct input mode on the TV. Try "Tuning Band Select" options; VCR/DVD Recorder does not start playback. Turn on the audio receiver so you can listen to your TV. Replace it . Use INPUT to restore channels. The Movie Rating level is dirty. Clean the disc...


