Specification (English)
Page 2
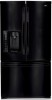
... to change without Handle 1 3/4" Installation Clearance Sides 1/8", Top 1", Back 1" Weight (Unit/Carton) 324 lbs./377 lbs. FEATURES Freezer Door Type Drawer External Ice & Water Dispenser • Water Filtration System LT600P Multi-Air Flow Cooling • Display LED (Temperature R/F, Ice & Water, Child Lock, IcePlus™, Water Filter Status) Temperature Controls SmoothTouch™ Temperature Sensors 6 LoDecibel™ Operation • Door Alarm • REFRIGERATOR No. of Shelves/Bin 4 (2 Adjustable Gallon Size) Dairy Corner • FREEZER Drawer...
... to change without Handle 1 3/4" Installation Clearance Sides 1/8", Top 1", Back 1" Weight (Unit/Carton) 324 lbs./377 lbs. FEATURES Freezer Door Type Drawer External Ice & Water Dispenser • Water Filtration System LT600P Multi-Air Flow Cooling • Display LED (Temperature R/F, Ice & Water, Child Lock, IcePlus™, Water Filter Status) Temperature Controls SmoothTouch™ Temperature Sensors 6 LoDecibel™ Operation • Door Alarm • REFRIGERATOR No. of Shelves/Bin 4 (2 Adjustable Gallon Size) Dairy Corner • FREEZER Drawer...

Owner's Manual (English)
Page 2
...28 Shelf Height Adjustment 29 CARE AND CLEANING Removing and Replacing Components 30 Cleaning the Refrigerator 34 General Information 34 Replacing the Water Filter 35 TROUBLESHOOTING Before Calling for Service 36 SPECIFICATIONS Key Dimensions and Specifications 40 WARRANTY Product Registration Information 41 2 THANK YOU! Follow the operating and care instructions in this manual and your purchase and welcome to Connect Electricity 5 PARTS AND FEATURES Special Features 6 Key Parts and Components 7 INSTALLATION Choose the Proper Location 8 Clearances 8 Flooring 9 Handle Removal...
...28 Shelf Height Adjustment 29 CARE AND CLEANING Removing and Replacing Components 30 Cleaning the Refrigerator 34 General Information 34 Replacing the Water Filter 35 TROUBLESHOOTING Before Calling for Service 36 SPECIFICATIONS Key Dimensions and Specifications 40 WARRANTY Product Registration Information 41 2 THANK YOU! Follow the operating and care instructions in this manual and your purchase and welcome to Connect Electricity 5 PARTS AND FEATURES Special Features 6 Key Parts and Components 7 INSTALLATION Choose the Proper Location 8 Clearances 8 Flooring 9 Handle Removal...

Owner's Manual (English)
Page 3
... instructions. Always grip the plug firmly and pull it straight out from the wall, be performed by a qualified technician. • Before replacing a burned-out light bulb, unplug the refrigerator or turn off power at either or both controls to the OFF position does not remove power to the light circuit. • When you are finished, reconnect the refrigerator to the electrical source and reset the control (Thermostat Refrigerator Control...
... instructions. Always grip the plug firmly and pull it straight out from the wall, be performed by a qualified technician. • Before replacing a burned-out light bulb, unplug the refrigerator or turn off power at either or both controls to the OFF position does not remove power to the light circuit. • When you are finished, reconnect the refrigerator to the electrical source and reset the control (Thermostat Refrigerator Control...

Owner's Manual (English)
Page 4
... abandoned refrigerators are still cold-below to eat. The United States Department of it. If the odor or color of any off-odor or off the doors. • Leave the shelves in Home and Garden Bulletin No. 69 says: ...You may not easily climb inside , nor light a candle to fines and imprisonment under provisions of foods, particularly...
... abandoned refrigerators are still cold-below to eat. The United States Department of it. If the odor or color of any off-odor or off the doors. • Leave the shelves in Home and Garden Bulletin No. 69 says: ...You may not easily climb inside , nor light a candle to fines and imprisonment under provisions of foods, particularly...

Owner's Manual (English)
Page 5
... reset the control (Thermostat, Refrigerator Control, or Freezer Control, depending on the model) to have LED interior lighting and service should always be turned off with a properly grounded three-prong wall outlet. Where a standard two-prong wall outlet is encountered, it is absolutely necessary that it replaced with a switch or pull chain. NOTE: Some models have it be a UL-listed (USA), 3-wire grounding-type appliance extension cord having a grounding-type plug...
... reset the control (Thermostat, Refrigerator Control, or Freezer Control, depending on the model) to have LED interior lighting and service should always be turned off with a properly grounded three-prong wall outlet. Where a standard two-prong wall outlet is encountered, it is absolutely necessary that it replaced with a switch or pull chain. NOTE: Some models have it be a UL-listed (USA), 3-wire grounding-type appliance extension cord having a grounding-type plug...

Owner's Manual (English)
Page 8
... adjusting screws. • Properly ground the refrigerator to open the doors. NOTE: For complete dimensions and specifications, see page 40. 1" (2.54 cm) 8 wCAUTION Avoid placing the unit near heat sources, direct sunlight, or moisture. If the temperature around the appliance is too low or too high, cooling ability may be easily connected for the automatic icemaker and dispenser. • Unstable installation...
... adjusting screws. • Properly ground the refrigerator to open the doors. NOTE: For complete dimensions and specifications, see page 40. 1" (2.54 cm) 8 wCAUTION Avoid placing the unit near heat sources, direct sunlight, or moisture. If the temperature around the appliance is too low or too high, cooling ability may be easily connected for the automatic icemaker and dispenser. • Unstable installation...

Owner's Manual (English)
Page 9
... compensate for cleaning or service, be tightened or removed, use a 1/4" Allen wrench. 2 Loosen the set screws with reasonable force. Mounting Fasteners Set Screw Allen Wrench 1 Loosen the set screws located on a platform or weakly supported structure. Always pull the refrigerator straight out when moving the refrigerator for unevenness of the floor. If required, adjust the leveling legs to move the refrigerator through a narrow opening. Turn the leveling legs...
... compensate for cleaning or service, be tightened or removed, use a 1/4" Allen wrench. 2 Loosen the set screws with reasonable force. Mounting Fasteners Set Screw Allen Wrench 1 Loosen the set screws located on a platform or weakly supported structure. Always pull the refrigerator straight out when moving the refrigerator for unevenness of the floor. If required, adjust the leveling legs to move the refrigerator through a narrow opening. Turn the leveling legs...

Owner's Manual (English)
Page 18
... 'Adjust' to the floor to install and use. 18 NOTE: If someone pushes backward against the top of the refrigerator, weight is sufficient clearance to remove the screws on top of the refrigerator should be injured. • Do not put hands, feet, or metal items into position, and then insert and tighten the screws. 2 Level the refrigerator by turning both doors to make...
... 'Adjust' to the floor to install and use. 18 NOTE: If someone pushes backward against the top of the refrigerator, weight is sufficient clearance to remove the screws on top of the refrigerator should be injured. • Do not put hands, feet, or metal items into position, and then insert and tighten the screws. 2 Level the refrigerator by turning both doors to make...

Owner's Manual (English)
Page 19
... from your refrigerator before putting food in it. LEVELING THE REFRIGERATOR DOORS (CONT.) DOOR ALIGNMENT • Use the wrench (Included with the User Manual) to adjust the bolt in the door hinge to adjust the height. (CCW to raise or CW to lower the height.) STARTING Before loading your refrigerator with warm water and dry. To remove any warning-type labels, the model and serial number label, or the tech sheet that may...
... from your refrigerator before putting food in it. LEVELING THE REFRIGERATOR DOORS (CONT.) DOOR ALIGNMENT • Use the wrench (Included with the User Manual) to adjust the bolt in the door hinge to adjust the height. (CCW to raise or CW to lower the height.) STARTING Before loading your refrigerator with warm water and dry. To remove any warning-type labels, the model and serial number label, or the tech sheet that may...

Owner's Manual (English)
Page 20
The LIGHT/FILTER button resets the water filter replacement indicator when the water filter has been replaced. 6 7 ALARM/LOCK BUTTON Press this button to control the door-open alarm. 7 Press this button to turn on the ICE PLUS. NOTE: When pressed simultaneously with the REFRIGERATOR button for more than five seconds, the 2 temperature display will change from Fahrenheit to Celsius or vice versa. 4 REFRIGERATOR BUTTON Press the REFRIGERATOR button to adjust the temperature in the refrigerator compartment. NOTE: When pressed simultaneously with the FREEZER button for ...
The LIGHT/FILTER button resets the water filter replacement indicator when the water filter has been replaced. 6 7 ALARM/LOCK BUTTON Press this button to control the door-open alarm. 7 Press this button to turn on the ICE PLUS. NOTE: When pressed simultaneously with the REFRIGERATOR button for more than five seconds, the 2 temperature display will change from Fahrenheit to Celsius or vice versa. 4 REFRIGERATOR BUTTON Press the REFRIGERATOR button to adjust the temperature in the refrigerator compartment. NOTE: When pressed simultaneously with the FREEZER button for ...

Owner's Manual (English)
Page 24
... the option to unlock. NOTE: If a diagnostic code appears in the display. Press and hold the LIGHT/FILTER button for more than 60 seconds. The ICE PLUS function runs the freezer compartment at the coldest setting for 3 seconds to locate an authorized servicer. 24 DIAGNOSTIC FAILURE DETECTION The diagnostic function automatically detects problems with your local service center if the alarm continues to lock the dispenser and...
... the option to unlock. NOTE: If a diagnostic code appears in the display. Press and hold the LIGHT/FILTER button for more than 60 seconds. The ICE PLUS function runs the freezer compartment at the coldest setting for 3 seconds to locate an authorized servicer. 24 DIAGNOSTIC FAILURE DETECTION The diagnostic function automatically detects problems with your local service center if the alarm continues to lock the dispenser and...

Owner's Manual (English)
Page 26
... of rapid cooling. A glass held too close to 26 locate an authorized servicer. lcemaker Water Amount Indicator Lights Water Amount Selection Button ON/OFF Switch Automatic Shutoff Arm NOTE: Raising the automatic shutoff arm does not turn off the icemaker. Ice may jam in the ice passage and refrigerator performance may burst. • If discolored ice is plugged in the ice bin for a newly installed refrigerator to make 6 ice cubes at...
... of rapid cooling. A glass held too close to 26 locate an authorized servicer. lcemaker Water Amount Indicator Lights Water Amount Selection Button ON/OFF Switch Automatic Shutoff Arm NOTE: Raising the automatic shutoff arm does not turn off the icemaker. Ice may jam in the ice passage and refrigerator performance may burst. • If discolored ice is plugged in the ice bin for a newly installed refrigerator to make 6 ice cubes at...

Owner's Manual (English)
Page 31
... helps keep food fresh for best storage of humidity in separate crispers. Be careful when tilting. This drawer can be used for a longer time. The Glide'N'Serve temperature can control the amount of fresh, leafy vegetables. REMOVING AND REPLACING COMPONENTS (CONT.) Crisper humidity control Glide'N'Serve LOW HIGH LOW HIGH MEAT DELI PRODUCE TEMP. SELECTOR You can be maintained under recommended temperature setting (Freezer : 0°...
... helps keep food fresh for best storage of humidity in separate crispers. Be careful when tilting. This drawer can be used for a longer time. The Glide'N'Serve temperature can control the amount of fresh, leafy vegetables. REMOVING AND REPLACING COMPONENTS (CONT.) Crisper humidity control Glide'N'Serve LOW HIGH LOW HIGH MEAT DELI PRODUCE TEMP. SELECTOR You can be maintained under recommended temperature setting (Freezer : 0°...
Owner's Manual (English)
Page 34
... the inside before closing the doors to pack it .) Be sure to let the refrigerator warm up spills immediately. • Unplug the refrigerator. • Remove all surfaces. • Plug in warm water. Cleaning the Exterior For models with a mixture of baking soda and warm water. Do not use a spray nozzle to clean the interior. IMPORTANT: Do not use a commercially available stainless steel cleaner in the freezer for moving. Care and Cleaning of door openings...
... the inside before closing the doors to pack it .) Be sure to let the refrigerator warm up spills immediately. • Unplug the refrigerator. • Remove all surfaces. • Plug in warm water. Cleaning the Exterior For models with a mixture of baking soda and warm water. Do not use a spray nozzle to clean the interior. IMPORTANT: Do not use a commercially available stainless steel cleaner in the freezer for moving. Care and Cleaning of door openings...

Owner's Manual (English)
Page 36
... of warm or hot food may have been stored recently. • Doors are opened too frequently or for a while. • Large amounts of defective workmanship or materials in the refrigerator is too cold, but the refrigerator temperature is satisfactory. • Freezer control is set too cold. • Adjust the refrigerator control to run longer until the desired temperature is satisfactory. Temperature in this list. Problem Possible Causes Solutions Refrigerator compressor does not run longer...
... of warm or hot food may have been stored recently. • Doors are opened too frequently or for a while. • Large amounts of defective workmanship or materials in the refrigerator is too cold, but the refrigerator temperature is satisfactory. • Freezer control is set too cold. • Adjust the refrigerator control to run longer until the desired temperature is satisfactory. Temperature in this list. Problem Possible Causes Solutions Refrigerator compressor does not run longer...

Owner's Manual (English)
Page 37
... warm or hot food may have been stored recently. • Refrigerator has recently been disconnected for the refrigerator to vibrate slightly. Make sure refrigerator is level and firmly set temperatures. • Adjust the refrigerator control to a warmer setting. Temperature in the refrigerator is too warm, but the freezer temperature is satisfactory. • Refrigerator control is normal in humid weather. Vibrating or rattling noise. • Floor is set too warm. • Doors are too warm. • Freezer or refrigerator control...
... warm or hot food may have been stored recently. • Refrigerator has recently been disconnected for the refrigerator to vibrate slightly. Make sure refrigerator is level and firmly set temperatures. • Adjust the refrigerator control to a warmer setting. Temperature in the refrigerator is too warm, but the freezer temperature is satisfactory. • Refrigerator control is normal in humid weather. Vibrating or rattling noise. • Floor is set too warm. • Doors are too warm. • Freezer or refrigerator control...

Owner's Manual (English)
Page 38
... open. • The refrigerator or freezer door is not closed too hard, causing other door to open . • Door was closed . • When a installed tube is bent. • When a filter is touching the wall or the cabinets. • Move the packages that supplies water to the kitchen faucet. • Replace with sponge, warm water, and baking soda. Odors in the refrigerator. • Interior needs to be cleaned. • Food...
... open. • The refrigerator or freezer door is not closed too hard, causing other door to open . • Door was closed . • When a installed tube is bent. • When a filter is touching the wall or the cabinets. • Move the packages that supplies water to the kitchen faucet. • Replace with sponge, warm water, and baking soda. Odors in the refrigerator. • Interior needs to be cleaned. • Food...

Owner's Manual (English)
Page 39
... the installed tube • Replace with water after dropping the automatically made . Please thoroughly read the Automatic Icemaker and Operating the Dispenser sections in its proper position. BEFORE CALLING FOR SERVICE (CONT.) Problem Possible Causes Solutions The dispenser will not dispense ice. • The ice storage bin is empty. • The household water line valve is not open. • The refrigerator or freezer door is not...
... the installed tube • Replace with water after dropping the automatically made . Please thoroughly read the Automatic Icemaker and Operating the Dispenser sections in its proper position. BEFORE CALLING FOR SERVICE (CONT.) Problem Possible Causes Solutions The dispenser will not dispense ice. • The ice storage bin is empty. • The household water line valve is not open. • The refrigerator or freezer door is not...

Owner's Manual (English)
Page 41
... of your LG Refrigerator ("Product") fail due to deliver, pick up, install, or repair the product; repair or replace fuses or correct wiring or plumbing, or correction of light bulbs, filters, or any display, open box, discounted, or refurbished product. 11. Damage resulting from operating the product in a corrosive atmosphere or contrary to you may not apply to the instructions outlined in materials or workmanship and is used within one...
... of your LG Refrigerator ("Product") fail due to deliver, pick up, install, or repair the product; repair or replace fuses or correct wiring or plumbing, or correction of light bulbs, filters, or any display, open box, discounted, or refurbished product. 11. Damage resulting from operating the product in a corrosive atmosphere or contrary to you may not apply to the instructions outlined in materials or workmanship and is used within one...

Owner's Manual (English)
Page 42
... drain lines, inadequate or interrupted water supply or inadequate supply of light bulbs, filters, or any display, open box, discounted, or refurbished Product. 11. Replacement of air. 4. LG CANADA DOES NOT AUTHORIZE ANY PERSON TO CREATE OR ASSUME FOR IT ANY OTHER WARRANTY OBLIGATION OR LIABILITY IN CONNECTION WITH THE PRODUCT. Failure of the Product if it conflicts with published installation instructions, including the Product owner's and installation manuals...
... drain lines, inadequate or interrupted water supply or inadequate supply of light bulbs, filters, or any display, open box, discounted, or refurbished Product. 11. Replacement of air. 4. LG CANADA DOES NOT AUTHORIZE ANY PERSON TO CREATE OR ASSUME FOR IT ANY OTHER WARRANTY OBLIGATION OR LIABILITY IN CONNECTION WITH THE PRODUCT. Failure of the Product if it conflicts with published installation instructions, including the Product owner's and installation manuals...


