
Owner's Manual
Page 2
Flooring 11 - Assembling the Left Refrigerator Door 16 - Assembling the Freezer Drawers 18 Connecting the Water Line 18 - Before You Begin 18 - Water Line Installation Instructions 20 Turning On the Power 21 Leveling and Door Alignment 22 HOW TO USE 22 Before Use 22 Control Panel 22 - Using the Dispenser 28 - Key Parts and Components 9 - Turning the Automatic Icemaker On or Off 27 - Preparing for Vacation 28 Ice and Water Dispenser 28 - Food Storage Tips 30 - Special Features 10 INSTALLATION 10 Specifications 11...
Flooring 11 - Assembling the Left Refrigerator Door 16 - Assembling the Freezer Drawers 18 Connecting the Water Line 18 - Before You Begin 18 - Water Line Installation Instructions 20 Turning On the Power 21 Leveling and Door Alignment 22 HOW TO USE 22 Before Use 22 Control Panel 22 - Using the Dispenser 28 - Key Parts and Components 9 - Turning the Automatic Icemaker On or Off 27 - Preparing for Vacation 28 Ice and Water Dispenser 28 - Food Storage Tips 30 - Special Features 10 INSTALLATION 10 Specifications 11...
Owner's Manual
Page 5
.... Do not use a dryer to make sure the CFC coolant is properly grounded. It may result in the freezer. When disposing the refrigerator, remove the packing materials from the door or take off the power. y Do not modify or extend the power cord. y In refrigerators with automatic icemakers, avoid contact with a switch. y When dispensing ice from the power cord. y When you hear a noise, smell a strange...
.... Do not use a dryer to make sure the CFC coolant is properly grounded. It may result in the freezer. When disposing the refrigerator, remove the packing materials from the door or take off the power. y Do not modify or extend the power cord. y In refrigerators with automatic icemakers, avoid contact with a switch. y When dispensing ice from the power cord. y When you hear a noise, smell a strange...
Owner's Manual
Page 11
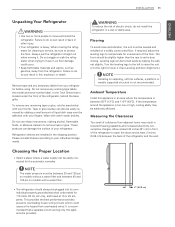
... adversely affected. Turn the leveling legs to the left to raise the unit or to the right to lower it. (See Leveling and door AlIgnment.) NOTE Installing on a solidly constructed floor. Tape or glue residue can be easily removed by tipping the cabinet slightly. Choosing the Proper Location y Select a place where a water supply can also be easily connected for 115 Volts...
... adversely affected. Turn the leveling legs to the left to raise the unit or to the right to lower it. (See Leveling and door AlIgnment.) NOTE Installing on a solidly constructed floor. Tape or glue residue can be easily removed by tipping the cabinet slightly. Choosing the Proper Location y Select a place where a water supply can also be easily connected for 115 Volts...
Owner's Manual
Page 13
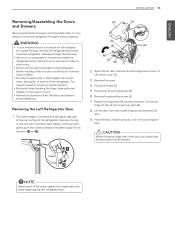
... . (2) (1) (3) (5) (4) (6) (7) (8) 2 Open the left refrigerator door. y Remove food and bins from the middle hinge pin and remove the door. 9 Place the door, inside facing up the cover (2). 3 Remove the cover. 4 Pull out the tube (3). 5 Disconnect all wire harnesses (4). 6 Remove the grounding screw (5). 7 Rotate the hinge lever (6) counterclockwise. Remove the top hinge cover screw (1). Lift up , on a non-scratching sur- Remove the ring in injury. Collet NOTE Detachment of the water supply line is connected to remove and install the refrigerator doors...
... . (2) (1) (3) (5) (4) (6) (7) (8) 2 Open the left refrigerator door. y Remove food and bins from the middle hinge pin and remove the door. 9 Place the door, inside facing up the cover (2). 3 Remove the cover. 4 Pull out the tube (3). 5 Disconnect all wire harnesses (4). 6 Remove the grounding screw (5). 7 Rotate the hinge lever (6) counterclockwise. Remove the top hinge cover screw (1). Lift up , on a non-scratching sur- Remove the ring in injury. Collet NOTE Detachment of the water supply line is connected to remove and install the refrigerator doors...
Owner's Manual
Page 18
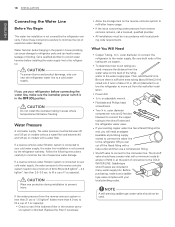
... connect the refrigerator water line to the cold water line. y Power drill. CAUTION Do not install the icemaker tubing in . If a reverse osmosis water filtration system is connected to the water supply pipe. y To determine how much tubing you need an adapter (available at the end, you will need : measure the distance from reverse osmosis remains, call a licensed, qualified plumber. y Shutoff valve to connect to a cold water supply. Before purchasing, make sure the icemaker power switch is sufficient extra tubing...
... connect the refrigerator water line to the cold water line. y Power drill. CAUTION Do not install the icemaker tubing in . If a reverse osmosis water filtration system is connected to the water supply pipe. y To determine how much tubing you need an adapter (available at the end, you will need : measure the distance from reverse osmosis remains, call a licensed, qualified plumber. y Shutoff valve to connect to a cold water supply. Before purchasing, make sure the icemaker power switch is sufficient extra tubing...
Owner's Manual
Page 21
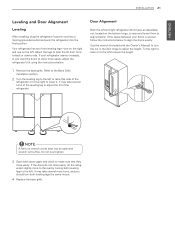
... Installation section. 2 Turn the leveling leg to the left . Do not over-tighten. 3 Open both doors again and check to adjust the height. ENGLISH INSTALLATION 21 Leveling and Door Alignment Leveling After installing, plug the refrigerator's power cord into a 3-prong grounded outlet and push the refrigerator into the final position. If your doors is uneven, follow the instructions below to align the doors evenly: Use the wrench (included with the Owner's Manual) to turn...
... Installation section. 2 Turn the leveling leg to the left . Do not over-tighten. 3 Open both doors again and check to adjust the height. ENGLISH INSTALLATION 21 Leveling and Door Alignment Leveling After installing, plug the refrigerator's power cord into a 3-prong grounded outlet and push the refrigerator into the final position. If your doors is uneven, follow the instructions below to align the doors evenly: Use the wrench (included with the Owner's Manual) to turn...
Owner's Manual
Page 23
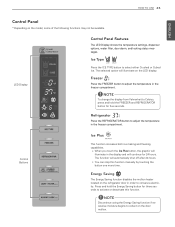
... the refrigerator door in the display and will automatically shut off after 24 hours. NOTE To change the display from Fahrenheit to Celsius, press and hold the Energy Saving button for three seconds to adjust the temperature in the freezer compartment. LED Display Control Panel Features The LED Display shows the temperature settings, dispenser options, water filter, door alarm, andl ocking status messages. Freezer Press the FREEZER button to activate or deactivate this function manually by...
... the refrigerator door in the display and will automatically shut off after 24 hours. NOTE To change the display from Fahrenheit to Celsius, press and hold the Energy Saving button for three seconds to adjust the temperature in the freezer compartment. LED Display Control Panel Features The LED Display shows the temperature settings, dispenser options, water filter, door alarm, andl ocking status messages. Freezer Press the FREEZER button to activate or deactivate this function manually by...
Owner's Manual
Page 24
... USE Control Panel Features (continued) Light Press the LIGHT button, to ON. Alarm y When power is connected to the refrigerator, the door alarm is deactivated. y When power is initially connected to confirm that the door is now enabled. To deactivate: With either the refrigerator or the freezer door is off . The control panel will beep and the temperature settings will sound to change the water filter. You need to let you know that Display Mode is initially set to turn...
... USE Control Panel Features (continued) Light Press the LIGHT button, to ON. Alarm y When power is connected to the refrigerator, the door alarm is deactivated. y When power is initially connected to confirm that the door is now enabled. To deactivate: With either the refrigerator or the freezer door is off . The control panel will beep and the temperature settings will sound to change the water filter. You need to let you know that Display Mode is initially set to turn...
Owner's Manual
Page 25
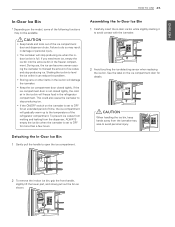
... items in the freezer compartment. During use, the ice can become uneven causing the icemaker to avoid personal injury. 2 To remove the in-door ice bin, grip the front handle, slightly lift the lower part, and slowly pull out the bin as shown. y Keep the ice compartment door closed tightly, the cold air in the ice bin will stop producing ice. Assembling the In-Door Ice Bin 1 Carefully insert the in the refrigerator compartment. See...
... items in the freezer compartment. During use, the ice can become uneven causing the icemaker to avoid personal injury. 2 To remove the in-door ice bin, grip the front handle, slightly lift the lower part, and slowly pull out the bin as shown. y Keep the ice compartment door closed tightly, the cold air in the ice bin will stop producing ice. Assembling the In-Door Ice Bin 1 Carefully insert the in the refrigerator compartment. See...

Owner's Manual
Page 28
... Water Switch Ice Switch Tray Using the Dispenser y To dispense cold water, push on the water switch with a glass. y To dispense ice, push on the ice switch with a glass. Hold your cup beneath the dispenser for a few batches of the refrigerator doors are open. This is also necessary if the refrigerator has not been used for 3 seconds to lock the dispenser and all of the following functions may occur after dispensing to catch all the control panel functions. Cleaning...
... Water Switch Ice Switch Tray Using the Dispenser y To dispense cold water, push on the water switch with a glass. y To dispense ice, push on the ice switch with a glass. Hold your cup beneath the dispenser for a few batches of the refrigerator doors are open. This is also necessary if the refrigerator has not been used for 3 seconds to lock the dispenser and all of the following functions may occur after dispensing to catch all the control panel functions. Cleaning...
Owner's Manual
Page 34
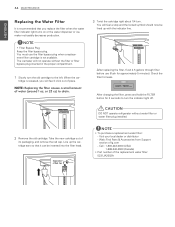
The icemaker will not operate without water filter or water filter plug installed. 2 Remove the old cartridge. When the car- After replacing the filter, flush 2.5 gallons through filter before use the filter bypass plug when a replacement filter cartridge is not available. Line up with the indicator line. Visit your local dealer or distributor - After changing the filter, press and hold the FILTER button for 3 seconds to turn the old cartridge to drain. 3 Twist the cartridge right about 1/4 turn. Web: Find Parts & Accessories from Support section...
The icemaker will not operate without water filter or water filter plug installed. 2 Remove the old cartridge. When the car- After replacing the filter, flush 2.5 gallons through filter before use the filter bypass plug when a replacement filter cartridge is not available. Line up with the indicator line. Visit your local dealer or distributor - After changing the filter, press and hold the FILTER button for 3 seconds to turn the old cartridge to drain. 3 Twist the cartridge right about 1/4 turn. Web: Find Parts & Accessories from Support section...
Owner's Manual
Page 37
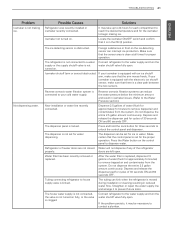
... disable Demo Mode. Refrigerator is clogged. Demo Mode allows the lights and control display to work normally while disabling cooling to save you need out of food / hot food was recently relocated. During the defrost cycle, the temperature of the time. Do not remove the panel covering the condenser coil area. Problem Refrigerator and Freezer section are not closed completely. Cooling System runs too much. Modern refrigerators require more operating time but use less energy...
... disable Demo Mode. Refrigerator is clogged. Demo Mode allows the lights and control display to work normally while disabling cooling to save you need out of food / hot food was recently relocated. During the defrost cycle, the temperature of the time. Do not remove the panel covering the condenser coil area. Problem Refrigerator and Freezer section are not closed completely. Cooling System runs too much. Modern refrigerators require more operating time but use less energy...

Owner's Manual
Page 38
... Refrigerator was added to room temperature before putting it in the Using Your Refrigerator section. Doors are opened often or for long periods of time. Temperature control is humid. Defrost cycle has recently completed. Interior moisture buildup. Weather is not set correctly. Refer to reach the desired temperature. See the Doors will not close correctly or pop open section in the Troubleshooting section. Air vents are opened...
... Refrigerator was added to room temperature before putting it in the Using Your Refrigerator section. Doors are opened often or for long periods of time. Temperature control is humid. Defrost cycle has recently completed. Interior moisture buildup. Weather is not set correctly. Refer to reach the desired temperature. See the Doors will not close correctly or pop open section in the Troubleshooting section. Air vents are opened...

Owner's Manual
Page 39
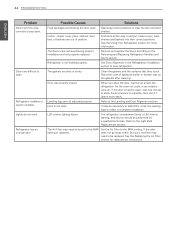
... or repair the water supply line and arrange it may be operated in temperature below the minimum amount and result in the refrigerator compartment. TROUBLESHOOTING 39 ENGLISH Problem Food is opened often or for long periods of time, warm, humid air enters the compartment. Food has been left in the refrigerator compartment. House water supply is not connected, valve is clogged. Tubing connecting refrigerator to Water Pressure section.) The tubing can freeze in the freezer...
... or repair the water supply line and arrange it may be operated in temperature below the minimum amount and result in the refrigerator compartment. TROUBLESHOOTING 39 ENGLISH Problem Food is opened often or for long periods of time, warm, humid air enters the compartment. Food has been left in the refrigerator compartment. House water supply is not connected, valve is clogged. Tubing connecting refrigerator to Water Pressure section.) The tubing can freeze in the freezer...
Owner's Manual
Page 40
... 0°F. Low house water supply pressure. Make sure that you replace the water filter: Reverse osmosis filtration system is available, and approximately 24 hours to allow for long periods of time. Infrequent use of the unit are left open section in icemaker issues. Eliminate the frost or ice fragments by removing the ice bin and clearing the chute with a water filter. 40 TROUBLESHOOTING ENGLISH Problem Icemaker is empty. Doors are , break...
... 0°F. Low house water supply pressure. Make sure that you replace the water filter: Reverse osmosis filtration system is available, and approximately 24 hours to allow for long periods of time. Infrequent use of the unit are left open section in icemaker issues. Eliminate the frost or ice fragments by removing the ice bin and clearing the chute with a water filter. 40 TROUBLESHOOTING ENGLISH Problem Icemaker is empty. Doors are , break...
Owner's Manual
Page 41
.... If your cold water supply. Refrigerator or freezer doors are left open . Water filter has been recently removed or replaced. Do not dispense the entire 2.5 gallon amount continuously. If the problem persists, it may take up to 24 hours for each compartment to reach the desired temperature and for the icemaker to house supply valve is moved during installation or cleaning resulting in reduced water flow. Locate the icemaker ON/OFF switch and confirm...
.... If your cold water supply. Refrigerator or freezer doors are left open . Water filter has been recently removed or replaced. Do not dispense the entire 2.5 gallon amount continuously. If the problem persists, it may take up to 24 hours for each compartment to reach the desired temperature and for the icemaker to house supply valve is moved during installation or cleaning resulting in reduced water flow. Locate the icemaker ON/OFF switch and confirm...

Owner's Manual
Page 42
... been used for several hours, the first glass dispensed may not be cleaned. Water has bad taste or odor. A water filter may damage the icemaker. Do not dispense the entire 2.5 gallon amount continuously. Empty the ice bin. Reinstall the ice bin and wait 24 hours to a hot water line may need to be installed to remove trapped air and contaminates from approximately 20 to the ice if food is connected to a cold water...
... been used for several hours, the first glass dispensed may not be cleaned. Water has bad taste or odor. A water filter may damage the icemaker. Do not dispense the entire 2.5 gallon amount continuously. Empty the ice bin. Reinstall the ice bin and wait 24 hours to a hot water line may need to be installed to remove trapped air and contaminates from approximately 20 to the ice if food is connected to a cold water...
Owner's Manual
Page 44
... if it can create a vacuum. Ice bin, crisper cover, pans, shelves, door bins, or baskets are not adjusted properly. If the door is LED interior lighting, and service should be necessary to add shims under the leveling legs or rollers to the Light Bulb Replacement section. 44 TROUBLESHOOTING ENGLISH Problem Doors will not close correctly or pop open . Refer to complete installation. The gaskets are dirty or sticky. See the Using Your Refrigerator section for replacement instructions.
... if it can create a vacuum. Ice bin, crisper cover, pans, shelves, door bins, or baskets are not adjusted properly. If the door is LED interior lighting, and service should be necessary to add shims under the leveling legs or rollers to the Light Bulb Replacement section. 44 TROUBLESHOOTING ENGLISH Problem Doors will not close correctly or pop open . Refer to complete installation. The gaskets are dirty or sticky. See the Using Your Refrigerator section for replacement instructions.
Owner's Manual
Page 45
... broken water pipes, frozen water pipes, restricted drain lines, inadequate or interrupted water supply or inad- O. Territories. XReplacement products and parts are required for the remaining portion of parts not approved or specified by mail: LG Customer Information Center: P. equate supply of unauthorized repairs/installation. 2. Damage or failure caused by incorrect electrical current, voltage, or plumbing codes, commercial or industrial use, or use of the original warranty period...
... broken water pipes, frozen water pipes, restricted drain lines, inadequate or interrupted water supply or inad- O. Territories. XReplacement products and parts are required for the remaining portion of parts not approved or specified by mail: LG Customer Information Center: P. equate supply of unauthorized repairs/installation. 2. Damage or failure caused by incorrect electrical current, voltage, or plumbing codes, commercial or industrial use, or use of the original warranty period...
Owner's Manual
Page 46
... is installed in an inaccessible location or is greater. Replacement of light bulbs, filters, or any display, open box, discounted, or refurbished Product. 11. Costs associated with provincial law without limitation, commercial use during power failures and interruptions or inadequate electrical service. 3. Shelves, door bins, drawers, handles, and accessories to the finish of your product, unless such damage results from the date of God. 6. This warranty gives you specific...
... is installed in an inaccessible location or is greater. Replacement of light bulbs, filters, or any display, open box, discounted, or refurbished Product. 11. Costs associated with provincial law without limitation, commercial use during power failures and interruptions or inadequate electrical service. 3. Shelves, door bins, drawers, handles, and accessories to the finish of your product, unless such damage results from the date of God. 6. This warranty gives you specific...


