
Owner's Manual
Page 1
OWNER'S MANUAL FRENCH DOOR REFRIGERATOR Please read this owner's manual thoroughly before operating and keep it handy for reference at all times. LFX25974** P/NO : MFL62184512 www.lg.com ENGLISH FRANÇAIS ESPAÑOL
OWNER'S MANUAL FRENCH DOOR REFRIGERATOR Please read this owner's manual thoroughly before operating and keep it handy for reference at all times. LFX25974** P/NO : MFL62184512 www.lg.com ENGLISH FRANÇAIS ESPAÑOL
Owner's Manual
Page 2
...25 - Storing Frozen Food 31 Humidity Controlled Crisper and Glide'N'Serve 31 Detaching and Assembling the Storage Bins 32 Adjusting the Refrigerator Shelves 33 MAINTENANCE 33 Cleaning 34 Replacing the Water Filter 36 SMART DIAGNOSIS 37 TROUBLESHOOTING 45 WARRANTY Special Features 10 INSTALLATION 10...Should Turn the Icemaker Off 27 - Normal Sounds You May Hear 27 - Locking the Dispenser 28 - Ambient Temperature 11 - Assembling the Left Refrigerator Door 16 - Detaching the In-Door Ice Bin 25 - Food Preservation Location 30 - Assembling the In-Door Ice Bin 26 Automatic Icemaker ...
...25 - Storing Frozen Food 31 Humidity Controlled Crisper and Glide'N'Serve 31 Detaching and Assembling the Storage Bins 32 Adjusting the Refrigerator Shelves 33 MAINTENANCE 33 Cleaning 34 Replacing the Water Filter 36 SMART DIAGNOSIS 37 TROUBLESHOOTING 45 WARRANTY Special Features 10 INSTALLATION 10...Should Turn the Icemaker Off 27 - Normal Sounds You May Hear 27 - Locking the Dispenser 28 - Ambient Temperature 11 - Assembling the Left Refrigerator Door 16 - Detaching the In-Door Ice Bin 25 - Food Preservation Location 30 - Assembling the In-Door Ice Bin 26 Automatic Icemaker ...
Owner's Manual
Page 3
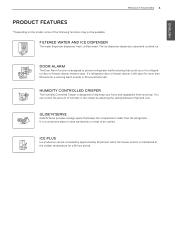
...warning alarm sounds in the crisper by approximately 20 percent when the freezer section is designed to prevent refrigerator malfunctioning that keeps the compartment colder than the refrigerator. ICE PLUS Ice production can control the amount of the following functions may not be cooked. You... Depending on the model, some of humidity in 30 second intervals. If a refrigerator door or freezer drawer is left open . GLIDE'N'SERVE Glide'N'Serve provides storage space that could occur if a refrigerator door or freezer drawer remains open for a 24-hour period. It is designed...
...warning alarm sounds in the crisper by approximately 20 percent when the freezer section is designed to prevent refrigerator malfunctioning that keeps the compartment colder than the refrigerator. ICE PLUS Ice production can control the amount of the following functions may not be cooked. You... Depending on the model, some of humidity in 30 second intervals. If a refrigerator door or freezer drawer is left open . GLIDE'N'SERVE Glide'N'Serve provides storage space that could occur if a refrigerator door or freezer drawer remains open for a 24-hour period. It is designed...

Owner's Manual
Page 4
...damage along its length or at either the plug or connector end. Installation y Contact an authorized service center when you of the refrigerator. Use y DO NOT allow children to climb into the product when it . Ventilate sufficiently and contact an authorized service center. ... wall outlet with the rating prior to a dedicated grounded electric outlet conforming with a standard 3-prong wall outlet. They could damage the refrigerator and seriously injure themselves. Do not touch or disassemble the electric outlet of a blackout or thunderstorm. Always read and obey all power ...
...damage along its length or at either the plug or connector end. Installation y Contact an authorized service center when you of the refrigerator. Use y DO NOT allow children to climb into the product when it . Ventilate sufficiently and contact an authorized service center. ... wall outlet with the rating prior to a dedicated grounded electric outlet conforming with a standard 3-prong wall outlet. They could damage the refrigerator and seriously injure themselves. Do not touch or disassemble the electric outlet of a blackout or thunderstorm. Always read and obey all power ...
Owner's Manual
Page 5
... y For your product, basic safety precautions should be properly grounded. y Disconnect the power cord immediately if you are throwing away your refrigerator is plugged in place so that can be fined or imprisoned in accordance with a switch. y Do not put glass containers, glass ...mental capabilities, or lack of the ejector mechanism or with a standard 3-prong wall outlet. y Do not disassemble or modify the refrigerator. When disposing the refrigerator, remove the packing materials from the door or take off if water or dust penetrates into a multi-outlet extension cord. Do...
... y For your product, basic safety precautions should be properly grounded. y Disconnect the power cord immediately if you are throwing away your refrigerator is plugged in place so that can be fined or imprisoned in accordance with a switch. y Do not put glass containers, glass ...mental capabilities, or lack of the ejector mechanism or with a standard 3-prong wall outlet. y Do not disassemble or modify the refrigerator. When disposing the refrigerator, remove the packing materials from the door or take off if water or dust penetrates into a multi-outlet extension cord. Do...

Owner's Manual
Page 6
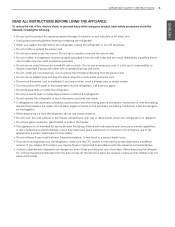
... of packing materials (plastic) out of reach of pinch point areas; y If you unpack and install the refrigerator. SAVE THESE INSTUCTIONS ENGLISH 6 IMPORTANT SAFETY INSTRUCTIONS READ ALL INSTRUCTIONS BEFORE USING THE APPLIANCE. CAUTION Installation y The refrigerator must be followed, including the following. y Keep fingers out of children. y Wipe foreign objects (dust, water... use strong detergents like wax or thinners for cleaning. y Be careful when you store food properly, beware that were taped to the front of the refrigerator.
... of packing materials (plastic) out of reach of pinch point areas; y If you unpack and install the refrigerator. SAVE THESE INSTUCTIONS ENGLISH 6 IMPORTANT SAFETY INSTRUCTIONS READ ALL INSTRUCTIONS BEFORE USING THE APPLIANCE. CAUTION Installation y The refrigerator must be followed, including the following. y Keep fingers out of children. y Wipe foreign objects (dust, water... use strong detergents like wax or thinners for cleaning. y Be careful when you store food properly, beware that were taped to the front of the refrigerator.
Owner's Manual
Page 7
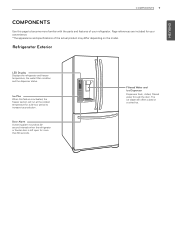
...ice dispenser offers cubed or crushed ice. ENGLISH COMPONENTS 7 COMPONENTS Use this feature is activated, the freezer section will run at 30second intervals when the refrigerator or freezer door is left open for a 24-hour period to become more than 60 seconds. Page references are included for your... refrigerator. Ice Plus When this page to increase ice production. Door Alarm A warning alarm sounds at the coldest temperature for more familiar with the parts ...
...ice dispenser offers cubed or crushed ice. ENGLISH COMPONENTS 7 COMPONENTS Use this feature is activated, the freezer section will run at 30second intervals when the refrigerator or freezer door is left open for a 24-hour period to become more than 60 seconds. Page references are included for your... refrigerator. Ice Plus When this page to increase ice production. Door Alarm A warning alarm sounds at the coldest temperature for more familiar with the parts ...

Owner's Manual
Page 8
ENGLISH 8 COMPONENTS Refrigerator Interior Key Parts and Components LED Interior Lamps The interior lamps light up the inside of the refrigerator. Durabase Divider Dairy Product Bin Refrigerator Shelves The shelves in your refrigerator are adjustable to preserve chilled food or drinks. Modular Door Bins Pullout Drawer Durabase Fixed Door Bins Can Storage Bin Used to meet your individual storage needs.
ENGLISH 8 COMPONENTS Refrigerator Interior Key Parts and Components LED Interior Lamps The interior lamps light up the inside of the refrigerator. Durabase Divider Dairy Product Bin Refrigerator Shelves The shelves in your refrigerator are adjustable to preserve chilled food or drinks. Modular Door Bins Pullout Drawer Durabase Fixed Door Bins Can Storage Bin Used to meet your individual storage needs.
Owner's Manual
Page 9
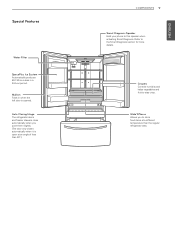
... at a different temperature than 30°.) COMPONENTS 9 Smart Diagnosis Speaker Hold your phone to the Smart Diagnosis section for more details. Auto Closing Hinge The refrigerator doors and freezer drawers close automatically when you to stay crisp. ENGLISH Crispers Controls humidity and helps vegetables and fruit to store food items at...
... at a different temperature than 30°.) COMPONENTS 9 Smart Diagnosis Speaker Hold your phone to the Smart Diagnosis section for more details. Auto Closing Hinge The refrigerator doors and freezer drawers close automatically when you to stay crisp. ENGLISH Crispers Controls humidity and helps vegetables and fruit to store food items at...
Owner's Manual
Page 10
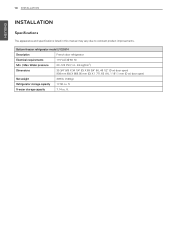
ft. Bottom-freezer refrigerator model LFX25974 Description French door refrigerator Electrical requirements 115 VAC @ 60 Hz Min. / Max. Freezer storage capacity 7.14 cu. ft. Water pressure 20 -125 PSI (1.4 - 8.4 kgf/cm2) ... 1/4" (D) X 69 3/4" (H), 46 1/2" (D w/ door open) 908 mm (W) X 869.95 mm (D) X 1 771.65 (H), 1 181.1 mm (D w/ door open) Net weight 309 lb. (140kg) Refrigerator storage capacity 17.56 cu. 10 INSTALLATION ENGLISH INSTALLATION Specifications The appearance and specifications listed in this manual may vary due to constant product improvements.
ft. Bottom-freezer refrigerator model LFX25974 Description French door refrigerator Electrical requirements 115 VAC @ 60 Hz Min. / Max. Freezer storage capacity 7.14 cu. ft. Water pressure 20 -125 PSI (1.4 - 8.4 kgf/cm2) ... 1/4" (D) X 69 3/4" (H), 46 1/2" (D w/ door open) 908 mm (W) X 869.95 mm (D) X 1 771.65 (H), 1 181.1 mm (D w/ door open) Net weight 309 lb. (140kg) Refrigerator storage capacity 17.56 cu. 10 INSTALLATION ENGLISH INSTALLATION Specifications The appearance and specifications listed in this manual may vary due to constant product improvements.
Owner's Manual
Page 11
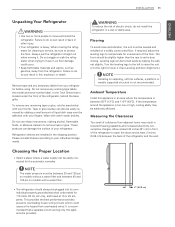
...be adversely affected. The front should always be plugged into its own individual properly grounded electrical outlet rated for unevenness of the refrigerator, behind the base grille. Ambient Temperature Install this appliance be easily connected for cleaning or service, be slightly higher than the ...and serial number label, or the Tech Sheet that a separate circuit serving only this appliance in front of the refrigerator and the wall. 2" (5.08 cm) Refrigerator shelves are installed in fire, explosion, or death. Leveling legs can damage the surface of liquid dish soap over...
...be adversely affected. The front should always be plugged into its own individual properly grounded electrical outlet rated for unevenness of the refrigerator, behind the base grille. Ambient Temperature Install this appliance be easily connected for cleaning or service, be slightly higher than the ...and serial number label, or the Tech Sheet that a separate circuit serving only this appliance in front of the refrigerator and the wall. 2" (5.08 cm) Refrigerator shelves are installed in fire, explosion, or death. Leveling legs can damage the surface of liquid dish soap over...
Owner's Manual
Page 12
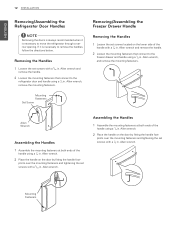
... set screws located on the door by fitting the handle foot- ENGLISH 12 INSTALLATION Removing/Assembling the Refrigerator Door Handles NOTE Removing the doors is always recommended when it is necessary to move the refrigerator through a narrow opening. Allen wrench, and remove the mounting fasteners. prints over the mounting fasteners and tightening... below. Allen wrench. Allen wrench. 2 Place the handle on the lower side of the handle using a 1/4 in . Allen wrench. If it is necessary to the refrigerator door and handle using a 1/4 in .
... set screws located on the door by fitting the handle foot- ENGLISH 12 INSTALLATION Removing/Assembling the Refrigerator Door Handles NOTE Removing the doors is always recommended when it is necessary to move the refrigerator through a narrow opening. Allen wrench, and remove the mounting fasteners. prints over the mounting fasteners and tightening... below. Allen wrench. Allen wrench. 2 Place the handle on the lower side of the handle using a 1/4 in . Allen wrench. If it is necessary to the refrigerator door and handle using a 1/4 in .
Owner's Manual
Page 13
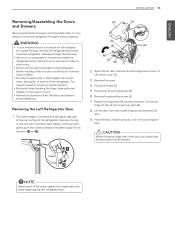
...free of the hinge lever latch (8). 8 Lift the door from the doors and drawers before installing. y Use two or more people to the refrigerator before detaching. y Remove food and bins from the middle hinge pin and remove the door. 9 Place the door, inside facing up the ... (4). 6 Remove the grounding screw (5). 7 Rotate the hinge lever (6) counterclockwise. You may result in the joint area. Collet NOTE Detachment of the refrigerator. Remove the ring in injury. Lift up , on a non-scratching sur- Remove the top hinge cover screw (1). CAUTION When lifting the hinge free...
...free of the hinge lever latch (8). 8 Lift the door from the doors and drawers before installing. y Use two or more people to the refrigerator before detaching. y Remove food and bins from the middle hinge pin and remove the door. 9 Place the door, inside facing up the ... (4). 6 Remove the grounding screw (5). 7 Rotate the hinge lever (6) counterclockwise. You may result in the joint area. Collet NOTE Detachment of the refrigerator. Remove the ring in injury. Lift up , on a non-scratching sur- Remove the top hinge cover screw (1). CAUTION When lifting the hinge free...
Owner's Manual
Page 14
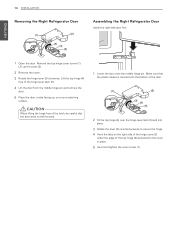
... up the cover (2). 2 Remove the cover. 3 Rotate the hinge lever (3) clockwise. Remove the top hinge cover screw (1). 14 INSTALLATION ENGLISH Removing the Right Refrigerator Door (1) (2) (3) (4) (5) Assembling the Right Refrigerator Door Install the right-side door first. 1 Open the door. Lift up , on the right side of the hinge cover (2) under the edge...
... up the cover (2). 2 Remove the cover. 3 Rotate the hinge lever (3) clockwise. Remove the top hinge cover screw (1). 14 INSTALLATION ENGLISH Removing the Right Refrigerator Door (1) (2) (3) (4) (5) Assembling the Right Refrigerator Door Install the right-side door first. 1 Open the door. Lift up , on the right side of the hinge cover (2) under the edge...
Owner's Manual
Page 15
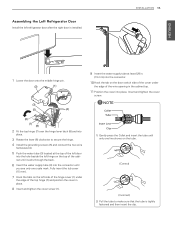
Fully insert the tub cover (15 mm). 7 Hook the tabs on the left refrigerator door after the right door is tightly fastened and then insert the clip. NOTE Collet Tube Insert Line Clip 1) Gently press the Collet and insert ... of the cover under the edge of the cabinet until it exits through the back. 6 Insert the water supply tube (3) into place. Assembling the Left Refrigerator Door Install the left side of the hinge cover (1) under the edge of the top hinge (7) and position the cover in place. 8 Insert and tighten...
Fully insert the tub cover (15 mm). 7 Hook the tabs on the left refrigerator door after the right door is tightly fastened and then insert the clip. NOTE Collet Tube Insert Line Clip 1) Gently press the Collet and insert ... of the cover under the edge of the cabinet until it exits through the back. 6 Insert the water supply tube (3) into place. Assembling the Left Refrigerator Door Install the left side of the hinge cover (1) under the edge of the top hinge (7) and position the cover in place. 8 Insert and tighten...
Owner's Manual
Page 18
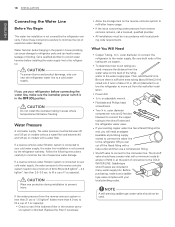
... head screwdrivers. 18 INSTALLATION ENGLISH Connecting the Water Line Before You Begin This water line installation is not covered by the refrigerator warranty. Follow these instructions carefully to a cold water supply. Call a qualified plumber to the cold water line. CAUTION ...drill. y ½ in many water supply kits. y If your cold water supply, this water line installation is not covered by the refrigerator warranty. y Shutoff valve to connect to correct water hammer before connecting the water line, make sure a saddletype valve complies with a tube cutter...
... head screwdrivers. 18 INSTALLATION ENGLISH Connecting the Water Line Before You Begin This water line installation is not covered by the refrigerator warranty. Follow these instructions carefully to a cold water supply. Call a qualified plumber to the cold water line. CAUTION ...drill. y ½ in many water supply kits. y If your cold water supply, this water line installation is not covered by the refrigerator warranty. y Shutoff valve to connect to correct water hammer before connecting the water line, make sure a saddletype valve complies with a tube cutter...
Owner's Manual
Page 19
...¼ in reduced ice production or smaller cubes. Make sure the tubing is sufficient extra tubing (about 10 in the wall or floor (behind the refrigerator or adjacent base cabinet) as close to the shutoff valve. hole in the pipe. Be careful not to allow the...sealing washer begins to . Washer Pipe Clamp Inlet End Clamp Screw 6 ROUTE THE TUBING Route the tubing between the cold water line and the refrigerator. Tighten the compression nut securely. hole may crush the tubing. Saddle-Type Shutoff Valve Compression Nut Saddle-Type Shutoff Valve Vertical Cold Water Pipe Packing...
...¼ in reduced ice production or smaller cubes. Make sure the tubing is sufficient extra tubing (about 10 in the wall or floor (behind the refrigerator or adjacent base cabinet) as close to the shutoff valve. hole in the pipe. Be careful not to allow the...sealing washer begins to . Washer Pipe Clamp Inlet End Clamp Screw 6 ROUTE THE TUBING Route the tubing between the cold water line and the refrigerator. Tighten the compression nut securely. hole may crush the tubing. Saddle-Type Shutoff Valve Compression Nut Saddle-Type Shutoff Valve Vertical Cold Water Pipe Packing...

Owner's Manual
Page 20
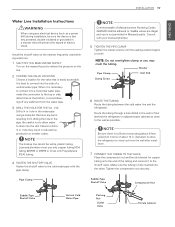
... icemaker power switch to a rated power outlet. CAUTION y Connect to the ON position. Tubing Refrigerator Connection 10 TURN THE WATER ON AT THE SHUTOFF VALVE Tighten any connections that the refrigerator power cord is not plugged into the con- Insert the end of the tubing as possible. ... against the back of 15°F (-9°C) or below. Compression Nut Ferrule (sleeve) ¼ in the refrigerator. y Do not damage or cut off at the water line connections. 11 PLUG IN THE REFRIGERATOR Arrange the coil of tubing so that it reaches its operating temperature of the...
... icemaker power switch to a rated power outlet. CAUTION y Connect to the ON position. Tubing Refrigerator Connection 10 TURN THE WATER ON AT THE SHUTOFF VALVE Tighten any connections that the refrigerator power cord is not plugged into the con- Insert the end of the tubing as possible. ... against the back of 15°F (-9°C) or below. Compression Nut Ferrule (sleeve) ¼ in the refrigerator. y Do not damage or cut off at the water line connections. 11 PLUG IN THE REFRIGERATOR Arrange the coil of tubing so that it reaches its operating temperature of the...
Owner's Manual
Page 21
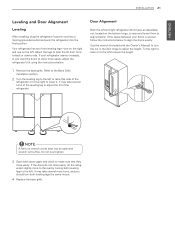
... hinge, to raise and lower them to adjust the height. It may take several turns of the leveling leg to adjust the tilt of the refrigerator or to the right to the left . NOTE A flare nut wrench works best, but an open-end wrench will suffice. Do not over-tighten. 3 Open... both leveling legs the same mount. 4 Replace the base grille. If the space between your refrigerator seems unsteady, or you should turn the nut in the door hinge to align properly. If your doors is uneven, follow the instructions below : 1 Remove...
... hinge, to raise and lower them to adjust the height. It may take several turns of the leveling leg to adjust the tilt of the refrigerator or to the right to the left . NOTE A flare nut wrench works best, but an open-end wrench will suffice. Do not over-tighten. 3 Open... both leveling legs the same mount. 4 Replace the base grille. If the space between your refrigerator seems unsteady, or you should turn the nut in the door hinge to align properly. If your doors is uneven, follow the instructions below : 1 Remove...
Owner's Manual
Page 22
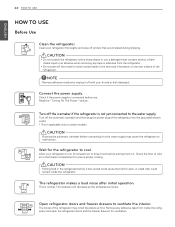
.... * This is not yet connected to spoil, or a bad odor could remain inside the refrigerator and open the refrigerator doors and the freezer drawers for ventilation. Allow your refrigerator thoroughly and wipe off the model or serial number label or the technical information on the rear ...Running the automatic icemaker before putting food in the freezer compartment to ventilate the interior. The refrigerator makes a loud noise after initial operation. Clean your refrigerator to run for the refrigerator to the water supply may smell like plastic at first. ENGLISH 22 HOW TO USE HOW...
.... * This is not yet connected to spoil, or a bad odor could remain inside the refrigerator and open the refrigerator doors and the freezer drawers for ventilation. Allow your refrigerator thoroughly and wipe off the model or serial number label or the technical information on the rear ...Running the automatic icemaker before putting food in the freezer compartment to ventilate the interior. The refrigerator makes a loud noise after initial operation. Clean your refrigerator to run for the refrigerator to the water supply may smell like plastic at first. ENGLISH 22 HOW TO USE HOW...


