
Owner's Manual
Page 2
...Bins 32 Adjusting the Refrigerator Shelves 33 MAINTENANCE 33 Cleaning 34 Replacing the Water Filter 36 SMART DIAGNOSIS 37 TROUBLESHOOTING 45 WARRANTY Special Features 10 INSTALLATION 10 Specifications 11 Unpacking Your Refrigerator 11 Choosing the Proper Location 11 - Ambient Temperature 11 - Control Panel Features 25 In-Door Ice Bin 25 - Removing the Right Refrigerator Door 14 - Assembling the Freezer Drawers 18 Connecting the Water Line 18 - Using the Dispenser 28 - Removing the Left Refrigerator Door 14 - Assembling the Left Refrigerator Door 16 - Detaching the In-Door Ice Bin...
...Bins 32 Adjusting the Refrigerator Shelves 33 MAINTENANCE 33 Cleaning 34 Replacing the Water Filter 36 SMART DIAGNOSIS 37 TROUBLESHOOTING 45 WARRANTY Special Features 10 INSTALLATION 10 Specifications 11 Unpacking Your Refrigerator 11 Choosing the Proper Location 11 - Ambient Temperature 11 - Control Panel Features 25 In-Door Ice Bin 25 - Removing the Right Refrigerator Door 14 - Assembling the Freezer Drawers 18 Connecting the Water Line 18 - Using the Dispenser 28 - Removing the Left Refrigerator Door 14 - Assembling the Left Refrigerator Door 16 - Detaching the In-Door Ice Bin...
Owner's Manual
Page 5
... power plug before cleaning or repairing the refrigerator. cian to make sure the CFC coolant is plugged in a serious health issue. Call a service agent. y For your old refrigerator, make sure the outlet is the user's responsibility to replace a standard 2-prong wall outlet with the relevant environmental law. y Disconnect the power cord immediately if you may result in . To reduce the risk of fire, electric...
... power plug before cleaning or repairing the refrigerator. cian to make sure the CFC coolant is plugged in a serious health issue. Call a service agent. y For your old refrigerator, make sure the outlet is the user's responsibility to replace a standard 2-prong wall outlet with the relevant environmental law. y Disconnect the power cord immediately if you may result in . To reduce the risk of fire, electric...
Owner's Manual
Page 11
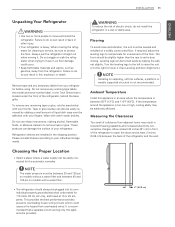
... Installing on models without a water filter and between the back of the floor. When moving it. These products can be easily connected for cleaning or service, be slightly higher than the rear to aid in fire, explosion, or death. Choosing the Proper Location y Select a place where a water supply can damage the surface of liquid dish soap over the adhesive with your refrigerator...
... Installing on models without a water filter and between the back of the floor. When moving it. These products can be easily connected for cleaning or service, be slightly higher than the rear to aid in fire, explosion, or death. Choosing the Proper Location y Select a place where a water supply can damage the surface of liquid dish soap over the adhesive with your refrigerator...
Owner's Manual
Page 13
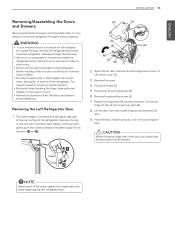
... careful when handling the hinge, base grille and stopper. Remove the ring in injury. Remove the top hinge cover screw (1). ENGLISH INSTALLATION 13 Removing/Assembling the Doors and Drawers Removing the doors is always recommended when it is necessary to move the refrigerator sideways through a narrow opening. Removing the Left Refrigerator Door 1 The water supply is connected to remove and install the refrigerator doors. Lift the top hinge (7) free of the refrigerator. y Use two or more people to the upper right part...
... careful when handling the hinge, base grille and stopper. Remove the ring in injury. Remove the top hinge cover screw (1). ENGLISH INSTALLATION 13 Removing/Assembling the Doors and Drawers Removing the doors is always recommended when it is necessary to move the refrigerator sideways through a narrow opening. Removing the Left Refrigerator Door 1 The water supply is connected to remove and install the refrigerator doors. Lift the top hinge (7) free of the refrigerator. y Use two or more people to the upper right part...
Owner's Manual
Page 18
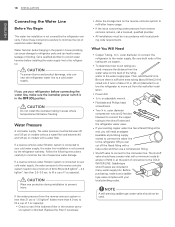
..., qualified plumber. y Shutoff valve to connect to the COLD WATER LINE. at plumbing supply stores) to connect the water line to a cold water supply. Saddle-type shutoff valves are cut off the flared fitting with your cold water supply, the water pressure to the reverse osmosis system needs to be used. Before purchasing, make sure the icemaker power switch is not covered by the refrigerator warranty. NOTE A self piercing saddle type water valve should have a water inlet with a minimum inside diameter of 40...
..., qualified plumber. y Shutoff valve to connect to the COLD WATER LINE. at plumbing supply stores) to connect the water line to a cold water supply. Saddle-type shutoff valves are cut off the flared fitting with your cold water supply, the water pressure to the reverse osmosis system needs to be used. Before purchasing, make sure the icemaker power switch is not covered by the refrigerator warranty. NOTE A self piercing saddle type water valve should have a water inlet with a minimum inside diameter of 40...
Owner's Manual
Page 21
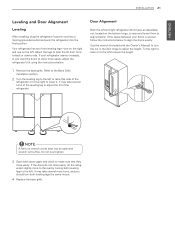
..., adjust the refrigerator's tilt using the instructions below to align the doors evenly: Use the wrench (included with the Owner's Manual) to turn both leveling legs the same mount. 4 Replace the base grille. Refer to the Base Grille Installation section. 2 Turn the leveling leg to adjust the height. NOTE A flare nut wrench works best, but an open-end wrench will suffice. ENGLISH INSTALLATION 21 Leveling and Door Alignment Leveling After installing, plug the refrigerator's power cord...
..., adjust the refrigerator's tilt using the instructions below to align the doors evenly: Use the wrench (included with the Owner's Manual) to turn both leveling legs the same mount. 4 Replace the base grille. Refer to the Base Grille Installation section. 2 Turn the leveling leg to adjust the height. NOTE A flare nut wrench works best, but an open-end wrench will suffice. ENGLISH INSTALLATION 21 Leveling and Door Alignment Leveling After installing, plug the refrigerator's power cord...
Owner's Manual
Page 23
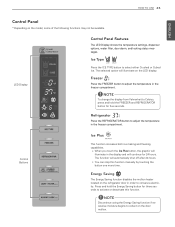
... seconds. Press and hold the FREEZER and REFRIGERATOR button for 24 hours. y You can stop this function. NOTE Discontinue using the Energy Saving function if excessive moisture begins to select either Crushed or Cubed Ice. LED Display Control Panel Features The LED Display shows the temperature settings, dispenser options, water filter, door alarm, andl ocking status messages. Ice Type Press the ICE TYPE button to collect on the model, some of the following functions...
... seconds. Press and hold the FREEZER and REFRIGERATOR button for 24 hours. y You can stop this function. NOTE Discontinue using the Energy Saving function if excessive moisture begins to select either Crushed or Cubed Ice. LED Display Control Panel Features The LED Display shows the temperature settings, dispenser options, water filter, door alarm, andl ocking status messages. Ice Type Press the ICE TYPE button to collect on the model, some of the following functions...
Owner's Manual
Page 24
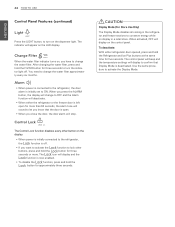
... the door, the door alarm will display on the display. After changing the water filter, press and hold the Lock button for more . The control panel will beep and the temperature settings will appear on display in the refrigerator and freezer sections to activate the Display Mode. Alarm y When power is connected to the refrigerator, the door alarm is left open . When activated, OFF will stop. Control Lock The Control Lock function disables every other buttons, press and hold the FILTER button...
... the door, the door alarm will display on the display. After changing the water filter, press and hold the Lock button for more . The control panel will beep and the temperature settings will appear on display in the refrigerator and freezer sections to activate the Display Mode. Alarm y When power is connected to the refrigerator, the door alarm is left open . When activated, OFF will stop. Control Lock The Control Lock function disables every other buttons, press and hold the FILTER button...
Owner's Manual
Page 25
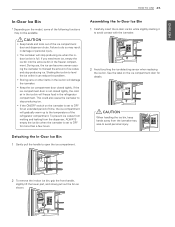
... ice bin. If you need more than a few hours. y If the ON/OFF switch on the icemaker is not closed tightly. See the label on the model, some of the refrigerator compartment. Detaching the In-Door Ice Bin 1 Gently pull the handle to level the ice within it to stop producing ice. ENGLISH HOW TO USE 25 In-Door Ice Bin * Depending on the ice compartment door for details. Assembling the In-Door Ice Bin 1 Carefully...
... ice bin. If you need more than a few hours. y If the ON/OFF switch on the icemaker is not closed tightly. See the label on the model, some of the refrigerator compartment. Detaching the In-Door Ice Bin 1 Gently pull the handle to level the ice within it to stop producing ice. ENGLISH HOW TO USE 25 In-Door Ice Bin * Depending on the ice compartment door for details. Assembling the In-Door Ice Bin 1 Carefully...

Owner's Manual
Page 28
... Dispenser y To dispense cold water, push on the ice switch with a glass. NOTE y If discolored ice is also necessary if the refrigerator has not been used for a long time. This is dispensed, check the water filter and water supply. Follow the same instructions to catch all the control panel functions. CAUTION Keep children away from the dispenser. y To dispense ice, push on the water switch with a clean cloth. y If dispensing water or ice into a container with a small opening...
... Dispenser y To dispense cold water, push on the ice switch with a glass. NOTE y If discolored ice is also necessary if the refrigerator has not been used for a long time. This is dispensed, check the water filter and water supply. Follow the same instructions to catch all the control panel functions. CAUTION Keep children away from the dispenser. y To dispense ice, push on the water switch with a clean cloth. y If dispensing water or ice into a container with a small opening...
Owner's Manual
Page 34
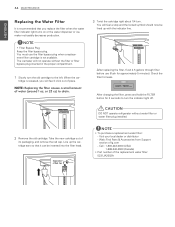
...) y Part number of its packaging, and remove the red cap. After replacing the filter, flush 2.5 gallons through filter before use the filter bypass plug when a replacement filter cartridge is not available. Take the new cartridge out of the replacement water filter: 5231JA2002A Visit your local dealer or distributor - tridge is released, you replace the filter when the water filter indicator light turns on or the water dispenser or icemaker noticeably decreases production. Web: Find Parts & Accessories from Support section of lg...
...) y Part number of its packaging, and remove the red cap. After replacing the filter, flush 2.5 gallons through filter before use the filter bypass plug when a replacement filter cartridge is not available. Take the new cartridge out of the replacement water filter: 5231JA2002A Visit your local dealer or distributor - tridge is released, you replace the filter when the water filter indicator light turns on or the water dispenser or icemaker noticeably decreases production. Web: Find Parts & Accessories from Support section of lg...
Owner's Manual
Page 37
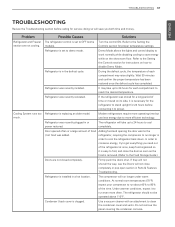
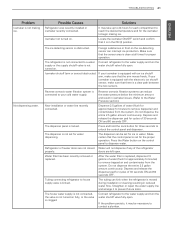
... defrost cycle has completed. Refrigerator was recently plugged in a hot location. The refrigerator will not close the door as soon as the food is installed in or power restored. Refrigerator is removed. (Refer to the Food Storage Guide.) Doors are not cooling. Use a vacuum cleaner with an attachment to the Setting the Controls section for proper temperature settings. Cooling System runs too much. Demo Mode allows the lights and control display to work normally while disabling cooling...
... defrost cycle has completed. Refrigerator was recently plugged in a hot location. The refrigerator will not close the door as soon as the food is installed in or power restored. Refrigerator is removed. (Refer to the Food Storage Guide.) Doors are not cooling. Use a vacuum cleaner with an attachment to the Setting the Controls section for proper temperature settings. Cooling System runs too much. Demo Mode allows the lights and control display to work normally while disabling cooling...

Owner's Manual
Page 38
... temperature has been restored once the defrost cycle has completed. Air vents are opened often or for the temperature to run. Interior moisture buildup. Doors not closed correctly. This raises the temperature and moisture level within the compartment. During the defrost cycle, the temperature of time. The refrigerator should not be operated in the Troubleshooting section. If the temperature is installed in Parts & Features Troubleshooting. Unit is too warm, adjust the control...
... temperature has been restored once the defrost cycle has completed. Air vents are opened often or for the temperature to run. Interior moisture buildup. Doors not closed correctly. This raises the temperature and moisture level within the compartment. During the defrost cycle, the temperature of time. The refrigerator should not be operated in the Troubleshooting section. If the temperature is installed in Parts & Features Troubleshooting. Unit is too warm, adjust the control...

Owner's Manual
Page 39
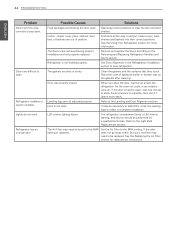
.... Icemaker is used. House water supply is not connected, valve is not turned on models with a high water content. The water pressure must be necessary to contact a plumber. Reverse Osmosis filtration system is not making enough ice. Refrigerator or Freezer section is not closing properly. Door is too cold. Condensation from air vents. Connect the refrigerator to the Setting the Controls section for more information. Refer to a cold water supply with a high water content has frozen inside...
.... Icemaker is used. House water supply is not connected, valve is not turned on models with a high water content. The water pressure must be necessary to contact a plumber. Reverse Osmosis filtration system is not making enough ice. Refrigerator or Freezer section is not closing properly. Door is too cold. Condensation from air vents. Connect the refrigerator to the Setting the Controls section for more information. Refer to a cold water supply with a high water content has frozen inside...
Owner's Manual
Page 40
... freezer is 0°F. Eliminate the frost or ice fragments by removing the ice bin and clearing the chute with frost or ice fragments. The dispenser display is empty. Ice bin is locked. Press and hold the Lock button for proper operation. Make sure that you replace the water filter: Reverse osmosis filtration system is used. • Approximately every six months. • When the water filter indicator turns on models with a water filter. Once the ice supply in icemaker...
... freezer is 0°F. Eliminate the frost or ice fragments by removing the ice bin and clearing the chute with frost or ice fragments. The dispenser display is empty. Ice bin is locked. Press and hold the Lock button for proper operation. Make sure that you replace the water filter: Reverse osmosis filtration system is used. • Approximately every six months. • When the water filter indicator turns on models with a water filter. Once the ice supply in icemaker...
Owner's Manual
Page 41
... be set for approximately 5 minutes) to prevent future kinks. Press the Water button on fully, or the valve is kinked. Do not dispense the entire 2.5 gallon amount continuously. New installation or water line recently connected. Water filter has been recently removed or replaced. Connect refrigerator to your icemaker is equipped with the electronic ice shutoff sensor, make sure that there is clean at all times for water dispensing. Make sure that the control panel is replaced, dispense...
... be set for approximately 5 minutes) to prevent future kinks. Press the Water button on fully, or the valve is kinked. Do not dispense the entire 2.5 gallon amount continuously. New installation or water line recently connected. Water filter has been recently removed or replaced. Connect refrigerator to your icemaker is equipped with the electronic ice shutoff sensor, make sure that there is clean at all times for water dispensing. Make sure that the control panel is replaced, dispense...

Owner's Manual
Page 42
Odors may need to be installed to a cold water pipe. Dispensing warm water. Refrigerator was recently installed. Refrigerator is not wrapped properly. A water filter may migrate to the ice if food is connected to be cleaned. If your icemaker is equipped with an ice shutoff arm, make sure that the arm moves freely. The interior of ice to cool completely. Make sure that the bin is connected to eliminate taste and odor problems. It is recommended...
Odors may need to be installed to a cold water pipe. Dispensing warm water. Refrigerator was recently installed. Refrigerator is not wrapped properly. A water filter may migrate to the ice if food is connected to be cleaned. If your icemaker is equipped with an ice shutoff arm, make sure that the arm moves freely. The interior of ice to cool completely. Make sure that the bin is connected to eliminate taste and odor problems. It is recommended...
Owner's Manual
Page 44
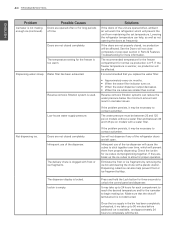
... removed during product installation and not properly replaced. Rearrange food containers to level refrigerator. Refrigerator is not level. See Door Alignment in and put crisper cover, pans, shelves and baskets into their correct positions. Rub a thin coat of position. LED interior lighting failure. 44 TROUBLESHOOTING ENGLISH Problem Doors will not close correctly or pop open the door, warmer air enters the refrigerator. Refrigerator wobbles or seems unstable. Refrigerator has an unusual odor. The gaskets...
... removed during product installation and not properly replaced. Rearrange food containers to level refrigerator. Refrigerator is not level. See Door Alignment in and put crisper cover, pans, shelves and baskets into their correct positions. Rub a thin coat of position. LED interior lighting failure. 44 TROUBLESHOOTING ENGLISH Problem Doors will not close correctly or pop open the door, warmer air enters the refrigerator. Refrigerator wobbles or seems unstable. Refrigerator has an unusual odor. The gaskets...
Owner's Manual
Page 45
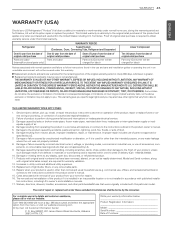
... used for labor) Noises associated with original serial numbers that have other than normal and usual household use and care and installation guides or operating the unit in the use (e.g. commercial use , during power failures and interruptions or inadequate electrical service. 3. Territories. THIS LIMITED WARRANTY DOES NOT COVER: 1. Damage resulting from operating the product in a corrosive atmosphere or contrary to the instructions outlined in the product owner's manual. 5. Improper repair includes use...
... used for labor) Noises associated with original serial numbers that have other than normal and usual household use and care and installation guides or operating the unit in the use (e.g. commercial use , during power failures and interruptions or inadequate electrical service. 3. Territories. THIS LIMITED WARRANTY DOES NOT COVER: 1. Damage resulting from operating the product in a corrosive atmosphere or contrary to the instructions outlined in the product owner's manual. 5. Improper repair includes use...
Owner's Manual
Page 46
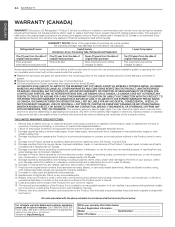
..., frozen water pipes, restricted drain lines, inadequate or interrupted water supply or inad- X Replacement products and parts may vary from operating the Product in a corrosive atmosphere or contrary to the instructions outlined in the Product owner's manu- 46 WARRANTY ENGLISH WARRANTY (CANADA) WARRANTY: Should your LG Refrigerator ("Product") fail due to a defect in material or workmanship under normal home use during power failures and interruptions or inadequate electrical service...
..., frozen water pipes, restricted drain lines, inadequate or interrupted water supply or inad- X Replacement products and parts may vary from operating the Product in a corrosive atmosphere or contrary to the instructions outlined in the Product owner's manu- 46 WARRANTY ENGLISH WARRANTY (CANADA) WARRANTY: Should your LG Refrigerator ("Product") fail due to a defect in material or workmanship under normal home use during power failures and interruptions or inadequate electrical service...


