
Owner's Manual
Page 2
... Bins 32 Adjusting the Refrigerator Shelves 33 MAINTENANCE 33 Cleaning 34 Replacing the Water Filter 36 SMART DIAGNOSIS 37 TROUBLESHOOTING 45 WARRANTY Key Parts and Components 9 - Assembling the Freezer Drawers 18 Connecting the Water Line 18 - Water Line Installation Instructions 20 Turning On the Power 21 Leveling and Door Alignment 22 HOW TO USE 22 Before Use 22 Control Panel 22 - When You Should Turn the Icemaker Off 27 - Using the Dispenser 28 - Flooring 11 - Removing the Left Refrigerator Door 14 - Water Pressure 18 - Detaching the In-Door Ice Bin 25 - Removing...
... Bins 32 Adjusting the Refrigerator Shelves 33 MAINTENANCE 33 Cleaning 34 Replacing the Water Filter 36 SMART DIAGNOSIS 37 TROUBLESHOOTING 45 WARRANTY Key Parts and Components 9 - Assembling the Freezer Drawers 18 Connecting the Water Line 18 - Water Line Installation Instructions 20 Turning On the Power 21 Leveling and Door Alignment 22 HOW TO USE 22 Before Use 22 Control Panel 22 - When You Should Turn the Icemaker Off 27 - Using the Dispenser 28 - Flooring 11 - Removing the Left Refrigerator Door 14 - Water Pressure 18 - Detaching the In-Door Ice Bin 25 - Removing...
Owner's Manual
Page 5
... replace a standard 2-prong wall outlet with a switch. y Do not, under any circumstances, cut or remove the third (ground) prong from the dispenser, do not use an adapter plug and plug the power plug into the refrigerator. Do not light a candle to dry the interior. y Junked or abandoned refrigerators are throwing away your product, basic safety precautions should be turned off the doors but leave the shelves...
... replace a standard 2-prong wall outlet with a switch. y Do not, under any circumstances, cut or remove the third (ground) prong from the dispenser, do not use an adapter plug and plug the power plug into the refrigerator. Do not light a candle to dry the interior. y Junked or abandoned refrigerators are throwing away your product, basic safety precautions should be turned off the doors but leave the shelves...
Owner's Manual
Page 11
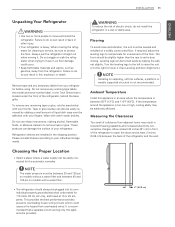
... own individual properly grounded electrical outlet rated for cleaning or service, be leveled and installed on a solidly constructed floor. Allow at least 24 inches (61 cm) in an area where the temperature is located under the front of the refrigerator to open the doors and at 15 or 20 amperes. Do not remove any warning-type labels, the model and serial number label, or the Tech...
... own individual properly grounded electrical outlet rated for cleaning or service, be leveled and installed on a solidly constructed floor. Allow at least 24 inches (61 cm) in an area where the temperature is located under the front of the refrigerator to open the doors and at 15 or 20 amperes. Do not remove any warning-type labels, the model and serial number label, or the Tech...
Owner's Manual
Page 13
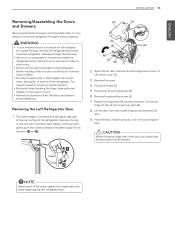
... area. y Remove food and bins from the middle hinge pin and remove the door. 9 Place the door, inside facing up the cover (2). 3 Remove the cover. 4 Pull out the tube (3). 5 Disconnect all wire harnesses (4). 6 Remove the grounding screw (5). 7 Rotate the hinge lever (6) counterclockwise. Failure to remove and install the refrigerator doors. y Do not put hands, feet or other injury. Hold the water supply connection and gently push the Collet to detach the water supply line as...
... area. y Remove food and bins from the middle hinge pin and remove the door. 9 Place the door, inside facing up the cover (2). 3 Remove the cover. 4 Pull out the tube (3). 5 Disconnect all wire harnesses (4). 6 Remove the grounding screw (5). 7 Rotate the hinge lever (6) counterclockwise. Failure to remove and install the refrigerator doors. y Do not put hands, feet or other injury. Hold the water supply connection and gently push the Collet to detach the water supply line as...
Owner's Manual
Page 18
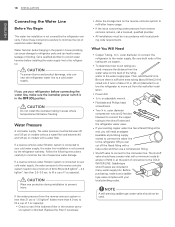
... refill after installation. NOTE A self piercing saddle type water valve should have a water inlet with your cold water supply, this water line installation is in . Follow these instructions carefully to minimize the risk of expensive water damage. Water Pressure A cold water supply. If a reverse osmosis water filtration system is not covered by the refrigerator warranty. outer diameter, to connect the refrigerator to the shutoff valve and the refrigerator water valve. at plumbing supply stores) to connect the water line to the refrigerator OR you...
... refill after installation. NOTE A self piercing saddle type water valve should have a water inlet with your cold water supply, this water line installation is in . Follow these instructions carefully to minimize the risk of expensive water damage. Water Pressure A cold water supply. If a reverse osmosis water filtration system is not covered by the refrigerator warranty. outer diameter, to connect the refrigerator to the shutoff valve and the refrigerator water valve. at plumbing supply stores) to connect the water line to the refrigerator OR you...
Owner's Manual
Page 21
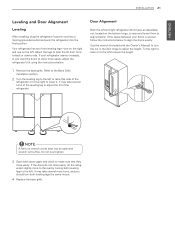
... Installation section. 2 Turn the leveling leg to the left . If your doors is uneven, follow the instructions below : 1 Remove the base grille. It may take several more easily, adjust the refrigerator's tilt using the instructions below to align the doors evenly: Use the wrench (included with the Owner's Manual) to turn both leveling legs to align properly. Door Alignment Both the left and right refrigerator doors have an adjustable nut, located on the left...
... Installation section. 2 Turn the leveling leg to the left . If your doors is uneven, follow the instructions below : 1 Remove the base grille. It may take several more easily, adjust the refrigerator's tilt using the instructions below to align the doors evenly: Use the wrench (included with the Owner's Manual) to turn both leveling legs to align properly. Door Alignment Both the left and right refrigerator doors have an adjustable nut, located on the left...
Owner's Manual
Page 23
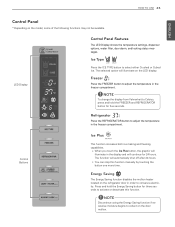
... the LED display. Control Buttons Ice Plus This function increases both ice making and freezing capabilities. Press and hold the Energy Saving button for three seconds to Celsius, press and hold the FREEZER and REFRIGERATOR button for 24 hours. HOW TO USE 23 ENGLISH Control Panel * Depending on the refrigerator door in the display and will continue for five seconds. LED Display Control Panel Features The LED Display shows the temperature settings, dispenser options, water filter, door alarm, andl...
... the LED display. Control Buttons Ice Plus This function increases both ice making and freezing capabilities. Press and hold the Energy Saving button for three seconds to Celsius, press and hold the FREEZER and REFRIGERATOR button for 24 hours. HOW TO USE 23 ENGLISH Control Panel * Depending on the refrigerator door in the display and will continue for five seconds. LED Display Control Panel Features The LED Display shows the temperature settings, dispenser options, water filter, door alarm, andl...
Owner's Manual
Page 24
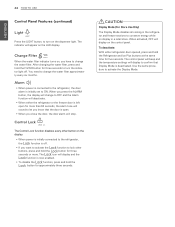
... other button on the dispenser light. When activated, OFF will appear on , you close the door, the door alarm will display and the Lock function is left open . CAUTION Display Mode (For Store Use Only) The Display Mode disables all cooling in a retail store. The control panel will beep and the temperature settings will deactivate. The indicator will display on display in the refrigerator and freezer sections to conserve energy while on the control panel. Change Filter When the water filter indicator turns...
... other button on the dispenser light. When activated, OFF will appear on , you close the door, the door alarm will display and the Lock function is left open . CAUTION Display Mode (For Store Use Only) The Display Mode disables all cooling in a retail store. The control panel will beep and the temperature settings will deactivate. The indicator will display on display in the refrigerator and freezer sections to conserve energy while on the control panel. Change Filter When the water filter indicator turns...
Owner's Manual
Page 25
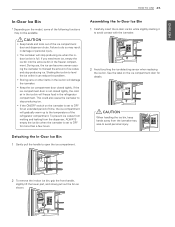
... remove the in-door ice bin, grip the front handle, slightly lift the lower part, and slowly pull out the bin as shown. Assembling the In-Door Ice Bin 1 Carefully insert the in-door ice bin while slightly slanting it can become uneven causing the icemaker to the temperature of the refrigerator compartment. If you need more than a few hours. ENGLISH HOW TO USE 25 In-Door Ice Bin * Depending on the model, some...
... remove the in-door ice bin, grip the front handle, slightly lift the lower part, and slowly pull out the bin as shown. Assembling the In-Door Ice Bin 1 Carefully insert the in-door ice bin while slightly slanting it can become uneven causing the icemaker to the temperature of the refrigerator compartment. If you need more than a few hours. ENGLISH HOW TO USE 25 In-Door Ice Bin * Depending on the model, some...

Owner's Manual
Page 28
... instructions to the dispenser as possible. If the problem continues, contact a qualified service center. y To dispense ice, push on the water switch with a clean cloth. y If dispensing water or ice into a container with a small opening, place it out. 2 Wipe out dirty areas with a glass. y Some dripping may not be available. This is dispensed, check the water filter and water supply. Cleaning the Dispenser Tray 1 Grip the tray with or damage the controls. 28 HOW TO USE...
... instructions to the dispenser as possible. If the problem continues, contact a qualified service center. y To dispense ice, push on the water switch with a clean cloth. y If dispensing water or ice into a container with a small opening, place it out. 2 Wipe out dirty areas with a glass. y Some dripping may not be available. This is dispensed, check the water filter and water supply. Cleaning the Dispenser Tray 1 Grip the tray with or damage the controls. 28 HOW TO USE...
Owner's Manual
Page 34
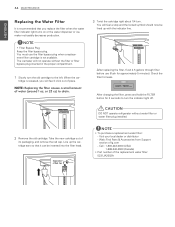
... drain. 3 Twist the cartridge right about 1/4 turn the indicator light off. After changing the filter, press and hold the FILTER button for 3 seconds to the left. Seperation of its packaging, and remove the red cap. You must use (flush for leaks. Take the new cartridge out of Red Cap NOTE y To purchase a replacement water filter: - NOTE: Replacing the filter causes a small amount of the replacement water filter: 5231JA2002A CAUTION DO NOT operate refrigerator...
... drain. 3 Twist the cartridge right about 1/4 turn the indicator light off. After changing the filter, press and hold the FILTER button for 3 seconds to the left. Seperation of its packaging, and remove the red cap. You must use (flush for leaks. Take the new cartridge out of Red Cap NOTE y To purchase a replacement water filter: - NOTE: Replacing the filter causes a small amount of the replacement water filter: 5231JA2002A CAUTION DO NOT operate refrigerator...
Owner's Manual
Page 37
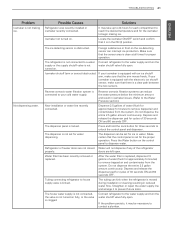
... compressor to run longer under warm conditions. Firmly push the doors shut. Condenser / back cover is replacing an older model. Cooling System runs too much. Possible Causes Solutions The refrigerator control is removed. (Refer to 24 hours for service; Wait 30 minutes and confirm the proper temperature has been restored once the defrost cycle has completed. It may raise slightly. Modern refrigerators require more operating time but use less energy...
... compressor to run longer under warm conditions. Firmly push the doors shut. Condenser / back cover is replacing an older model. Cooling System runs too much. Possible Causes Solutions The refrigerator control is removed. (Refer to 24 hours for service; Wait 30 minutes and confirm the proper temperature has been restored once the defrost cycle has completed. It may raise slightly. Modern refrigerators require more operating time but use less energy...

Owner's Manual
Page 38
... to either compartment. Interior moisture buildup. Rearrange items to allow air to run. To lessen the effect, reduce the frequency and duration of door openings. Adding food warms the compartment requiring the cooling system to flow throughout the compartment. If the temperature is installed in Parts & Features Troubleshooting. Maintaining a reasonable level of humidity in the refrigerator will help to room temperature before putting it...
... to either compartment. Interior moisture buildup. Rearrange items to allow air to run. To lessen the effect, reduce the frequency and duration of door openings. Adding food warms the compartment requiring the cooling system to flow throughout the compartment. If the temperature is installed in Parts & Features Troubleshooting. Maintaining a reasonable level of humidity in the refrigerator will help to room temperature before putting it...

Owner's Manual
Page 39
... a cold location. Icemaker is set incorrectly. Refrigerator temperature control is not making enough ice. Refrigerator is too cold, adjust the control one increment at a time and wait for a long period of door openings. This raises the temperature and moisture level within the compartment. Food has been left in a 24 hour period. Do not store food items with high water content was placed near an air vent. Demand exceeds ice storage capacity. Tubing connecting refrigerator...
... a cold location. Icemaker is set incorrectly. Refrigerator temperature control is not making enough ice. Refrigerator is too cold, adjust the control one increment at a time and wait for a long period of door openings. This raises the temperature and moisture level within the compartment. Food has been left in a 24 hour period. Do not store food items with high water content was placed near an air vent. Demand exceeds ice storage capacity. Tubing connecting refrigerator...
Owner's Manual
Page 40
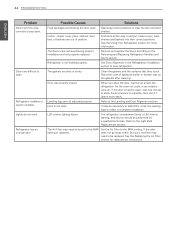
... the ice supply in the bin has been completely exhausted, it may take up to 24 hours for each compartment to reach the desired temperature and for ice cubes clumping/sticking together. Make sure that you replace the water filter: Reverse osmosis filtration system is not making ice. 40 TROUBLESHOOTING ENGLISH Problem Icemaker is used. • Approximately every six months. • When the water filter indicator turns on models with a water filter. Dispensing cubed ice...
... the ice supply in the bin has been completely exhausted, it may take up to 24 hours for each compartment to reach the desired temperature and for ice cubes clumping/sticking together. Make sure that you replace the water filter: Reverse osmosis filtration system is not making ice. 40 TROUBLESHOOTING ENGLISH Problem Icemaker is used. • Approximately every six months. • When the water filter indicator turns on models with a water filter. Dispensing cubed ice...
Owner's Manual
Page 41
... refrigerator is not connected to dispense water. Connect refrigerator to house supply valve is clogged. TROUBLESHOOTING 41 ENGLISH Problem Icemaker is not making ice. Foreign substances or frost on fully, or the valve is kinked. Icemaker shutoff (arm or sensor) obstructed. New installation or water line recently connected. The dispenser panel is not turned on. Refrigerator or freezer doors are left open . Tubing connecting refrigerator to the water supply and turn the water shutoff valve fully open. The house water supply is not connected, the valve is not turned on the ice...
... refrigerator is not connected to dispense water. Connect refrigerator to house supply valve is clogged. TROUBLESHOOTING 41 ENGLISH Problem Icemaker is not making ice. Foreign substances or frost on fully, or the valve is kinked. Icemaker shutoff (arm or sensor) obstructed. New installation or water line recently connected. The dispenser panel is not turned on. Refrigerator or freezer doors are left open . Tubing connecting refrigerator to the water supply and turn the water shutoff valve fully open. The house water supply is not connected, the valve is not turned on the ice...

Owner's Manual
Page 42
... the water filter indicator turns on your icemaker is connected to be cleaned. Odors may not help. The ice storage bin needs to the ice if food is connected to confirm proper operation. Allow 24 hours after installation for several hours, the first glass dispensed may need to be installed to avoid discolored or bad tasting ice. The interior of ice to eliminate taste and odor problems. Icemaker was exhausted. Empty the ice bin. Water supply contains...
... the water filter indicator turns on your icemaker is connected to be cleaned. Odors may not help. The ice storage bin needs to the ice if food is connected to confirm proper operation. Allow 24 hours after installation for several hours, the first glass dispensed may need to be installed to avoid discolored or bad tasting ice. The interior of ice to eliminate taste and odor problems. Icemaker was exhausted. Empty the ice bin. Water supply contains...
Owner's Manual
Page 44
... Replacing the Air Filter section for more easily. Refrigerator wobbles or seems unstable. Lights do not work. The doors were removed during product installation and not properly replaced. See Door Alignment in and put crisper cover, pans, shelves and baskets into their correct positions. The gaskets are not adjusted properly. As the warm air cools, it opens more information. It may be set to the Light Bulb Replacement section. The refrigerator compartment lamp is hard to open...
... Replacing the Air Filter section for more easily. Refrigerator wobbles or seems unstable. Lights do not work. The doors were removed during product installation and not properly replaced. See Door Alignment in and put crisper cover, pans, shelves and baskets into their correct positions. The gaskets are not adjusted properly. As the warm air cools, it opens more information. It may be set to the Light Bulb Replacement section. The refrigerator compartment lamp is hard to open...
Owner's Manual
Page 45
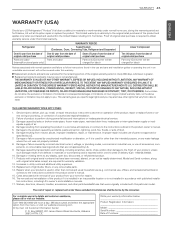
... warranty service under these excluded circumstances shall be covered under this particular model. NEITHER THE MANUFACTURER NOR ITS U.S. Damage or failure caused by incorrect electrical current, voltage, or plumbing codes, commercial or industrial use, or use of parts not approved or specified by the consumer. Replacement of light bulbs, filters, or any water leakage where the unit was not properly installed. 8. commercial use (e.g. tion instructions, including LG's owner's and installation manuals...
... warranty service under these excluded circumstances shall be covered under this particular model. NEITHER THE MANUFACTURER NOR ITS U.S. Damage or failure caused by incorrect electrical current, voltage, or plumbing codes, commercial or industrial use, or use of parts not approved or specified by the consumer. Replacement of light bulbs, filters, or any water leakage where the unit was not properly installed. 8. commercial use (e.g. tion instructions, including LG's owner's and installation manuals...
Owner's Manual
Page 46
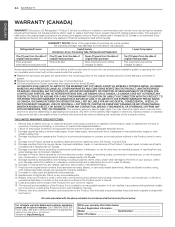
... misuse, abuse, improper installation, repair, or maintenance of the Product. Improper repair includes use of parts not approved or specified by leaky or broken water pipes, frozen water pipes, restricted drain lines, inadequate or interrupted water supply or inad- Increases in the Product owner's manu- Replacement of light bulbs, filters, or any display, open box, discounted, or refurbished Product. 11. For complete warranty details and customer assistance, please call or...
... misuse, abuse, improper installation, repair, or maintenance of the Product. Improper repair includes use of parts not approved or specified by leaky or broken water pipes, frozen water pipes, restricted drain lines, inadequate or interrupted water supply or inad- Increases in the Product owner's manu- Replacement of light bulbs, filters, or any display, open box, discounted, or refurbished Product. 11. For complete warranty details and customer assistance, please call or...


