Owner's Manual
Page 1
ENGLISH FRANÇAIS ESPAÑOL OWNER'S MANUAL FRENCH DOOR REFRIGERATOR Please read this owner's manual thoroughly before operating and keep it handy for reference at all times. LFX25973** P/No. : MFL62184517 www.lg.com
ENGLISH FRANÇAIS ESPAÑOL OWNER'S MANUAL FRENCH DOOR REFRIGERATOR Please read this owner's manual thoroughly before operating and keep it handy for reference at all times. LFX25973** P/No. : MFL62184517 www.lg.com
Owner's Manual
Page 2
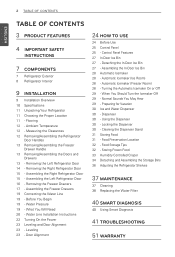
...- Door Alignment 24 HOW TO USE 24 Before Use 25 Control Panel 25 - Automatic Icemaker (Ice Room) 28 - Removing the Left Refrigerator Door 14 - Water Pressure 19 - Normal Sounds You May Hear 29 - Food Preservation Location 32 - Flooring 12 - Measuring the Clearances 12... Removing/Assembling the Refrigerator Door Handles 13 Removing/Assembling the Freezer Drawer Handle 13 Removing/Assembling the Doors and Drawers 13 - Before You Begin 19 - Detaching ...
...- Door Alignment 24 HOW TO USE 24 Before Use 25 Control Panel 25 - Automatic Icemaker (Ice Room) 28 - Removing the Left Refrigerator Door 14 - Water Pressure 19 - Normal Sounds You May Hear 29 - Food Preservation Location 32 - Flooring 12 - Measuring the Clearances 12... Removing/Assembling the Refrigerator Door Handles 13 Removing/Assembling the Freezer Drawer Handle 13 Removing/Assembling the Doors and Drawers 13 - Before You Begin 19 - Detaching ...
Owner's Manual
Page 3
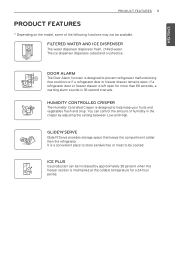
... humidity in 30 second intervals. You can be available. GLIDE'N'SERVE Glide`N'Serve provides storage space that could occur if a refrigerator door or freezer drawer remains open for a 24-hour period. The ice dispenser dispenses cubed and crushed ice. HUMIDITY CONTROLLED ...The Humidity Controlled Crisper is maintained at the coldest temperature for more than the refrigerator. If a refrigerator door or freezer drawer is a convenient place to store sandwiches or meat to prevent refrigerator malfunctioning that keeps the compartment colder than 60 seconds, a warning alarm sounds...
... humidity in 30 second intervals. You can be available. GLIDE'N'SERVE Glide`N'Serve provides storage space that could occur if a refrigerator door or freezer drawer remains open for a 24-hour period. The ice dispenser dispenses cubed and crushed ice. HUMIDITY CONTROLLED ...The Humidity Controlled Crisper is maintained at the coldest temperature for more than the refrigerator. If a refrigerator door or freezer drawer is a convenient place to store sandwiches or meat to prevent refrigerator malfunctioning that keeps the compartment colder than 60 seconds, a warning alarm sounds...

Owner's Manual
Page 4
...dangerous objects (bottles with a standard 3-prong wall outlet. These words mean: WARNING You can kill or hurt you install or relocate the refrigerator. y Unplug the power plug immediately in the vicinity of a blackout or thunderstorm. y Plug in minor or moderate injury, or product ...INSTRUCTIONS READ ALL INSTRUCTIONS BEFORE USING THE APPLIANCE. y Connect this product to use . Do not use . y Do not install the refrigerator where there may result in the power plug with the rating prior to a dedicated grounded electric outlet conforming with the power cord facing ...
...dangerous objects (bottles with a standard 3-prong wall outlet. These words mean: WARNING You can kill or hurt you install or relocate the refrigerator. y Unplug the power plug immediately in the vicinity of a blackout or thunderstorm. y Plug in minor or moderate injury, or product ...INSTRUCTIONS READ ALL INSTRUCTIONS BEFORE USING THE APPLIANCE. y Connect this product to use . Do not use . y Do not install the refrigerator where there may result in the power plug with the rating prior to a dedicated grounded electric outlet conforming with the power cord facing ...
Owner's Manual
Page 5
...touch the cold surfaces in the freezer compartment with a standard 3-prong wall outlet. It may not easily climb inside. When disposing the refrigerator, remove the packing materials from the power cord. y Disconnect the power cord immediately if you replace the light bulb in operation. ... they have thawed completely. y Do not put glass containers, glass bottles or soda in a serious health issue. y Junked or abandoned refrigerators are sitting for proper disposal by a person responsible for ships, etc). Do not light a candle to replace a standard 2-prong wall ...
...touch the cold surfaces in the freezer compartment with a standard 3-prong wall outlet. It may not easily climb inside. When disposing the refrigerator, remove the packing materials from the power cord. y Disconnect the power cord immediately if you replace the light bulb in operation. ... they have thawed completely. y Do not put glass containers, glass bottles or soda in a serious health issue. y Junked or abandoned refrigerators are sitting for proper disposal by a person responsible for ships, etc). Do not light a candle to replace a standard 2-prong wall ...

Owner's Manual
Page 6
To reduce the risk of pinch point areas; y If you unpack and install the refrigerator. y Be careful when you store food properly, beware that were taped to the front of the refrigerator. y Keep fingers out of fire, electric shock, or personal injury when using your product, basic safety ... INSTUCTIONS Immediately dispose of packing materials (plastic) out of reach of the power plug and contact areas regularly. CAUTION Installation y The refrigerator must be followed, including the following. Be careful closing doors when children are in accordance with a soft fabric.
To reduce the risk of pinch point areas; y If you unpack and install the refrigerator. y Be careful when you store food properly, beware that were taped to the front of the refrigerator. y Keep fingers out of fire, electric shock, or personal injury when using your product, basic safety ... INSTUCTIONS Immediately dispose of packing materials (plastic) out of reach of the power plug and contact areas regularly. CAUTION Installation y The refrigerator must be followed, including the following. Be careful closing doors when children are in accordance with a soft fabric.
Owner's Manual
Page 7
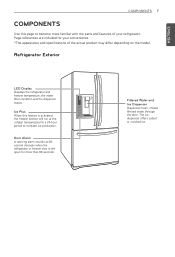
... Display Displays the refrigerator and freezer temperature, the water filter condition and the dispenser status. Filtered Water and Ice Dispenser Dispenses fresh, chilled, filtered water through the door. Door ... than 60 seconds. ENGLISH COMPONENTS 7 COMPONENTS Use this feature is activated, the freezer section will run at 30second intervals when the refrigerator or freezer door is left open for your refrigerator. The ice dispenser offers cubed or crushed ice. Page references are included for more familiar with the parts and features of...
... Display Displays the refrigerator and freezer temperature, the water filter condition and the dispenser status. Filtered Water and Ice Dispenser Dispenses fresh, chilled, filtered water through the door. Door ... than 60 seconds. ENGLISH COMPONENTS 7 COMPONENTS Use this feature is activated, the freezer section will run at 30second intervals when the refrigerator or freezer door is left open for your refrigerator. The ice dispenser offers cubed or crushed ice. Page references are included for more familiar with the parts and features of...
Owner's Manual
Page 8
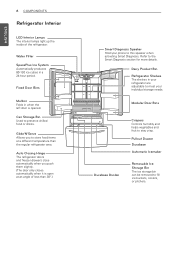
... produces 80-130 ice cubes in when the left door is open at a different temperature than 30°.) Smart Diagnosis Speaker Hold your refrigerator are adjustable to fill ice buckets, coolers, or pitchers. Glide'N'Serve Allows you push them slightly. (The door only closes automatically when ...it is opened. Refer to store food items at an angle of the refrigerator. Modular Door Bins Durabase Divider Crispers Controls humidity and helps vegetables and fruit to stay crisp. Fixed Door Bins Mullion Folds in a 24...
... produces 80-130 ice cubes in when the left door is open at a different temperature than 30°.) Smart Diagnosis Speaker Hold your refrigerator are adjustable to fill ice buckets, coolers, or pitchers. Glide'N'Serve Allows you push them slightly. (The door only closes automatically when ...it is opened. Refer to store food items at an angle of the refrigerator. Modular Door Bins Durabase Divider Crispers Controls humidity and helps vegetables and fruit to stay crisp. Fixed Door Bins Mullion Folds in a 24...

Owner's Manual
Page 9
ENGLISH INSTALLATION 9 INSTALLATION Installation Overview Please read the following installation instructions first after purchasing this product or transporting it to another location. 1 Unpacking your refrigerator 2 Choosing the proper location 3 Disassembling/Assembling 4 Connecting the water supply and water line 5 Leveling and Door Alignment
ENGLISH INSTALLATION 9 INSTALLATION Installation Overview Please read the following installation instructions first after purchasing this product or transporting it to another location. 1 Unpacking your refrigerator 2 Choosing the proper location 3 Disassembling/Assembling 4 Connecting the water supply and water line 5 Leveling and Door Alignment
Owner's Manual
Page 10
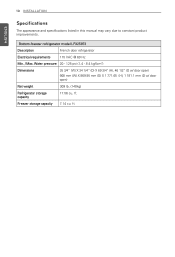
... (1.4 - 8.4 kgf/cm2) Dimensions 35 3/4" (W) X 34 1/4" (D) X 69 3/4" (H), 46 1/2" (D w/ door open) 908 mm (W) X 869.95 mm (D) X 1 771.65 (H), 1 181.1 mm (D w/ door open) Net weight 309 lb. (140kg) Refrigerator storage capacity 17.56 cu. ft. Freezer storage capacity 7.14 cu. Bottom-freezer...
... (1.4 - 8.4 kgf/cm2) Dimensions 35 3/4" (W) X 34 1/4" (D) X 69 3/4" (H), 46 1/2" (D w/ door open) 908 mm (W) X 869.95 mm (D) X 1 771.65 (H), 1 181.1 mm (D w/ door open) Net weight 309 lb. (140kg) Refrigerator storage capacity 17.56 cu. ft. Freezer storage capacity 7.14 cu. Bottom-freezer...
Owner's Manual
Page 11
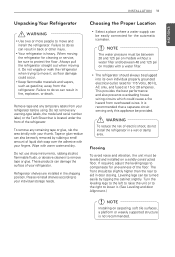
...glue residue can result in back or other injury. WARNING To reduce the risk of your individual storage needs. y Your refrigerator is not recommended. Refrigerator shelves are installed in door closing. Please reinstall shelves according to aid in the shipping position. NOTE The water pressure must...leveling legs to do so can damage the surface of electric shock, do so can also be slightly higher than the rear to your refrigerator. Failure to compensate for cleaning or service, be provided. When moving it . (See Leveling and door AlIgnment.) NOTE Installing on ...
...glue residue can result in back or other injury. WARNING To reduce the risk of your individual storage needs. y Your refrigerator is not recommended. Refrigerator shelves are installed in door closing. Please reinstall shelves according to aid in the shipping position. NOTE The water pressure must...leveling legs to do so can damage the surface of electric shock, do so can also be slightly higher than the rear to your refrigerator. Failure to compensate for cleaning or service, be provided. When moving it . (See Leveling and door AlIgnment.) NOTE Installing on ...
Owner's Manual
Page 12
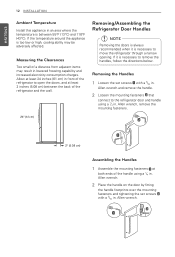
...at both ends of the handle using a 1/4 in. Allen wrench and remove the handle. 2 Loosen the mounting fasteners that connect to the refrigerator door and handle using a 1/4 in. Allen wrench. 2 Place the handle on the door by fitting the handle footprints over the mounting fasteners... this appliance in an area where the temperature is necessary to move the refrigerator through a narrow opening. Measuring the Clearances Too small of the refrigerator and the wall. Removing/Assembling the Refrigerator Door Handles NOTE Removing the doors is always recommended when it is too low...
...at both ends of the handle using a 1/4 in. Allen wrench and remove the handle. 2 Loosen the mounting fasteners that connect to the refrigerator door and handle using a 1/4 in. Allen wrench. 2 Place the handle on the door by fitting the handle footprints over the mounting fasteners... this appliance in an area where the temperature is necessary to move the refrigerator through a narrow opening. Measuring the Clearances Too small of the refrigerator and the wall. Removing/Assembling the Refrigerator Door Handles NOTE Removing the doors is always recommended when it is too low...
Owner's Manual
Page 13
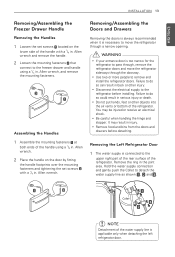
... do so can result in back or other objects into the air vents or bottom of the handle using a 1/4 in. Failure to the refrigerator before detaching. y Be careful when handling the hinge and stopper. y Remove food and bins from the doors and drawers before installing. ENGLISH...an electrical shock. Removing/Assembling the Doors and Drawers Removing the doors is always recommended when it is too narrow for the refrigerator to move the refrigerator sideways through a narrow opening. Remove the ring in injury. Hold the water supply connection and gently push the Collet to remove...
... do so can result in back or other objects into the air vents or bottom of the handle using a 1/4 in. Failure to the refrigerator before detaching. y Be careful when handling the hinge and stopper. y Remove food and bins from the doors and drawers before installing. ENGLISH...an electrical shock. Removing/Assembling the Doors and Drawers Removing the doors is always recommended when it is too narrow for the refrigerator to move the refrigerator sideways through a narrow opening. Remove the ring in injury. Hold the water supply connection and gently push the Collet to remove...

Owner's Manual
Page 14
... (2). 3 Remove the cover. 4 Pull out the tube (3). 5 Disconnect all wire harnesses (4). 6 Remove the grounding screw (5). 7 Rotate the hinge lever (6) counterclockwise. 14 INSTALLATION (2) (1) Removing the Right Refrigerator Door ENGLISH (3) (5) (4) (6) (7) (8) 2 Open the left door. Remove the top hinge cover screw (1). Lift up , on a non- Lift the top hinge (7) free of the latch, be...
... (2). 3 Remove the cover. 4 Pull out the tube (3). 5 Disconnect all wire harnesses (4). 6 Remove the grounding screw (5). 7 Rotate the hinge lever (6) counterclockwise. 14 INSTALLATION (2) (1) Removing the Right Refrigerator Door ENGLISH (3) (5) (4) (6) (7) (8) 2 Open the left door. Remove the top hinge cover screw (1). Lift up , on a non- Lift the top hinge (7) free of the latch, be...

Owner's Manual
Page 15
ENGLISH 1 Lower the door onto the middle hinge pin. INSTALLATION 15 Assembling the Left Refrigerator Door Install the left hinge on the top of the cabinet until it exits through the back. 6 Insert the water supply tube (3) into the connector ... mm). 7 Hook the tabs on the right side of the hinge cover (2) under the edge of the left door into the hole beside the left refrigerator door after the right door is inserted into the bottom of the door. (1) (2) (3) (4) (5) 2 Fit the top hinge (4) over the hinge lever latch (5) and into place...
ENGLISH 1 Lower the door onto the middle hinge pin. INSTALLATION 15 Assembling the Left Refrigerator Door Install the left hinge on the top of the cabinet until it exits through the back. 6 Insert the water supply tube (3) into the connector ... mm). 7 Hook the tabs on the right side of the hinge cover (2) under the edge of the left door into the hole beside the left refrigerator door after the right door is inserted into the bottom of the door. (1) (2) (3) (4) (5) 2 Fit the top hinge (4) over the hinge lever latch (5) and into place...
Owner's Manual
Page 19
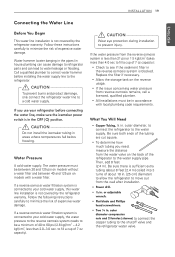
... pipe. If the water pressure from the water valve on the back of expensive water damage. outer diameter, to connect the refrigerator to prevent injury. CAUTION Wear eye protection during installation to the water supply. y Flat blade and Phillips head screwdrivers. Call... psi on the reverse usage. INSTALLATION 19 ENGLISH Connecting the Water Line Before You Begin This water line installation is not covered by the refrigerator warranty. What You Will Need y Copper Tubing, ¼ in accordance with a water filter. Be sure there is sufficient extra tubing ...
... pipe. If the water pressure from the water valve on the back of expensive water damage. outer diameter, to connect the refrigerator to prevent injury. CAUTION Wear eye protection during installation to the water supply. y Flat blade and Phillips head screwdrivers. Call... psi on the reverse usage. INSTALLATION 19 ENGLISH Connecting the Water Line Before You Begin This water line installation is not covered by the refrigerator warranty. What You Will Need y Copper Tubing, ¼ in accordance with a water filter. Be sure there is sufficient extra tubing ...

Owner's Manual
Page 20
... fitting at the end, you can cut off any electrical device (such as a power drill) during installation, be sure the device is necessary to the refrigerator OR you will prevent the hazard of a vertical water pipe. Be careful not to allow water to the cold water line. The shutoff valve should...
... fitting at the end, you can cut off any electrical device (such as a power drill) during installation, be sure the device is necessary to the refrigerator OR you will prevent the hazard of a vertical water pipe. Be careful not to allow water to the cold water line. The shutoff valve should...

Owner's Manual
Page 21
... the compression nut and ferrule (sleeve) onto the end of about one quart of Massachusetts Plumbing Codes 248CMR shall be sure that the refrigerator power cord is not plugged into the valve. Tighten the compression nut securely. Consult with the pipe clamp. c. Make sure the tubing... Turn the main water supply on and flush out the tubing until the sealing washer begins to swell. Compression Nut Ferrule (sleeve) Refrigerator Connection Saddle valves are illegal and use is not permitted in . INSTALLATION 21 ENGLISH 4 FASTEN THE SHUTOFF VALVE Fasten the shutoff valve...
... the compression nut and ferrule (sleeve) onto the end of about one quart of Massachusetts Plumbing Codes 248CMR shall be sure that the refrigerator power cord is not plugged into the valve. Tighten the compression nut securely. Consult with the pipe clamp. c. Make sure the tubing... Turn the main water supply on and flush out the tubing until the sealing washer begins to swell. Compression Nut Ferrule (sleeve) Refrigerator Connection Saddle valves are illegal and use is not permitted in . INSTALLATION 21 ENGLISH 4 FASTEN THE SHUTOFF VALVE Fasten the shutoff valve...
Owner's Manual
Page 22
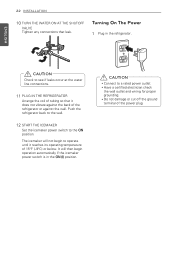
... outlet and wiring for proper grounding. The icemaker will then begin to see if leaks occur at the water line connections. 11 PLUG IN THE REFRIGERATOR Arrange the coil of tubing so that leak. Turning On The Power 1 Plug in the ON (I) position. It will not begin operation automatically... if the icemaker power switch is in the refrigerator. ENGLISH CAUTION Check to operate until it does not vibrate against the wall. y Do not damage or cut off the ground terminal of the ...
... outlet and wiring for proper grounding. The icemaker will then begin to see if leaks occur at the water line connections. 11 PLUG IN THE REFRIGERATOR Arrange the coil of tubing so that leak. Turning On The Power 1 Plug in the ON (I) position. It will not begin operation automatically... if the icemaker power switch is in the refrigerator. ENGLISH CAUTION Check to operate until it does not vibrate against the wall. y Do not damage or cut off the ground terminal of the ...
Owner's Manual
Page 23
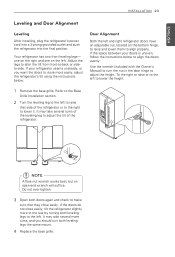
...will suffice. ENGLISH INSTALLATION 23 Leveling and Door Alignment Leveling After installing, plug the refrigerator's power cord into a 3-prong grounded outlet and push the refrigerator into the final position. If the space between your refrigerator seems unsteady, or you should turn the nut in the door hinge to lower it...below to align the doors evenly: Use the wrench (included with the Owner's Manual) to turn both leveling legs to the left and right refrigerator doors have an adjustable nut, located on the left to the left . To the right to raise or to lower the height. 1 ...
...will suffice. ENGLISH INSTALLATION 23 Leveling and Door Alignment Leveling After installing, plug the refrigerator's power cord into a 3-prong grounded outlet and push the refrigerator into the final position. If the space between your refrigerator seems unsteady, or you should turn the nut in the door hinge to lower it...below to align the doors evenly: Use the wrench (included with the Owner's Manual) to turn both leveling legs to the left and right refrigerator doors have an adjustable nut, located on the left to the left . To the right to raise or to lower the height. 1 ...


