Owner's Manual (English)
Page 2
... the operating and care instructions in this manual and your purchase and welcome to Connect Electricity 5 PARTS AND FEATURES Special Features 6 Key Parts and Components 7 INSTALLATION Choose the Proper Location 8 Clearances 8 Flooring 9 Handle Removal 9 Door and Drawer Removal 10 Connecting the Water Supply 16 Connecting the Water Lines 16 Leveling the Refrigerator Doors 18 Starting 19 HOW TO USE Control Panel Features 20 The LED Display 21 Adjusting the Temperatures and Display 22 Operating the Dispenser 23 Setting the Functions 24 In-Door Ice Bin 25 Automatic Icemaker...
... the operating and care instructions in this manual and your purchase and welcome to Connect Electricity 5 PARTS AND FEATURES Special Features 6 Key Parts and Components 7 INSTALLATION Choose the Proper Location 8 Clearances 8 Flooring 9 Handle Removal 9 Door and Drawer Removal 10 Connecting the Water Supply 16 Connecting the Water Lines 16 Leveling the Refrigerator Doors 18 Starting 19 HOW TO USE Control Panel Features 20 The LED Display 21 Adjusting the Temperatures and Display 22 Operating the Dispenser 23 Setting the Functions 24 In-Door Ice Bin 25 Automatic Icemaker...
Owner's Manual (English)
Page 3
... hands are damp or wet. It alerts you to avoid contact with the Installer Instructions that can happen if the instructions are finished, reconnect the refrigerator to the electrical source and reset the control (Thermostat Refrigerator Control, or Freezer Control, or Freezer Control, depending on the automatic icemaking mechanism while the refrigerator is plugged in the vicinity of hazards that were taped to the front of fire...
... hands are damp or wet. It alerts you to avoid contact with the Installer Instructions that can happen if the instructions are finished, reconnect the refrigerator to the electrical source and reset the control (Thermostat Refrigerator Control, or Freezer Control, or Freezer Control, depending on the automatic icemaking mechanism while the refrigerator is plugged in the vicinity of hazards that were taped to the front of fire...
Owner's Manual (English)
Page 6
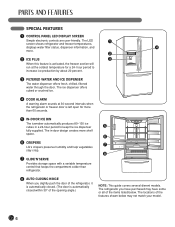
... shows refrigerator and freezer temperatures, displays water filter status, dispenser information, and 4 more. 2 2 ICE PLUS 3 When this feature is activated, the freezer section will run at 30-second intervals when the refrigerator or freezer door is automatically closed within 30° of the opening angle.) NOTE: This guide covers several dierent models. The ice dispenser offers cubed or crushed ice. 4 DOOR ALARM A warning alarm sounds at the coldest temperature for more shelf space. 6 6 CRISPERS 7 LG's crispers preserve humidity...
... shows refrigerator and freezer temperatures, displays water filter status, dispenser information, and 4 more. 2 2 ICE PLUS 3 When this feature is activated, the freezer section will run at 30-second intervals when the refrigerator or freezer door is automatically closed within 30° of the opening angle.) NOTE: This guide covers several dierent models. The ice dispenser offers cubed or crushed ice. 4 DOOR ALARM A warning alarm sounds at the coldest temperature for more shelf space. 6 6 CRISPERS 7 LG's crispers preserve humidity...
Owner's Manual (English)
Page 8
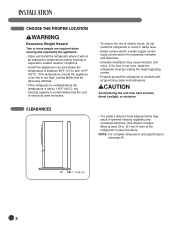
.... • Select a place where a water supply can be easily connected for the automatic icemaker and dispenser. • Unstable installation may be exposed to temperatures below freezing or exposed to open the doors. CHOOSE THE PROPER LOCATION wWARNING Excessive Weight Hazard Two or more people are required when moving and unpacking the appliance. • Store and install the refrigerator where it will not be...
.... • Select a place where a water supply can be easily connected for the automatic icemaker and dispenser. • Unstable installation may be exposed to temperatures below freezing or exposed to open the doors. CHOOSE THE PROPER LOCATION wWARNING Excessive Weight Hazard Two or more people are required when moving and unpacking the appliance. • Store and install the refrigerator where it will not be...

Owner's Manual (English)
Page 9
... wrench and remove the handle. wCAUTION • Use special care when removing handles to move the refrigerator through a narrow opening. Do not wiggle or walk the refrigerator when trying to prevent scratching the doors. • The handle could occur. Mounting Fasteners Set Screw Allen Wrench 1 Loosen the set screws located on a platform or weakly supported structure. If required, adjust the leveling legs to compensate for cleaning or service, be...
... wrench and remove the handle. wCAUTION • Use special care when removing handles to move the refrigerator through a narrow opening. Do not wiggle or walk the refrigerator when trying to prevent scratching the doors. • The handle could occur. Mounting Fasteners Set Screw Allen Wrench 1 Loosen the set screws located on a platform or weakly supported structure. If required, adjust the leveling legs to compensate for cleaning or service, be...
Owner's Manual (English)
Page 16
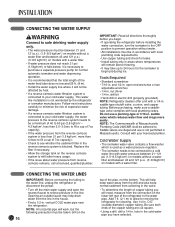
... connecting the tubing to the water line, unplug the refrigerator or disconnect the power. • Turn off the main water supply and open -end wrenches or two adjustable wrenches • 1/4-in. Opening an outside diameter) copper tubing. nut driver • 1/4-in . drill bit • Hand drill or electric drill (properly grounded) NOTE: Refrigerator dealers offer a kit with a 1/4-in . saddle valve which is used as a water pressure regulator. • The icemaker needs to...
... connecting the tubing to the water line, unplug the refrigerator or disconnect the power. • Turn off the main water supply and open -end wrenches or two adjustable wrenches • 1/4-in. Opening an outside diameter) copper tubing. nut driver • 1/4-in . drill bit • Hand drill or electric drill (properly grounded) NOTE: Refrigerator dealers offer a kit with a 1/4-in . saddle valve which is used as a water pressure regulator. • The icemaker needs to...
Owner's Manual (English)
Page 17
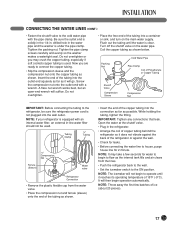
... of the tubing as shown below. Coil the copper tubing as shown. • Insert the end of 15°F (-9°C). Tubing Clamp 1/4" Tubing 1/4" Compression Nut Ferrule (Sleeve) Water valve Refrigerator Connection • Remove the plastic flexible cap from the lines. • Push the refrigerator back to the wall. • Set the icemaker switch to the refrigerator, be used . IMPORTANT: Tighten any connections that leak. NOTE: The icemaker will suffice...
... of the tubing as shown below. Coil the copper tubing as shown. • Insert the end of 15°F (-9°C). Tubing Clamp 1/4" Tubing 1/4" Compression Nut Ferrule (Sleeve) Water valve Refrigerator Connection • Remove the plastic flexible cap from the lines. • Push the refrigerator back to the wall. • Set the icemaker switch to the refrigerator, be used . IMPORTANT: Tighten any connections that leak. NOTE: The icemaker will suffice...
Owner's Manual (English)
Page 18
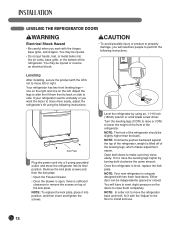
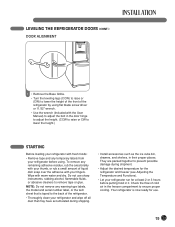
... want the doors to close more easily, adjust the refrigerator's tilt using an, 11/16 inch (18mm) wrench or a flat blade screw driver. NOTE: If someone pushes backward against the top of the refrigerator. You will need two people to perform the following instructions: Kick Plate 1 Plug the power cord into a 3-prong grounded outlet, and move the refrigerator into the air vents...
... want the doors to close more easily, adjust the refrigerator's tilt using an, 11/16 inch (18mm) wrench or a flat blade screw driver. NOTE: If someone pushes backward against the top of the refrigerator. You will need two people to perform the following instructions: Kick Plate 1 Plug the power cord into a 3-prong grounded outlet, and move the refrigerator into the air vents...
Owner's Manual (English)
Page 19
... with warm water and dry. To remove any temporary labels from your thumb, or rub a small amount of cold air in the freezer compartment to prevent possible damage during shipping. • Install accessories such as the ice cube bin, drawers, and shelves, in it. Wipe with your refrigerator before putting food in their proper places. They are packed together to ensure proper cooling.
... with warm water and dry. To remove any temporary labels from your thumb, or rub a small amount of cold air in the freezer compartment to prevent possible damage during shipping. • Install accessories such as the ice cube bin, drawers, and shelves, in it. Wipe with your refrigerator before putting food in their proper places. They are packed together to ensure proper cooling.
Owner's Manual (English)
Page 20
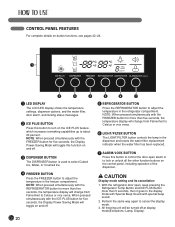
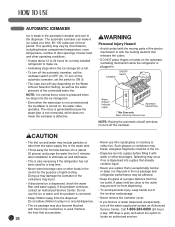
.... 20 5 REFRIGERATOR BUTTON Press the REFRIGERATOR button to adjust the temperature in the freezer compartment. NOTE: When pressed simultaneously with the FREEZER button for five seconds, the Display Power Saving Mode will change from Fahrenheit to Celsius or vice versa. 6 LIGHT/FILTER BUTTON The LIGHT/FILTER button controls the lamp in the dispenser and resets the water filter replacement indicator when the water filter has been replaced. 7 ALARM/LOCK BUTTON Press this button to turn on the ICE PLUS feature, which increases icemaking capabilities up...
.... 20 5 REFRIGERATOR BUTTON Press the REFRIGERATOR button to adjust the temperature in the freezer compartment. NOTE: When pressed simultaneously with the FREEZER button for five seconds, the Display Power Saving Mode will change from Fahrenheit to Celsius or vice versa. 6 LIGHT/FILTER BUTTON The LIGHT/FILTER button controls the lamp in the dispenser and resets the water filter replacement indicator when the water filter has been replaced. 7 ALARM/LOCK BUTTON Press this button to turn on the ICE PLUS feature, which increases icemaking capabilities up...
Owner's Manual (English)
Page 21
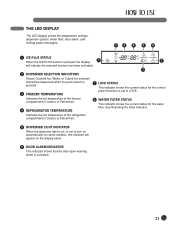
... some models), this indicator will appear on the display panel. 6 DOOR ALARM INDICATOR This indicator shows that will indicate the selected function has been activated. 7 2 DISPENSER SELECTION INDICATORS Shows Crushed Ice, Water, or Cubed Ice selection that the door-open warning alarm is set to LOCK. 3 FREEZER TEMPERATURE Indicates the set temperature of the freezer compartment in Celsius or Fahrenheit. 4 REFRIGERATOR TEMPERATURE 8 WATER FILTER STATUS This indicator shows the current status for the control panel functions is activated. 21 See Resetting the Filter Indicator...
... some models), this indicator will appear on the display panel. 6 DOOR ALARM INDICATOR This indicator shows that will indicate the selected function has been activated. 7 2 DISPENSER SELECTION INDICATORS Shows Crushed Ice, Water, or Cubed Ice selection that the door-open warning alarm is set to LOCK. 3 FREEZER TEMPERATURE Indicates the set temperature of the freezer compartment in Celsius or Fahrenheit. 4 REFRIGERATOR TEMPERATURE 8 WATER FILTER STATUS This indicator shows the current status for the control panel functions is activated. 21 See Resetting the Filter Indicator...
Owner's Manual (English)
Page 24
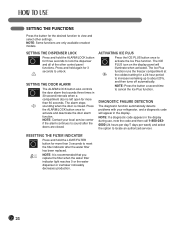
... replaced. SETTING THE DOOR ALARM The ALARM/LOCK button also controls the door alarm that you replace the filter when the water filter indicator light reaches 0 or the water dispenser or icemaker noticeably decreases production. 24 NOTE: Contact your refrigerator, and a diagnostic code will illuminate when activated. DIAGNOSTIC FAILURE DETECTION The diagnostic function automatically detects problems with your local service center if the alarm continues to reset the filter indicator after the doors are only available onselect models...
... replaced. SETTING THE DOOR ALARM The ALARM/LOCK button also controls the door alarm that you replace the filter when the water filter indicator light reaches 0 or the water dispenser or icemaker noticeably decreases production. 24 NOTE: Contact your refrigerator, and a diagnostic code will illuminate when activated. DIAGNOSTIC FAILURE DETECTION The diagnostic function automatically detects problems with your local service center if the alarm continues to reset the filter indicator after the doors are only available onselect models...
Owner's Manual (English)
Page 26
.../OFF Switch Water Amount Indicator Lights Automatic Shutoff Arm * This Zone only Must control by circumstance, including freezer compartment temperature, room temperature, number of the connected water line. If the problem continues, contact an Authorized Service Center. NOTE: It is normal that accumulates. AUTOMATIC ICEMAKER Ice is turned on, the water valve operates. The automatic icemaker can make ice. • Icemaking stops when the ice storage bin is exceptionally narrow or deep. To turn off the icemaker. Such glasses or...
.../OFF Switch Water Amount Indicator Lights Automatic Shutoff Arm * This Zone only Must control by circumstance, including freezer compartment temperature, room temperature, number of the connected water line. If the problem continues, contact an Authorized Service Center. NOTE: It is normal that accumulates. AUTOMATIC ICEMAKER Ice is turned on, the water valve operates. The automatic icemaker can make ice. • Icemaking stops when the ice storage bin is exceptionally narrow or deep. To turn off the icemaker. Such glasses or...
Owner's Manual (English)
Page 36
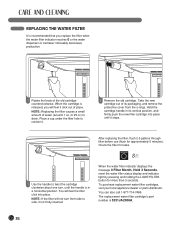
... inserted. When the cartridge is released, you replace the filter when the water filter indicator reaches 0 or the water dispenser or icemaker noticeably decreases production. 1 Rotate the knob of water (around 1 oz. Take the new cartridge out of place. When the water filter indicator displays the message 0 Filter Month, Hold 3 Seconds, reset the water filter status display and indicator light by pressing and holding the LIGHT/FILTER button for approximately 5 minutes). Check the filter for leaks. 1 Use the handle to drain.
... inserted. When the cartridge is released, you replace the filter when the water filter indicator reaches 0 or the water dispenser or icemaker noticeably decreases production. 1 Rotate the knob of water (around 1 oz. Take the new cartridge out of place. When the water filter indicator displays the message 0 Filter Month, Hold 3 Seconds, reset the water filter status display and indicator light by pressing and holding the LIGHT/FILTER button for approximately 5 minutes). Check the filter for leaks. 1 Use the handle to drain.

Owner's Manual (English)
Page 37
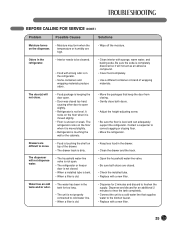
... refrigerator temperature is satisfactory. • Clean or change the gasket. BEFORE CALLING FOR SERVICE Before calling for the refrigerator to reach cooling temperatures. • Warm food will cause the refrigerator to run longer in the refrigerator is too cold, but the refrigerator temperature is satisfactory. • Freezer control is set too cold. • Adjust the freezer control to a warmer setting until the freezer temperature is normal. Refrigerator compressor cycles on and off to maintain desired temperatures. Temperature in defrost cycle. • Plug...
... refrigerator temperature is satisfactory. • Clean or change the gasket. BEFORE CALLING FOR SERVICE Before calling for the refrigerator to reach cooling temperatures. • Warm food will cause the refrigerator to run longer in the refrigerator is too cold, but the refrigerator temperature is satisfactory. • Freezer control is set too cold. • Adjust the freezer control to a warmer setting until the freezer temperature is normal. Refrigerator compressor cycles on and off to maintain desired temperatures. Temperature in defrost cycle. • Plug...

Owner's Manual (English)
Page 38
... is opened too often or for the refrigerator to reach the set too warm. • Adjust the refrigerator control to a warmer setting. BEFORE CALLING FOR SERVICE (CONT.) Problem Possible Causes Solutions Food stored in refrigerator drawers freezes. • Refrigerator control is uneven or weak. Vibrating or rattling noise. • Floor is set on the inside walls of the refrigerator. • The weather is hot and humid which increases the rate...
... is opened too often or for the refrigerator to reach the set too warm. • Adjust the refrigerator control to a warmer setting. BEFORE CALLING FOR SERVICE (CONT.) Problem Possible Causes Solutions Food stored in refrigerator drawers freezes. • Refrigerator control is uneven or weak. Vibrating or rattling noise. • Floor is set on the inside walls of the refrigerator. • The weather is hot and humid which increases the rate...
Owner's Manual (English)
Page 39
... in the refrigerator. • Interior needs to be cleaned. • Food with strong odor is touching the wall or the cabinets. • Move the packages that supplies water to the kitchen faucet. • Replace with sponge, warm water, and baking soda. Odors in the drawer. • Clean the drawer and the track. • Open the household water-line valve. • Be sure both doors. • Adjust the height-adjusting screw. •...
... in the refrigerator. • Interior needs to be cleaned. • Food with strong odor is touching the wall or the cabinets. • Move the packages that supplies water to the kitchen faucet. • Replace with sponge, warm water, and baking soda. Odors in the drawer. • Clean the drawer and the track. • Open the household water-line valve. • Be sure both doors. • Adjust the height-adjusting screw. •...

Owner's Manual (English)
Page 40
... been used with the dispenser. • Check the installed tube • Replace with a new filter. Sound of the refrigerator. BEFORE CALLING FOR SERVICE (CONT.) Problem Possible Causes Solutions The dispenser will not dispense ice. • The ice storage bin is empty. • The household water line valve is not open. • The refrigerator or freezer door is not closed . • Remove the ice storage bin and thaw the contents. Clean the bin, wipe it dry, and replace it...
... been used with the dispenser. • Check the installed tube • Replace with a new filter. Sound of the refrigerator. BEFORE CALLING FOR SERVICE (CONT.) Problem Possible Causes Solutions The dispenser will not dispense ice. • The ice storage bin is empty. • The household water line valve is not open. • The refrigerator or freezer door is not closed . • Remove the ice storage bin and thaw the contents. Clean the bin, wipe it dry, and replace it...
Owner's Manual (English)
Page 42
... option from defects in the product owner's manual. 15. LG REFRIGERATOR LIMITED WARRANTY - Refrigerator One (1) year from the date of original retail purchase WARRANTY PERIOD Sealed System (Compressor, Condenser, Dryer, Connecting Tube and Evaporator) One (1) year from the date of original retail purchase Seven (7) years from misuse, abuse, improper installation, repair, or maintenance. TO THE EXTENT ANY IMPLIED WARRANTY IS REQUIRED BY LAW, IT...
... option from defects in the product owner's manual. 15. LG REFRIGERATOR LIMITED WARRANTY - Refrigerator One (1) year from the date of original retail purchase WARRANTY PERIOD Sealed System (Compressor, Condenser, Dryer, Connecting Tube and Evaporator) One (1) year from the date of original retail purchase Seven (7) years from misuse, abuse, improper installation, repair, or maintenance. TO THE EXTENT ANY IMPLIED WARRANTY IS REQUIRED BY LAW, IT...
Owner's Manual (English)
Page 43
... BE BINDING ON LG CANADA. instructing a customer on applicable provincial laws. Damage or Product failure caused by incorrect electrical current, voltage, or plumbing codes, commercial or industrial use, or use (including, without affecting the remainder of light bulbs, filters, or any display, open box, discounted, or refurbished Product. 11. Replacement of this warranty's terms. THIS LIMITED WARRANTY DOES NOT COVER: 1. For complete warranty details and customer assistance, please...
... BE BINDING ON LG CANADA. instructing a customer on applicable provincial laws. Damage or Product failure caused by incorrect electrical current, voltage, or plumbing codes, commercial or industrial use, or use (including, without affecting the remainder of light bulbs, filters, or any display, open box, discounted, or refurbished Product. 11. Replacement of this warranty's terms. THIS LIMITED WARRANTY DOES NOT COVER: 1. For complete warranty details and customer assistance, please...


