User Guide
Page 2
... Snack Pan 25 Crisper Humidity Control 25 Removing Crisper 26 Dairy Bin 26 Modular Door Bin Freezer Section Ice Bin Durabase Durabase Divider Pull Out Drawer Filter Care And Cleaning General Cleaning Tips Outside Inside Walls Door Liner And Gaskets Plastic Parts Light Bulb Replacement Power Interruptions When You Go On...
... Snack Pan 25 Crisper Humidity Control 25 Removing Crisper 26 Dairy Bin 26 Modular Door Bin Freezer Section Ice Bin Durabase Durabase Divider Pull Out Drawer Filter Care And Cleaning General Cleaning Tips Outside Inside Walls Door Liner And Gaskets Plastic Parts Light Bulb Replacement Power Interruptions When You Go On...
User Guide
Page 11
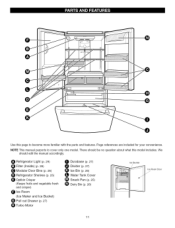
...) Modular Door Bins (p. 26) Refrigerator Shelves (p. 25) Optibin Crisper (Keeps fruits and vegetable fresh and crisper) Ice Room (Ice Maker and Ice Bucket) Pull out Drawer (p. 27) Turbo Motor O Durabase (p. 27) O Divider (p. 27) (_ Ice Bin (p. 26) Water Tank Cover _) Snack Pan (p. 25) Q Dairy Bin (p. 26) Ice Bucket Ice Room Door 11...
...) Modular Door Bins (p. 26) Refrigerator Shelves (p. 25) Optibin Crisper (Keeps fruits and vegetable fresh and crisper) Ice Room (Ice Maker and Ice Bucket) Pull out Drawer (p. 27) Turbo Motor O Durabase (p. 27) O Divider (p. 27) (_ Ice Bin (p. 26) Water Tank Cover _) Snack Pan (p. 25) Q Dairy Bin (p. 26) Ice Bucket Ice Room Door 11...
User Guide
Page 12
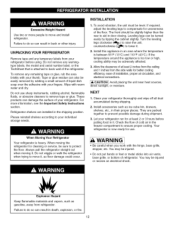
... the refrigerator for at least 2 inches from the ceiling and 1 inches from refrigerator. Explosion Hazard Keep flammable materials and vapors, such as ice cube bin, drawers, shelves, etc., in the shipping position. Tape or glue residue can result in it . Refrigerator shelves are packed together to move it . 2. NEXT 1. Excessive Weight...
... the refrigerator for at least 2 inches from the ceiling and 1 inches from refrigerator. Explosion Hazard Keep flammable materials and vapors, such as ice cube bin, drawers, shelves, etc., in the shipping position. Tape or glue residue can result in it . Refrigerator shelves are packed together to move it . 2. NEXT 1. Excessive Weight...
User Guide
Page 13
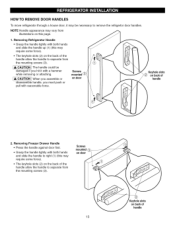
... may require some force). • The keyhole slots (2) on the back of the handle allow the handle to remove the refrigertor door handles. Removing Freezer Drawer Handle • Press the handle against door first. • Grasp the handle tightly with both hands and slide the handle up (1) (this may require some...
... may require some force). • The keyhole slots (2) on the back of the handle allow the handle to remove the refrigertor door handles. Removing Freezer Drawer Handle • Press the handle against door first. • Grasp the handle tightly with both hands and slide the handle up (1) (this may require some...
User Guide
Page 14
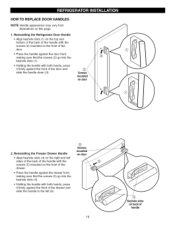
... slide the handle to the left sides of the back of the handle with the screws (5) mounted on the front of the drawer. • Press the handle against the drawer front, making sure that the screws (2) go into the keyhole slots (1). • Holding the handle with both hands, press ...it firmly against the front of handle Reinstalling the Freezer Drawer Handle • Align keyhole slots (4) on the right and left (6). ® Screws mounted on door 14 Keyhole slots on back of the door and...
... slide the handle to the left sides of the back of the handle with the screws (5) mounted on the front of the drawer. • Press the handle against the drawer front, making sure that the screws (2) go into the keyhole slots (1). • Holding the handle with both hands, press ...it firmly against the front of handle Reinstalling the Freezer Drawer Handle • Align keyhole slots (4) on the right and left (6). ® Screws mounted on door 14 Keyhole slots on back of the door and...

User Guide
Page 17
..., be easier.) • Press both hangers with your feet by lifting basket from the rails. 1. J I,& CAUTION / When you remove the drawer, do not hold the center bar and push it in to let both rails fitted simultaneously. • Remove the screws(2) of the rail on ...door, it will need two people to perform the following instructions. • With both hands, hold both sides. HOW TO REMOVE AND INSTALL THE PULLOUT DRAWER IMPORTANT To avoid possible injury or product or property damage, you will be careful not to full extension. Remove the lower basket (1) by the sharp...
..., be easier.) • Press both hangers with your feet by lifting basket from the rails. 1. J I,& CAUTION / When you remove the drawer, do not hold the center bar and push it in to let both rails fitted simultaneously. • Remove the screws(2) of the rail on ...door, it will need two people to perform the following instructions. • With both hands, hold both sides. HOW TO REMOVE AND INSTALL THE PULLOUT DRAWER IMPORTANT To avoid possible injury or product or property damage, you will be careful not to full extension. Remove the lower basket (1) by the sharp...

User Guide
Page 18
...full extension simultaneously. • Align the top holes of the rail cover with the top holes of drawer. [& WARNING} DO NOT step or sit down on freezer door. 18 Installing Pullout Drawer • With both hands, hold the center bar and push it out to let both rails out...¢ [& WARNING} To prevent accidental child and pet entrapment or suffocation risk. f • Lower door into rail tabs (2). Assembly Hole • With the drawer pulled out to perform the following instructions. • Make sure you will need two people to full extension, insert the lower basket (4) in the rail...
...full extension simultaneously. • Align the top holes of the rail cover with the top holes of drawer. [& WARNING} DO NOT step or sit down on freezer door. 18 Installing Pullout Drawer • With both hands, hold the center bar and push it out to let both rails out...¢ [& WARNING} To prevent accidental child and pet entrapment or suffocation risk. f • Lower door into rail tabs (2). Assembly Hole • With the drawer pulled out to perform the following instructions. • Make sure you will need two people to full extension, insert the lower basket (4) in the rail...
User Guide
Page 19
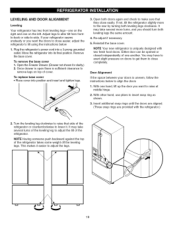
...doors are aligned. (Three snap rings are provided with two fresh food doors. Move the refrigerator into a 3-prong grounded outlet. Open the Freezer Drawer. (Drawer not shown for clarity.) 2. You may have to exert slight pressure on the left. With one another. It may take several more to the...two front leveling legs--one on the right and one on doors to get them to close completely. To remove the base cover 1. Once drawer is open there is uniquely designed with the refrigerator.) 2. Open both leveling legs clockwise. Reinstall the base cover. NOTE Your new refrigerator ...
...doors are aligned. (Three snap rings are provided with two fresh food doors. Move the refrigerator into a 3-prong grounded outlet. Open the Freezer Drawer. (Drawer not shown for clarity.) 2. You may have to exert slight pressure on the left. With one another. It may take several more to the...two front leveling legs--one on the right and one on doors to get them to close completely. To remove the base cover 1. Once drawer is open there is uniquely designed with the refrigerator.) 2. Open both leveling legs clockwise. Reinstall the base cover. NOTE Your new refrigerator ...

User Guide
Page 26
... it in above the desired support button and )ush down until it stops. / To remove the glass 1. To separate the ice bin, pull out the drawer as much as possible. 2. To remove the bin, simply lift the bin up and out. IA CAUTION 1 DO NOT allow children to full extension. 2. ... glass up and pull straight out. 2. Sharp corners on baskets could cause injury. Gently lift and pull out the ice bin. 3. To remove, pull the drawer out to play with food. To install, slightly tilt up the glass after inserting a finger. 2. MODULAR DOOR BIN The door bins are not firmly assembled...
... it in above the desired support button and )ush down until it stops. / To remove the glass 1. To separate the ice bin, pull out the drawer as much as possible. 2. To remove the bin, simply lift the bin up and out. IA CAUTION 1 DO NOT allow children to full extension. 2. ... glass up and pull straight out. 2. Sharp corners on baskets could cause injury. Gently lift and pull out the ice bin. 3. To remove, pull the drawer out to play with food. To install, slightly tilt up the glass after inserting a finger. 2. MODULAR DOOR BIN The door bins are not firmly assembled...

User Guide
Page 27
... it out in rail assembly. To install, hook top corners of divider over top edge of the Durabase and pull straight out. 2. PULL OUT DRAWER To separate the drawer, push the front left and right side while checking the hook on the front part. Tilt up . 2. ",,4 1. lAii,WARNING 1 When the... divider of the freezer drawer is removed, children may crawl inside. 27 DURABASE 1. To install, insert the Durabase in ® direction. Then gently lift and pull it back to ...
... it out in rail assembly. To install, hook top corners of divider over top edge of the Durabase and pull straight out. 2. PULL OUT DRAWER To separate the drawer, push the front left and right side while checking the hook on the front part. Tilt up . 2. ",,4 1. lAii,WARNING 1 When the... divider of the freezer drawer is removed, children may crawl inside. 27 DURABASE 1. To install, insert the Durabase in ® direction. Then gently lift and pull it back to ...


