User Guide
Page 2
...Use A New Door Ice Bucket 22 Adjusting Control Settings 23 Food Storage Guide 23 Storing Frozen Food 24 I_ Refrigerator Section Water Dispenser 24 Refrigerator Shelves 25 Snack Pan 25 Crisper Humidity Control 25 Removing Crisper 26 Dairy Bin 26 Modular Door Bin Freezer Section Ice Bin Durabase Durabase Divider Pull Out Drawer Filter Care And Cleaning General Cleaning Tips Outside Inside Walls Door Liner And Gaskets Plastic Parts Light Bulb Replacement Power Interruptions When You Go On Vacation When You Move About The Automatic Icemaker Connecting The Water Line...
...Use A New Door Ice Bucket 22 Adjusting Control Settings 23 Food Storage Guide 23 Storing Frozen Food 24 I_ Refrigerator Section Water Dispenser 24 Refrigerator Shelves 25 Snack Pan 25 Crisper Humidity Control 25 Removing Crisper 26 Dairy Bin 26 Modular Door Bin Freezer Section Ice Bin Durabase Durabase Divider Pull Out Drawer Filter Care And Cleaning General Cleaning Tips Outside Inside Walls Door Liner And Gaskets Plastic Parts Light Bulb Replacement Power Interruptions When You Go On Vacation When You Move About The Automatic Icemaker Connecting The Water Line...
User Guide
Page 3
... long an implied warranty lasts, so the above exclusion or limitation may also have other than intended purpose. • Repairs when your home to deliver, pick up, and/or install the product, instruct, or replace house fuses or correct wiring, or correction of unauthorized repairs. • Damages or operating problems that result from misuse, abuse, operation outside environmental specifications or contrary...
... long an implied warranty lasts, so the above exclusion or limitation may also have other than intended purpose. • Repairs when your home to deliver, pick up, and/or install the product, instruct, or replace house fuses or correct wiring, or correction of unauthorized repairs. • Damages or operating problems that result from misuse, abuse, operation outside environmental specifications or contrary...
User Guide
Page 6
... be 15 amperes (minimum) and 120 volts. Use a receptacle which have it be a UL-listed (USA), 3-wire grounding type appliance extension cord having a grounding type plug and outlet, and that the electrical rating of the cord be dangerous to use an extension cord, it is poor or questionable, get rid of installation, cleaning, or removing a light bulb, turn the control (Thermostat, Refrigerator Control or Freezer Control, depending on for a long time, it...
... be 15 amperes (minimum) and 120 volts. Use a receptacle which have it be a UL-listed (USA), 3-wire grounding type appliance extension cord having a grounding type plug and outlet, and that the electrical rating of the cord be dangerous to use an extension cord, it is poor or questionable, get rid of installation, cleaning, or removing a light bulb, turn the control (Thermostat, Refrigerator Control or Freezer Control, depending on for a long time, it...
User Guide
Page 9
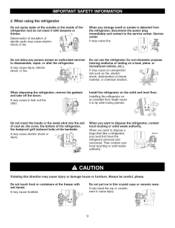
... power plug immediately and contact to disassemble, repair, or alter the refrigerator. Install the refrigerator on a boat, plane, or recreational vehicle, etc.). It may cause frostbite. When using the refrigerator Do not spray water at the freezer with benzene or thinner. When disposing the refrigerator, remove the gaskets and take off the doors. Do not touch food or containers at the outside or the inside...
... power plug immediately and contact to disassemble, repair, or alter the refrigerator. Install the refrigerator on a boat, plane, or recreational vehicle, etc.). It may cause frostbite. When using the refrigerator Do not spray water at the freezer with benzene or thinner. When disposing the refrigerator, remove the gaskets and take off the doors. Do not touch food or containers at the outside or the inside...
User Guide
Page 11
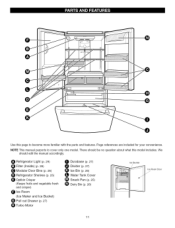
O Refrigerator Light (p. 29) Q Filter (Inside) (p. 28) Modular Door Bins (p. 26) Refrigerator Shelves (p. 25) Optibin Crisper (Keeps fruits and vegetable fresh and crisper) Ice Room (Ice Maker and Ice Bucket) Pull out Drawer (p. 27) Turbo Motor O Durabase (p. 27) O Divider (p. 27) (_ Ice Bin (p. 26) Water Tank Cover _) Snack Pan (p. 25) Q Dairy Bin (p. 26) Ice Bucket Ice Room Door 11 NOTE This manual purports to become more familiar with the parts and features. There should edit the manual accordingly. Page references are...
O Refrigerator Light (p. 29) Q Filter (Inside) (p. 28) Modular Door Bins (p. 26) Refrigerator Shelves (p. 25) Optibin Crisper (Keeps fruits and vegetable fresh and crisper) Ice Room (Ice Maker and Ice Bucket) Pull out Drawer (p. 27) Turbo Motor O Durabase (p. 27) O Divider (p. 27) (_ Ice Bin (p. 26) Water Tank Cover _) Snack Pan (p. 25) Q Dairy Bin (p. 26) Ice Bucket Ice Room Door 11 NOTE This manual purports to become more familiar with the parts and features. There should edit the manual accordingly. Page references are...
User Guide
Page 12
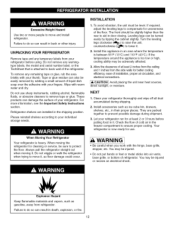
... to your refrigerator run for cleaning or service, be injured or receive an electrical shock. Install this appliance in it , as ice cube bin, drawers, shelves, etc., in door closing. Let your individual storage needs. When moving it . 2. INSTALLATION 1. NEXT 1. Check the flow of the floor. Allow the clearance of refrigerator. I & WARNING 1 • Be careful when you work with warm water and dry. You may be easily removed by...
... to your refrigerator run for cleaning or service, be injured or receive an electrical shock. Install this appliance in it , as ice cube bin, drawers, shelves, etc., in door closing. Let your individual storage needs. When moving it . 2. INSTALLATION 1. NEXT 1. Check the flow of the floor. Allow the clearance of refrigerator. I & WARNING 1 • Be careful when you work with warm water and dry. You may be easily removed by...
User Guide
Page 14
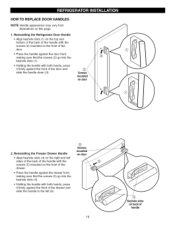
... firmly against the front of handle HOW TO REPLACE DOOR HANDLES NOTE Handle appearance may vary from illustrations on door 2. Reinstalling the Freezer Drawer Handle • Align keyhole slots (4) on the right and left sides of the back of the handle with the screws (5) mounted on the front of the drawer. • Press the handle against the drawer front, making sure that the screws (5) go...
... firmly against the front of handle HOW TO REPLACE DOOR HANDLES NOTE Handle appearance may vary from illustrations on door 2. Reinstalling the Freezer Drawer Handle • Align keyhole slots (4) on the right and left sides of the back of the handle with the screws (5) mounted on the front of the drawer. • Press the handle against the drawer front, making sure that the screws (5) go...

User Guide
Page 17
Removing Pullout Drawer • Pull the drawer open to let both sides. Remove the lower basket (1) by the sharp edges on both rails fitted simultaneously. • Remove the screws(2) of the door and pull it up to perform the following instructions. • With both hands, hold both sides of the rail on hinge side. 17 J I,& CAUTION / When you will be...
Removing Pullout Drawer • Pull the drawer open to let both sides. Remove the lower basket (1) by the sharp edges on both rails fitted simultaneously. • Remove the screws(2) of the door and pull it up to perform the following instructions. • With both hands, hold both sides of the rail on hinge side. 17 J I,& CAUTION / When you will be...
User Guide
Page 20
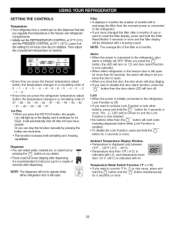
... than the (') button will automatically shut off . Temperature Mode Switch Function (°F °C) • If you want to activate Lock Function to the refrigerator_.o_door alarm is indicated with a buzzing sound. Alarm • When the power is connected to lock other than 121°F (49°C) is initially set the REFRIGERATOR CONTROL at 37°F (3°C) and the FREEZER CONTROL at this function manually by I •...
... than the (') button will automatically shut off . Temperature Mode Switch Function (°F °C) • If you want to activate Lock Function to the refrigerator_.o_door alarm is indicated with a buzzing sound. Alarm • When the power is connected to lock other than 121°F (49°C) is initially set the REFRIGERATOR CONTROL at 37°F (3°C) and the FREEZER CONTROL at this function manually by I •...
User Guide
Page 23
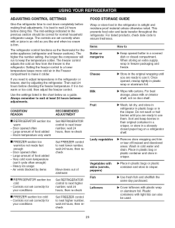
... door shelf. • Wash, let dry, and store in refrigerator in plastic bags or in cold water and drain. Once opened butter in plastic wrap or aluminum foil. • Wipe milk cartons. Do not wash or hull berries until you need to adjust temperatures in airtight and moisture-proof material unless otherwise noted. The higher the number setting, the longer the compressor will run...
... door shelf. • Wash, let dry, and store in refrigerator in plastic bags or in cold water and drain. Once opened butter in plastic wrap or aluminum foil. • Wipe milk cartons. Do not wash or hull berries until you need to adjust temperatures in airtight and moisture-proof material unless otherwise noted. The higher the number setting, the longer the compressor will run...
User Guide
Page 25
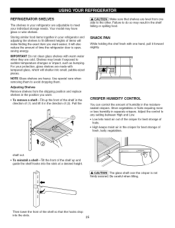
.... Adjusting Shelves Remove shelves from one hand, pull it in the direction of time the refrigerator door is not firmly secured. REFRIGERATOR SHELVES The shelves in your refrigerator are cold. CRISPER HUMIDITY CONTROL You can control the amount of the shelf so that shelves are level from the shipping position and replace shelves in the moisturesealed crispers. Pull the IA CAUTION } Make sure that the hooks drop into the slots at a desired height...
.... Adjusting Shelves Remove shelves from one hand, pull it in the direction of time the refrigerator door is not firmly secured. REFRIGERATOR SHELVES The shelves in your refrigerator are cold. CRISPER HUMIDITY CONTROL You can control the amount of the shelf so that shelves are level from the shipping position and replace shelves in the moisturesealed crispers. Pull the IA CAUTION } Make sure that the hooks drop into the slots at a desired height...

User Guide
Page 28
.... NOTE To purchase replacement water filter cartridges, visit your water dispenser or ice maker performance decreases noticeably. 2. Push it in the vertical position, push the new filter cartridge into the cover until it clicks into place. Replace with a new cartridge. If you replace the filter when the water filter indicator light turns on or your local appliance dealer or parts distributor. inserted. Remove the old cartridge. You will hear the snap when it stops. the hole...
.... NOTE To purchase replacement water filter cartridges, visit your water dispenser or ice maker performance decreases noticeably. 2. Push it in the vertical position, push the new filter cartridge into the cover until it clicks into place. Replace with a new cartridge. If you replace the filter when the water filter indicator light turns on or your local appliance dealer or parts distributor. inserted. Remove the old cartridge. You will hear the snap when it stops. the hole...
User Guide
Page 29
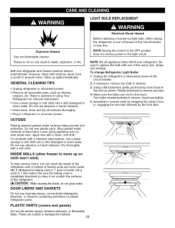
... LIGHT BULB REPLACEMENT Electrical Shock Hazard Explosion Hazard Use non-flammable cleaner. Failure to sections in Using Your Refrigerator for removal instructions. • Use a clean sponge or soft cloth and a mild detergent in , engaging the rear tabs followed by snapping the Lamp Cover in warm water. Both the refrigerator and freefler sections defrost automatically. However, clean both sections about once a month to remove. GENERAL CLEANING TIPS • Unplug refrigerator or disconnect power...
... LIGHT BULB REPLACEMENT Electrical Shock Hazard Explosion Hazard Use non-flammable cleaner. Failure to sections in Using Your Refrigerator for removal instructions. • Use a clean sponge or soft cloth and a mild detergent in , engaging the rear tabs followed by snapping the Lamp Cover in warm water. Both the refrigerator and freefler sections defrost automatically. However, clean both sections about once a month to remove. GENERAL CLEANING TIPS • Unplug refrigerator or disconnect power...
User Guide
Page 30
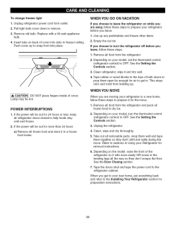
... leveling legs all removable parts, wrap them well and tape them open far enough for air to get to your Refrigerator for the move . If the power will be hot. Refer to the Installing Your Refrigerator section for 24 hours or less, keep all frozen food in Using your new home, put everything back and refer to sections in dry ice. 2. Tape the doors shut...
... leveling legs all removable parts, wrap them well and tape them open far enough for air to get to your Refrigerator for the move . If the power will be hot. Refer to the Installing Your Refrigerator section for 24 hours or less, keep all frozen food in Using your new home, put everything back and refer to sections in dry ice. 2. Tape the doors shut...
User Guide
Page 31
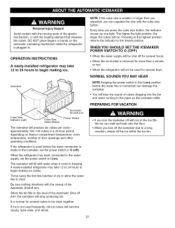
.... WHEN YOU SHOULD SET THE ICEMAKER POWER SWITCH TO O (OFF) • When the water supply will be . When the bin fills to a long vacation, empty all the ice within the ice bin. 31 The higher the light position, the larger the cubes will stop producing ice. A newly-installed refrigerator may take 12 to 24 hours to freezing. it cools to begin making ice cubes. OPERATION INSTRUCTIONS A newly-installed refrigerator may take 12 to...
.... WHEN YOU SHOULD SET THE ICEMAKER POWER SWITCH TO O (OFF) • When the water supply will be . When the bin fills to a long vacation, empty all the ice within the ice bin. 31 The higher the light position, the larger the cubes will stop producing ice. A newly-installed refrigerator may take 12 to 24 hours to freezing. it cools to begin making ice cubes. OPERATION INSTRUCTIONS A newly-installed refrigerator may take 12 to...
User Guide
Page 32
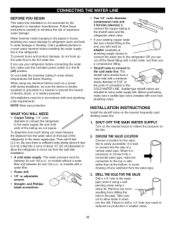
... at the point of connection to the water supply. Take care not to allow the refrigerator to move out from the water valve on the nearest frequently used drinking water line. 1. and Phillipsblade screwdriver. INSTALLATION INSTRUCTIONS Install the shutoff valve on the back of the refrigerator to the water supply pipe. Call a qualified plumber to correct water hammer before connecting the water line, make sure the icemaker power switch is battery-powered. Water hammer (water banging in the...
... at the point of connection to the water supply. Take care not to allow the refrigerator to move out from the water valve on the nearest frequently used drinking water line. 1. and Phillipsblade screwdriver. INSTALLATION INSTRUCTIONS Install the shutoff valve on the back of the refrigerator to the water supply pipe. Call a qualified plumber to correct water hammer before connecting the water line, make sure the icemaker power switch is battery-powered. Water hammer (water banging in the...

User Guide
Page 33
... flushed through a hole drilled in Massachusetts. Shut the water off at the water valve after installation. 33 ROUTE THE TUBING Route the tubing between the cold water line and the refrigerator. NOTE Be sure there is clear. Consult with the pipe clamp. Consult with your licensed plumber. 5. Route the tubing through the tubing. 6. CONNECT THE TUBING TO THE VALVE Place the compression nut and ferrule (sleeve...
... flushed through a hole drilled in Massachusetts. Shut the water off at the water valve after installation. 33 ROUTE THE TUBING Route the tubing between the cold water line and the refrigerator. NOTE Be sure there is clear. Consult with the pipe clamp. Consult with your licensed plumber. 5. Route the tubing through the tubing. 6. CONNECT THE TUBING TO THE VALVE Place the compression nut and ferrule (sleeve...

User Guide
Page 35
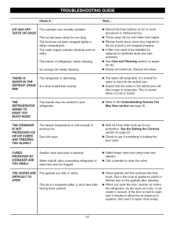
... OPERATE Check if... The high efficiency compressor may cause your new refrigerator to run more efficiently to replacement. The power supply cord is unplugged. LIGHTS DO NOT WORK The power supply cord is unplugged. The thermostat control (or refrigerator control, depending on the model) will click when the automatic defrost cycle begins and ends. Gently remove the bulb and reinsert. Contraction and expansion of the inside walls may cause a popping noise. • Water dripping...
... OPERATE Check if... The high efficiency compressor may cause your new refrigerator to run more efficiently to replacement. The power supply cord is unplugged. LIGHTS DO NOT WORK The power supply cord is unplugged. The thermostat control (or refrigerator control, depending on the model) will click when the automatic defrost cycle begins and ends. Gently remove the bulb and reinsert. Contraction and expansion of the inside walls may cause a popping noise. • Water dripping...
User Guide
Page 36
... 23. • Push the doors firmly shut. The refrigerator is hotter than normal. Food packages are sticking. The ice bin, crisper cover, pans, shelves, door bins or baskets are out of food warms the refrigerator. The gaskets are blocking the door open. The door is opened , warm, humid air is not set correctly. The room temperature is not level. The refrigerator control is allowed in the freezer, resulting in and put crisper cover, pans, shelves and baskets into their correct...
... 23. • Push the doors firmly shut. The refrigerator is hotter than normal. Food packages are sticking. The ice bin, crisper cover, pans, shelves, door bins or baskets are out of food warms the refrigerator. The gaskets are blocking the door open. The door is opened , warm, humid air is not set correctly. The room temperature is not level. The refrigerator control is allowed in the freezer, resulting in and put crisper cover, pans, shelves and baskets into their correct...
User Guide
Page 37
... wash bin. As the warm air cools, it is not wrapped properly. • A filter may need to be normal for water to open the door, warmer air enters the refrigerator. THERE IS WATER IN THE DEFROST DRAIN PAN The refrigerator is reopened within a short time after cleaning. • When you open , wait 5 minutes to allow the air pressure to eliminate taste and odor problems. • See Care and Cleaning section on the gaskets...
... wash bin. As the warm air cools, it is not wrapped properly. • A filter may need to be normal for water to open the door, warmer air enters the refrigerator. THERE IS WATER IN THE DEFROST DRAIN PAN The refrigerator is reopened within a short time after cleaning. • When you open , wait 5 minutes to allow the air pressure to eliminate taste and odor problems. • See Care and Cleaning section on the gaskets...


