User Guide
Page 2
...And Features 3 4 5-10 6 11 Refrigerator Installation Unpacking Your Refrigerator Installation 12-19 12 12 Removing And Replacing Your Refrigerator Handles And Doors 13-18 Leveling And Door Alignment 19 Base Cover 19 Using Your Refrigerator 20-28 Setting The Controls 20 Ensuring Proper Air Circulation...24 I_ Refrigerator Section Water Dispenser 24 Refrigerator Shelves 25 Snack Pan 25 Crisper Humidity Control 25 Removing Crisper 26 Dairy Bin 26 Modular Door Bin Freezer Section Ice Bin Durabase Durabase Divider Pull Out Drawer Filter Care And Cleaning General ...
...And Features 3 4 5-10 6 11 Refrigerator Installation Unpacking Your Refrigerator Installation 12-19 12 12 Removing And Replacing Your Refrigerator Handles And Doors 13-18 Leveling And Door Alignment 19 Base Cover 19 Using Your Refrigerator 20-28 Setting The Controls 20 Ensuring Proper Air Circulation...24 I_ Refrigerator Section Water Dispenser 24 Refrigerator Shelves 25 Snack Pan 25 Crisper Humidity Control 25 Removing Crisper 26 Dairy Bin 26 Modular Door Bin Freezer Section Ice Bin Durabase Durabase Divider Pull Out Drawer Filter Care And Cleaning General ...
User Guide
Page 13
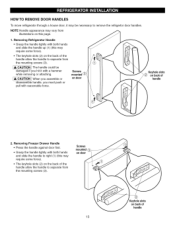
... (2) on the back of the handle allow the handle to separate from the mounting screws (3). /A CAUTION 1 The handle could be necessary to remove the refrigertor door handles. HOW TO REMOVE DOOR HANDLES To move refrigerator through a house door, it with a hammer while removing or attaching. Removing Refrigerator Handle • Grasp the handle tightly with both hands and slide the handle up (1) (this may vary from...
... (2) on the back of the handle allow the handle to separate from the mounting screws (3). /A CAUTION 1 The handle could be necessary to remove the refrigertor door handles. HOW TO REMOVE DOOR HANDLES To move refrigerator through a house door, it with a hammer while removing or attaching. Removing Refrigerator Handle • Grasp the handle tightly with both hands and slide the handle up (1) (this may vary from...

User Guide
Page 17
...8226; Remove the screws(2) of the door and pull it up to separate it from rail system. (If you will be careful not to damage the floor or hurt your thumbs to lift it up. • Separate the left and right rail cover • With both hands, hold the handle. Removing Pullout Drawer... • Pull the drawer open to full extension. HOW TO REMOVE AND INSTALL THE PULLOUT DRAWER IMPORTANT To avoid possible injury or product or property damage, you tilt the door, it will need two people to perform the following ...
...8226; Remove the screws(2) of the door and pull it up to separate it from rail system. (If you will be careful not to damage the floor or hurt your thumbs to lift it up. • Separate the left and right rail cover • With both hands, hold the handle. Removing Pullout Drawer... • Pull the drawer open to full extension. HOW TO REMOVE AND INSTALL THE PULLOUT DRAWER IMPORTANT To avoid possible injury or product or property damage, you tilt the door, it will need two people to perform the following ...

User Guide
Page 22
t- 1 . Lift the lower part slightly. 3. Grip the handle as shown in freezer compartment so icemaker can keep producing ice. Replace ice bucket by slightly slanting it to remove the Door Ice Bucket. How to avoid touching the ice maker. * Avoid touching the automatic shut off arm when replacing the ice bucket. 22 Take the ice bucket out slowly. 1 . If you need more ice, please use the extra ice bucket in the picture How to reinstall the Door Ice Bucket. 2. HOW TO USE A NEW DOOR ICE BUCKET The icemaker will stop producing ice when ice bucket is full.
t- 1 . Lift the lower part slightly. 3. Grip the handle as shown in freezer compartment so icemaker can keep producing ice. Replace ice bucket by slightly slanting it to remove the Door Ice Bucket. How to avoid touching the ice maker. * Avoid touching the automatic shut off arm when replacing the ice bucket. 22 Take the ice bucket out slowly. 1 . If you need more ice, please use the extra ice bucket in the picture How to reinstall the Door Ice Bucket. 2. HOW TO USE A NEW DOOR ICE BUCKET The icemaker will stop producing ice when ice bucket is full.
User Guide
Page 36
... or seems unstable. See the Using Your Refrigerator section on page 19. • Remove and replace the doors according to run longer in order to clear door and door shelves. • Push bins all the way, see Doors will take up to 24 hours to the Care and Cleaning section on page 23... opened often or a large amount of the refrigerator at once, keep food organized so it to the Removing and Replacing Refrigerator handles and doors section on page 19. • Rearrange food containers to cool the refrigerator back down. Refer to cool completely. • See the Adjusting Control ...
... or seems unstable. See the Using Your Refrigerator section on page 19. • Remove and replace the doors according to run longer in order to clear door and door shelves. • Push bins all the way, see Doors will take up to 24 hours to the Care and Cleaning section on page 23... opened often or a large amount of the refrigerator at once, keep food organized so it to the Removing and Replacing Refrigerator handles and doors section on page 19. • Rearrange food containers to cool the refrigerator back down. Refer to cool completely. • See the Adjusting Control ...


