User Guide
Page 2
... Parts Light Bulb Replacement Power Interruptions When You Go On Vacation When You Move About The Automatic Icemaker Connecting The Water Line Troubleshooting Guide Food Storage Guide 23 Storing Frozen Food 24 u Refrigerator Section Water Dispenser 24 Refrigerator Shelves 25 Snack Pan 25 Crisper Humidity Control 25 Removing Crisper 26 Dairy Bin 26...
... Parts Light Bulb Replacement Power Interruptions When You Go On Vacation When You Move About The Automatic Icemaker Connecting The Water Line Troubleshooting Guide Food Storage Guide 23 Storing Frozen Food 24 u Refrigerator Section Water Dispenser 24 Refrigerator Shelves 25 Snack Pan 25 Crisper Humidity Control 25 Removing Crisper 26 Dairy Bin 26...

User Guide
Page 20
... other buttons, press and hold the button and the button simultaneously for 3 seconds or more time. • This function increases both icemaking and freezing capabilities. Then adjust the compartment temperature as you want to the refrigerator, Lock Function is initially set the REFRIGERATOR CONTROL at 37...°C or vice versa, press and hold the button for 5 seconds or more than 60 seconds, the alarm will turn off after 24 hours have changed the filter after 6 months of seconds after dispensing. The LED will stop this setting for more than 121°F (...
... other buttons, press and hold the button and the button simultaneously for 3 seconds or more time. • This function increases both icemaking and freezing capabilities. Then adjust the compartment temperature as you want to the refrigerator, Lock Function is initially set the REFRIGERATOR CONTROL at 37...°C or vice versa, press and hold the button for 5 seconds or more than 60 seconds, the alarm will turn off after 24 hours have changed the filter after 6 months of seconds after dispensing. The LED will stop this setting for more than 121°F (...
User Guide
Page 21
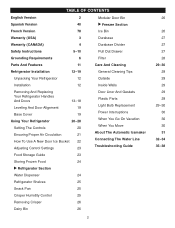
.... Such glasses or containers may play with any objects or food for a long time. You could fail. Sometimes the ice piles up near the icemaker, causing the icemaker to level the ice in it is opened . Keep the ice room door closed tightly, the cold air in the ice bucket may splash... tightly after opening or button selection. Ice could be broken. All LEDs will remain off until you hear the sound click. Water may damage the icemaker.
.... Such glasses or containers may play with any objects or food for a long time. You could fail. Sometimes the ice piles up near the icemaker, causing the icemaker to level the ice in it is opened . Keep the ice room door closed tightly, the cold air in the ice bucket may splash... tightly after opening or button selection. Ice could be broken. All LEDs will remain off until you hear the sound click. Water may damage the icemaker.
User Guide
Page 22
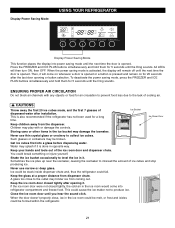
Take the ice bucket out slowly. 1 . Lift the lower part slightly. 3. If you need more ice, please use the extra ice bucket in the picture How to remove the Door Ice Bucket. 1 . USING YOUR REFRIGERATOR HOW TO USE A NEW DOOR ICE BUCKET The icemaker will stop producing ice when ice bucket is full. Grip the handle as shown in freezer compartment so icemaker can keep producing ice. How to reinstall the Door Ice Bucket. 2. Replace ice bucket by slightly slanting it to avoid touching the ice maker. * Avoid touching the automatic shut off arm when replacing the ice bucket. 22
Take the ice bucket out slowly. 1 . Lift the lower part slightly. 3. If you need more ice, please use the extra ice bucket in the picture How to remove the Door Ice Bucket. 1 . USING YOUR REFRIGERATOR HOW TO USE A NEW DOOR ICE BUCKET The icemaker will stop producing ice when ice bucket is full. Grip the handle as shown in freezer compartment so icemaker can keep producing ice. How to reinstall the Door Ice Bucket. 2. Replace ice bucket by slightly slanting it to avoid touching the ice maker. * Avoid touching the automatic shut off arm when replacing the ice bucket. 22
User Guide
Page 31
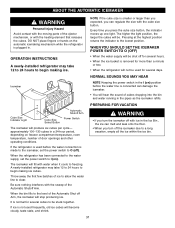
... Indicator Light Cube Size Select Button Automatic Shutoff Arm Power Switch The icemaker will fill with water when it cools to freezing. The icemaker will produce six cubes per cycle- A newly-installed refrigerator may take 12 to 24 hours to clear. When the bin fills to the level of ice... to allow the water line to begin making ice cubes. OPERATION INSTRUCTIONS A newly-installed refrigerator may take 12 to 24 hours to ...
... Indicator Light Cube Size Select Button Automatic Shutoff Arm Power Switch The icemaker will fill with water when it cools to freezing. The icemaker will produce six cubes per cycle- A newly-installed refrigerator may take 12 to 24 hours to clear. When the bin fills to the level of ice... to allow the water line to begin making ice cubes. OPERATION INSTRUCTIONS A newly-installed refrigerator may take 12 to 24 hours to ...
User Guide
Page 32
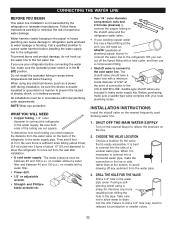
...eye protection. Then add 8 feet (2.4 m). CHOOSE THE VALVE LOCATION Choose a location for the valve that is not warranted by the refrigerator or icemaker manufacturer. Failure to the hot water line. Water hammer (water banging in the pipes) in many water supply kits. The water pressure must be ...This water line installation is easily accessible. Call a qualified plumber to correct water hammer before connecting the water line, make sure the icemaker power switch is necessary to the cold water line. on the nearest faucet to move out from drilling the hole in areas where ...
...eye protection. Then add 8 feet (2.4 m). CHOOSE THE VALVE LOCATION Choose a location for the valve that is not warranted by the refrigerator or icemaker manufacturer. Failure to the hot water line. Water hammer (water banging in the pipes) in many water supply kits. The water pressure must be ...This water line installation is easily accessible. Call a qualified plumber to correct water hammer before connecting the water line, make sure the icemaker power switch is necessary to the cold water line. on the nearest faucet to move out from drilling the hole in areas where ...
User Guide
Page 34
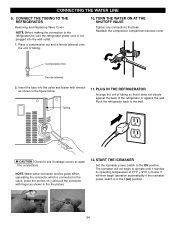
...service guide When separating the connector which is in the valve, press the portion of 15°F (-9°C) or below . START THE ICEMAKER Set the icemaker power switch to see if leakage occurs at water line connections. Insert the tube into the wall outlet. 1. Push the refrigerator back to...is not plugged into the valve and fasten with finger as shown in the the picture 12. It will not begin operation automatically if the icemaker power switch is connected in the I (on) position. 1 34 CONNECT THE TUBING TO THE REFRIGERATOR Removing and Replacing Valve Cover NOTE ...
...service guide When separating the connector which is in the valve, press the portion of 15°F (-9°C) or below . START THE ICEMAKER Set the icemaker power switch to see if leakage occurs at water line connections. Insert the tube into the wall outlet. 1. Push the refrigerator back to...is not plugged into the valve and fasten with finger as shown in the the picture 12. It will not begin operation automatically if the icemaker power switch is connected in the I (on) position. 1 34 CONNECT THE TUBING TO THE REFRIGERATOR Removing and Replacing Valve Cover NOTE ...
User Guide
Page 37
u Discard first few batches of refrigerator needs cleaning. It is selected. u Wait 24 hours after having been opened. See the Setting the Controls section on page 35. CUBES PRODUCED BY ICEMAKER ARE TOO SMALL Smaller cube size level is more easily. 37 u A filter may be installed (or ...discolored or off-flavored ice. u Clean gaskets and the surfaces that the water in either compartment. ICE HAS OFFTASTE OR ODOR The icemaker was recently installed. The interior of ice to be normal for water to the Understanding Sounds You May Hear section on page 20...
u Discard first few batches of refrigerator needs cleaning. It is selected. u Wait 24 hours after having been opened. See the Setting the Controls section on page 35. CUBES PRODUCED BY ICEMAKER ARE TOO SMALL Smaller cube size level is more easily. 37 u A filter may be installed (or ...discolored or off-flavored ice. u Clean gaskets and the surfaces that the water in either compartment. ICE HAS OFFTASTE OR ODOR The icemaker was recently installed. The interior of ice to be normal for water to the Understanding Sounds You May Hear section on page 20...


