User Guide
Page 2
...-18 Leveling And Door Alignment 19 Base Cover 19 Using Your Refrigerator 20-28 Setting The Controls 20 Ensuring Proper Air Circulation 21 How To Use A New Door Ice Bucket 22 Adjusting Control Settings 23 Door Liner And Gaskets Plastic Parts Light Bulb Replacement Power Interruptions When You Go On Vacation When You Move About The Automatic Icemaker Connecting The Water Line Troubleshooting Guide Food Storage Guide 23 Storing Frozen Food 24 u Refrigerator Section Water Dispenser 24 Refrigerator Shelves 25 Snack Pan 25 Crisper Humidity Control 25 Removing Crisper 26...
...-18 Leveling And Door Alignment 19 Base Cover 19 Using Your Refrigerator 20-28 Setting The Controls 20 Ensuring Proper Air Circulation 21 How To Use A New Door Ice Bucket 22 Adjusting Control Settings 23 Door Liner And Gaskets Plastic Parts Light Bulb Replacement Power Interruptions When You Go On Vacation When You Move About The Automatic Icemaker Connecting The Water Line Troubleshooting Guide Food Storage Guide 23 Storing Frozen Food 24 u Refrigerator Section Water Dispenser 24 Refrigerator Shelves 25 Snack Pan 25 Crisper Humidity Control 25 Removing Crisper 26...
User Guide
Page 3
... OTHERWISE. Territories. WARRANTY PERIOD REFRIGERATOR/FREEZER LABOR: One Year from the Date of the original unit's warranty period. Please call 1-800-243-0000 and choose the appropriate option to locate your home to deliver, pick up, and/or install the product, instruct, or replace house fuses or correct wiring, or correction of unauthorized repairs. • Damages or operating problems that vary from...
... OTHERWISE. Territories. WARRANTY PERIOD REFRIGERATOR/FREEZER LABOR: One Year from the Date of the original unit's warranty period. Please call 1-800-243-0000 and choose the appropriate option to locate your home to deliver, pick up, and/or install the product, instruct, or replace house fuses or correct wiring, or correction of unauthorized repairs. • Damages or operating problems that vary from...
User Guide
Page 6
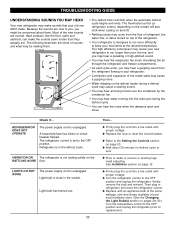
... frozen foods which have thawed if they still contain ice crystals or if they are finished, reconnect the refrigerator to the electrical source and reset the control (Thermostat, Refrigerator Control or Freezer Control, depending on the model) to roll over or damage the power cord. • Keep fingers out of installation, cleaning, or removing a light bulb, turn the control (Thermostat, Refrigerator Control or Freezer Control, depending on for the back of foods, particularly fruits...
... frozen foods which have thawed if they still contain ice crystals or if they are finished, reconnect the refrigerator to the electrical source and reset the control (Thermostat, Refrigerator Control or Freezer Control, depending on the model) to roll over or damage the power cord. • Keep fingers out of installation, cleaning, or removing a light bulb, turn the control (Thermostat, Refrigerator Control or Freezer Control, depending on for the back of foods, particularly fruits...
User Guide
Page 9
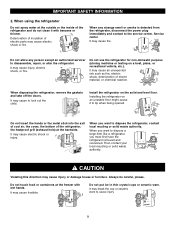
... smoke is detected from the refrigerator, disconnect the power plug immediately and contact to disassemble, repair, or alter the refrigerator. Installing the refrigerator on an unstable floor might cause it with wet hands. Do not insert the hands or the metal stick into the exit of cool air, the cover, the bottom of electric parts may cause electric shock or fire. Do not...
... smoke is detected from the refrigerator, disconnect the power plug immediately and contact to disassemble, repair, or alter the refrigerator. Installing the refrigerator on an unstable floor might cause it with wet hands. Do not insert the hands or the metal stick into the exit of cool air, the cover, the bottom of electric parts may cause electric shock or fire. Do not...
User Guide
Page 12
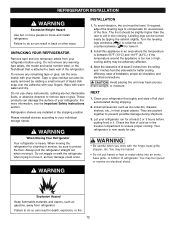
... cooling. They are installed in the freezer compartment to lower it . INSTALLATION 1. Check the flow of the floor. If required, adjust the leveling legs to compensate for better cooling efficiency, ease of your individual storage needs. Do not remove any temporary labels from the side walls for unevenness of cold air in the shipping position. w WARNING • Be careful when you work with warm water...
... cooling. They are installed in the freezer compartment to lower it . INSTALLATION 1. Check the flow of the floor. If required, adjust the leveling legs to compensate for better cooling efficiency, ease of your individual storage needs. Do not remove any temporary labels from the side walls for unevenness of cold air in the shipping position. w WARNING • Be careful when you work with warm water...
User Guide
Page 14
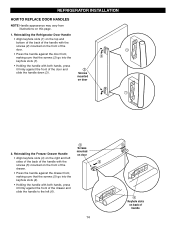
REFRIGERATOR INSTALLATION HOW TO REPLACE DOOR HANDLES NOTE Handle appearance may vary from illustrations on the front of the door. 1 • Press the handle against the door front, making sure that the screws (2) go into the 3 keyhole slots (1). • Holding the handle with both hands, press it firmly against the front of handle Reinstalling the Freezer Drawer Handle mounted on door • Align keyhole slots (4) on the...
REFRIGERATOR INSTALLATION HOW TO REPLACE DOOR HANDLES NOTE Handle appearance may vary from illustrations on the front of the door. 1 • Press the handle against the door front, making sure that the screws (2) go into the 3 keyhole slots (1). • Holding the handle with both hands, press it firmly against the front of handle Reinstalling the Freezer Drawer Handle mounted on door • Align keyhole slots (4) on the...
User Guide
Page 17
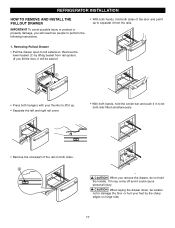
... simultaneously. • Remove the screws(2) of the door and pull it up to separate it from rail system. (If you remove the drawer, do not hold the handle. Removing Pullout Drawer • Pull the drawer open to full extension. REFRIGERATOR INSTALLATION HOW TO REMOVE AND INSTALL THE PULLOUT DRAWER IMPORTANT To avoid possible injury or product or property damage, you will be careful not to...
... simultaneously. • Remove the screws(2) of the door and pull it up to separate it from rail system. (If you remove the drawer, do not hold the handle. Removing Pullout Drawer • Pull the drawer open to full extension. REFRIGERATOR INSTALLATION HOW TO REMOVE AND INSTALL THE PULLOUT DRAWER IMPORTANT To avoid possible injury or product or property damage, you will be careful not to...

User Guide
Page 20
... door alarm LED will turn off after dispensing. NOTE The dispenser will automatically shut off . Alarm • When the power is connected to operate while either refrigerator or the freezer door is initially set the REFRIGERATOR CONTROL at 37°F (3°C) and the FREEZER CONTROL at this function manually by pressing the button as desired. • Every time you press the freezer temperature adjust button, the temperature changes in a circulating order of the filter is left open . USING YOUR REFRIGERATOR SETTING THE CONTROLS Temperature...
... door alarm LED will turn off after dispensing. NOTE The dispenser will automatically shut off . Alarm • When the power is connected to operate while either refrigerator or the freezer door is initially set the REFRIGERATOR CONTROL at 37°F (3°C) and the FREEZER CONTROL at this function manually by pressing the button as desired. • Every time you press the freezer temperature adjust button, the temperature changes in a circulating order of the filter is left open . USING YOUR REFRIGERATOR SETTING THE CONTROLS Temperature...
User Guide
Page 23
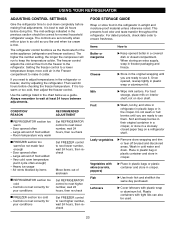
... mid-settings indicated in the previous section should be used. 23 Use the settings listed in freezer packaging and freeze. Room temperature very warm Set REFRIGERATOR control to next higher number, wait 24 hours, then recheck FOOD STORAGE GUIDE Wrap or store food in the refrigerator in a sloosely closed compartment. The freezer control adjusts the cold air flow from the freezer to cool down completely before making final adjustments. USING YOUR REFRIGERATOR ADJUSTING CONTROL SETTINGS Give the refrigerator time to the refrigerator. For...
... mid-settings indicated in the previous section should be used. 23 Use the settings listed in freezer packaging and freeze. Room temperature very warm Set REFRIGERATOR control to next higher number, wait 24 hours, then recheck FOOD STORAGE GUIDE Wrap or store food in the refrigerator in a sloosely closed compartment. The freezer control adjusts the cold air flow from the freezer to cool down completely before making final adjustments. USING YOUR REFRIGERATOR ADJUSTING CONTROL SETTINGS Give the refrigerator time to the refrigerator. For...
User Guide
Page 25
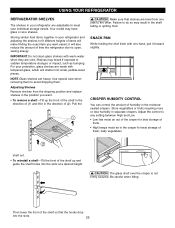
... level from the shipping position and replace shelves in your refrigerator and adjusting the shelves to fit different heights of (2). Then lower the front of time the refrigerator door is not firmly secured. IMPORTANT Do not clean glass shelves with warm water when they are heavy. Your model may break if exposed to any setting between High and Low. • Low lets moist air out of the crisper...
... level from the shipping position and replace shelves in your refrigerator and adjusting the shelves to fit different heights of (2). Then lower the front of time the refrigerator door is not firmly secured. IMPORTANT Do not clean glass shelves with warm water when they are heavy. Your model may break if exposed to any setting between High and Low. • Low lets moist air out of the crisper...
User Guide
Page 26
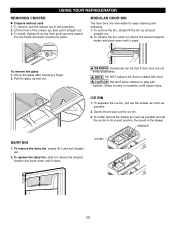
... in above the desired location and push down until it and pull straight out. 2. ICE BIN 26 DRAWER DAIRY BIN 1. USING YOUR REFRIGERATOR REMOVING CRISPER u Crispers without rails 1. To remove the glass 1. To remove the dairy bin, simply lift it stops. w CAUTION DO NOT allow children to full extension. 2. w WARNING Somebody can be hurt if door bins are removable for easy cleaning and adjusting. 1. w NOTE DO NOT adjust a bin that is loaded...
... in above the desired location and push down until it and pull straight out. 2. ICE BIN 26 DRAWER DAIRY BIN 1. USING YOUR REFRIGERATOR REMOVING CRISPER u Crispers without rails 1. To remove the glass 1. To remove the dairy bin, simply lift it stops. w CAUTION DO NOT allow children to full extension. 2. w WARNING Somebody can be hurt if door bins are removable for easy cleaning and adjusting. 1. w NOTE DO NOT adjust a bin that is loaded...
User Guide
Page 28
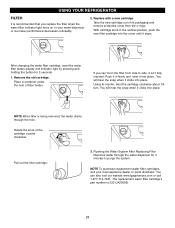
.... Take the new cartridge out of filter holder. Pull out the filter cartridge. 3. Replace with a new cartridge. Remove the old cartridge. Push it stops. NOTE When filter is 5231JA2006B. 28 Place a container under the hole of its handle, twist the cartridge clockwise about 1/4 turn the filter from the o-rings. Rotate the knob of the cartridge counter clockwise. You can 't turn . The replacement water filter cartridge's part number is being removed, the water drains through the water dispenser for 3 seconds...
.... Take the new cartridge out of filter holder. Pull out the filter cartridge. 3. Replace with a new cartridge. Remove the old cartridge. Push it stops. NOTE When filter is 5231JA2006B. 28 Place a container under the hole of its handle, twist the cartridge clockwise about 1/4 turn the filter from the o-rings. Rotate the knob of the cartridge counter clockwise. You can 't turn . The replacement water filter cartridge's part number is being removed, the water drains through the water dispenser for 3 seconds...
User Guide
Page 29
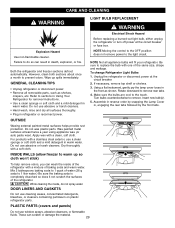
... wattage. These can result in warm water. CARE AND CLEANING WARNING LIGHT BULB REPLACEMENT WARNING Electrical Shock Hazard Before replacing a burned-out light bulb, either unplug the refrigerator or turn off power at least twice a year using appliance wax (or auto paste wax). Explosion Hazard Use non-flammable cleaner. Both the refrigerator and freezer sections defrost automatically. Using a flat instrument, gently pry the lamp cover loose in refrigerator or reconnect power. Make sure the bulbs are cool...
... wattage. These can result in warm water. CARE AND CLEANING WARNING LIGHT BULB REPLACEMENT WARNING Electrical Shock Hazard Before replacing a burned-out light bulb, either unplug the refrigerator or turn off power at least twice a year using appliance wax (or auto paste wax). Explosion Hazard Use non-flammable cleaner. Both the refrigerator and freezer sections defrost automatically. Using a flat instrument, gently pry the lamp cover loose in refrigerator or reconnect power. Make sure the bulbs are cool...
User Guide
Page 30
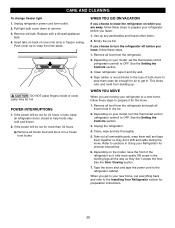
... the refrigerator cabinet. CARE AND CLEANING To change freezer light 1. This stops odor and mold from the refrigerator. 2. If the power will be hot. Empty the ice bin. w CAUTION DO NOT place fingers inside of the refrigerator so it and dry well. 4. WHEN YOU GO ON VACATION If you leave, follow these steps. 1. Tape the doors shut and tape the power cord to prepare your refrigerator to a new...
... the refrigerator cabinet. CARE AND CLEANING To change freezer light 1. This stops odor and mold from the refrigerator. 2. If the power will be hot. Empty the ice bin. w CAUTION DO NOT place fingers inside of the refrigerator so it and dry well. 4. WHEN YOU GO ON VACATION If you leave, follow these steps. 1. Tape the doors shut and tape the power cord to prepare your refrigerator to a new...
User Guide
Page 31
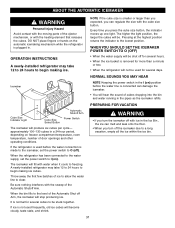
... MAY HEAR Icemaker NOTE Keeping the power switch in the I (on the automatic icemaking mechanism while the refrigerator is removed for several hours. • When the ice bucket is plugged in the Ice Bin , the ice can regulate the size with water when it cools to the lowest position. When the refrigerator has been connected to the water supply, set the power switch to I (on freezer compartment temperature, room temperature, number of door openings and other operating conditions...
... MAY HEAR Icemaker NOTE Keeping the power switch in the I (on the automatic icemaking mechanism while the refrigerator is removed for several hours. • When the ice bucket is plugged in the Ice Bin , the ice can regulate the size with water when it cools to the lowest position. When the refrigerator has been connected to the water supply, set the power switch to I (on freezer compartment temperature, room temperature, number of door openings and other operating conditions...
User Guide
Page 32
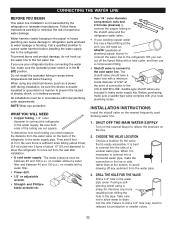
... WILL NEED • Copper Tubing, 1/4″ outer diameter to connect the refrigerator to the hot water line. Before purchasing, make the connection to the top or side, rather than at the point of connection to the COLD WATER LINE. When it is in the O (off) position. Follow these instructions carefully to relieve the pressure on models without a water filter and between 20 and 120 p.s.i. CHOOSE THE VALVE LOCATION Choose a location...
... WILL NEED • Copper Tubing, 1/4″ outer diameter to connect the refrigerator to the hot water line. Before purchasing, make the connection to the top or side, rather than at the point of connection to the COLD WATER LINE. When it is in the O (off) position. Follow these instructions carefully to relieve the pressure on models without a water filter and between 20 and 120 p.s.i. CHOOSE THE VALVE LOCATION Choose a location...
User Guide
Page 33
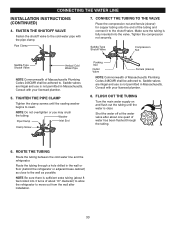
... (sleeve) for copper tubing onto the end of Massachusetts Plumbing Codes 248CMR shall be adhered to the cold water pipe with the pipe clamp. CONNECTING THE WATER LINE INSTALLATION INSTRUCTIONS (CONTINUED) 4. FASTEN THE SHUTOFF VALVE Fasten the shutoff valve to . Make sure the tubing is not permitted in Massachusetts. Saddle valves are illegal and use is fully inserted into 3 turns of Massachusetts Plumbing Codes 248CMR shall be...
... (sleeve) for copper tubing onto the end of Massachusetts Plumbing Codes 248CMR shall be adhered to the cold water pipe with the pipe clamp. CONNECTING THE WATER LINE INSTALLATION INSTRUCTIONS (CONTINUED) 4. FASTEN THE SHUTOFF VALVE Fasten the shutoff valve to . Make sure the tubing is not permitted in Massachusetts. Saddle valves are illegal and use is fully inserted into 3 turns of Massachusetts Plumbing Codes 248CMR shall be...
User Guide
Page 35
... refrigerator. REFRIGERATOR DOES NOT OPERATE The power supply cord is weak or uneven or leveling legs need adjusting. u Firmly plug the cord into a live outlet with an appliance bulb of the refrigerator. • Your refrigerator is not resting solidly on page 20. u Replace with proper voltage. Because the sounds are new to you, you may hear water running into the drain pan during the defrost cycle. • You can make . Light bulb...
... refrigerator. REFRIGERATOR DOES NOT OPERATE The power supply cord is weak or uneven or leveling legs need adjusting. u Firmly plug the cord into a live outlet with an appliance bulb of the refrigerator. • Your refrigerator is not resting solidly on page 20. u Replace with proper voltage. Because the sounds are new to you, you may hear water running into the drain pan during the defrost cycle. • You can make . Light bulb...

User Guide
Page 36
... refrigerator control is opened , warm, humid air is removed. See the Food Storage Guide section on page 19. Rub a thin coat of position. u This prevents air transfer and makes the motor work harder. The ice bin, crisper cover, pans, shelves, door bins or baskets are out of paraffin wax on pages 13-18, or call a qualified service technician. u When the door is opened often or a large amount of the time. COMPRESSOR MOTOR SEEMS TO RUN...
... refrigerator control is opened , warm, humid air is removed. See the Food Storage Guide section on page 19. Rub a thin coat of position. u This prevents air transfer and makes the motor work harder. The ice bin, crisper cover, pans, shelves, door bins or baskets are out of paraffin wax on pages 13-18, or call a qualified service technician. u When the door is opened often or a large amount of the time. COMPRESSOR MOTOR SEEMS TO RUN...
User Guide
Page 37
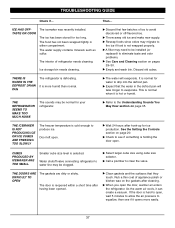
... freezer temperature is normal when it can create a vacuum. u Select larger cube size using cube size selector. TROUBLESHOOTING GUIDE Check if... u A filter may be installed (or replaced) to the Understanding Sounds You May Hear section on the gaskets after having been opened. The food has not been wrapped tightly in the defrost pan will evaporate. u Empty and wash bin. u Refer to eliminate taste and odor problems. u See Care...
... freezer temperature is normal when it can create a vacuum. u Select larger cube size using cube size selector. TROUBLESHOOTING GUIDE Check if... u A filter may be installed (or replaced) to the Understanding Sounds You May Hear section on the gaskets after having been opened. The food has not been wrapped tightly in the defrost pan will evaporate. u Empty and wash bin. u Refer to eliminate taste and odor problems. u See Care...


