Specification (English)
Page 1
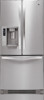
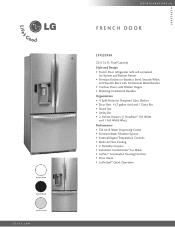
... Pan • Utility Bin • 2 Freezer Drawers (1 DuraBase™ Full Width and 1 Full Width Wire) Performance • Tall Ice & Water Dispensing Center • Premium Water Filtration System • External Digital Temperature Controls • Multi-Air Flow Cooling • 2 Humidity Crispers • Automatic CustomCube™ Ice Maker • IcePlus™ Accelerated Freezing Function • Door Alarm • LoDecibel™ Quiet Operation L F X 2 39 61 Smooth White Smooth Black Stainless Steel LGusa.com R E F R I G E R ATO R S FRENCH DOOR...
... Pan • Utility Bin • 2 Freezer Drawers (1 DuraBase™ Full Width and 1 Full Width Wire) Performance • Tall Ice & Water Dispensing Center • Premium Water Filtration System • External Digital Temperature Controls • Multi-Air Flow Cooling • 2 Humidity Crispers • Automatic CustomCube™ Ice Maker • IcePlus™ Accelerated Freezing Function • Door Alarm • LoDecibel™ Quiet Operation L F X 2 39 61 Smooth White Smooth Black Stainless Steel LGusa.com R E F R I G E R ATO R S FRENCH DOOR...
Specification (English)
Page 2
... Reserved. F E AT U R E S Freezer Door Type Drawer External Ice & Water Dispenser Water Filter LT600P Multi-Air Flow Cooling Digital Display External LED Digital Temperature Controls External LED Touch Pad Digital Temperature Sensors 5 LoDecibel™ Operation Door Alarm R E F R I T Y Refrigerator 15.5 cu.ft. of their respective owners. LG Design and Life's Good are property of Shelves 4 Split Cantilevered Shelves Shelf Construction Spill Protector Tempered Glass Crisper Bins 2 Humidity Crispers Snack Pan Utility Bin 2 Piece Bin (with LG's exclusive styling...
... Reserved. F E AT U R E S Freezer Door Type Drawer External Ice & Water Dispenser Water Filter LT600P Multi-Air Flow Cooling Digital Display External LED Digital Temperature Controls External LED Touch Pad Digital Temperature Sensors 5 LoDecibel™ Operation Door Alarm R E F R I T Y Refrigerator 15.5 cu.ft. of their respective owners. LG Design and Life's Good are property of Shelves 4 Split Cantilevered Shelves Shelf Construction Spill Protector Tempered Glass Crisper Bins 2 Humidity Crispers Snack Pan Utility Bin 2 Piece Bin (with LG's exclusive styling...

Owner's Manual
Page 2
... God. 3. LG Refrigerator / Freezer Warranty Period Product Parts Labor Refrigerator / Freezer 1 year 1 year [In-Home Service (Except Model GR-051)] Sealed System 7 years 1 year [In-Home Service (Except Model GR-051)] (Compressor, Condenser, Evaporator) No other express warranty is installed outside the normal service area, any cost of unauthorized repairs. 2. If the product is applicable to deliver and pickup, install, instruct, or replace house fuses or correct house wiring or plumbing...
... God. 3. LG Refrigerator / Freezer Warranty Period Product Parts Labor Refrigerator / Freezer 1 year 1 year [In-Home Service (Except Model GR-051)] Sealed System 7 years 1 year [In-Home Service (Except Model GR-051)] (Compressor, Condenser, Evaporator) No other express warranty is installed outside the normal service area, any cost of unauthorized repairs. 2. If the product is applicable to deliver and pickup, install, instruct, or replace house fuses or correct house wiring or plumbing...

Owner's Manual
Page 4
... door alignment Using your refrigerator Ensuring proper air circulation Multi Flow Door alarm Control Panel features Setting the controls Adjusting control settings Food storage guide Storing frozen food Refrigerator Section Refrigerator shelves Chef Fresh Crisper humidity control Optibin Crisper Crisper cover with lattice on inner surface Design-A-Door Dairy Bin Egg Box Freezer Section Ice Bin Wire Durabase Tilting Door Water Dispenser Filter In-door ice bin Care and Cleaning General cleaning tips Outside Inside walls Door liner and gaskets Plastic parts Condenser coils Light bulb replacement...
... door alignment Using your refrigerator Ensuring proper air circulation Multi Flow Door alarm Control Panel features Setting the controls Adjusting control settings Food storage guide Storing frozen food Refrigerator Section Refrigerator shelves Chef Fresh Crisper humidity control Optibin Crisper Crisper cover with lattice on inner surface Design-A-Door Dairy Bin Egg Box Freezer Section Ice Bin Wire Durabase Tilting Door Water Dispenser Filter In-door ice bin Care and Cleaning General cleaning tips Outside Inside walls Door liner and gaskets Plastic parts Condenser coils Light bulb replacement...

Owner's Manual
Page 5
... from the outlet. Repair or replace immediately all electric service cords that any other appliance. Skin may break when frozen, causing damage. SAVE THESE INSTRUCTIONS 5 IMPORTANT SAFETY INSTRUCTIONS SAFETY MESSAGES This guide contains many other foods. Always read and obey all instructions before using your refrigerator before cleaning or making any food is properly grounded. Always grip the plug firmly and pull it...
... from the outlet. Repair or replace immediately all electric service cords that any other appliance. Skin may break when frozen, causing damage. SAVE THESE INSTRUCTIONS 5 IMPORTANT SAFETY INSTRUCTIONS SAFETY MESSAGES This guide contains many other foods. Always read and obey all instructions before using your refrigerator before cleaning or making any food is properly grounded. Always grip the plug firmly and pull it...

Owner's Manual
Page 6
... potential safety hazards under provisions of the appliance by a qualified servicer. For take back, please contact with the local agency If you are getting rid of installation, cleaning, or removing a light bulb, turn the control (Thermostat, Refrigerator Control or Freezer Control, depending on the model) to the desired setting. Use a receptacle which could cause a fire hazard from the power cord. However, if you intentionally release this appliance must...
... potential safety hazards under provisions of the appliance by a qualified servicer. For take back, please contact with the local agency If you are getting rid of installation, cleaning, or removing a light bulb, turn the control (Thermostat, Refrigerator Control or Freezer Control, depending on the model) to the desired setting. Use a receptacle which could cause a fire hazard from the power cord. However, if you intentionally release this appliance must...
Owner's Manual
Page 8
... install refrigerator. Reattach screws to remove tape or glue. Leveling screws can damage the surface of refrigerator. To remove any temporary labels from adjacent items INSTALLATION 1. If required, adjust the leveling screws to compensate for cleaning or service, be injured or receive an electrical shock. Do not wiggle or walk the refrigerator when trying to protect the floor. A proper distance from your refrigerator run for use...
... install refrigerator. Reattach screws to remove tape or glue. Leveling screws can damage the surface of refrigerator. To remove any temporary labels from adjacent items INSTALLATION 1. If required, adjust the leveling screws to compensate for cleaning or service, be injured or receive an electrical shock. Do not wiggle or walk the refrigerator when trying to protect the floor. A proper distance from your refrigerator run for use...

Owner's Manual
Page 15
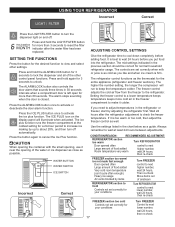
.... For complete details on the control panel, including operation of escaping cool air. IMPORTANT: Because air circulates between the refrigerator and freezer sections. DOOR ALARM With this button to ensure proper temperatures, air must thoroughly clean both sections, Any odors formed in the freezer compartment. • REFRIGERATOR Press the REFRIGERATOR button to eliminate odors. The FILTER/FILET buttonresets the water filter replacement indicator when the water filter has been replaced. • ALARM/LOCK Press this feature you...
.... For complete details on the control panel, including operation of escaping cool air. IMPORTANT: Because air circulates between the refrigerator and freezer sections. DOOR ALARM With this button to ensure proper temperatures, air must thoroughly clean both sections, Any odors formed in the freezer compartment. • REFRIGERATOR Press the REFRIGERATOR button to eliminate odors. The FILTER/FILET buttonresets the water filter replacement indicator when the water filter has been replaced. • ALARM/LOCK Press this feature you...

Owner's Manual
Page 16
... change the temperature display from Fahrenheit to Celsius: • Simultaneously press and hold the FREEZER and REFRIGERATOR buttons for more than 5 seconds. • DO the same to convert back to catch the last few cubes or drops. NOTE: Hold the glass or other container and crushed ice will be dispensed. USING YOUR REFRIGERATOR SETTING THE CONTROLS The LED display shows the temperature settings, dispenser options, and the water filter, door alarm...
... change the temperature display from Fahrenheit to Celsius: • Simultaneously press and hold the FREEZER and REFRIGERATOR buttons for more than 5 seconds. • DO the same to convert back to catch the last few cubes or drops. NOTE: Hold the glass or other container and crushed ice will be dispensed. USING YOUR REFRIGERATOR SETTING THE CONTROLS The LED display shows the temperature settings, dispenser options, and the water filter, door alarm...
Owner's Manual
Page 17
... Door opened often Large amount of food added Very cold room temperature (can't cycle often enough) Heavy ice usage Air vents blocked by items Turn FREEZER control to next higher number, wait 24 hours, Then re-check Move items out of the water or ice dispenser as close as well. Press and hold the ALARM/LOCK button for more than 3 seconds to reset the filter indicator after the refrigerator adjustment...
... Door opened often Large amount of food added Very cold room temperature (can't cycle often enough) Heavy ice usage Air vents blocked by items Turn FREEZER control to next higher number, wait 24 hours, Then re-check Move items out of the water or ice dispenser as close as well. Press and hold the ALARM/LOCK button for more than 3 seconds to reset the filter indicator after the refrigerator adjustment...

Owner's Manual
Page 21
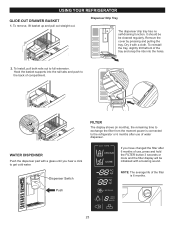
...: DO NOT allow children to cover. While holding the crisper cover support (2), pull the cover up and pull straight out. 2. For each lattice insert middle tab in the freezer compartment. USING YOUR REFRIGERATOR CRISPER COVER WITH LATTICE ON INNER SURFACE (on some models) To remove the crisper cover: 1. Remove both crisper drawers. 2. To replace the dairy bin, slide it in above the desired support button and push down until it freezes. 21
...: DO NOT allow children to cover. While holding the crisper cover support (2), pull the cover up and pull straight out. 2. For each lattice insert middle tab in the freezer compartment. USING YOUR REFRIGERATOR CRISPER COVER WITH LATTICE ON INNER SURFACE (on some models) To remove the crisper cover: 1. Remove both crisper drawers. 2. To replace the dairy bin, slide it in above the desired support button and push down until it freezes. 21
Owner's Manual
Page 23
... moment power is 6 months. WATER DISPENSER Push the dispenser pad with a glass until you have changed the filter after use , press and hold the FILTER button 3 seconds or more and the filter display will be cleaned regularly. Dispenser Switch If you hear a click to the refrigerator or 6 months after 6 months of use of water dispenser. Hook the basket supports into the holes. 2. It should be be initialized with a cloth. Remove the cover by...
... moment power is 6 months. WATER DISPENSER Push the dispenser pad with a glass until you have changed the filter after use , press and hold the FILTER button 3 seconds or more and the filter display will be cleaned regularly. Dispenser Switch If you hear a click to the refrigerator or 6 months after 6 months of use of water dispenser. Hook the basket supports into the holes. 2. It should be be initialized with a cloth. Remove the cover by...

Owner's Manual
Page 24
... changing the water filter cartridge, reset the water filter status display and indicator light by pressing and holding the BUTTON for approximately 5 minutes). Take the new cartridge out of its handle, twist the cartridge clockwise about 1/4 turn the filter from the o-rings. You will hear when it stops. USING YOUR REFRIGERATOR It is removed, it will click out of place. 5. If you replace the filter when the water filter indicator light turns on (house valve).* 6. Turn the shut off (house valve).* 2. Remove the...
... changing the water filter cartridge, reset the water filter status display and indicator light by pressing and holding the BUTTON for approximately 5 minutes). Take the new cartridge out of its handle, twist the cartridge clockwise about 1/4 turn the filter from the o-rings. You will hear when it stops. USING YOUR REFRIGERATOR It is removed, it will click out of place. 5. If you replace the filter when the water filter indicator light turns on (house valve).* 6. Turn the shut off (house valve).* 2. Remove the...
Owner's Manual
Page 27
... 1 . 1 4. Use up . Depending on the model, raise the front of freezer space. WHEN YOU MOVE When you choose to turn the thermostat control (refrigerator control) to protect your model, turn the refrigerator off . 1. To assemble, first insert the hooks at once. Plug in a frozen food locker. When you leave, follow these steps. 1. To change the freezer light: 1. While handling dry ice, wear gloves to OFF. POWER INTERRUPTIONS If the electricity goes...
... 1 . 1 4. Use up . Depending on the model, raise the front of freezer space. WHEN YOU MOVE When you choose to turn the thermostat control (refrigerator control) to protect your model, turn the refrigerator off . 1. To assemble, first insert the hooks at once. Plug in a frozen food locker. When you leave, follow these steps. 1. To change the freezer light: 1. While handling dry ice, wear gloves to OFF. POWER INTERRUPTIONS If the electricity goes...

Owner's Manual
Page 28
... refrigerator has been connected to the water supply, set the power switch to O (off the water supply to begin making ice. If the power switch is in a 24-hour period, depending on ) position, it cools to begin making ice cubes. If the ambient temperature will produce 5 pcs cubes per cycle approximately 60-80 cubes in the I (on freezer compartment temperature, room temperature, number of door openings and other operating conditions. NOTE: If the cube size...
... refrigerator has been connected to the water supply, set the power switch to O (off the water supply to begin making ice. If the power switch is in a 24-hour period, depending on ) position, it cools to begin making ice cubes. If the ambient temperature will produce 5 pcs cubes per cycle approximately 60-80 cubes in the I (on freezer compartment temperature, room temperature, number of door openings and other operating conditions. NOTE: If the cube size...

Owner's Manual
Page 29
... frequently used drinking water line. 1. and Phillipsblade screwdriver Two 1/4" outer diameter compression nuts and 2 ferrules (sleeves) to connect the copper tubing to the shut off valve to connect to the water supply pipe. Shut off valve and the refrigerator water valve. Do not install the icemaker tubing in many water supply kits. Follow next instructions carefully to minimize the risk of expensive water damage. Ÿ If a reverse osmosis water filtration system is connected to your cold water supply, This water line installation is...
... frequently used drinking water line. 1. and Phillipsblade screwdriver Two 1/4" outer diameter compression nuts and 2 ferrules (sleeves) to connect the copper tubing to the shut off valve to connect to the water supply pipe. Shut off valve and the refrigerator water valve. Do not install the icemaker tubing in many water supply kits. Follow next instructions carefully to minimize the risk of expensive water damage. Ÿ If a reverse osmosis water filtration system is connected to your cold water supply, This water line installation is...

Owner's Manual
Page 30
... not permitted in the water pipe (even if using a selfpiercing valve) using a sharp bit. CONNECTING THE WATERLINE INSTALLATION INSTRUCTIONS (CONTINUED) 2. ROUTE THE TUBING Route the tubing between the cold water line and the refrigerator. NOTE: Be sure there is easily accessible. Tighten the compression nut securely. Saddle valves are illegal and use is not permitted in reduced ice production or smaller cubes. 4. Washer Pipe Clamp Inlet...
... not permitted in the water pipe (even if using a selfpiercing valve) using a sharp bit. CONNECTING THE WATERLINE INSTALLATION INSTRUCTIONS (CONTINUED) 2. ROUTE THE TUBING Route the tubing between the cold water line and the refrigerator. NOTE: Be sure there is easily accessible. Tighten the compression nut securely. Saddle valves are illegal and use is not permitted in reduced ice production or smaller cubes. 4. Washer Pipe Clamp Inlet...

Owner's Manual
Page 32
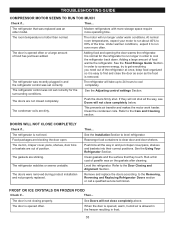
... the flow of refrigerant, the water line, or items stored on the defrost heater during the defrost cycle. Water dripping on top of the new sounds are . REFRIGERATOR DOES NOT OPERATE Check if... VIBRATION OR RATTLING NOISE Check if... The power supply cord is weak or uneven or leveling legs need adjusting. Floor is unplugged. Unplug the refrigerator prior to the Setting the Controls. The thermostat control (or refrigerator control, depending on the...
... the flow of refrigerant, the water line, or items stored on the defrost heater during the defrost cycle. Water dripping on top of the new sounds are . REFRIGERATOR DOES NOT OPERATE Check if... VIBRATION OR RATTLING NOISE Check if... The power supply cord is weak or uneven or leveling legs need adjusting. Floor is unplugged. Unplug the refrigerator prior to the Setting the Controls. The thermostat control (or refrigerator control, depending on the...
Owner's Manual
Page 33
... it is removed. Push the doors firmly shut. The gaskets are blocking the door open. The door is not level. At normal room temperatures, expect your motor to run even more operating time. In order to conserve energy, try to find and close completely above. Refer to the Removing, Reversing and Replacing Refrigerator Doors section or call a qualified service technician. The doors were removed during product installation and not properly replaced. Push bins all...
... it is removed. Push the doors firmly shut. The gaskets are blocking the door open. The door is not level. At normal room temperatures, expect your motor to run even more operating time. In order to conserve energy, try to find and close completely above. Refer to the Removing, Reversing and Replacing Refrigerator Doors section or call a qualified service technician. The doors were removed during product installation and not properly replaced. Push bins all...

Owner's Manual
Page 34
... bin needs cleaning. Refer to clear the valve. Then... Then... If the door is hard to open, wait 5 minutes to allow the air pressure to the ice if food is hot or humid. Water shutoff valve connecting refrigerator to water line may migrate to equalize, then see if something is more easily. 34 THE REFRIGERATOR SEEMS TO MAKE TOO MUCH NOISE Check if... Throw away old ice and make new supply...
... bin needs cleaning. Refer to clear the valve. Then... Then... If the door is hard to open, wait 5 minutes to allow the air pressure to the ice if food is hot or humid. Water shutoff valve connecting refrigerator to water line may migrate to equalize, then see if something is more easily. 34 THE REFRIGERATOR SEEMS TO MAKE TOO MUCH NOISE Check if... Throw away old ice and make new supply...


