User Guide
Page 2
... Control 24 Spanish Version 40 Removing Crisper 24 French Version 78 Warranty (U.S.A.) 3 Warranty (CANADA) 4 Safety Instructions 5-6 Grounding Requirements 6 Parts And Features 7 Refrigerator Installation 8-17 Unpacking Your Refrigerator 8 Installation 8 Removing And Replacing Your Refrigerator Handles And Doors 9-16 Leveling And ...And Cleaning 29-30 General Cleaning Tips 29 Outside 29 Inside Walls 29 Door Liner And Gaskets 29 Plastic Parts 29 Condenser Coils 29 Light Bulb Replacement 29-30 Power Interruptions 30 When You Go On Vacation 30 When...
... Control 24 Spanish Version 40 Removing Crisper 24 French Version 78 Warranty (U.S.A.) 3 Warranty (CANADA) 4 Safety Instructions 5-6 Grounding Requirements 6 Parts And Features 7 Refrigerator Installation 8-17 Unpacking Your Refrigerator 8 Installation 8 Removing And Replacing Your Refrigerator Handles And Doors 9-16 Leveling And ...And Cleaning 29-30 General Cleaning Tips 29 Outside 29 Inside Walls 29 Door Liner And Gaskets 29 Plastic Parts 29 Condenser Coils 29 Light Bulb Replacement 29-30 Power Interruptions 30 When You Go On Vacation 30 When...
User Guide
Page 3
... do not allow the exclusion or limitation of Purchase. USA Your LG Refrigerator will be borne by the consumer. PARTS: One Year from the date ("Date of Purchase") of original consumer purchase of Purchase. LG REFRIGERATOR LIMITED WARRANTY - Territories. Replacement Units and Repair Parts are answered 24 hours a day, 365 days per year) and...
... do not allow the exclusion or limitation of Purchase. USA Your LG Refrigerator will be borne by the consumer. PARTS: One Year from the date ("Date of Purchase") of original consumer purchase of Purchase. LG REFRIGERATOR LIMITED WARRANTY - Territories. Replacement Units and Repair Parts are answered 24 hours a day, 365 days per year) and...
User Guide
Page 4
...Province. A copy of original purchase. or by Internet: http://www.lg.ca To Obtain Nearest Authorized Service Center, Parts Distributor, or Sales Dealer by phone: Call 1-888-542-2623 (1-888-LG-CANADA) and choose the appropriate prompt. SHALL NOT BE LIABLE FOR ...use for other express warranty is applicable to the product caused by Internet: http://www.lg.ca 4 WARRANTY PERIOD MODEL# : LFX25970**/LFX21970**/LFX25960**/LFX21960** LABOR : 2 Years PARTS : 2 Years SEALED SYSTEM : Labor/ 2 Years, Parts/ 5 Years (Compressor, condenser, and evaporator) HOW SERVICE IS HANDLED : Call ...
...Province. A copy of original purchase. or by Internet: http://www.lg.ca To Obtain Nearest Authorized Service Center, Parts Distributor, or Sales Dealer by phone: Call 1-888-542-2623 (1-888-LG-CANADA) and choose the appropriate prompt. SHALL NOT BE LIABLE FOR ...use for other express warranty is applicable to the product caused by Internet: http://www.lg.ca 4 WARRANTY PERIOD MODEL# : LFX25970**/LFX21970**/LFX25960**/LFX21960** LABOR : 2 Years PARTS : 2 Years SEALED SYSTEM : Labor/ 2 Years, Parts/ 5 Years (Compressor, condenser, and evaporator) HOW SERVICE IS HANDLED : Call ...

User Guide
Page 5
... which have any repairs. Read all safety messages. Skin may break when being replaced.) NOTE: Setting either the plug or connector end. • When moving parts of the ejector mechanism, or with the Attention Installer Instructions that were taped to safety messages that inform you of hazards that releases the cubes...
... which have any repairs. Read all safety messages. Skin may break when being replaced.) NOTE: Setting either the plug or connector end. • When moving parts of the ejector mechanism, or with the Attention Installer Instructions that were taped to safety messages that inform you of hazards that releases the cubes...
User Guide
Page 7
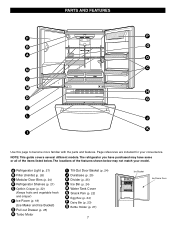
PARTS AND FEATURES F P B O A Q N C C M H D G E L J K I Tilt-Out Door Basket (p. 24) J Durabase (p. 25) K Divider (p. 25) L Ice Bin (p. 24) M Water Tank Cover N Snack Pan (p. 22) O Egg Box (p. 24) P Dairy Bin (p. ... and crisper) F Ice Room (p. 18) (Ice Maker and Ice Bucket) G Pull out Drawer (p. 25) H Turbo Motor I Use this page to become more familiar with the parts and features. Page references are included for your model. The refrigerator you have some or all of the items listed below. The locations of the...
PARTS AND FEATURES F P B O A Q N C C M H D G E L J K I Tilt-Out Door Basket (p. 24) J Durabase (p. 25) K Divider (p. 25) L Ice Bin (p. 24) M Water Tank Cover N Snack Pan (p. 22) O Egg Box (p. 24) P Dairy Bin (p. ... and crisper) F Ice Room (p. 18) (Ice Maker and Ice Bucket) G Pull out Drawer (p. 25) H Turbo Motor I Use this page to become more familiar with the parts and features. Page references are included for your model. The refrigerator you have some or all of the items listed below. The locations of the...
User Guide
Page 20
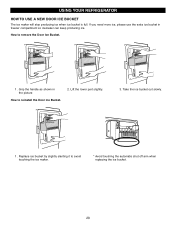
USING YOUR REFRIGERATOR HOW TO USE A NEW DOOR ICE BUCKET The ice maker will stop producing ice when ice bucket is full. Replace ice bucket by slightly slanting it to remove the Door Ice Bucket. 1 . How to avoid touching the ice maker. * Avoid touching the automatic shut off arm when replacing the ice bucket. 20 Lift the lower part slightly. 3. Take the ice bucket out slowly. 1 . If you need more ice, please use the extra ice bucket in the picture How to reinstall the Door Ice Bucket. 2. Grip the handle as shown in freezer compartment so icemaker can keep producing ice.
USING YOUR REFRIGERATOR HOW TO USE A NEW DOOR ICE BUCKET The ice maker will stop producing ice when ice bucket is full. Replace ice bucket by slightly slanting it to remove the Door Ice Bucket. 1 . How to avoid touching the ice maker. * Avoid touching the automatic shut off arm when replacing the ice bucket. 20 Lift the lower part slightly. 3. Take the ice bucket out slowly. 1 . If you need more ice, please use the extra ice bucket in the picture How to reinstall the Door Ice Bucket. 2. Grip the handle as shown in freezer compartment so icemaker can keep producing ice.
User Guide
Page 27
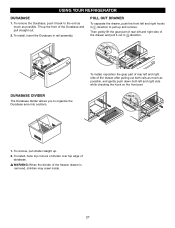
... rear left and right side while checking the hook on the front part. Hook 1. w WARNING: When the divider of the drawer after pulling out both rails as much as possible, and gently push down both left and right ... possible. USING YOUR REFRIGERATOR DURABASE 1. To install, insert the Durabase in direction to organize the Durabase area into sections. 1 32 To install, reposition the gear part of rear left and right hooks in rail assembly. To remove, pull divider staight up the front of durabase. To remove the Durabase, push it...
... rear left and right side while checking the hook on the front part. Hook 1. w WARNING: When the divider of the drawer after pulling out both rails as much as possible, and gently push down both left and right ... possible. USING YOUR REFRIGERATOR DURABASE 1. To install, insert the Durabase in direction to organize the Durabase area into sections. 1 32 To install, reposition the gear part of rear left and right hooks in rail assembly. To remove, pull divider staight up the front of durabase. To remove the Durabase, push it...
User Guide
Page 28
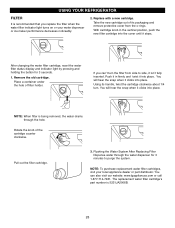
... into place. Place a container under the hole of the cartridge counter clockwise. Pull out the filter cartridge. 3. You can 't turn . The replacement water filter cartridge's part number is being removed, the water drains through the water dispenser for 3 seconds. 1. USING YOUR REFRIGERATOR FILTER It is recommended that you can also visit... snap when it clicks into place. If you replace the filter when the water filter indicator light turns on or your local appliance dealer or part distributor.
... into place. Place a container under the hole of the cartridge counter clockwise. Pull out the filter cartridge. 3. You can 't turn . The replacement water filter cartridge's part number is being removed, the water drains through the water dispenser for 3 seconds. 1. USING YOUR REFRIGERATOR FILTER It is recommended that you can also visit... snap when it clicks into place. If you replace the filter when the water filter indicator light turns on or your local appliance dealer or part distributor.
User Guide
Page 29
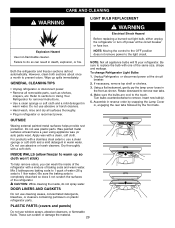
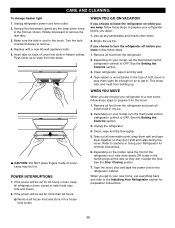
...use window sprays, abrasive cleansers, or flammable fluids. Do not use cleaning waxes, concentrated detergents, bleaches, or cleaners containing petroleum on plastic refrigerator parts. Wipe up so cloth won't stick) To help remove odors, you can wash the inside , do so can scratch or damage the ... helps provide rust protection. Explosion Hazard Use non-flammable cleaner. However, clean both sections about once a month to the light circuit. PLASTIC PARTS (covers and panels) Do not use abrasive or harsh cleaners. • Hand wash, rinse and dry all appliance bulbs will fit your ...
...use window sprays, abrasive cleansers, or flammable fluids. Do not use cleaning waxes, concentrated detergents, bleaches, or cleaners containing petroleum on plastic refrigerator parts. Wipe up so cloth won't stick) To help remove odors, you can wash the inside , do so can scratch or damage the ... helps provide rust protection. Explosion Hazard Use non-flammable cleaner. However, clean both sections about once a month to the light circuit. PLASTIC PARTS (covers and panels) Do not use abrasive or harsh cleaners. • Hand wash, rinse and dry all appliance bulbs will fit your ...
User Guide
Page 30
... to help foods stay cold and frozen. 2. See the Setting the Controls section. 3. This stops odor and mold from the refrigerator and pack all removable parts, wrap them well and tape them open far enough for 24 hours or less, keep all refrigerator doors closed to your refrigerator before you leave...
... to help foods stay cold and frozen. 2. See the Setting the Controls section. 3. This stops odor and mold from the refrigerator and pack all removable parts, wrap them well and tape them open far enough for 24 hours or less, keep all refrigerator doors closed to your refrigerator before you leave...
User Guide
Page 31
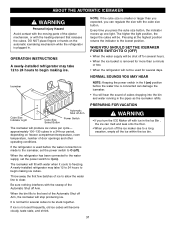
... bucket is connected can damage the icemaker. • You will not be . ABOUT THE AUTOMATIC ICEMAKER WARNING Personal Injury Hazard Avoid contact with the moving parts of the Automatic Shut off Arm. The higher the light position, the larger the cubes will fill with water when it cools to I (on freezer...
... bucket is connected can damage the icemaker. • You will not be . ABOUT THE AUTOMATIC ICEMAKER WARNING Personal Injury Hazard Avoid contact with the moving parts of the Automatic Shut off Arm. The higher the light position, the larger the cubes will fill with water when it cools to I (on freezer...

User Guide
Page 32
... tubing you need an adapter (available at plumbing supply stores) to connect the water line to the refrigerator OR you can cause damage to refrigerator parts and lead to water leakage or flooding. and Phillipsblade screwdriver. • Two 1/4 ″ outer diameter compression nuts and 2 ferrules (sleeves) to connect the copper tubing...
... tubing you need an adapter (available at plumbing supply stores) to connect the water line to the refrigerator OR you can cause damage to refrigerator parts and lead to water leakage or flooding. and Phillipsblade screwdriver. • Two 1/4 ″ outer diameter compression nuts and 2 ferrules (sleeves) to connect the copper tubing...


