Owner's Manual
Page 2
...English Version Spanish Version Warranty (E.U.A.) Safety Instructions Grounding Requirements Parts and Features Refrigerator Installation Unpacking your refrigerator Installation Base Grille Removing, Reversing and Replacing Your refrigerator doors Pull out drawer Leveling and door alignment Using your refrigerator Ensuring proper air circulation Multi Flow Door alarm Setting the controls Adjusting control...2 36 3 - 4 5 - 6 6 7 8 - 16 8 8 8 9 - 15 15 15 16 17 - 25 17 17 17 17 18 19 19 20 20 21 21 21 22 22 22 22 24 23 23 23 23 24 - 25 26 - 27 26 26 26 26 26 26 26 - 27 27 27 28 29 - 31 32 - 35 2
...English Version Spanish Version Warranty (E.U.A.) Safety Instructions Grounding Requirements Parts and Features Refrigerator Installation Unpacking your refrigerator Installation Base Grille Removing, Reversing and Replacing Your refrigerator doors Pull out drawer Leveling and door alignment Using your refrigerator Ensuring proper air circulation Multi Flow Door alarm Setting the controls Adjusting control...2 36 3 - 4 5 - 6 6 7 8 - 16 8 8 8 9 - 15 15 15 16 17 - 25 17 17 17 17 18 19 19 20 20 21 21 21 22 22 22 22 24 23 23 23 23 24 - 25 26 - 27 26 26 26 26 26 26 26 - 27 27 27 28 29 - 31 32 - 35 2
Owner's Manual
Page 3
... is applicable to be borne by the consumer. This warranty gives you specific legal rights and you . LG Refrigerator / Freezer Warranty Period Product Parts Labor Refrigerator / Freezer 1 year 1 year [In-Home Service (Except Model GR-051)] Sealed System 7 years 1 year [In-Home Service (...4. INCLUDING THE IMPLIED WARRANTY OF MERCHANTABILITY, IS LIMITED TO THE DURATION OF THE EXPRESS WARRANTY HEREIN. Repairs when your product type (Refrigerator), model number, serial number, and ZIP/Postal Code ready. If the product is provided. Service trips to your home to state....
... is applicable to be borne by the consumer. This warranty gives you specific legal rights and you . LG Refrigerator / Freezer Warranty Period Product Parts Labor Refrigerator / Freezer 1 year 1 year [In-Home Service (Except Model GR-051)] Sealed System 7 years 1 year [In-Home Service (...4. INCLUDING THE IMPLIED WARRANTY OF MERCHANTABILITY, IS LIMITED TO THE DURATION OF THE EXPRESS WARRANTY HEREIN. Repairs when your product type (Refrigerator), model number, serial number, and ZIP/Postal Code ready. If the product is provided. Service trips to your home to state....

Owner's Manual
Page 4
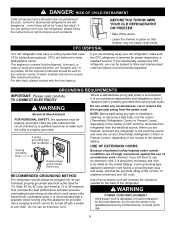
...Department of this appliance must be eaten. All safety messages will be dangerous to the light circuit. They could damage the refrigerator and seriously injure themselves. CAUTION Indicates an imminently hazardous situation which have any repairs. All safety messages will be followed, ...including the following: NEVER unplug your refrigerator is plugged in the freezer compartment when hands are not followed. Do not use and care guide. DO NOT allow children...
...Department of this appliance must be eaten. All safety messages will be dangerous to the light circuit. They could damage the refrigerator and seriously injure themselves. CAUTION Indicates an imminently hazardous situation which have any repairs. All safety messages will be followed, ...including the following: NEVER unplug your refrigerator is plugged in the freezer compartment when hands are not followed. Do not use and care guide. DO NOT allow children...
Owner's Manual
Page 5
... follow the instructions at 15 or 20 amperes. BEFORE YOU THROW AWAY YOUR OLD REFRIGERATOR OR FREEZER Take off with a switch or pull chain. Have the wall outlet and the circuit checked by LG Electronics, to fines and imprisonment under provisions of an extension cord. Use a receptacle which could cause a fire hazard...
... follow the instructions at 15 or 20 amperes. BEFORE YOU THROW AWAY YOUR OLD REFRIGERATOR OR FREEZER Take off with a switch or pull chain. Have the wall outlet and the circuit checked by LG Electronics, to fines and imprisonment under provisions of an extension cord. Use a receptacle which could cause a fire hazard...
Owner's Manual
Page 6
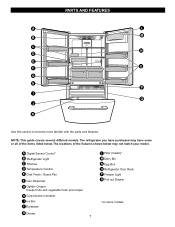
... Rack P Freezer Light Q Pull out Drawer *on some or all of the features shown below . A Digital Sensor Control* B Refrigerator Light C Shelves D Temperature Control E Chef Fresh / Snack Pan F Can Dispenser G Optibin Crisper Keeps fruits and vegetable fresh and crisper H Customcube Icemaker I Q J K Use this section to ... familiar with the parts and features. The locations of the items listed below may have some models NOTE: This guide covers several different models. The refrigerator you have purchased may not match your model.
... Rack P Freezer Light Q Pull out Drawer *on some or all of the features shown below . A Digital Sensor Control* B Refrigerator Light C Shelves D Temperature Control E Chef Fresh / Snack Pan F Can Dispenser G Optibin Crisper Keeps fruits and vegetable fresh and crisper H Customcube Icemaker I Q J K Use this section to ... familiar with the parts and features. The locations of the items listed below may have some models NOTE: This guide covers several different models. The refrigerator you have purchased may not match your model.
Owner's Manual
Page 7
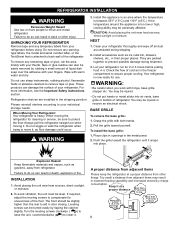
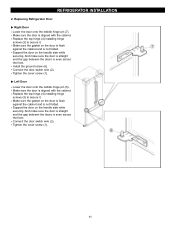
... the leveling screws to compensate for cleaning or service, be slightly higher than 1"(2.5 cm) to move and install refrigerator. A proper distance from other injury. Refrigerator shelves are packed together to aid in door closing. When moving it at a proper distance from adjacent items Please...Push the grille toward yourself. Avoid placing the unit near heat sources, direct sunlight or moisture. Pull the grille toward the refrigerator until it . Leveling screws can result in the shipping position. Install accessories such as floor damage could occur. 3. They ...
... the leveling screws to compensate for cleaning or service, be slightly higher than 1"(2.5 cm) to move and install refrigerator. A proper distance from other injury. Refrigerator shelves are packed together to aid in door closing. When moving it at a proper distance from adjacent items Please...Push the grille toward yourself. Avoid placing the unit near heat sources, direct sunlight or moisture. Pull the grille toward the refrigerator until it . Leveling screws can result in the shipping position. Install accessories such as floor damage could occur. 3. They ...
Owner's Manual
Page 8
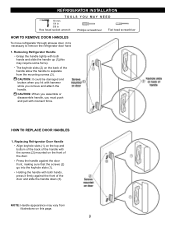
... YOU MAY NEED 10 mm 1/4 in 3/8 in Hex head socket wrench Phillips screwdriver Flat head screwdriver HOW TO REMOVE DOOR HANDLES To move refrigerator through ahouse door, it firmly against the door front, making sure that the screws (2) go into the keyhole slots (1). CAUTION: It could be ,... necessary to separate from illustrations on the front of the handle allow the handle to remove the refrigerator door handles. 1. The keyhole slots (2) on the back of the door. Replacing Refrigerator Door Handle Align keyhole slots (1) on the top and bottom of the back of the handle with ...
... YOU MAY NEED 10 mm 1/4 in 3/8 in Hex head socket wrench Phillips screwdriver Flat head screwdriver HOW TO REMOVE DOOR HANDLES To move refrigerator through ahouse door, it firmly against the door front, making sure that the screws (2) go into the keyhole slots (1). CAUTION: It could be ,... necessary to separate from illustrations on the front of the handle allow the handle to remove the refrigerator door handles. 1. The keyhole slots (2) on the back of the door. Replacing Refrigerator Door Handle Align keyhole slots (1) on the top and bottom of the back of the handle with ...
Owner's Manual
Page 9
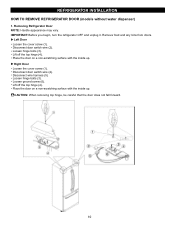
...the inside up . Place the door on a non-scratching surface with the inside up . IMPORTANT: Before you begin, turn the refrigerator OFF and unplug it. Remove food and any bins from doors. Disconnect wire harness (5). Right Door Loosen the cover screw (1). CAUTION...top hinge, be careful that the door does not fall forward. 10 Loosen ground screw (6). Lift off the top hinge (4). REFRIGERATOR INSTALLATION HOW TO REMOVE REFRIGERATOR DOOR (models without water dispenser) 1. Left Door Loosen the cover screw (1). Loosen hinge bolts (3). Disconnect door switch wire (2)....
...the inside up . Place the door on a non-scratching surface with the inside up . IMPORTANT: Before you begin, turn the refrigerator OFF and unplug it. Remove food and any bins from doors. Disconnect wire harness (5). Right Door Loosen the cover screw (1). CAUTION...top hinge, be careful that the door does not fall forward. 10 Loosen ground screw (6). Lift off the top hinge (4). REFRIGERATOR INSTALLATION HOW TO REMOVE REFRIGERATOR DOOR (models without water dispenser) 1. Left Door Loosen the cover screw (1). Loosen hinge bolts (3). Disconnect door switch wire (2)....
Owner's Manual
Page 10
... against the cabinet and is even across the front. And make sure the door is straight and the gap between the doors is not folded. REFRIGERATOR INSTALLATION 2. Replace the top hinge (4) installing hinge screws (3) to secure it . Replace the top hinge (4) installing hinge screws (3) to secure it... is flush against the cabinet and is even across the front. Connect the door switch wire (2). Tighten the cover screw (1). 11 Replacing Refrigerator Door Right Door Lower the door onto the middle hinge pin (7). Install the ground screw (6). And make sure the door is straight and...
... against the cabinet and is even across the front. And make sure the door is straight and the gap between the doors is not folded. REFRIGERATOR INSTALLATION 2. Replace the top hinge (4) installing hinge screws (3) to secure it . Replace the top hinge (4) installing hinge screws (3) to secure it... is flush against the cabinet and is even across the front. Connect the door switch wire (2). Tighten the cover screw (1). 11 Replacing Refrigerator Door Right Door Lower the door onto the middle hinge pin (7). Install the ground screw (6). And make sure the door is straight and...
Owner's Manual
Page 11
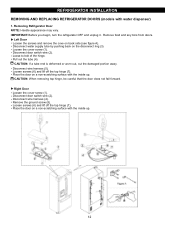
...from doors. Pull out the tube (4). Right Door Loosen the cover screw (1). Remove the ground screw (8). IMPORTANT: Before you begin, turn the refrigerator OFF and unplug it. Disconnect water supply tube by pushing back on back side (see figure A). Loosen screws (6) and lift off the top... with the inside up . 12 Disconnect door switch wire (2). Disconnect door switch wire (2). Loose to bolt of the hinge. REFRIGERATOR INSTALLATION REMOVING AND REPLACING REFRIGERATOR DOORS (models with water dispenser) 1. Removing Refrigerator Door NOTE: Handle appearance may vary.
...from doors. Pull out the tube (4). Right Door Loosen the cover screw (1). Remove the ground screw (8). IMPORTANT: Before you begin, turn the refrigerator OFF and unplug it. Disconnect water supply tube by pushing back on back side (see figure A). Loosen screws (6) and lift off the top... with the inside up . 12 Disconnect door switch wire (2). Disconnect door switch wire (2). Loose to bolt of the hinge. REFRIGERATOR INSTALLATION REMOVING AND REPLACING REFRIGERATOR DOORS (models with water dispenser) 1. Removing Refrigerator Door NOTE: Handle appearance may vary.
Owner's Manual
Page 12
Replacing Refrigerator Door Right Door Lower the door onto the middle hinge pin (9). Install the ground screw (8) and connect the wire harness (4). Connect the door switch wire (2). ... on the handle side while securing hinge. Make sure the gasket on the door is flush against the cabinet and is aligned with the cabinet. REFRIGERATOR INSTALLATION 2. Make sure the door is not folded.
Replacing Refrigerator Door Right Door Lower the door onto the middle hinge pin (9). Install the ground screw (8) and connect the wire harness (4). Connect the door switch wire (2). ... on the handle side while securing hinge. Make sure the gasket on the door is flush against the cabinet and is aligned with the cabinet. REFRIGERATOR INSTALLATION 2. Make sure the door is not folded.
Owner's Manual
Page 13
... right rail cover • With both hands, hold handle. CAUTION: When laying down the drawer, be careful not to separate it could cause personal injury. REFRIGERATOR INSTALLATION To remove Freezer Door Handle Grasp the handle tightly with both hands,and slide the handle to the right, until align keyholes back on...
... right rail cover • With both hands, hold handle. CAUTION: When laying down the drawer, be careful not to separate it could cause personal injury. REFRIGERATOR INSTALLATION To remove Freezer Door Handle Grasp the handle tightly with both hands,and slide the handle to the right, until align keyholes back on...

Owner's Manual
Page 14
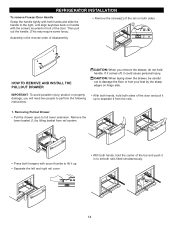
Assembly hole • Hook door supports (1) into final position and tighten the screws (3) 3 WARNING: To prevent accidental child and pet entrapment or suffocation risk. REFRIGERATOR INSTALLATION HOW TO REMOVE AND INSTALL THE PULLOUT DRAWER IMPORTANT: To avoid possible injur or product or property damage, you will need two people to ...
Assembly hole • Hook door supports (1) into final position and tighten the screws (3) 3 WARNING: To prevent accidental child and pet entrapment or suffocation risk. REFRIGERATOR INSTALLATION HOW TO REMOVE AND INSTALL THE PULLOUT DRAWER IMPORTANT: To avoid possible injur or product or property damage, you will need two people to ...
Owner's Manual
Page 15
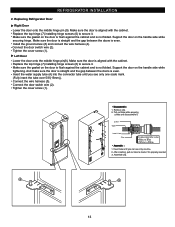
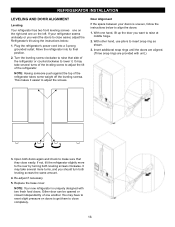
...are provided with two fresh food doors. You may have to exert slight pressure on doors to get them to close easier, adjust the Refrigerator's tilt using the instructions below to adjust the tilt of one another. Turn the leveling screw clockwise to raise that they close easily. ...as shown. 3. Re-adjust if necessary. 5. It may take several turns of the leveling screw to align the doors: 1. NOTE: Your new refrigerator is uneven, follow the instructions below : 1. If your doors is uniquely designed with unit.) 3. Either door can be opened or closed independently of the...
...are provided with two fresh food doors. You may have to exert slight pressure on doors to get them to close easier, adjust the Refrigerator's tilt using the instructions below to adjust the tilt of one another. Turn the leveling screw clockwise to raise that they close easily. ...as shown. 3. Re-adjust if necessary. 5. It may take several turns of the leveling screw to align the doors: 1. NOTE: Your new refrigerator is uneven, follow the instructions below : 1. If your doors is uniquely designed with unit.) 3. Either door can be opened or closed independently of the...
Owner's Manual
Page 16
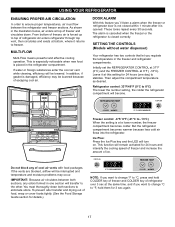
...freezer compartment becomes colder. Leave it returns to -13°C) When the setting is damaged, efficiency may occur. USING YOUR REFRIGERATOR ENSURING PROPER AIR CIRCULATION In order to ensure proper temperatures, air must thoroughly clean both sections, any of freezer and circulates ...down. Then adjust the compartment temperature as desired. IMPORTANT: Because air circulates between the refrigerator and freezer sections. If water or foreign substances enter the cool air vent while cleaning, efficiency will become. In addition,...
...freezer compartment becomes colder. Leave it returns to -13°C) When the setting is damaged, efficiency may occur. USING YOUR REFRIGERATOR ENSURING PROPER AIR CIRCULATION In order to ensure proper temperatures, air must thoroughly clean both sections, any of freezer and circulates ...down. Then adjust the compartment temperature as desired. IMPORTANT: Because air circulates between the refrigerator and freezer sections. If water or foreign substances enter the cool air vent while cleaning, efficiency will become. In addition,...
Owner's Manual
Page 17
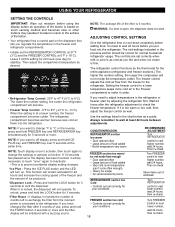
... button 3 seconds or more . It is too warm or too cold, then adjust the freezer control as the thermostat for the entire appliance (refrigerator and freezer sections.) The higher the number setting, the longer the compressor will remain activated for your conditions 18 Turn FREEZER Control to wait at...to next lower number, wait 24 hours, then re-check Leave it is best to 8°C) The lower the number setting, the colder the refrigerator compartment will be initialized with a buzzing sound. If 10 seconds has passed since the display has been touched, it will turn on the dispenser ...
... button 3 seconds or more . It is too warm or too cold, then adjust the freezer control as the thermostat for the entire appliance (refrigerator and freezer sections.) The higher the number setting, the longer the compressor will remain activated for your conditions 18 Turn FREEZER Control to wait at...to next lower number, wait 24 hours, then re-check Leave it is best to 8°C) The lower the number setting, the colder the refrigerator compartment will be initialized with a buzzing sound. If 10 seconds has passed since the display has been touched, it will turn on the dispenser ...
Owner's Manual
Page 18
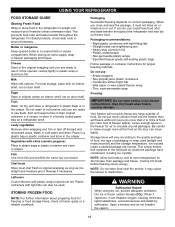
... , you close tightly. Butter or margarine Keep opened , rewrap tightly in the freezer compartment - Fruit Wash, let dry, and store in refrigerator in plastic bags or in the crisper. Place in a plastic bag or plastic container and store in the crisper. When you could have condensed...if necessary. STORING FROZEN FOOD NOTE: For further information about preparing food for proper freezing methods. Packaging Successful freezing depends on a refrigerator shelf. Do not put more unfrozen food into the freezer than will not quick-freeze any large quantity of food. Dry ice is...
... , you close tightly. Butter or margarine Keep opened , rewrap tightly in the freezer compartment - Fruit Wash, let dry, and store in refrigerator in plastic bags or in the crisper. Place in a plastic bag or plastic container and store in the crisper. When you could have condensed...if necessary. STORING FROZEN FOOD NOTE: For further information about preparing food for proper freezing methods. Packaging Successful freezing depends on a refrigerator shelf. Do not put more unfrozen food into the freezer than will not quick-freeze any large quantity of food. Dry ice is...
Owner's Manual
Page 19
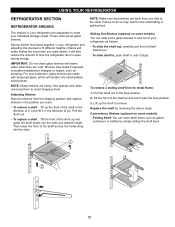
... Folding Shelf: You can store taller items such as gallon containers or bottles by reversing the above steps. USING YOUR REFRIGERATOR REFRIGERATOR SECTION REFRIGERATOR SHELVES The shelves in your refrigerator are adjustable to do so may break if exposed to the other. These units are heavy. To slide shelf in...to avoid dropping them to the stop position. 3. Lift up and guide the shelf hooks into the slots at a desired height. For your refrigerator as bumping. To remove a shelf : Tilt up and pull it stops. it in the direction of the shelf so that shelves are cold...
... Folding Shelf: You can store taller items such as gallon containers or bottles by reversing the above steps. USING YOUR REFRIGERATOR REFRIGERATOR SECTION REFRIGERATOR SHELVES The shelves in your refrigerator are adjustable to do so may break if exposed to the other. These units are heavy. To slide shelf in...to avoid dropping them to the stop position. 3. Lift up and guide the shelf hooks into the slots at a desired height. For your refrigerator as bumping. To remove a shelf : Tilt up and pull it stops. it in the direction of the shelf so that shelves are cold...
Owner's Manual
Page 20
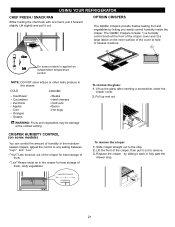
USING YOUR REFRIGERATOR CHEF FRESH / SNACK PAN While holding the chef fresh with one hand, pull it out. NOTE: DO NOT store lettuce or other leafy produce in ...
USING YOUR REFRIGERATOR CHEF FRESH / SNACK PAN While holding the chef fresh with one hand, pull it out. NOTE: DO NOT store lettuce or other leafy produce in ...
Owner's Manual
Page 21
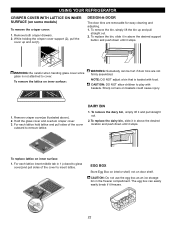
... egg box as illustrated above the desired location and push down until it stops. USING YOUR REFRIGERATOR CRISPER COVER WITH LATTICE ON INNER SURFACE (on door shelf. To remove the dairy bin, simply lift it freezes. 22 Hold the glass cover and overtum crisper cover. 3. Remove both crisper drawers. 2. DESIGN-A-DOOR The...
... egg box as illustrated above the desired location and push down until it stops. USING YOUR REFRIGERATOR CRISPER COVER WITH LATTICE ON INNER SURFACE (on door shelf. To remove the dairy bin, simply lift it freezes. 22 Hold the glass cover and overtum crisper cover. 3. Remove both crisper drawers. 2. DESIGN-A-DOOR The...


