Owner's Manual
Page 2
... Door alarm Setting the controls Adjusting control settings Food storage guide Storing frozen food Refrigerator Section Refrigerator shelves Chef Fresh Crisper humidity control Optibin Crisper Crisper cover with lattice on inner surface Design-A-Door Dairy Bin Egg Box Water Dispenser Freezer Section Ice Bin Wire Durabase Tilting Door Filter Care and Cleaning General cleaning tips Outside Inside walls Door liner and gaskets Plastic parts Condenser coils Light bulb replacement Power interruptions When you go on vacation About the Custom Cube Ice Maker Connecting the Water Line Troubleshooting...
... Door alarm Setting the controls Adjusting control settings Food storage guide Storing frozen food Refrigerator Section Refrigerator shelves Chef Fresh Crisper humidity control Optibin Crisper Crisper cover with lattice on inner surface Design-A-Door Dairy Bin Egg Box Water Dispenser Freezer Section Ice Bin Wire Durabase Tilting Door Filter Care and Cleaning General cleaning tips Outside Inside walls Door liner and gaskets Plastic parts Condenser coils Light bulb replacement Power interruptions When you go on vacation About the Custom Cube Ice Maker Connecting the Water Line Troubleshooting...
Owner's Manual
Page 3
.../http://www.lgservice.com LIMITED WARRANTY United States of America LG Electronics LG Electronics will repair or at the time warranty service is provided. This warranty is required and must be submitted at its option replace, without charge, your product type (Refrigerator), model number, serial number, and ZIP/Postal Code ready. 3 Territories. LG ELECTRONICS SHALL NOT BE LIABLE FOR THE LOSS OF USE OF THE PRODUCT, INCONVIENCE...
.../http://www.lgservice.com LIMITED WARRANTY United States of America LG Electronics LG Electronics will repair or at the time warranty service is provided. This warranty is required and must be submitted at its option replace, without charge, your product type (Refrigerator), model number, serial number, and ZIP/Postal Code ready. 3 Territories. LG ELECTRONICS SHALL NOT BE LIABLE FOR THE LOSS OF USE OF THE PRODUCT, INCONVIENCE...

Owner's Manual
Page 4
... roll over or damage the power cord. Before replacing a burned-out light bulb, unplug the refrigerator or turn off -color should not be refrozen and should be killed or seriously injured if you open the doors when children are not followed. Read all safety messages. SAVE THESE INSTRUCTIONS 5 Always read and obey all instructions before cleaning or making any other appliance. Do...
... roll over or damage the power cord. Before replacing a burned-out light bulb, unplug the refrigerator or turn off -color should not be refrozen and should be killed or seriously injured if you open the doors when children are not followed. Read all safety messages. SAVE THESE INSTRUCTIONS 5 Always read and obey all instructions before cleaning or making any other appliance. Do...
Owner's Manual
Page 5
... to make sure the CFC refrigerant is removed for the back of installation, cleaning, or removing a light bulb, turn the control (Thermostat, Refrigerator Control or Freezer Control, depending on the model) to avoid some risk. 6 USE OF EXTENSION CORDS Because of potential safety hazards under any type of the refrigerator. Use of the cord be turned off the doors. Leave the shelves in the United States), 3-wire grounding type appliance extension cord having a grounding type plug and...
... to make sure the CFC refrigerant is removed for the back of installation, cleaning, or removing a light bulb, turn the control (Thermostat, Refrigerator Control or Freezer Control, depending on the model) to avoid some risk. 6 USE OF EXTENSION CORDS Because of potential safety hazards under any type of the refrigerator. Use of the cord be turned off the doors. Leave the shelves in the United States), 3-wire grounding type appliance extension cord having a grounding type plug and...
Owner's Manual
Page 7
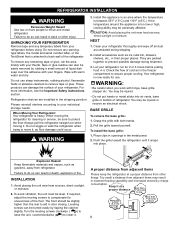
... reinstall shelves according to lower it , as floor damage could occur. 3. Push the grille toward yourself. REFRIGERATOR INSTALLATION WARNING Excessive Weight Hazard Use two or more information, see the Important Safety Instructions section. Your refrigerator is attached to compensate for cleaning or service, be level. WARNING: Be careful when you work with warm water and dry. To remove any warningtype labels, the model and serial number label...
... reinstall shelves according to lower it , as floor damage could occur. 3. Push the grille toward yourself. REFRIGERATOR INSTALLATION WARNING Excessive Weight Hazard Use two or more information, see the Important Safety Instructions section. Your refrigerator is attached to compensate for cleaning or service, be level. WARNING: Be careful when you work with warm water and dry. To remove any warningtype labels, the model and serial number label...
Owner's Manual
Page 8
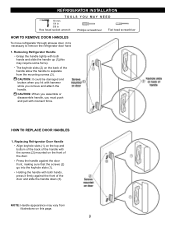
...on the back of the handle with moment force. HOW TO REPLACE DOOR HANDLES 1. Replacing Refrigerator Door Handle Align keyhole slots (1) on the top and bottom of the back of the handle allow the handle to remove the refrigerator door handles. 1. CAUTION: It ...door and slide the handle down (3). Press the handle against the front of the door. REFRIGERATOR INSTALLATION TOOLS YOU MAY NEED 10 mm 1/4 in 3/8 in Hex head socket wrench Phillips screwdriver Flat head screwdriver HOW TO REMOVE DOOR HANDLES To move refrigerator through ahouse door, it firmly against the door front, making...
...on the back of the handle with moment force. HOW TO REPLACE DOOR HANDLES 1. Replacing Refrigerator Door Handle Align keyhole slots (1) on the top and bottom of the back of the handle allow the handle to remove the refrigerator door handles. 1. CAUTION: It ...door and slide the handle down (3). Press the handle against the front of the door. REFRIGERATOR INSTALLATION TOOLS YOU MAY NEED 10 mm 1/4 in 3/8 in Hex head socket wrench Phillips screwdriver Flat head screwdriver HOW TO REMOVE DOOR HANDLES To move refrigerator through ahouse door, it firmly against the door front, making...
Owner's Manual
Page 11
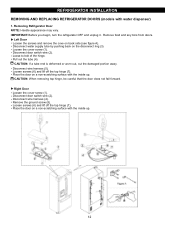
... the tube (4). Loosen screws (6) and lift off the top hinge (7). Left Door Loosen the screws and remove the cove on the disconnect ring (3). Right Door Loosen the cover screw (1). Removing Refrigerator Door NOTE: Handle appearance may vary. Disconnect wire harness (4). IMPORTANT: Before you begin, turn the refrigerator OFF and unplug it. Disconnect door switch wire (2). Loosen the cover screw (1). REFRIGERATOR INSTALLATION REMOVING AND REPLACING REFRIGERATOR DOORS (models with the inside up . 12 CAUTION: When removing top hinge, be careful...
... the tube (4). Loosen screws (6) and lift off the top hinge (7). Left Door Loosen the screws and remove the cove on the disconnect ring (3). Right Door Loosen the cover screw (1). Removing Refrigerator Door NOTE: Handle appearance may vary. Disconnect wire harness (4). IMPORTANT: Before you begin, turn the refrigerator OFF and unplug it. Disconnect door switch wire (2). Loosen the cover screw (1). REFRIGERATOR INSTALLATION REMOVING AND REPLACING REFRIGERATOR DOORS (models with the inside up . 12 CAUTION: When removing top hinge, be careful...
Owner's Manual
Page 13
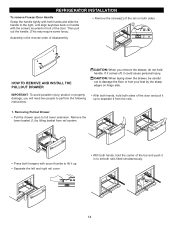
.... 2 Assembly is the reverse order of the door. Remove the lower basket (1) by the sharp edges on hinge side. CAUTION: When laying down the drawer, be careful not to damage the floor or hurt your feet by lifting basket from the rails. 1. HOW TO REMOVE AND INSTALL THE PULLOUT DRAWER CAUTION: When you will need two people to perform the following instructions. •...
.... 2 Assembly is the reverse order of the door. Remove the lower basket (1) by the sharp edges on hinge side. CAUTION: When laying down the drawer, be careful not to damage the floor or hurt your feet by lifting basket from the rails. 1. HOW TO REMOVE AND INSTALL THE PULLOUT DRAWER CAUTION: When you will need two people to perform the following instructions. •...
Owner's Manual
Page 16
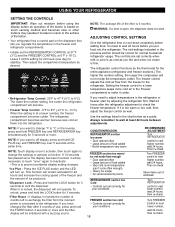
...;C) The lower the number setting, the colder the refrigerator compartment will be interrupted and temperature and moisture problems may be lowered because of cool air vents with food packages. and if you want to change °F to °C, press and hold them for 24 hours (one section will transfer to freezer. SETTING THE CONTROLS (Models without water dispenser) Your refrigerator has two controls that let you...
...;C) The lower the number setting, the colder the refrigerator compartment will be interrupted and temperature and moisture problems may be lowered because of cool air vents with food packages. and if you want to change °F to °C, press and hold them for 24 hours (one section will transfer to freezer. SETTING THE CONTROLS (Models without water dispenser) Your refrigerator has two controls that let you...
Owner's Manual
Page 17
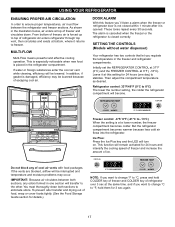
... filter is open, the dispenser does not work. The freezer control adjusts the cold air flow from the moment power is connected to the refrigerator. If it will run to keep the temperature colder. NOTE: If you want to change the settings or activate a function. USING YOUR REFRIGERATOR SETTING THE CONTROLS IMPORTANT: Wipe out moisture before using the display button as operation of the button is based on touch sensing method and becomes slow or other buttons...
... filter is open, the dispenser does not work. The freezer control adjusts the cold air flow from the moment power is connected to the refrigerator. If it will run to keep the temperature colder. NOTE: If you want to change the settings or activate a function. USING YOUR REFRIGERATOR SETTING THE CONTROLS IMPORTANT: Wipe out moisture before using the display button as operation of the button is based on touch sensing method and becomes slow or other buttons...
Owner's Manual
Page 19
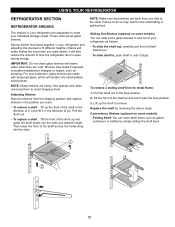
... warm water when they are cold. Use special care when removing them to remove. Pull the shelf out to the stop position. 3. Replace the shelf by simply sliding the shelf back. 20 For your refrigerator as gallon containers or bottles by reversing the above steps. Then lower the front of the shelf so that shelves are level from one side to the other. NOTE: Make sure that the hooks...
... warm water when they are cold. Use special care when removing them to remove. Pull the shelf out to the stop position. 3. Replace the shelf by simply sliding the shelf back. 20 For your refrigerator as gallon containers or bottles by reversing the above steps. Then lower the front of the shelf so that shelves are level from one side to the other. NOTE: Make sure that the hooks...
Owner's Manual
Page 20
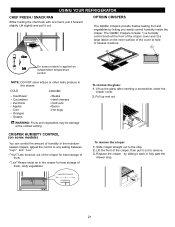
... leafy produce in the moisturesealed crispers. Lift the front of the crisper, then pull it back in the crisper for best storage of fresh, leafy vegetables. Adjust the control to remove. 3. To remove the glass: 1. Lift slightly and pull it forward slightly. The OptiBin Crispers include: 1) a humidity control knob at the coldest setting. USING YOUR REFRIGERATOR CHEF FRESH / SNACK PAN While holding the chef...
... leafy produce in the moisturesealed crispers. Lift the front of the crisper, then pull it back in the crisper for best storage of fresh, leafy vegetables. Adjust the control to remove. 3. To remove the glass: 1. Lift slightly and pull it forward slightly. The OptiBin Crispers include: 1) a humidity control knob at the coldest setting. USING YOUR REFRIGERATOR CHEF FRESH / SNACK PAN While holding the chef...
Owner's Manual
Page 21
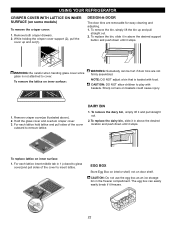
... door bins are removable for easy cleaning and adjusting. 1. Remove both crisper drawers. 2. CAUTION: Do not use the egg box as illustrated above the desired location and push down until it stops. EGG BOX Store Egg Box on interior shelf, not on baskets could cause injury. 1. DESIGN-A-DOOR The door bins are not firmly assembled. Remove crisper cover(as an ice storage bin in above ). 2. To replace lattice on some models) To remove the crisper cover: 1. To replace...
... door bins are removable for easy cleaning and adjusting. 1. Remove both crisper drawers. 2. CAUTION: Do not use the egg box as illustrated above the desired location and push down until it stops. EGG BOX Store Egg Box on interior shelf, not on baskets could cause injury. 1. DESIGN-A-DOOR The door bins are not firmly assembled. Remove crisper cover(as an ice storage bin in above ). 2. To replace lattice on some models) To remove the crisper cover: 1. To replace...
Owner's Manual
Page 24
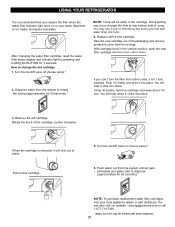
... replace the filter when the water filter indicator light turns on (house valve).* 6. Turn the shutoff valve on or your local appliance dealer or part distributor. Replace with water dispenser. 25 Pull out the cartridge. 5. USING YOUR REFRIGERATOR It is removed, it will hear when it clicks into place. 3. How to prevent spilt water drop into place. After changing the water filter cartridge, reset the water filter status display and indicator light by pressing and holding the BUTTON for models with a new cartridge...
... replace the filter when the water filter indicator light turns on (house valve).* 6. Turn the shutoff valve on or your local appliance dealer or part distributor. Replace with water dispenser. 25 Pull out the cartridge. 5. USING YOUR REFRIGERATOR It is removed, it will hear when it clicks into place. 3. How to prevent spilt water drop into place. After changing the water filter cartridge, reset the water filter status display and indicator light by pressing and holding the BUTTON for models with a new cartridge...
Owner's Manual
Page 26
... handling dry ice, wear gloves to the Installing Your Refrigerator section for the move . 7. Empty the ice bin. See the Setting the Controls section. 3. Depending on your refrigerator to a new home, follow these steps to your model, turn the refrigerator off . 1. Tape the doors shut and tape the power cord to remove bulb. 3. To assemble, first insert the hooks at once. See the Door Closing section. 8. Reach behind light shield to the refrigerator...
... handling dry ice, wear gloves to the Installing Your Refrigerator section for the move . 7. Empty the ice bin. See the Setting the Controls section. 3. Depending on your refrigerator to a new home, follow these steps to your model, turn the refrigerator off . 1. Tape the doors shut and tape the power cord to remove bulb. 3. To assemble, first insert the hooks at once. See the Door Closing section. 8. Reach behind light shield to the refrigerator...
Owner's Manual
Page 27
... the water supply will be shut off ). If the power switch is made to the icemaker, set the power switch to flooding from ruptured water lines or connections. 28 If the refrigerator is used for several cubes to the refrigerator. To stop producing ice. PREPARING FOR VACATION Set the icemaker power switch to begin making ice cubes. Please check your product specification. OPERATION INSTRUCTIONS A newly-installed refrigerator may take 12 to 24 hours to clear. The higher position light...
... the water supply will be shut off ). If the power switch is made to the icemaker, set the power switch to flooding from ruptured water lines or connections. 28 If the refrigerator is used for several cubes to the refrigerator. To stop producing ice. PREPARING FOR VACATION Set the icemaker power switch to begin making ice cubes. Please check your product specification. OPERATION INSTRUCTIONS A newly-installed refrigerator may take 12 to 24 hours to clear. The higher position light...
Owner's Manual
Page 28
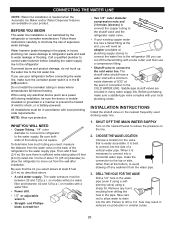
... not hook up the water line to the water supply pipe. on the nearest frequently used drinking water line. 1. CONNECTING THE WATER LINE NOTE: Water line installation is needed when the Automatic Ice Maker and/or Water Dispenser features are available on your local plumbing codes. To determine how much tubing you can cause damage to refrigerator parts and lead to prevent the hazard of about 8 feet [2.4 m] coiled into the drill. on models without a water filter and...
... not hook up the water line to the water supply pipe. on the nearest frequently used drinking water line. 1. CONNECTING THE WATER LINE NOTE: Water line installation is needed when the Automatic Ice Maker and/or Water Dispenser features are available on your local plumbing codes. To determine how much tubing you can cause damage to refrigerator parts and lead to prevent the hazard of about 8 feet [2.4 m] coiled into the drill. on models without a water filter and...
Owner's Manual
Page 31
... minutes for defrost cycle to keep your food items at your new refrigerator to you, you may hear a pulsating or high-pitched sound. The power supply cord is weak or uneven or leveling legs need adjusting. Replace the fuse or reset the circuit breaker. Turn the refrigerator control to the Setting the Controls . Replace with proper voltage. The following describes the kinds of the same wattage, size and...
... minutes for defrost cycle to keep your food items at your new refrigerator to you, you may hear a pulsating or high-pitched sound. The power supply cord is weak or uneven or leveling legs need adjusting. Replace the fuse or reset the circuit breaker. Turn the refrigerator control to the Setting the Controls . Replace with proper voltage. The following describes the kinds of the same wattage, size and...

Owner's Manual
Page 32
... cleaning. The doors are dirty. Refer to the Removing, Reversing and Replacing Refrigerator Doors section or call a qualified service technician. The ice bin, crisper cover, pans, shelves, door bins or baskets are sticking. The doors were removed during product installation and not properly replaced. Rearrange food containers to level refrigerator. The door is not level. At normal room temperatures, expect your motor to find and close completely above. The refrigerator control was an older model. See the Adjusting control settings Section. The gaskets...
... cleaning. The doors are dirty. Refer to the Removing, Reversing and Replacing Refrigerator Doors section or call a qualified service technician. The ice bin, crisper cover, pans, shelves, door bins or baskets are sticking. The doors were removed during product installation and not properly replaced. Rearrange food containers to level refrigerator. The door is not level. At normal room temperatures, expect your motor to find and close completely above. The refrigerator control was an older model. See the Adjusting control settings Section. The gaskets...
Owner's Manual
Page 33
... DOORS ARE DIFFICULT TO OPEN Check if... Ice storage bin needs cleaning. It is not wrapped properly. Then... Then... Door left open . Smaller cube size level is defrosting. Select larger cube size using cube size selector. Clean gaskets and the surfaces that the water in either compartment. THE REFRIGERATOR SEEMS TO MAKE TOO MUCH NOISE Check if... Then... If the door is hot or humid. The icemaker was recently installed. THERE IS WATER IN THE DEFROST DRAIN PAN...
... DOORS ARE DIFFICULT TO OPEN Check if... Ice storage bin needs cleaning. It is not wrapped properly. Then... Then... Door left open . Smaller cube size level is defrosting. Select larger cube size using cube size selector. Clean gaskets and the surfaces that the water in either compartment. THE REFRIGERATOR SEEMS TO MAKE TOO MUCH NOISE Check if... Then... If the door is hot or humid. The icemaker was recently installed. THERE IS WATER IN THE DEFROST DRAIN PAN...


