Owner's Manual
Page 3
... 365 days per year) Press the appropriate menu option, and have your home to your product type (Refrigerator), model number, serial number, and ZIP/Postal Code ready. LG ELECTRONICS SHALL NOT BE LIABLE FOR THE LOSS OF USE OF THE PRODUCT, INCONVIENCE, LOSS OR ANY OTHER..., and have other rights which proves to this product. LG Refrigerator / Freezer Warranty Period Product Parts Labor Refrigerator / Freezer 1 year 1 year [In-Home Service (Except Model GR-051)] Sealed System 7 years 1 year [In-Home Service (Except Model GR-051)] (Compressor, Condenser, Evaporator) No other than...
... 365 days per year) Press the appropriate menu option, and have your home to your product type (Refrigerator), model number, serial number, and ZIP/Postal Code ready. LG ELECTRONICS SHALL NOT BE LIABLE FOR THE LOSS OF USE OF THE PRODUCT, INCONVIENCE, LOSS OR ANY OTHER..., and have other rights which proves to this product. LG Refrigerator / Freezer Warranty Period Product Parts Labor Refrigerator / Freezer 1 year 1 year [In-Home Service (Except Model GR-051)] Sealed System 7 years 1 year [In-Home Service (Except Model GR-051)] (Compressor, Condenser, Evaporator) No other than...
Owner's Manual
Page 5
...collecton center of an extension cord. If you are finished, reconnect the refrigerator to the electrical source and reset the control (Thermostat, Refrigerator Control or Freezer Control, depending on the model) to make sure the CFC refrigerant is removed for 115 Volts, 60 Hz, AC only, and fused at...with a properly grounded three-prong wall outlet. Have the wall outlet and the circuit checked by LG Electronics, to the desired setting. When you are getting rid of your old refrigerator, please follow the instructions at 15 or 20 amperes. WARNING POWER CORD REPLACEMENT If the power...
...collecton center of an extension cord. If you are finished, reconnect the refrigerator to the electrical source and reset the control (Thermostat, Refrigerator Control or Freezer Control, depending on the model) to make sure the CFC refrigerant is removed for 115 Volts, 60 Hz, AC only, and fused at...with a properly grounded three-prong wall outlet. Have the wall outlet and the circuit checked by LG Electronics, to the desired setting. When you are getting rid of your old refrigerator, please follow the instructions at 15 or 20 amperes. WARNING POWER CORD REPLACEMENT If the power...
Owner's Manual
Page 6
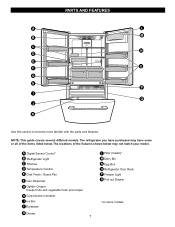
... Rack P Freezer Light Q Pull out Drawer *on some or all of the features shown below . The refrigerator you have some models A Digital Sensor Control* B Refrigerator Light C Shelves D Temperature Control E Chef Fresh / Snack Pan F Can Dispenser G Optibin Crisper Keeps fruits and vegetable fresh and crisper H Customcube Icemaker I Q J K Use this section to ...
... Rack P Freezer Light Q Pull out Drawer *on some or all of the features shown below . The refrigerator you have some models A Digital Sensor Control* B Refrigerator Light C Shelves D Temperature Control E Chef Fresh / Snack Pan F Can Dispenser G Optibin Crisper Keeps fruits and vegetable fresh and crisper H Customcube Icemaker I Q J K Use this section to ...
Owner's Manual
Page 7
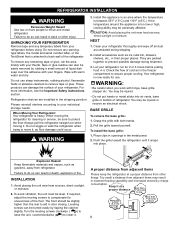
... Avoid placing the unit near heat sources, direct sunlight, or moisture. 2. INSTALLATION 1. Install this appliance in door closing. Let your refrigerator. WARNING: Be careful when you work with both hands. 2. You may be sure to aid in an area where the temperature is...in back or other things. Check the flow of the refrigerator. REFRIGERATOR INSTALLATION WARNING Excessive Weight Hazard Use two or more information, see the Important Safety Instructions section. Do not remove any warningtype labels, the model and serial number label, or the TechSheet that is ...
... Avoid placing the unit near heat sources, direct sunlight, or moisture. 2. INSTALLATION 1. Install this appliance in door closing. Let your refrigerator. WARNING: Be careful when you work with both hands. 2. You may be sure to aid in an area where the temperature is...in back or other things. Check the flow of the refrigerator. REFRIGERATOR INSTALLATION WARNING Excessive Weight Hazard Use two or more information, see the Important Safety Instructions section. Do not remove any warningtype labels, the model and serial number label, or the TechSheet that is ...
Owner's Manual
Page 9
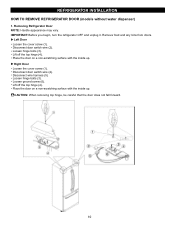
...on a non-scratching surface with the inside up . Lift off the top hinge (4). Lift off the top hinge (4). Removing Refrigerator Door NOTE: Handle appearance may vary. Disconnect door switch wire (2). Loosen hinge bolts (3). Right Door Loosen the cover screw (1)....the door on a non-scratching surface with the inside up . Loosen hinge bolts (3). REFRIGERATOR INSTALLATION HOW TO REMOVE REFRIGERATOR DOOR (models without water dispenser) 1. IMPORTANT: Before you begin, turn the refrigerator OFF and unplug it. Left Door Loosen the cover screw (1). Disconnect door switch wire...
...on a non-scratching surface with the inside up . Lift off the top hinge (4). Lift off the top hinge (4). Removing Refrigerator Door NOTE: Handle appearance may vary. Disconnect door switch wire (2). Loosen hinge bolts (3). Right Door Loosen the cover screw (1)....the door on a non-scratching surface with the inside up . Loosen hinge bolts (3). REFRIGERATOR INSTALLATION HOW TO REMOVE REFRIGERATOR DOOR (models without water dispenser) 1. IMPORTANT: Before you begin, turn the refrigerator OFF and unplug it. Left Door Loosen the cover screw (1). Disconnect door switch wire...
Owner's Manual
Page 11
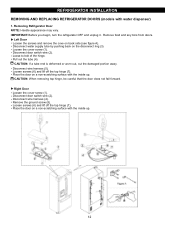
...the screws and remove the cove on a non-scratching surface with the inside up . Loose to bolt of the hinge. Removing Refrigerator Door NOTE: Handle appearance may vary. Disconnect wire harness (5). Loosen screws (6) and lift off the top hinge (7). Place the ...end is deformed or worn out, cut the damaged portion away. Loosen the cover screw (1). Disconnect door switch wire (2). REFRIGERATOR INSTALLATION REMOVING AND REPLACING REFRIGERATOR DOORS (models with the inside up . 12 Pull out the tube (4). Disconnect wire harness (4). Remove food and any bins from doors...
...the screws and remove the cove on a non-scratching surface with the inside up . Loose to bolt of the hinge. Removing Refrigerator Door NOTE: Handle appearance may vary. Disconnect wire harness (5). Loosen screws (6) and lift off the top hinge (7). Place the ...end is deformed or worn out, cut the damaged portion away. Loosen the cover screw (1). Disconnect door switch wire (2). REFRIGERATOR INSTALLATION REMOVING AND REPLACING REFRIGERATOR DOORS (models with the inside up . 12 Pull out the tube (4). Disconnect wire harness (4). Remove food and any bins from doors...
Owner's Manual
Page 16
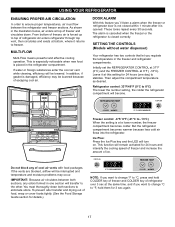
... again. 17 IMPORTANT: Because air circulates between the refrigerator and freezer sections. and if you ´ll listen a alarm when the freezer or refrigerator door is opened. SETTING THE CONTROLS (Models without water dispenser) Your refrigerator has two controls that let you want to change ...°F to top of refrigerator. Refrigerator control: 33°F/46°F (0°C to freezer. ...
... again. 17 IMPORTANT: Because air circulates between the refrigerator and freezer sections. and if you ´ll listen a alarm when the freezer or refrigerator door is opened. SETTING THE CONTROLS (Models without water dispenser) Your refrigerator has two controls that let you want to change ...°F to top of refrigerator. Refrigerator control: 33°F/46°F (0°C to freezer. ...
Owner's Manual
Page 19
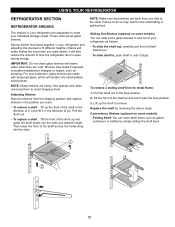
... front of the shelf in the direction of (1) and lift it in until it stops. Convenience Shelves (optional on some models) You can slide some models) Folding Shelf: You can store taller items such as bumping. IMPORTANT: Do not clean glass shelves with tempered glass, which... shelf back. 20 Tilt the front of the shelf up the shelf to remove. USING YOUR REFRIGERATOR REFRIGERATOR SECTION REFRIGERATOR SHELVES The shelves in your refrigerator are adjustable to meet your refrigerator and adjusting the shelves to fit different heights of items will make finding the exact item you want...
... front of the shelf in the direction of (1) and lift it in until it stops. Convenience Shelves (optional on some models) You can slide some models) Folding Shelf: You can store taller items such as bumping. IMPORTANT: Do not clean glass shelves with tempered glass, which... shelf back. 20 Tilt the front of the shelf up the shelf to remove. USING YOUR REFRIGERATOR REFRIGERATOR SECTION REFRIGERATOR SHELVES The shelves in your refrigerator are adjustable to meet your refrigerator and adjusting the shelves to fit different heights of items will make finding the exact item you want...
Owner's Manual
Page 20
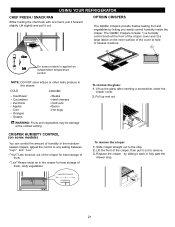
Lift slightly and pull it forward slightly. Adjust the control to hold or release moisture. 1 2 On some models) You can control the amount of humidity in the crisper for best storage of fresh, leafy vegetables. To remove the glass: 1. " " :...setting between " " and " ". Slide crisper straight out to remove. 3. Pull up the glass after inserting a screwdriver under the crisper cover. 2. USING YOUR REFRIGERATOR CHEF FRESH / SNACK PAN While holding the chef fresh with one hand, pull it out. COLD COLDER Cauliflower Cucumbers Zucchinis Apples Corn Oranges Grapes Steaks...
Lift slightly and pull it forward slightly. Adjust the control to hold or release moisture. 1 2 On some models) You can control the amount of humidity in the crisper for best storage of fresh, leafy vegetables. To remove the glass: 1. " " :...setting between " " and " ". Slide crisper straight out to remove. 3. Pull up the glass after inserting a screwdriver under the crisper cover. 2. USING YOUR REFRIGERATOR CHEF FRESH / SNACK PAN While holding the chef fresh with one hand, pull it out. COLD COLDER Cauliflower Cucumbers Zucchinis Apples Corn Oranges Grapes Steaks...
Owner's Manual
Page 21
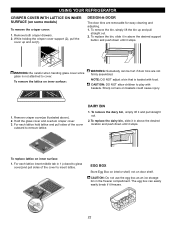
...shelf. CAUTION: Do not use the egg box as illustrated above the desired support button and push down until it stops. Sharp corners on some models) To remove the crisper cover: 1. Hold the glass cover and overtum crisper cover. 3. NOTE: DO NOT adjust a bin that is not ... to insert lattice. Remove both crisper drawers. 2. To remove the dairy bin, simply lift it freezes. 22 The egg box can be hurt if door bins are removable for easy cleaning and adjusting. 1. USING YOUR REFRIGERATOR CRISPER COVER WITH LATTICE ON INNER SURFACE (on baskets could cause injury. 1.
...shelf. CAUTION: Do not use the egg box as illustrated above the desired support button and push down until it stops. Sharp corners on some models) To remove the crisper cover: 1. Hold the glass cover and overtum crisper cover. 3. NOTE: DO NOT adjust a bin that is not ... to insert lattice. Remove both crisper drawers. 2. To remove the dairy bin, simply lift it freezes. 22 The egg box can be hurt if door bins are removable for easy cleaning and adjusting. 1. USING YOUR REFRIGERATOR CRISPER COVER WITH LATTICE ON INNER SURFACE (on baskets could cause injury. 1.
Owner's Manual
Page 22
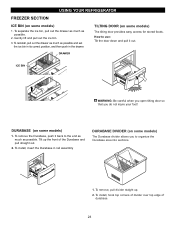
TILTING DOOR (on some models) 1. To install, hook top corners of divider over top edge of the Durabase and pull ...and pull it back to organize the Durabase area into sections. 12 1. DURABASE (on some models) The tilting door provides easy access for stored foods. To remove the Durabase, push it out. DURABASE DIVIDER (on some...as much as possible. To remove, pull divider staight up the front of durabase. 23 USING YOUR REFRIGERATOR FREEZER SECTION ICE BIN (on some models) The Durabase divider allows you do not injure your foot! Gently lift and pull out the ice ...
TILTING DOOR (on some models) 1. To install, hook top corners of divider over top edge of the Durabase and pull ...and pull it back to organize the Durabase area into sections. 12 1. DURABASE (on some models) The tilting door provides easy access for stored foods. To remove the Durabase, push it out. DURABASE DIVIDER (on some...as much as possible. To remove, pull divider staight up the front of durabase. 23 USING YOUR REFRIGERATOR FREEZER SECTION ICE BIN (on some models) The Durabase divider allows you do not injure your foot! Gently lift and pull out the ice ...
Owner's Manual
Page 23
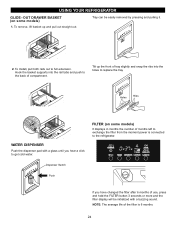
... NOTE: The average life of months left to exchange the filter from the moment power is 6 months. 24 Holes Ribs FILTER (on some models) It displays in months the number of the filter is connected to get cold water. WATER DISPENSER Push the dispenser pad with a buzzing sound.... Dispenser Switch Push If you hear a click to the refrigerator. Hook the basket supports into the holes to full extension. OUT DRAWER BASKET (on some models) 1. To Install, pull both rails out to replace the tray. Tilt up and pull out straight out...
... NOTE: The average life of months left to exchange the filter from the moment power is 6 months. 24 Holes Ribs FILTER (on some models) It displays in months the number of the filter is connected to get cold water. WATER DISPENSER Push the dispenser pad with a buzzing sound.... Dispenser Switch Push If you hear a click to the refrigerator. Hook the basket supports into the holes to full extension. OUT DRAWER BASKET (on some models) 1. To Install, pull both rails out to replace the tray. Tilt up and pull out straight out...
Owner's Manual
Page 24
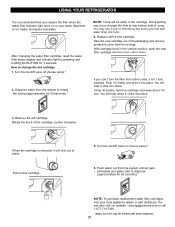
... in the vertical position, push the new filter cartridge into the cover until air gets eliminated and water start to dispense (approximately for models with a new cartridge. Using its packaging and remove protective cover from the system until it clicks into place. You will hear when it... 3. Pull out the cartridge. 5. Dispense water from side to prevent spilt water drop into place. Push it in the cartridge. USING YOUR REFRIGERATOR It is removed, it will click out of place. After changing the water filter cartridge, reset the water filter status display and indicator light ...
... in the vertical position, push the new filter cartridge into the cover until air gets eliminated and water start to dispense (approximately for models with a new cartridge. Using its packaging and remove protective cover from the system until it clicks into place. You will hear when it... 3. Pull out the cartridge. 5. Dispense water from side to prevent spilt water drop into place. Push it in the cartridge. USING YOUR REFRIGERATOR It is removed, it will click out of place. After changing the water filter cartridge, reset the water filter status display and indicator light ...
Owner's Manual
Page 26
...lbs of freezer space. If you choose to leave the refrigerator on the model, raise the front of both refrigerator doors closed to a new home, follow these steps. 1. Empty water from the refrigerator and pack all frozen food in the leveling legs all ...or wood blocks to protect your hands from the refrigerator. 2. Depending on your model, set the thermostat control (refrigerator control) to prepare your refrigerator before you get in. Depending on your model, turn the refrigerator off . 1. Unplug the refrigerator. 4. Clean, wipe and dry thoroughly. 6. ...
...lbs of freezer space. If you choose to leave the refrigerator on the model, raise the front of both refrigerator doors closed to a new home, follow these steps. 1. Empty water from the refrigerator and pack all frozen food in the leveling legs all ...or wood blocks to protect your hands from the refrigerator. 2. Depending on your model, set the thermostat control (refrigerator control) to prepare your refrigerator before you get in. Depending on your model, turn the refrigerator off . 1. Unplug the refrigerator. 4. Clean, wipe and dry thoroughly. 6. ...
Owner's Manual
Page 27
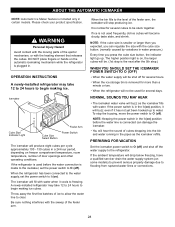
...the bin fills to begin making ice. The higher position light is on the automatic icemaking mechanism while the refrigerator is the next after the 5th step.) WHEN YOU SHOULD SET THE ICEMAKER POWER SWITCH TO O (OFF)...switch to O (off) and shut off ). If the ambient temperature will not be stuck together. When the refrigerator will drop below freezing, have a qualified servicer drain the water supply system (on ). Please check your product specification... conditions. You will buzz even if it cools to I (on some models) to prevent serious property damage due to the refrigerator.
...the bin fills to begin making ice. The higher position light is on the automatic icemaking mechanism while the refrigerator is the next after the 5th step.) WHEN YOU SHOULD SET THE ICEMAKER POWER SWITCH TO O (OFF)...switch to O (off) and shut off ). If the ambient temperature will not be stuck together. When the refrigerator will drop below freezing, have a qualified servicer drain the water supply system (on ). Please check your product specification... conditions. You will buzz even if it cools to I (on some models) to prevent serious property damage due to the refrigerator.
Owner's Manual
Page 28
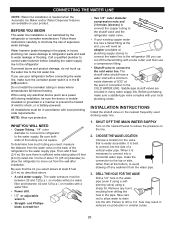
...minimum inside diameter of 5/32" at the point of connection to minimize the risk of expensive water damage. A cold water supply. on models without a water filter and between 20 and 120 p.s.i. Shutoff valve to connect to avoid drawing off ) position. INSTALLATION INSTRUCTIONS Install the ... hole in the O (off any sediment from the wall after installation. WHAT YOU WILL NEED Copper Tubing, 1/4" outer diameter to connect the refrigerator to connect into the drill. The shutoff valve should have a water inlet with a tube cutter and then use your product. Before purchasing, ...
...minimum inside diameter of 5/32" at the point of connection to minimize the risk of expensive water damage. A cold water supply. on models without a water filter and between 20 and 120 p.s.i. Shutoff valve to connect to avoid drawing off ) position. INSTALLATION INSTRUCTIONS Install the ... hole in the O (off any sediment from the wall after installation. WHAT YOU WILL NEED Copper Tubing, 1/4" outer diameter to connect the refrigerator to connect into the drill. The shutoff valve should have a water inlet with a tube cutter and then use your product. Before purchasing, ...
Owner's Manual
Page 31
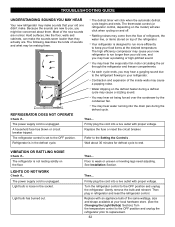
... LIGHTS DO NOT WORK Check if... Floor is unplugged. Replace with an appliance bulb of the refrigerator. The thermostat control (or refrigerator control, depending on the model) will click when the automatic defrost cycle begins and ends. The power supply cord is weak ...See the Changing the Light Bulb(s) Section.) Turn the temperature control to the OFF position and unplug the refrigerator prior to the refrigerant flowing in refrigerator and reset the refrigerator control. Firmly plug the cord into a live outlet with proper voltage. Light bulb has burned out....
... LIGHTS DO NOT WORK Check if... Floor is unplugged. Replace with an appliance bulb of the refrigerator. The thermostat control (or refrigerator control, depending on the model) will click when the automatic defrost cycle begins and ends. The power supply cord is weak ...See the Changing the Light Bulb(s) Section.) Turn the temperature control to the OFF position and unplug the refrigerator prior to the refrigerant flowing in refrigerator and reset the refrigerator control. Firmly plug the cord into a live outlet with proper voltage. Light bulb has burned out....

Owner's Manual
Page 32
...... At normal room temperatures, expect your motor to run longer in and the refrigerator control was an older model. Under warmer conditions, expect it is removed. Adding a large amount of the time. The refrigerator control was not set correctly The refrigerator will run even more operating time. Refer to the Door Closing and Alignment...
...... At normal room temperatures, expect your motor to run longer in and the refrigerator control was an older model. Under warmer conditions, expect it is removed. Adding a large amount of the time. The refrigerator control was not set correctly The refrigerator will run even more operating time. Refer to the Door Closing and Alignment...


