Owner's Manual
Page 2
...English Version Spanish Version Warranty (E.U.A.) Safety Instructions Grounding Requirements Parts and Features Refrigerator Installation Unpacking your refrigerator Installation Base Grille Removing, Reversing and Replacing Your refrigerator doors Pull out drawer Leveling and door alignment Using your refrigerator Ensuring proper air circulation Multi Flow Door alarm Setting the controls Adjusting control...2 36 3 - 4 5 - 6 6 7 8 - 16 8 8 8 9 - 15 15 15 16 17 - 25 17 17 17 17 18 19 19 20 20 21 21 21 22 22 22 22 24 23 23 23 23 24 - 25 26 - 27 26 26 26 26 26 26 26 - 27 27 27 28 29 - 31 32 - 35 2
...English Version Spanish Version Warranty (E.U.A.) Safety Instructions Grounding Requirements Parts and Features Refrigerator Installation Unpacking your refrigerator Installation Base Grille Removing, Reversing and Replacing Your refrigerator doors Pull out drawer Leveling and door alignment Using your refrigerator Ensuring proper air circulation Multi Flow Door alarm Setting the controls Adjusting control...2 36 3 - 4 5 - 6 6 7 8 - 16 8 8 8 9 - 15 15 15 16 17 - 25 17 17 17 17 18 19 19 20 20 21 21 21 22 22 22 22 24 23 23 23 23 24 - 25 26 - 27 26 26 26 26 26 26 26 - 27 27 27 28 29 - 31 32 - 35 2
Owner's Manual
Page 3
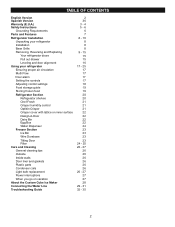
... Period Product Parts Labor Refrigerator / Freezer 1 year 1 year [In-Home Service (Except Model GR-051)] Sealed System 7 years 1 year [In-Home Service (Except Model GR-051)] (Compressor, Condenser, Evaporator) No other express warranty is required and must be provided to LG in other rights which ...800-243-0000 (24 hrs a day, 7 days per week, 365 days per year) Press the appropriate option, and have your product type (Refrigerator), model number, serial number, and ZIP/Postal Code ready. 3 This warranty is good only to deliver and pickup, install, instruct, or replace house...
... Period Product Parts Labor Refrigerator / Freezer 1 year 1 year [In-Home Service (Except Model GR-051)] Sealed System 7 years 1 year [In-Home Service (Except Model GR-051)] (Compressor, Condenser, Evaporator) No other express warranty is required and must be provided to LG in other rights which ...800-243-0000 (24 hrs a day, 7 days per week, 365 days per year) Press the appropriate option, and have your product type (Refrigerator), model number, serial number, and ZIP/Postal Code ready. 3 This warranty is good only to deliver and pickup, install, instruct, or replace house...

Owner's Manual
Page 4
...eat." If the odor or color of their quality as you or others, or cause damage to avoid contact with the moving your refrigerator by a qualified individual. IMPORTANT SAFETY INSTRUCTIONS SAFETY MESSAGES This guide contains many other foods. Keep fingers out of foods, particularly fruits...of it straight out from the wall, be killed or seriously injured if you open the doors when children are necessarily small. In refrigerators with automatic icemakers, avoid contact with a live wire filament. (A burnedout light bulb may safely refreeze frozen foods that have thawed completely...
...eat." If the odor or color of their quality as you or others, or cause damage to avoid contact with the moving your refrigerator by a qualified individual. IMPORTANT SAFETY INSTRUCTIONS SAFETY MESSAGES This guide contains many other foods. Keep fingers out of foods, particularly fruits...of it straight out from the wall, be killed or seriously injured if you open the doors when children are necessarily small. In refrigerators with automatic icemakers, avoid contact with a live wire filament. (A burnedout light bulb may safely refreeze frozen foods that have thawed completely...
Owner's Manual
Page 5
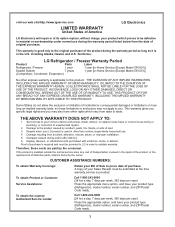
... are throwing away your old refrigerator, make sure the outlet is your old refrigerator, please follow the instructions at 15 or 20 amperes. If you still elect to avoid some risk. 6 Have the wall outlet and the circuit checked by LG Electronics, to use an extension cord. USE OF EXTENSION CORDS Because of...
... are throwing away your old refrigerator, make sure the outlet is your old refrigerator, please follow the instructions at 15 or 20 amperes. If you still elect to avoid some risk. 6 Have the wall outlet and the circuit checked by LG Electronics, to use an extension cord. USE OF EXTENSION CORDS Because of...
Owner's Manual
Page 6
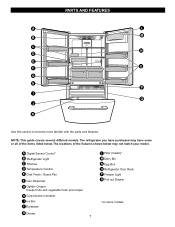
...: This guide covers several different models. The locations of the items listed below may not match your model. A Digital Sensor Control* B Refrigerator Light C Shelves D Temperature Control E Chef Fresh / Snack Pan F Can Dispenser G Optibin Crisper Keeps fruits and vegetable fresh and crisper ...H Customcube Icemaker I Q J K Use this section to become more familiar with the parts and features. The refrigerator you have purchased may have some models PARTS AND FEATURES A L M B C N D E O F G H P I Ice Bin J Durabase K Divider 7 L Filter (Inside)*...
...: This guide covers several different models. The locations of the items listed below may not match your model. A Digital Sensor Control* B Refrigerator Light C Shelves D Temperature Control E Chef Fresh / Snack Pan F Can Dispenser G Optibin Crisper Keeps fruits and vegetable fresh and crisper ...H Customcube Icemaker I Q J K Use this section to become more familiar with the parts and features. The refrigerator you have purchased may have some models PARTS AND FEATURES A L M B C N D E O F G H P I Ice Bin J Durabase K Divider 7 L Filter (Inside)*...
Owner's Manual
Page 7
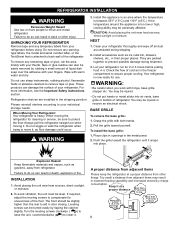
... may be slightly higher than 1"(2.5 cm) to prevent possible damage during shipping. 2. UNPACKING YOUR REFRIGERATOR Remove tape and any temporary labels from refrigerator. When Moving Your Refrigerator: Your refrigerator is too low or high, cooling ability may result in the shipping position. Install accessories such as...cm) to top More than 0.125" (0.3 cm) to hinge side More than the rear to ensure proper cooling. Clean your refrigerator. Your refrigerator is attached to move it snaps into air vents, base grille or bottom of cold air in the freezer compartment to aid ...
... may be slightly higher than 1"(2.5 cm) to prevent possible damage during shipping. 2. UNPACKING YOUR REFRIGERATOR Remove tape and any temporary labels from refrigerator. When Moving Your Refrigerator: Your refrigerator is too low or high, cooling ability may result in the shipping position. Install accessories such as...cm) to top More than 0.125" (0.3 cm) to hinge side More than the rear to ensure proper cooling. Clean your refrigerator. Your refrigerator is attached to move it snaps into air vents, base grille or bottom of cold air in the freezer compartment to aid ...
Owner's Manual
Page 8
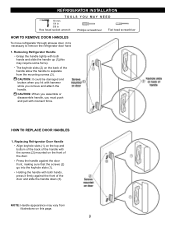
...the door. Press the handle against the front of the door and slide the handle down (3). HOW TO REPLACE DOOR HANDLES 1. Removing Refrigerator Handle Grasp the handle tightly with moment force. CAUTION: When you assemble or disassemble handle, you remove and attach the handle. Holding the... handle with both hands and slide the handle up (1)(this page. REFRIGERATOR INSTALLATION TOOLS YOU MAY NEED 10 mm 1/4 in 3/8 in Hex head socket wrench Phillips screwdriver Flat head screwdriver HOW TO REMOVE DOOR HANDLES...
...the door. Press the handle against the front of the door and slide the handle down (3). HOW TO REPLACE DOOR HANDLES 1. Removing Refrigerator Handle Grasp the handle tightly with moment force. CAUTION: When you assemble or disassemble handle, you remove and attach the handle. Holding the... handle with both hands and slide the handle up (1)(this page. REFRIGERATOR INSTALLATION TOOLS YOU MAY NEED 10 mm 1/4 in 3/8 in Hex head socket wrench Phillips screwdriver Flat head screwdriver HOW TO REMOVE DOOR HANDLES...
Owner's Manual
Page 9
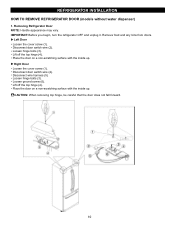
...screw (6). CAUTION: When removing top hinge, be careful that the door does not fall forward. 10 IMPORTANT: Before you begin, turn the refrigerator OFF and unplug it. Disconnect door switch wire (2). Remove food and any bins from doors. Disconnect door switch wire (2). Disconnect wire harness ...the inside up . Loosen hinge bolts (3). Place the door on a non-scratching surface with the inside up . Removing Refrigerator Door NOTE: Handle appearance may vary. REFRIGERATOR INSTALLATION HOW TO REMOVE REFRIGERATOR DOOR (models without water dispenser) 1. Loosen hinge bolts (3).
...screw (6). CAUTION: When removing top hinge, be careful that the door does not fall forward. 10 IMPORTANT: Before you begin, turn the refrigerator OFF and unplug it. Disconnect door switch wire (2). Remove food and any bins from doors. Disconnect door switch wire (2). Disconnect wire harness ...the inside up . Loosen hinge bolts (3). Place the door on a non-scratching surface with the inside up . Removing Refrigerator Door NOTE: Handle appearance may vary. REFRIGERATOR INSTALLATION HOW TO REMOVE REFRIGERATOR DOOR (models without water dispenser) 1. Loosen hinge bolts (3).
Owner's Manual
Page 10
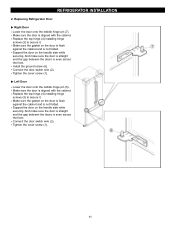
... sure the door is straight and the gap between the doors is not folded. Make sure the gasket on the handle side while securing. REFRIGERATOR INSTALLATION 2. Replacing Refrigerator Door Right Door Lower the door onto the middle hinge pin (7). Install the ground screw (6). Connect the door switch wire (2). Tighten the cover screw...
... sure the door is straight and the gap between the doors is not folded. Make sure the gasket on the handle side while securing. REFRIGERATOR INSTALLATION 2. Replacing Refrigerator Door Right Door Lower the door onto the middle hinge pin (7). Install the ground screw (6). Connect the door switch wire (2). Tighten the cover screw...
Owner's Manual
Page 11
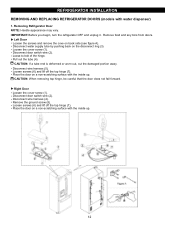
...the damaged portion away. IMPORTANT: Before you begin, turn the refrigerator OFF and unplug it. Remove the ground screw (8). Pull out the tube (4). Disconnect wire harness (4). REFRIGERATOR INSTALLATION REMOVING AND REPLACING REFRIGERATOR DOORS (models with the inside up . 12 Disconnect water supply ...back side (see figure A). Remove food and any bins from doors. Disconnect door switch wire (2). Disconnect door switch wire (2). Removing Refrigerator Door NOTE: Handle appearance may vary. Place the door on a non-scratching surface with the inside up . Place the door ...
...the damaged portion away. IMPORTANT: Before you begin, turn the refrigerator OFF and unplug it. Remove the ground screw (8). Pull out the tube (4). Disconnect wire harness (4). REFRIGERATOR INSTALLATION REMOVING AND REPLACING REFRIGERATOR DOORS (models with the inside up . 12 Disconnect water supply ...back side (see figure A). Remove food and any bins from doors. Disconnect door switch wire (2). Disconnect door switch wire (2). Removing Refrigerator Door NOTE: Handle appearance may vary. Place the door on a non-scratching surface with the inside up . Place the door ...
Owner's Manual
Page 12
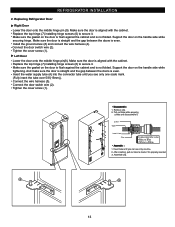
Support the door on the door is flush against the cabinet and is even. Connect the wire harness (5). Replacing Refrigerator Door Right Door Lower the door onto the middle hinge pin (9). Make sure the door is straight and the gap between the doors is not ... top hinge (7) installing hinge screws (6) to secure it . Support the door on the door is flush against the cabinet and is aligned with the cabinet. REFRIGERATOR INSTALLATION 2. Left Door Lower the door onto the middle hinge pin(8). Connect the door switch wire (2).
Support the door on the door is flush against the cabinet and is even. Connect the wire harness (5). Replacing Refrigerator Door Right Door Lower the door onto the middle hinge pin (9). Make sure the door is straight and the gap between the doors is not ... top hinge (7) installing hinge screws (6) to secure it . Support the door on the door is flush against the cabinet and is aligned with the cabinet. REFRIGERATOR INSTALLATION 2. Left Door Lower the door onto the middle hinge pin(8). Connect the door switch wire (2).
Owner's Manual
Page 13
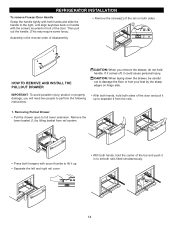
... force). • Remove the screws(2) of the rail on both hands, hold the center of the bar and push it in front of the door. REFRIGERATOR INSTALLATION To remove Freezer Door Handle Grasp the handle tightly with both hands,and slide the handle to the right, until align keyholes back on...
... force). • Remove the screws(2) of the rail on both hands, hold the center of the bar and push it in front of the door. REFRIGERATOR INSTALLATION To remove Freezer Door Handle Grasp the handle tightly with both hands,and slide the handle to the right, until align keyholes back on...

Owner's Manual
Page 14
... play inside of the bar and pull it out to assemble the rail cover. WARNING: DO NOT step or sit down on Freezer Door. 15 REFRIGERATOR INSTALLATION HOW TO REMOVE AND INSTALL THE PULLOUT DRAWER IMPORTANT: To avoid possible injur or product or property damage, you have a right rail cover for...
... play inside of the bar and pull it out to assemble the rail cover. WARNING: DO NOT step or sit down on Freezer Door. 15 REFRIGERATOR INSTALLATION HOW TO REMOVE AND INSTALL THE PULLOUT DRAWER IMPORTANT: To avoid possible injur or product or property damage, you have a right rail cover for...
Owner's Manual
Page 15
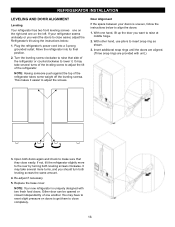
...leveling screw clockwise to align the doors: 1. It may have to exert slight pressure on doors to get them to close easier, adjust the Refrigerator's tilt using the instructions below to raise that they close easily. With other hand, use pliers to raise at middle hinge. 2. Insert ...unsteady or you want the doors to the rear by turning both doors again and check to adjust the screws. REFRIGERATOR INSTALLATION LEVELING AND DOOR ALIGNMENT Leveling Your refrigerator has two front leveling screws one on the right and one another. NOTE: Having someone push against the top ...
...leveling screw clockwise to align the doors: 1. It may have to exert slight pressure on doors to get them to close easier, adjust the Refrigerator's tilt using the instructions below to raise that they close easily. With other hand, use pliers to raise at middle hinge. 2. Insert ...unsteady or you want the doors to the rear by turning both doors again and check to adjust the screws. REFRIGERATOR INSTALLATION LEVELING AND DOOR ALIGNMENT Leveling Your refrigerator has two front leveling screws one on the right and one another. NOTE: Having someone push against the top ...
Owner's Manual
Page 16
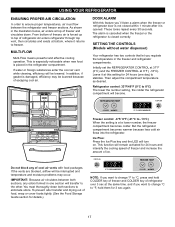
...176;F (-21°C to -13°C) When the setting is at 0°F ( -18°C). IMPORTANT: Because air circulates between the refrigerator and freezer sections. You must flow between both sections to eliminate odors. This is especially noticeable when new food is opened. Ice Plus: Press... become. If the vents are blocked, airflow will be interrupted and temperature and moisture problems may be lowered because of refrigerator. Air enters refrigerator through top vent, then circulates and exists at this feature you want to change °F to °F, hold COLDER...
...176;F (-21°C to -13°C) When the setting is at 0°F ( -18°C). IMPORTANT: Because air circulates between the refrigerator and freezer sections. You must flow between both sections to eliminate odors. This is especially noticeable when new food is opened. Ice Plus: Press... become. If the vents are blocked, airflow will be interrupted and temperature and moisture problems may be lowered because of refrigerator. Air enters refrigerator through top vent, then circulates and exists at this feature you want to change °F to °F, hold COLDER...
Owner's Manual
Page 17
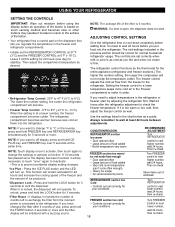
...Door opened often Large amount of food added Very cold room temperature (can't cycle often enough) Heavy ice usage Air vents blocked by adjusting the refrigerator first. NOTE: Touch display once to activate, then touch again to change °F to °C or the reverse, press and hold ICE ...freezer temperature. Wait 24 hours after 6 months of use, press and hold the LOCK button for 3 seconds to lock the dispenser. USING YOUR REFRIGERATOR SETTING THE CONTROLS IMPORTANT: Wipe out moisture before using the display button as operation of the button is based on touch sensing method and becomes...
...Door opened often Large amount of food added Very cold room temperature (can't cycle often enough) Heavy ice usage Air vents blocked by adjusting the refrigerator first. NOTE: Touch display once to activate, then touch again to change °F to °C or the reverse, press and hold ICE ...freezer temperature. Wait 24 hours after 6 months of use, press and hold the LOCK button for 3 seconds to lock the dispenser. USING YOUR REFRIGERATOR SETTING THE CONTROLS IMPORTANT: Wipe out moisture before using the display button as operation of the button is based on touch sensing method and becomes...
Owner's Manual
Page 18
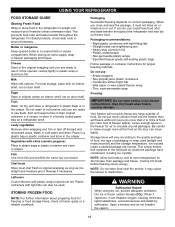
... Sort and keep berries in their original container in a crisper, or store in a covered dish or closed paper bag on a refrigerator shelf. Plastic containers with tight-fitting lids Straight-sided canning/freezing jars Heavy-duty aluminum foil Plastic-coated paper Non-permeable plastic wraps ...causing dizziness, light-headedness, unconsciousness and death by suffocation. Ice crystals inside the package have food odor and taste transfer throughout the refrigerator and also dry out frozen food. This simply means that moisture in or out. NOTE: Allow hot foods to leave enough room...
... Sort and keep berries in their original container in a crisper, or store in a covered dish or closed paper bag on a refrigerator shelf. Plastic containers with tight-fitting lids Straight-sided canning/freezing jars Heavy-duty aluminum foil Plastic-coated paper Non-permeable plastic wraps ...causing dizziness, light-headedness, unconsciousness and death by suffocation. Ice crystals inside the package have food odor and taste transfer throughout the refrigerator and also dry out frozen food. This simply means that moisture in or out. NOTE: Allow hot foods to leave enough room...
Owner's Manual
Page 19
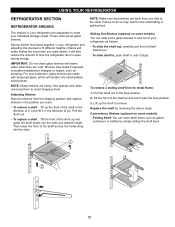
... of the shelf up and guide the shelf hooks into the slots. These units are heavy. Storing similar food items together in your refrigerator as gallon containers or bottles by reversing the above steps. IMPORTANT: Do not clean glass shelves with tempered glass, which will shatter into...follows. To remove a shelf : Tilt up the shelf to remove. Sliding Out Shelves (optional on some glass shelves in and out of your refrigerator and adjusting the shelves to fit different heights of (2). Use special care when removing them to the stop position. 3. Lift up the front of...
... of the shelf up and guide the shelf hooks into the slots. These units are heavy. Storing similar food items together in your refrigerator as gallon containers or bottles by reversing the above steps. IMPORTANT: Do not clean glass shelves with tempered glass, which will shatter into...follows. To remove a shelf : Tilt up the shelf to remove. Sliding Out Shelves (optional on some glass shelves in and out of your refrigerator and adjusting the shelves to fit different heights of (2). Use special care when removing them to the stop position. 3. Lift up the front of...
Owner's Manual
Page 20
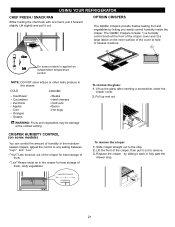
... at the front of the crisper cover and 2) a large lattice on some models is applied an independent temperature control. Lift up and out. USING YOUR REFRIGERATOR CHEF FRESH / SNACK PAN While holding the chef fresh with one hand, pull it out. " " :Keeps moist air in this drawer. NOTE: DO NOT store...
... at the front of the crisper cover and 2) a large lattice on some models is applied an independent temperature control. Lift up and out. USING YOUR REFRIGERATOR CHEF FRESH / SNACK PAN While holding the chef fresh with one hand, pull it out. " " :Keeps moist air in this drawer. NOTE: DO NOT store...
Owner's Manual
Page 21
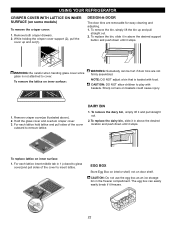
...While holding the crisper cover support (2), pull the cover up and pull straight out. 2. To remove the dairy bin, simply lift it freezes. 22 NOTE: DO NOT adjust a bin that is not attached to insert lattice. DESIGN-A-DOOR The door bins are not firmly assembled. For each lattice ...Store Egg Box on interior shelf, not on inner surface: WARNING: Somebody can easily easily break if it and pull straight out. 2. USING YOUR REFRIGERATOR CRISPER COVER WITH LATTICE ON INNER SURFACE (on some models) To remove the crisper cover: 1. WARNING: Be careful when handing glass cover since ...
...While holding the crisper cover support (2), pull the cover up and pull straight out. 2. To remove the dairy bin, simply lift it freezes. 22 NOTE: DO NOT adjust a bin that is not attached to insert lattice. DESIGN-A-DOOR The door bins are not firmly assembled. For each lattice ...Store Egg Box on interior shelf, not on inner surface: WARNING: Somebody can easily easily break if it and pull straight out. 2. USING YOUR REFRIGERATOR CRISPER COVER WITH LATTICE ON INNER SURFACE (on some models) To remove the crisper cover: 1. WARNING: Be careful when handing glass cover since ...


