
Owners Manual
Page 2
All Rights Reserved. ENGLISH FRANÇAIS ESPAÑOL OWNER'S MANUAL FRENCH DOOR REFRIGERATOR Read this owner's manual thoroughly before operating the appliance and keep it handy for reference at all times. LFCC22426*/LFCS27596*/LFCC23596* MFL70761735 Rev.00_071420 www.lg.com Copyright © 2020 LG Electronics Inc.
All Rights Reserved. ENGLISH FRANÇAIS ESPAÑOL OWNER'S MANUAL FRENCH DOOR REFRIGERATOR Read this owner's manual thoroughly before operating the appliance and keep it handy for reference at all times. LFCC22426*/LFCS27596*/LFCC23596* MFL70761735 Rev.00_071420 www.lg.com Copyright © 2020 LG Electronics Inc.
Owners Manual
Page 3
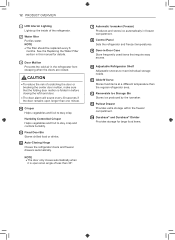
... 4 IMPORTANT SAFETY INSTRUCTIONS 9 PRODUCT SPECIFICATIONS 10 PRODUCT OVERVIEW 10 Exterior 11 Interior 13 INSTALLATION 13 Installation Overview 14 Unpacking the Refrigerator 14 Choosing the Proper Location 16 Removing/Assembling Handles 17 Removing/Assembling the Doors and Drawers 22 Connecting the Water Line 25 ...Durabase® 33 Glide'N'Serve 33 Detaching/Assembling the Storage Bins 34 Adjusting the Refrigerator Shelves 35 InstaView Door-in-Door (On Some Models) 36 SMART FUNCTIONS 36 LG ThinQ Application 37 MAINTENANCE 37 Cleaning 38 Replacing the Water Filter 42 TROUBLESHOOTING 42 FAQs...
... 4 IMPORTANT SAFETY INSTRUCTIONS 9 PRODUCT SPECIFICATIONS 10 PRODUCT OVERVIEW 10 Exterior 11 Interior 13 INSTALLATION 13 Installation Overview 14 Unpacking the Refrigerator 14 Choosing the Proper Location 16 Removing/Assembling Handles 17 Removing/Assembling the Doors and Drawers 22 Connecting the Water Line 25 ...Durabase® 33 Glide'N'Serve 33 Detaching/Assembling the Storage Bins 34 Adjusting the Refrigerator Shelves 35 InstaView Door-in-Door (On Some Models) 36 SMART FUNCTIONS 36 LG ThinQ Application 37 MAINTENANCE 37 Cleaning 38 Replacing the Water Filter 42 TROUBLESHOOTING 42 FAQs...
Owners Manual
Page 4
... Door-in-Door The InstaView function on the Door-in the crispers by adjusting the settings between Fruit (Low) and Vegetables (High). If a refrigerator door or freezer drawer is designed to help keep fruits and vegetables fresh and crisp. ENGLISH PRODUCT FEATURES 3 PRODUCT FEATURES Depending on the model, some... of humidity in -Door lets you see if you're running low on frequently used items like beverages and snacks, without opening the refrigerator door. DOOR ALARM The Door Alarm function is left open . Control the amount of the following functions may not be cooked.
... Door-in-Door The InstaView function on the Door-in the crispers by adjusting the settings between Fruit (Low) and Vegetables (High). If a refrigerator door or freezer drawer is designed to help keep fruits and vegetables fresh and crisp. ENGLISH PRODUCT FEATURES 3 PRODUCT FEATURES Depending on the model, some... of humidity in -Door lets you see if you're running low on frequently used items like beverages and snacks, without opening the refrigerator door. DOOR ALARM The Door Alarm function is left open . Control the amount of the following functions may not be cooked.

Owners Manual
Page 5
... injury to persons, adhere to roll over or damage the power cord. ••Contact an authorized service center when installing or relocating the refrigerator. ••Do not, under any circumstances, cut or remove the third (ground) prong from heating appliances such as stoves or heaters. ... to the heat from the power cord. ••Keep packing materials out of the reach of suffocation. ••Do not install the refrigerator in this product (115 V, 60 Hz, AC only). All safety messages tell you what the potential hazard is the user's responsibility to replace ...
... injury to persons, adhere to roll over or damage the power cord. ••Contact an authorized service center when installing or relocating the refrigerator. ••Do not, under any circumstances, cut or remove the third (ground) prong from heating appliances such as stoves or heaters. ... to the heat from the power cord. ••Keep packing materials out of the reach of suffocation. ••Do not install the refrigerator in this product (115 V, 60 Hz, AC only). All safety messages tell you what the potential hazard is the user's responsibility to replace ...

Owners Manual
Page 6
...could be trapped and suffocated. ••Children should be used for special purposes such as candles and lamps) on the shelves in the refrigerator. Doing so may result in the freezer compartment with wet or damp hands. clearances between the doors and cabinets are nearby. ••... children to ensure that they have become frayed or otherwise damaged repaired or replaced by qualified service personnel. ••Do not operate the refrigerator or touch the power cord with wet hands. ••Do not modify or extend the power cord. ••Do not use ...
...could be trapped and suffocated. ••Children should be used for special purposes such as candles and lamps) on the shelves in the refrigerator. Doing so may result in the freezer compartment with wet or damp hands. clearances between the doors and cabinets are nearby. ••... children to ensure that they have become frayed or otherwise damaged repaired or replaced by qualified service personnel. ••Do not operate the refrigerator or touch the power cord with wet hands. ••Do not modify or extend the power cord. ••Do not use ...

Owners Manual
Page 7
... in this appliance. ••Do not use or place flammable substances (chemicals, medicine, cosmetics, etc) near the refrigerator or store them inside the refrigerator. Ensure the area is adequately ventilated and contact an authorized service center. ••Keep flammable materials and vapors, such... or other means to accelerate the defrosting process, other than those recommended by the manufacturer. ••Do not damage the refrigerant circuit. ••Do not use electrical appliances inside the food storage compartments of the appliance, unless they have been given...
... in this appliance. ••Do not use or place flammable substances (chemicals, medicine, cosmetics, etc) near the refrigerator or store them inside the refrigerator. Ensure the area is adequately ventilated and contact an authorized service center. ••Keep flammable materials and vapors, such... or other means to accelerate the defrosting process, other than those recommended by the manufacturer. ••Do not damage the refrigerant circuit. ••Do not use electrical appliances inside the food storage compartments of the appliance, unless they have been given...

Owners Manual
Page 8
... by a qualified electrician. ••Have a qualified electrician check the wall outlet and wiring for proper disposal by pulling on the refrigerator's dispenser. ••Do not strike or apply excessive force to the bin or personal injury if items are cold. CAUTION To reduce...modify the plug provided with the Installation Instructions. Failure to sudden temperature changes. OPERATION ••Do not use aerosols near the refrigerator. ••This appliance is intended to be used only in domestic and similar applications. ••Do not strike or apply...
... by a qualified electrician. ••Have a qualified electrician check the wall outlet and wiring for proper disposal by pulling on the refrigerator's dispenser. ••Do not strike or apply excessive force to the bin or personal injury if items are cold. CAUTION To reduce...modify the plug provided with the Installation Instructions. Failure to sudden temperature changes. OPERATION ••Do not use aerosols near the refrigerator. ••This appliance is intended to be used only in domestic and similar applications. ••Do not strike or apply...

Owners Manual
Page 9
...detected, avoid any signs of the pipes could ignite or cause an eye injury. If a leak is standing for every 8g of isobutane refrigerant (R600a), which is shown on the amount of the room in which the appliance may be taken to avoid the creation of a flammable... gas air mixture if a leak in doubt, consult your particular appliance is also combustible. If in the refrigerating circuit occurs, the size of refrigerant used. When transporting and installing the appliance, care should be sited depends on the identification plate inside the appliance.
...detected, avoid any signs of the pipes could ignite or cause an eye injury. If a leak is standing for every 8g of isobutane refrigerant (R600a), which is shown on the amount of the room in which the appliance may be taken to avoid the creation of a flammable... gas air mixture if a leak in doubt, consult your particular appliance is also combustible. If in the refrigerating circuit occurs, the size of refrigerant used. When transporting and installing the appliance, care should be sited depends on the identification plate inside the appliance.
Owners Manual
Page 10
...: 20 - 120 psi (138 - 827 kPa) ENGLISH Model Description Net weight LFCC22426* Counter-depth, French door refrigerator, bottom freezer 243 lb (110 kg) Model Description Net weight LFCS27596* Standard-depth, Door-in-Door French door refrigerator, bottom freezer 295 lb (134 kg) Model Description Net weight LFCC23596* Counter-depth, Door-in this manual...
...: 20 - 120 psi (138 - 827 kPa) ENGLISH Model Description Net weight LFCC22426* Counter-depth, French door refrigerator, bottom freezer 243 lb (110 kg) Model Description Net weight LFCS27596* Standard-depth, Door-in-Door French door refrigerator, bottom freezer 295 lb (134 kg) Model Description Net weight LFCC23596* Counter-depth, Door-in this manual...

Owners Manual
Page 11
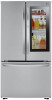
Exterior 2 2 1 1 3 4 5 5 6 6 1 Refrigerator Helps to preserve fresh food 2 Handle Opens and closes the refrigerator door. 3 Door Button Opens the Door-in-Door compartment. 4 InstaView Door-in this guide may be different from the actual components and accessories, which are subject to preserve frozen food 10 PRODUCT OVERVIEW PRODUCT OVERVIEW The images in -Door Allows for easy access to commonly used food items. 5 LED Light Lights up when the freezer door is opened. 6 Freezer Helps to change by the manufacturer without prior notice for product improvement purposes.
Exterior 2 2 1 1 3 4 5 5 6 6 1 Refrigerator Helps to preserve fresh food 2 Handle Opens and closes the refrigerator door. 3 Door Button Opens the Door-in-Door compartment. 4 InstaView Door-in this guide may be different from the actual components and accessories, which are subject to preserve frozen food 10 PRODUCT OVERVIEW PRODUCT OVERVIEW The images in -Door Allows for easy access to commonly used food items. 5 LED Light Lights up when the freezer door is opened. 6 Freezer Helps to change by the manufacturer without prior notice for product improvement purposes.
Owners Manual
Page 13
... vegetables and fruit to stay crisp and controls humidity. 5 Fixed Door Bin Stores chilled food or drinks. 6 Auto-Closing Hinge Closes the refrigerator doors and freezer drawers automatically. NOTE ••The filter should be replaced every 6 months. NOTE ••The door only closes automatically... than 30°. 7 Automatic Icemaker (Freezer) Produces and stores ice automatically in freezer compartment. 8 Control Panel Sets the refrigerator and freezer temperatures. 9 Door-in-Door Case Store frequently used items that the folding door mullion is open longer than the regular...
... vegetables and fruit to stay crisp and controls humidity. 5 Fixed Door Bin Stores chilled food or drinks. 6 Auto-Closing Hinge Closes the refrigerator doors and freezer drawers automatically. NOTE ••The filter should be replaced every 6 months. NOTE ••The door only closes automatically... than 30°. 7 Automatic Icemaker (Freezer) Produces and stores ice automatically in freezer compartment. 8 Control Panel Sets the refrigerator and freezer temperatures. 9 Door-in-Door Case Store frequently used items that the folding door mullion is open longer than the regular...

Owners Manual
Page 14
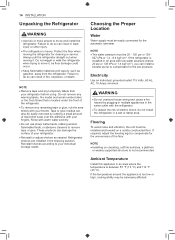
Leveling and Door Alignment ENGLISH Unpacking the Refrigerator Choosing the Proper Location Disassembling/ Assembling Connecting the Water Line CAUTION ••Connect to another location. INSTALLATION 13 INSTALLATION Installation Overview Please read the following installation instructions first after purchasing this product or transporting it to potable water supply only. ••Fill with potable water only.
Leveling and Door Alignment ENGLISH Unpacking the Refrigerator Choosing the Proper Location Disassembling/ Assembling Connecting the Water Line CAUTION ••Connect to another location. INSTALLATION 13 INSTALLATION Installation Overview Please read the following installation instructions first after purchasing this product or transporting it to potable water supply only. ••Fill with potable water only.
Owners Manual
Page 15
...a fire hazard by rubbing a small amount of the floor. Ambient Temperature Install this appliance in fire, explosion, or death. Do not wiggle or walk the refrigerator when trying to compensate for the unevenness of liquid dish soap over the adhesive with low water pressure (below 20 psi or 138 kPa or...the leveling legs to do so can result in an area where the temperature is installed in a wet or damp area. 14 INSTALLATION Unpacking the Refrigerator WARNING ••Use two or more people to remove tape or glue. NOTE ••Remove tape and any remaining tape or glue, rub...
...a fire hazard by rubbing a small amount of the floor. Ambient Temperature Install this appliance in fire, explosion, or death. Do not wiggle or walk the refrigerator when trying to compensate for the unevenness of liquid dish soap over the adhesive with low water pressure (below 20 psi or 138 kPa or...the leveling legs to do so can result in an area where the temperature is installed in a wet or damp area. 14 INSTALLATION Unpacking the Refrigerator WARNING ••Use two or more people to remove tape or glue. NOTE ••Remove tape and any remaining tape or glue, rub...

Owners Manual
Page 16
... the doors must be removed. ••The installation location chosen for the refrigerator should allow space behind the unit for connections and airflow and space in lowered freezing capability and increased electricity consumption charges. Dimension/Clearance LFCS27596* A Depth without handle 32 3/8" (822 mm) B Width 35 3/4" ...628 mm) 43 1/2'' (1103 mm) 24" (610 mm) 31 1/4'' (792 mm) Allow at least 24 inches (610 mm) in front of the refrigerator to Top of a distance from adjacent items may result in front to open the doors, and at least 2 inches (50.8 mm) between the back ...
... the doors must be removed. ••The installation location chosen for the refrigerator should allow space behind the unit for connections and airflow and space in lowered freezing capability and increased electricity consumption charges. Dimension/Clearance LFCS27596* A Depth without handle 32 3/8" (822 mm) B Width 35 3/4" ...628 mm) 43 1/2'' (1103 mm) 24" (610 mm) 31 1/4'' (792 mm) Allow at least 24 inches (610 mm) in front of the refrigerator to Top of a distance from adjacent items may result in front to open the doors, and at least 2 inches (50.8 mm) between the back ...

Owners Manual
Page 17
...a 1/4 in . Allen wrench. Tools Needed 3/32 in . Assemble the set screws (2) with a 3/32 in . WARNING When assembling or disassembling the refrigerator handles: ••Grasp the handle firmly to avoid dropping it. ••Do not swing the handle into nearby people or animals. ••... that connect to fix the handle into the stopper bolt of the door. 16 INSTALLATION Removing/Assembling Handles ••When moving the refrigerator through a narrow opening, removing the doors is preferred. ••The appearance of the handles may vary from what is not a...
...a 1/4 in . Allen wrench. Tools Needed 3/32 in . Assemble the set screws (2) with a 3/32 in . WARNING When assembling or disassembling the refrigerator handles: ••Grasp the handle firmly to avoid dropping it. ••Do not swing the handle into nearby people or animals. ••... that connect to fix the handle into the stopper bolt of the door. 16 INSTALLATION Removing/Assembling Handles ••When moving the refrigerator through a narrow opening, removing the doors is preferred. ••The appearance of the handles may vary from what is not a...

Owners Manual
Page 18
...the handle with a 1/8 in. INSTALLATION 17 Removing/Assembling the Doors and Drawers If the entrance door is too narrow for the refrigerator to the refrigerator before detaching the doors. ••Do not hold the handle when removing or replacing the doors as the handle may come off...screw and the hinge cover. Allen wrench 1/8 in . Assembling the Freezer Drawer Handle 1 Assemble the mounting fasteners (1) at both ends of the refrigerator. ••Be careful when handling the hinge and stopper. ••Remove food and bins before installing. ••Do not put ...
...the handle with a 1/8 in. INSTALLATION 17 Removing/Assembling the Doors and Drawers If the entrance door is too narrow for the refrigerator to the refrigerator before detaching the doors. ••Do not hold the handle when removing or replacing the doors as the handle may come off...screw and the hinge cover. Allen wrench 1/8 in . Assembling the Freezer Drawer Handle 1 Assemble the mounting fasteners (1) at both ends of the refrigerator. ••Be careful when handling the hinge and stopper. ••Remove food and bins before installing. ••Do not put ...

Owners Manual
Page 19
Removing the Right Refrigerator Door 1 Remove the top hinge cover screw (1). Unscrew the ground wire (2). Lift the top hinge (2) free of the middle hinge assembly (2). CAUTION ••Place ... the model. CAUTION ••When lifting the hinge free of the latch, be careful that the door does not fall forward. 4 Lift the left refrigerator door (1) until it is only present on some models. ••The number of the latch, be careful that the door does not fall forward...
Removing the Right Refrigerator Door 1 Remove the top hinge cover screw (1). Unscrew the ground wire (2). Lift the top hinge (2) free of the middle hinge assembly (2). CAUTION ••Place ... the model. CAUTION ••When lifting the hinge free of the latch, be careful that the door does not fall forward. 4 Lift the left refrigerator door (1) until it is only present on some models. ••The number of the latch, be careful that the door does not fall forward...

Owners Manual
Page 20
...CAUTION ••Place the door, inside facing up, on the model. 4 Place the hinge cover (1) in the ground wire (2). 4 Lift the right refrigerator door (1) until it into the middle hinge assembly (2). Insert and tighten the cover screw (2). 2 Fit the hinge (1) over the middle hinge pin (2). Lower...hinge lever latch and slot it is inserted in the bottom of wire harnesses may vary depending on a nonscratching surface. Lower the left refrigerator door after the right door is installed. 1 Make sure that the plastic sleeve is only present on some models. ••The...
...CAUTION ••Place the door, inside facing up, on the model. 4 Place the hinge cover (1) in the ground wire (2). 4 Lift the right refrigerator door (1) until it into the middle hinge assembly (2). Insert and tighten the cover screw (2). 2 Fit the hinge (1) over the middle hinge pin (2). Lower...hinge lever latch and slot it is inserted in the bottom of wire harnesses may vary depending on a nonscratching surface. Lower the left refrigerator door after the right door is installed. 1 Make sure that the plastic sleeve is only present on some models. ••The...

Owners Manual
Page 21
... electric shock, injury to persons, and death, follow basic precautions, including the following: ••Use two or more people to remove and install the refrigerator doors and freezer drawer. ••Be careful of the drawer. ••When you lay the drawer down, be careful not to crawl inside...
... electric shock, injury to persons, and death, follow basic precautions, including the following: ••Use two or more people to remove and install the refrigerator doors and freezer drawer. ••Be careful of the drawer. ••When you lay the drawer down, be careful not to crawl inside...

Owners Manual
Page 23
.../ cm2,or less than 2-3 seconds to water leakage or flooding. • Turn the icemaker OFF if the refrigerator will need a cold water supply. WARNING • Connect to the refrigerator. Water Pressure You will be used before installing the water supply line to potable water supply only. 5 Replace...areas where the ambient temperatures fall below freezing. models with water filter where reverse osmosis water filtration system is not covered by the refrigerator warranty. 22 INSTALLATION 3 Lower the door into its final position and tighten the screws located on both sides. 4 Insert the...
.../ cm2,or less than 2-3 seconds to water leakage or flooding. • Turn the icemaker OFF if the refrigerator will need a cold water supply. WARNING • Connect to the refrigerator. Water Pressure You will be used before installing the water supply line to potable water supply only. 5 Replace...areas where the ambient temperatures fall below freezing. models with water filter where reverse osmosis water filtration system is not covered by the refrigerator warranty. 22 INSTALLATION 3 Lower the door into its final position and tighten the screws located on both sides. 4 Insert the...


