Owner's Manual
Page 1
LFC25776** LFC21776** P/No. : MFL63728505 www.lge.com ENGLISH FRANÇAIS ESPAÑOL OWNER'S MANUAL FRENCH DOOR REFRIGERATOR Please read this guide thoroughly before operating and keep it handy for reference at all times.
LFC25776** LFC21776** P/No. : MFL63728505 www.lge.com ENGLISH FRANÇAIS ESPAÑOL OWNER'S MANUAL FRENCH DOOR REFRIGERATOR Please read this guide thoroughly before operating and keep it handy for reference at all times.
Owner's Manual
Page 2
... Connecting the Water Lines 17 Leveling the Refrigerator Doors 18 Starting 19 HOW TO USE Setting The Controls 20 Automatic Icemaker 21 Storing Foods 22 Location of reliable service. Your new LG French Door Refrigerator combines advanced cooling technology with many years ...of Foods 23 Shelf Height Adjustment 24 Removing and Replacing Components 25 CARE AND CLEANING Cleaning the Refrigerator 29 General Information 29 TROUBLESHOOTING Before Calling ...
... Connecting the Water Lines 17 Leveling the Refrigerator Doors 18 Starting 19 HOW TO USE Setting The Controls 20 Automatic Icemaker 21 Storing Foods 22 Location of reliable service. Your new LG French Door Refrigerator combines advanced cooling technology with many years ...of Foods 23 Shelf Height Adjustment 24 Removing and Replacing Components 25 CARE AND CLEANING Cleaning the Refrigerator 29 General Information 29 TROUBLESHOOTING Before Calling ...
Owner's Manual
Page 3
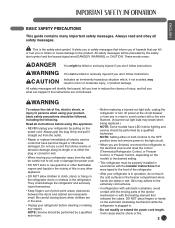
...When you don't follow instructions. Read all electric service cords that have LED interior lighting and service should be performed by pulling on the refrigerator doors or shelves in the freezer compartment when hands are not followed. Do not use gasoline or other flammable vapors and liquids in order...you what can kill or hurt you or others or cause damage to reduce the chance of this appliance. • NEVER unplug your refrigerator before using your product, basic safety precautions should be careful not to climb, stand, or hang on the power cord. ENGLISH BASIC SAFETY...
...When you don't follow instructions. Read all electric service cords that have LED interior lighting and service should be performed by pulling on the refrigerator doors or shelves in the freezer compartment when hands are not followed. Do not use gasoline or other flammable vapors and liquids in order...you what can kill or hurt you or others or cause damage to reduce the chance of this appliance. • NEVER unplug your refrigerator before using your product, basic safety precautions should be careful not to climb, stand, or hang on the power cord. ENGLISH BASIC SAFETY...
Owner's Manual
Page 4
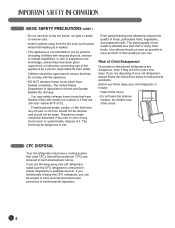
...; This appliance is removed for proper disposal by a person responsible for just a few days. Risk of Child Entrapment Discarded or abandoned refrigerators are still cold-below to help prevent accidents. Even partial thawing and refreezing reduces the quality of environmental legislation. 4 The food may ...have any food is affected less than that used CFCs (chlorofluorocarbons). CFC DISPOSAL Your old refrigerator may be discarded. Use refrozen foods as soon as possible to save as much of their safety. Before you are believed to...
...; This appliance is removed for proper disposal by a person responsible for just a few days. Risk of Child Entrapment Discarded or abandoned refrigerators are still cold-below to help prevent accidents. Even partial thawing and refreezing reduces the quality of environmental legislation. 4 The food may ...have any food is affected less than that used CFCs (chlorofluorocarbons). CFC DISPOSAL Your old refrigerator may be discarded. Use refrozen foods as soon as possible to save as much of their safety. Before you are believed to...
Owner's Manual
Page 5
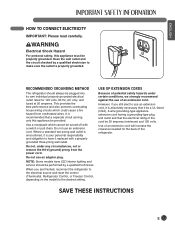
... a separate circuit serving only this appliance must be performed by a qualified electrician to use an extension cord. RECOMMENDED GROUNDING METHOD The refrigerator should be properly grounded. Do not, under certain conditions, we strongly recommend against the use an adapter plug. Use of an extension... Hz, AC only, and fused at 20 amperes. NOTE: Some models have it be provided. USE OF EXTENSION CORDS Because of the refrigerator. ENGLISH HOW TO CONNECT ELECTRICITY IMPORTANT: Please read carefully. SAVE THESE INSTRUCTIONS 5 Have the wall outlet and the circuit checked by a...
... a separate circuit serving only this appliance must be performed by a qualified electrician to use an extension cord. RECOMMENDED GROUNDING METHOD The refrigerator should be properly grounded. Do not, under certain conditions, we strongly recommend against the use an adapter plug. Use of an extension... Hz, AC only, and fused at 20 amperes. NOTE: Some models have it be provided. USE OF EXTENSION CORDS Because of the refrigerator. ENGLISH HOW TO CONNECT ELECTRICITY IMPORTANT: Please read carefully. SAVE THESE INSTRUCTIONS 5 Have the wall outlet and the circuit checked by a...
Owner's Manual
Page 6
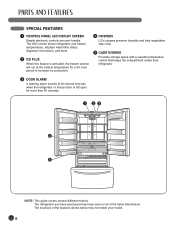
... freezer door is left open for more than refrigerator. 3 DOOR ALARM A warning alarm sounds at the coldest temperature for a 24- hour period to increase ice production. 4 CRISPERS LG's crispers preserve humidity and help vegetables stay crisp. 5 GLIDE'N'SERVE Provides storage space with a variable temperature control that keeps the compartment colder than 60...
... freezer door is left open for more than refrigerator. 3 DOOR ALARM A warning alarm sounds at the coldest temperature for a 24- hour period to increase ice production. 4 CRISPERS LG's crispers preserve humidity and help vegetables stay crisp. 5 GLIDE'N'SERVE Provides storage space with a variable temperature control that keeps the compartment colder than 60...
Owner's Manual
Page 7
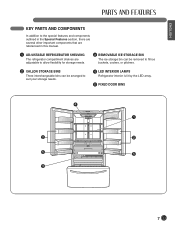
...special features and components outlined in the Special Features section, there are several other important components that are referenced in this manual. 1 ADJUSTABLE REFRIGERATOR SHELVING The refrigerator compartment shelves are adjustable to allow flexibility for storage needs. 3 REMOVABLE ICE STORAGE BIN The ice storage bin can be removed to fill ...ice buckets, coolers, or pitchers. 2 GALLON STORAGE BINS Three interchangeable bins can be arranged to suit your storage needs. 4 LED INTERIOR LAMPS Refrigerator interior is lit by the LED array. 5 FIXED DOOR BINS 4 1 2 2 5 5 3 7
...special features and components outlined in the Special Features section, there are several other important components that are referenced in this manual. 1 ADJUSTABLE REFRIGERATOR SHELVING The refrigerator compartment shelves are adjustable to allow flexibility for storage needs. 3 REMOVABLE ICE STORAGE BIN The ice storage bin can be removed to fill ...ice buckets, coolers, or pitchers. 2 GALLON STORAGE BINS Three interchangeable bins can be arranged to suit your storage needs. 4 LED INTERIOR LAMPS Refrigerator interior is lit by the LED array. 5 FIXED DOOR BINS 4 1 2 2 5 5 3 7

Owner's Manual
Page 8
...installation may cause vibration and noise. Allow at least 24 in. (61 cm) in front of electric shock, do not install the refrigerator in lowered freezing capability and increased electricity consumption charges. CLEARANCES • Too small a distance from adjacent items may result in a wet ...Select a place where a water supply can be exposed to temperatures below freezing or exposed to outdoor weather conditions. • Install this refrigerator is installed where the temperature is above 110°F (43°C), the freezing capacity is compromised and the cost of electricity used ...
...installation may cause vibration and noise. Allow at least 24 in. (61 cm) in front of electric shock, do not install the refrigerator in lowered freezing capability and increased electricity consumption charges. CLEARANCES • Too small a distance from adjacent items may result in a wet ...Select a place where a water supply can be exposed to temperatures below freezing or exposed to outdoor weather conditions. • Install this refrigerator is installed where the temperature is above 110°F (43°C), the freezing capacity is compromised and the cost of electricity used ...
Owner's Manual
Page 9
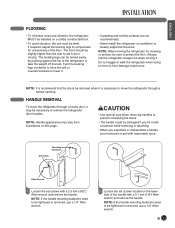
... removing or attaching. • When you assemble or disassemble a handle, you must be turned easily by pushing against the top of the refrigerator to take the weight off the feet. NOTE: If the handle mounting fasteners need to be slightly higher than the rear to aid in ... be tightened or removed, use a 1/4" Allen wrench. 9 The leveling legs can be level. ENGLISH FLOORING • To minimize noise and vibration, the refrigerator MUST be installed on a solidly constructed floor. • To avoid vibration, the unit must push or pull with reasonable force. If required, adjust the ...
... removing or attaching. • When you assemble or disassemble a handle, you must be turned easily by pushing against the top of the refrigerator to take the weight off the feet. NOTE: If the handle mounting fasteners need to be slightly higher than the rear to aid in ... be tightened or removed, use a 1/4" Allen wrench. 9 The leveling legs can be level. ENGLISH FLOORING • To minimize noise and vibration, the refrigerator MUST be installed on a solidly constructed floor. • To avoid vibration, the unit must push or pull with reasonable force. If required, adjust the ...

Owner's Manual
Page 10
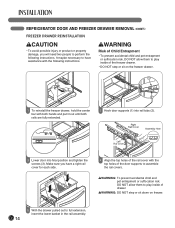
...when you begin, remove food and bins from the doors. You may be injured. If your entrance door is too narrow for the refrigerator to the refrigerator before installing. Failure to do so could result in death or serious injury. • Do not put hands or feet or metal...to be tightened or removed use a 1/4" Allen wrench. HANDLE REMOVAL (CONT.) HANDLE REINSTALLATION Mounting Fasteners 1 Place the handle on the bottom of the refrigerator. NOTE: If the handle mounting fasteners need to be tightened or removed use a 1/4" Allen wrench 2 Place the handle on the door by aligning ...
...when you begin, remove food and bins from the doors. You may be injured. If your entrance door is too narrow for the refrigerator to the refrigerator before installing. Failure to do so could result in death or serious injury. • Do not put hands or feet or metal...to be tightened or removed use a 1/4" Allen wrench. HANDLE REMOVAL (CONT.) HANDLE REINSTALLATION Mounting Fasteners 1 Place the handle on the bottom of the refrigerator. NOTE: If the handle mounting fasteners need to be tightened or removed use a 1/4" Allen wrench 2 Place the handle on the door by aligning ...
Owner's Manual
Page 11
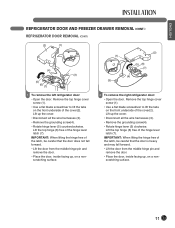
... AND FREEZER DRAWER REMOVAL (CONT.) REFRIGERATOR DOOR REMOVAL (CONT.) (2) (1) (4) (3) (5) (6) (7) (1) (3) (2) (5) (6) (7) (4) 1 To remove the left refrigerator door: • Open the door. Remove the top hinge cover screw (1). • Use a flat blade screwdriver to lift the tabs on a nonscratching surface. 11 ... lever latch (7). Remove the top hinge cover screw (1). • Use a flat blade screwdriver to lift the tabs on a nonscratching surface. 2 To remove the right refrigerator door: • Open the door. IMPORTANT: When lifting the hinge free of the cover(2).
... AND FREEZER DRAWER REMOVAL (CONT.) REFRIGERATOR DOOR REMOVAL (CONT.) (2) (1) (4) (3) (5) (6) (7) (1) (3) (2) (5) (6) (7) (4) 1 To remove the left refrigerator door: • Open the door. Remove the top hinge cover screw (1). • Use a flat blade screwdriver to lift the tabs on a nonscratching surface. 11 ... lever latch (7). Remove the top hinge cover screw (1). • Use a flat blade screwdriver to lift the tabs on a nonscratching surface. 2 To remove the right refrigerator door: • Open the door. IMPORTANT: When lifting the hinge free of the cover(2).
Owner's Manual
Page 12
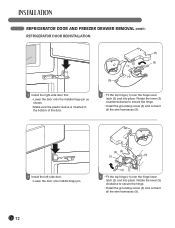
... into place. Rotate the lever (3) clockwise to secure the hinge. • Install the grounding screw (4) and connect all the wire harnesses (5). 12 REFRIGERATOR DOOR AND FREEZER DRAWER REMOVAL (CONT.) REFRIGERATOR DOOR REINSTALLATION (2) (2) (3) (1) (4) (5) 1 Install the right-side door first. • Lower the door onto the middle hinge pin as shown. • Make sure...
... into place. Rotate the lever (3) clockwise to secure the hinge. • Install the grounding screw (4) and connect all the wire harnesses (5). 12 REFRIGERATOR DOOR AND FREEZER DRAWER REMOVAL (CONT.) REFRIGERATOR DOOR REINSTALLATION (2) (2) (3) (1) (4) (5) 1 Install the right-side door first. • Lower the door onto the middle hinge pin as shown. • Make sure...
Owner's Manual
Page 13
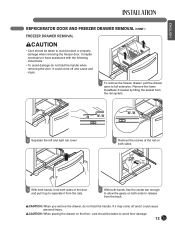
... left and right rail cover 3 Remove the screws of the rail on both sides. 4 With both hands, hold the handle when removing the door. ENGLISH REFRIGERATOR DOOR AND FREEZER DRAWER REMOVAL (CONT.) FREEZER DRAWER REMOVAL wCAUTION • Care should be taken to avoid floor damage. 13 wCAUTION: When you remove the...
... left and right rail cover 3 Remove the screws of the rail on both sides. 4 With both hands, hold the handle when removing the door. ENGLISH REFRIGERATOR DOOR AND FREEZER DRAWER REMOVAL (CONT.) FREEZER DRAWER REMOVAL wCAUTION • Care should be taken to avoid floor damage. 13 wCAUTION: When you remove the...
Owner's Manual
Page 14
... out to play inside of drawer. It maybe necessary to assemble the rail covers. wWARNING: To prevent accidental child and pet entrapment or suffocation risk. REFRIGERATOR DOOR AND FREEZER DRAWER REMOVAL (CONT.) FREEZER DRAWER REINSTALLATION wCAUTION • To avoid possible injury or product or property damage, you have a right rail cover...
... out to play inside of drawer. It maybe necessary to assemble the rail covers. wWARNING: To prevent accidental child and pet entrapment or suffocation risk. REFRIGERATOR DOOR AND FREEZER DRAWER REMOVAL (CONT.) FREEZER DRAWER REINSTALLATION wCAUTION • To avoid possible injury or product or property damage, you have a right rail cover...
Owner's Manual
Page 15
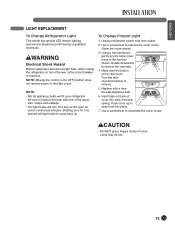
... position does not remove power to remove the cover screw. (Save the cover screw) 3. Replace with one second will fit your refrigerator. Using a flat instrument, gently pry the lamp cover loose in freezer ceiling. Shutting door for seven continuous minutes. Rotate downward to... come back on back of cover. Insert tabs on . Unplug refrigerator power cord form outlet. 2. NOTE: • Not all appliance bulbs will light bulbs to remove the rear tabs. 4. wWARNING Electrical ...
... position does not remove power to remove the cover screw. (Save the cover screw) 3. Replace with one second will fit your refrigerator. Using a flat instrument, gently pry the lamp cover loose in freezer ceiling. Shutting door for seven continuous minutes. Rotate downward to... come back on back of cover. Insert tabs on . Unplug refrigerator power cord form outlet. 2. NOTE: • Not all appliance bulbs will light bulbs to remove the rear tabs. 4. wWARNING Electrical ...
Owner's Manual
Page 16
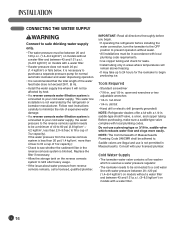
... the water supply line where it is necessary to purchase a separate pressure pump for the icemaker to begin . • If operating the refrigerator before you begin producing ice. Follow next instructions carefully to minimize the risk of 7oz capacity): • Check to refill after heavy usage...• If a reverse osmosis water filtration system is connected to your cold water supply, This water line installation is not warranted by the refrigerator or icemaker manufacturer. Do not use is blocked. open-end wrenches or two adjustable wrenches • 1/4-in . nut driver • ...
... the water supply line where it is necessary to purchase a separate pressure pump for the icemaker to begin . • If operating the refrigerator before you begin producing ice. Follow next instructions carefully to minimize the risk of 7oz capacity): • Check to refill after heavy usage...• If a reverse osmosis water filtration system is connected to your cold water supply, This water line installation is not warranted by the refrigerator or icemaker manufacturer. Do not use is blocked. open-end wrenches or two adjustable wrenches • 1/4-in . nut driver • ...
Owner's Manual
Page 17
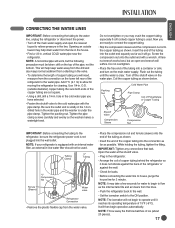
... Slip the compression sleeve and the compression nut onto the copper tubing as shown below. Coil the copper tubing as shown. NOTE: If your refrigerator is under the pipe clamp. It will suffice. Opening an outside diameter) copper tubing. Use 1/4-in . Be sure both ends of the ... not overtighten. • Place the free end of the pipe, not the bottom. This will help drain water from the lines. • Push the refrigerator back to the wall. • Set the icemaker switch to the ON position. Add 7 ft. (2.1 m) to begin operation automatically. hole in the...
... Slip the compression sleeve and the compression nut onto the copper tubing as shown below. Coil the copper tubing as shown. NOTE: If your refrigerator is under the pipe clamp. It will suffice. Opening an outside diameter) copper tubing. Use 1/4-in . Be sure both ends of the ... not overtighten. • Place the free end of the pipe, not the bottom. This will help drain water from the lines. • Push the refrigerator back to the wall. • Set the icemaker switch to the ON position. Add 7 ft. (2.1 m) to begin operation automatically. hole in the...
Owner's Manual
Page 18
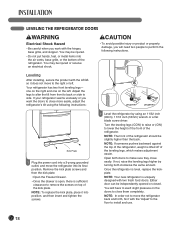
... not, raise the leveling legs higher by using the following instructions. You will need two people to make sure they close more easily, adjust the refrigerator's tilt using an 11/32 inch (8mm), 11/16 inch (18mm) wrench or a flat blade screw driver. Remove the kick plate screws and then ... into the air vents, base grille, or the bottom of the kick plate. NOTE: To replace the kick plate, place it does not move the refrigerator into a 3-prong grounded outlet, and move to install and use. 18 Either door can be slightly higher than the back. Leveling After installing, secure ...
... not, raise the leveling legs higher by using the following instructions. You will need two people to make sure they close more easily, adjust the refrigerator's tilt using an 11/32 inch (8mm), 11/16 inch (18mm) wrench or a flat blade screw driver. Remove the kick plate screws and then ... into the air vents, base grille, or the bottom of the kick plate. NOTE: To replace the kick plate, place it does not move the refrigerator into a 3-prong grounded outlet, and move to install and use. 18 Either door can be slightly higher than the back. Leveling After installing, secure ...
Owner's Manual
Page 19
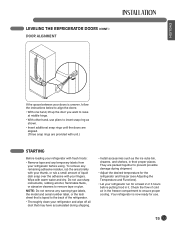
...Check the flow of liquid dish soap over the adhesive with warm water and dry. They are provided with unit.) STARTING Before loading your refrigerator with fresh foods: • Remove tape and any remaining adhesive residue, rub the area briskly with your thumb, or rub a small amount...• Insert additional snap rings until the doors are aligned. (Three snap rings are packed together to ensure proper cooling. ENGLISH LEVELING THE REFRIGERATOR DOORS (CONT.) DOOR ALIGNMENT If the space between your doors is uneven, follow the instructions below to align the doors: • With one...
...Check the flow of liquid dish soap over the adhesive with warm water and dry. They are provided with unit.) STARTING Before loading your refrigerator with fresh foods: • Remove tape and any remaining adhesive residue, rub the area briskly with your thumb, or rub a small amount...• Insert additional snap rings until the doors are aligned. (Three snap rings are packed together to ensure proper cooling. ENGLISH LEVELING THE REFRIGERATOR DOORS (CONT.) DOOR ALIGNMENT If the space between your doors is uneven, follow the instructions below to align the doors: • With one...

Owner's Manual
Page 20
...OFF). • Freezer Temp Control: -6°F to 8°F (-21°C to -13°C) When the setting is open , keep pressing the REFRIGERATOR Button and ICE PLUS Button more than 5 seconds, then it goes to the display mode with Special Beep Sound with special beep sound. • Perform...regulate the temperature in the display and it continues for 24hours. Or you want to change °C to °F, hold FREEZER key and REFRIGERATOR key over 5 seconds at display mode (Exceptions: Lamp, Display) • This function increases both icemaking and freezing capabilities. Then adjust the...
...OFF). • Freezer Temp Control: -6°F to 8°F (-21°C to -13°C) When the setting is open , keep pressing the REFRIGERATOR Button and ICE PLUS Button more than 5 seconds, then it goes to the display mode with Special Beep Sound with special beep sound. • Perform...regulate the temperature in the display and it continues for 24hours. Or you want to change °C to °F, hold FREEZER key and REFRIGERATOR key over 5 seconds at display mode (Exceptions: Lamp, Display) • This function increases both icemaking and freezing capabilities. Then adjust the...


