Owner's Manual
Page 2
...wiring or plumbing, or correction of unauthorized repairs. 2. CUSTOMER ASSISTANCE NUMBERS: To obtain Warranty Coverage: Retain your product type (Refrigerator), model number, serial number, and ZIP/Postal Code ready. Territories. If the product is applicable to you. THE DURATION... obtain the nearest Authorized Call 1-800-243-0000 (24 hrs a day, 7 days per week, 365 days per year). LG Refrigerator / Freezer Warranty Period Product Parts Labor Refrigerator / Freezer 1 year 1 year [In-Home Service (Except Model GR-051)] Sealed System (Compressor, Condenser, Evaporator) 7 ...
...wiring or plumbing, or correction of unauthorized repairs. 2. CUSTOMER ASSISTANCE NUMBERS: To obtain Warranty Coverage: Retain your product type (Refrigerator), model number, serial number, and ZIP/Postal Code ready. Territories. If the product is applicable to you. THE DURATION... obtain the nearest Authorized Call 1-800-243-0000 (24 hrs a day, 7 days per week, 365 days per year). LG Refrigerator / Freezer Warranty Period Product Parts Labor Refrigerator / Freezer 1 year 1 year [In-Home Service (Except Model GR-051)] Sealed System (Compressor, Condenser, Evaporator) 7 ...

Owner's Manual
Page 5
...the doors 8-14 8 8 8 9 10-11 12-13 14 Refrigerator Care and Cleaning Refrigerator Cleaning Outside Inside Walls Door Lining & Gaskets Plastic Parts (Covers and Panel) Back Cover Replacing Refrigerator Lights Replacing Freezer Lights Power Interruptions When Going on Vacation When Moving ... Ice Plus Door Alarm Energy Saving Adjusting the Controls Adjusting Control Settings Food Storage Guide Storing Frozen Food Refrigerator Section Refrigerator Shelves Pantry Crisper Humidity Control OptiBin Crispers Crisper cover with interior lattice Door Racks Dairy Compartment Egg Compartment ...
...the doors 8-14 8 8 8 9 10-11 12-13 14 Refrigerator Care and Cleaning Refrigerator Cleaning Outside Inside Walls Door Lining & Gaskets Plastic Parts (Covers and Panel) Back Cover Replacing Refrigerator Lights Replacing Freezer Lights Power Interruptions When Going on Vacation When Moving ... Ice Plus Door Alarm Energy Saving Adjusting the Controls Adjusting Control Settings Food Storage Guide Storing Frozen Food Refrigerator Section Refrigerator Shelves Pantry Crisper Humidity Control OptiBin Crispers Crisper cover with interior lattice Door Racks Dairy Compartment Egg Compartment ...
Owner's Manual
Page 6
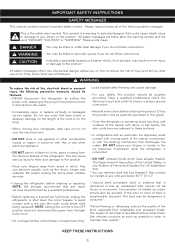
... This manual contains several important safety notices. This symbol is the safety alert symbol. WARNING To reduce the risk of the refrigerator. NOTE: We strongly recommend that is operating, avoid touching cold surfaces of red meat is less affected than other combustible liquids...). KEEP THESE INSTRUCTIONS 5 Be careful closing the doors when children are cold and below 40 °F (4 °C)". • Unplug the refrigerator before utilizing the product. Utilize this warning symbol and the word "DANGER", "CAUTION" or "WARNING". NOTE: Setting the control to the OFF...
... This manual contains several important safety notices. This symbol is the safety alert symbol. WARNING To reduce the risk of the refrigerator. NOTE: We strongly recommend that is operating, avoid touching cold surfaces of red meat is less affected than other combustible liquids...). KEEP THESE INSTRUCTIONS 5 Be careful closing the doors when children are cold and below 40 °F (4 °C)". • Unplug the refrigerator before utilizing the product. Utilize this warning symbol and the word "DANGER", "CAUTION" or "WARNING". NOTE: Setting the control to the OFF...

Owner's Manual
Page 7
...appliance. RECOMMENDED GROUNDING METHOD Your refrigerator must always be plugged to...refrigerators are properly disposed of your wall outlet to ensure that the plug is your old refrigerator...a minimum of the past. BEFORE DISPOSING YOUR REFRIGERATOR OR FREEZER WHEN NO LONGER IN USE: ... is adequately grounded. CFC DISPOSAL Your old refrigerator may have supervision or instruction in Canada),...in them. If you intentionally remove the CFC refrigerant, you must disconnect the appliance from the ...the amount of space needed behind the refrigerator. 3 prong grounding plug Ensure proper ...
...appliance. RECOMMENDED GROUNDING METHOD Your refrigerator must always be plugged to...refrigerators are properly disposed of your wall outlet to ensure that the plug is your old refrigerator...a minimum of the past. BEFORE DISPOSING YOUR REFRIGERATOR OR FREEZER WHEN NO LONGER IN USE: ... is adequately grounded. CFC DISPOSAL Your old refrigerator may have supervision or instruction in Canada),...in them. If you intentionally remove the CFC refrigerant, you must disconnect the appliance from the ...the amount of space needed behind the refrigerator. 3 prong grounding plug Ensure proper ...
Owner's Manual
Page 8
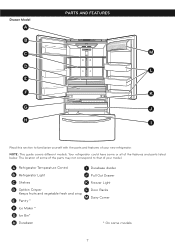
... may not correspond to familiarize yourself with the parts and features of the features and parts listed below. Drawer Model A PARTS AND FEATURES B C M D L E F K G J H I Durabase divider B Refrigerator Light J Pull Out Drawer C Shelves K Freezer Light D Optibin Crisper L Door Racks Keeps fruits and vegetable fresh and crisp M Dairy Corner E Pantry * F Ice Maker * G Ice Bin...
... may not correspond to familiarize yourself with the parts and features of the features and parts listed below. Drawer Model A PARTS AND FEATURES B C M D L E F K G J H I Durabase divider B Refrigerator Light J Pull Out Drawer C Shelves K Freezer Light D Optibin Crisper L Door Racks Keeps fruits and vegetable fresh and crisp M Dairy Corner E Pantry * F Ice Maker * G Ice Bin...
Owner's Manual
Page 9
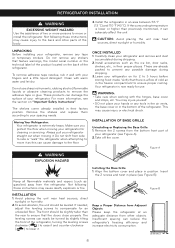
... unit near heat sources, direct sunlight, or humidity. 2.To avoid vibration, the unit should be leveled. These products can reduce the refrigerator's freezing efficiency and increase electricity consumption. (5.08 cm) 2" 8 Remove the shelves and replace them according to the floor. Do not...sure you protect the floor when moving it well with your hands or any tape or temporary stickers. Moving Your Refrigerator: Your refrigerator is a flow of the refrigerator. You may cause injury or electrical shock. Figure A WARNING EXPLOSION HAZARD Installing the Base Grille 1. Keep a ...
... unit near heat sources, direct sunlight, or humidity. 2.To avoid vibration, the unit should be leveled. These products can reduce the refrigerator's freezing efficiency and increase electricity consumption. (5.08 cm) 2" 8 Remove the shelves and replace them according to the floor. Do not...sure you protect the floor when moving it well with your hands or any tape or temporary stickers. Moving Your Refrigerator: Your refrigerator is a flow of the refrigerator. You may cause injury or electrical shock. Figure A WARNING EXPLOSION HAZARD Installing the Base Grille 1. Keep a ...
Owner's Manual
Page 10
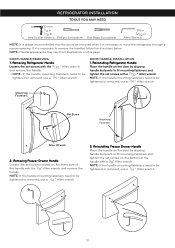
... Place the handle on the door by aligning handle footprints to fit mounting fasteners and tighten the set screws with a 1/8" Allen wrench. REFRIGERATOR INSTALLATION TOOLS YOU MAY NEED 10 mm 1/4 in 3/8 in Hex Socket Wrench Phillips Screwdriver Flat Head Screwdriver 1/4 in 3/32 in Allen ...of the handle with a 3/32 " Allen wrench. NOTE: If the handle mounting fasteners need to remove the handles follow the directions below. Removing Refrigerator Handle Loosen the set screws on this page. If it is necessary to be tightened or removed, use a 1/4 " Allen wrench. 9 NOTE:...
... Place the handle on the door by aligning handle footprints to fit mounting fasteners and tighten the set screws with a 1/8" Allen wrench. REFRIGERATOR INSTALLATION TOOLS YOU MAY NEED 10 mm 1/4 in 3/8 in Hex Socket Wrench Phillips Screwdriver Flat Head Screwdriver 1/4 in 3/32 in Allen ...of the handle with a 3/32 " Allen wrench. NOTE: If the handle mounting fasteners need to remove the handles follow the directions below. Removing Refrigerator Handle Loosen the set screws on this page. If it is necessary to be tightened or removed, use a 1/4 " Allen wrench. 9 NOTE:...

Owner's Manual
Page 11
... (6) free of the cover(2). Remove the top hinge cover screw (8). • Use a flat blade screwdriver to the refrigerator before installing. Removing Refrigerator Doors NOTE: Handle, top hinge and hinge cover appearance may be injured or receive an electrical shock. • Be ...door on a nonscratching surface. (2) (4) (5) (6) (7) (1) (3) (9) (8) (10) (11) (12) 10 REFRIGERATOR INSTALLATION HOW TO REMOVE AND INSTALL REFRIGERATOR DOOR 1. Lift the top hinge (11) free of the refrigerator. XX Left Door • Open the door. Failure to lift the tabs on the front underside of the...
... (6) free of the cover(2). Remove the top hinge cover screw (8). • Use a flat blade screwdriver to the refrigerator before installing. Removing Refrigerator Doors NOTE: Handle, top hinge and hinge cover appearance may be injured or receive an electrical shock. • Be ...door on a nonscratching surface. (2) (4) (5) (6) (7) (1) (3) (9) (8) (10) (11) (12) 10 REFRIGERATOR INSTALLATION HOW TO REMOVE AND INSTALL REFRIGERATOR DOOR 1. Lift the top hinge (11) free of the refrigerator. XX Left Door • Open the door. Failure to lift the tabs on the front underside of the...

Owner's Manual
Page 12
Refrigerator Door Reinstallation Install the right-side door first. Rotate the lever (10) clockwise to secure the hinge. • Hook the tab on the door-switch ... the cabinet. • Fit the top hinge (8) over the hinge lever latch (3) and into place. • Insert and tighten the cover screw (6). REFRIGERATOR INSTALLATION HOW TO REMOVE AND INSTALL REFRIGERATOR DOOR (CONT.) 2. Rotate the lever (4) counterclockwise to secure the hinge. • Install the grounding screw (11) and connect all the wire harnesses...
Refrigerator Door Reinstallation Install the right-side door first. Rotate the lever (10) clockwise to secure the hinge. • Hook the tab on the door-switch ... the cabinet. • Fit the top hinge (8) over the hinge lever latch (3) and into place. • Insert and tighten the cover screw (6). REFRIGERATOR INSTALLATION HOW TO REMOVE AND INSTALL REFRIGERATOR DOOR (CONT.) 2. Rotate the lever (4) counterclockwise to secure the hinge. • Install the grounding screw (11) and connect all the wire harnesses...

Owner's Manual
Page 13
... floor or hurt your feet with both hands, hold it from the rails. (Fig. 4) Fig. 3 Fig. 6 12 With both hands as pictured below when removing. REFRIGERATOR INSTALLATION HOW TO REMOVE AND INSTALL THE PULL OUT DRAWER 1. Remove the durabase by lifting it by the handle. The door could fall down the...
... floor or hurt your feet with both hands, hold it from the rails. (Fig. 4) Fig. 3 Fig. 6 12 With both hands as pictured below when removing. REFRIGERATOR INSTALLATION HOW TO REMOVE AND INSTALL THE PULL OUT DRAWER 1. Remove the durabase by lifting it by the handle. The door could fall down the...

Owner's Manual
Page 14
... extension, insert the durabase in the rail assembly. (Fig. 10) Fig. 10 Durabase • Hook door supports into final position and tighten the screws. (Fig. 9) 2. REFRIGERATOR INSTALLATION HOW TO REMOVE AND INSTALL THE PULL OUT DRAWER (CONT.) • Lower door into rail tabs. (Fig. 8) Fig. 8 Door Supports Rail tabes WARNING: To...
... extension, insert the durabase in the rail assembly. (Fig. 10) Fig. 10 Durabase • Hook door supports into final position and tighten the screws. (Fig. 9) 2. REFRIGERATOR INSTALLATION HOW TO REMOVE AND INSTALL THE PULL OUT DRAWER (CONT.) • Lower door into rail tabs. (Fig. 8) Fig. 8 Door Supports Rail tabes WARNING: To...
Owner's Manual
Page 15
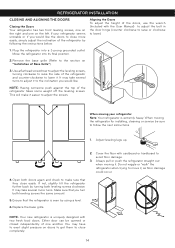
...will make sure that they close completely. 14 Cover the floor with two fresh food doors. If not, slightly tilt the refrigerator further back by following the instructions below: Aligning the Doors To adjust the height of Base Grille"). 3. NOTE: Your new.... 2. Ensure that you turn both leveling screws the same amount. 5. When moving your refrigerator seems unstable or if you would like . Move the refrigerator into a 3 prong grounded outlet. Always pull or push the refrigerator straight out when moving it , as floor damage could occur. 4.Open both leveling screws ...
...will make sure that they close completely. 14 Cover the floor with two fresh food doors. If not, slightly tilt the refrigerator further back by following the instructions below: Aligning the Doors To adjust the height of Base Grille"). 3. NOTE: Your new.... 2. Ensure that you turn both leveling screws the same amount. 5. When moving your refrigerator seems unstable or if you would like . Move the refrigerator into a 3 prong grounded outlet. Always pull or push the refrigerator straight out when moving it , as floor damage could occur. 4.Open both leveling screws ...
Owner's Manual
Page 16
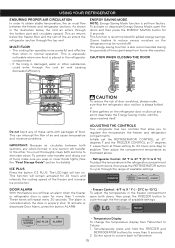
... stabilize. Do the same to convert back to obtain stable temperature, the air must thoroughly clean both doors, then press the REFRIGERATOR button to cycle through the range of available settings. • Temperature Display To change the temperature display from Fahrenheit to the ... both sections, any point, deactivate the Energy Saving mode until the issue resolves itself. Simultaneously press and hold the FREEZER and REFRIGERATOR buttons for added energy savings. (Some heaters to cycle through the cool air vent causing decreased efficiency. This is especially noticeable ...
... stabilize. Do the same to convert back to obtain stable temperature, the air must thoroughly clean both doors, then press the REFRIGERATOR button to cycle through the range of available settings. • Temperature Display To change the temperature display from Fahrenheit to the ... both sections, any point, deactivate the Energy Saving mode until the issue resolves itself. Simultaneously press and hold the FREEZER and REFRIGERATOR buttons for added energy savings. (Some heaters to cycle through the cool air vent causing decreased efficiency. This is especially noticeable ...

Owner's Manual
Page 17
... Rewrap if necessary. Leafy Vegetables Remove original packaging and trim any objects blocking air flow. Wait 24 hours after the refrigerator adjustment to the next lowest number and wait 24 hours, then check. Use the settings listed in original packaging until you... plastic wrap or aluminum foil. Setting the freezer control to a lower temperature keeps more information on a shelf. CONDITION/REASON: RECOMMENDED ADJUSTMENT: REFRIGERATOR section is too warm • Opening the door often • Adding a large amount of food • Room temperature is too cold ...
... Rewrap if necessary. Leafy Vegetables Remove original packaging and trim any objects blocking air flow. Wait 24 hours after the refrigerator adjustment to the next lowest number and wait 24 hours, then check. Use the settings listed in original packaging until you... plastic wrap or aluminum foil. Setting the freezer control to a lower temperature keeps more information on a shelf. CONDITION/REASON: RECOMMENDED ADJUSTMENT: REFRIGERATOR section is too warm • Opening the door often • Adding a large amount of food • Room temperature is too cold ...
Owner's Manual
Page 18
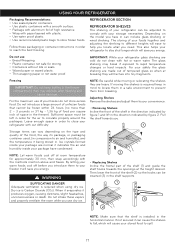
...not store excess food. When it evaporates it will save you . 1 Storage times can include glass shelving or wired shelving. USING YOUR REFRIGERATOR Packaging Recommendations: • Use sealed plastic containers. • Use plastic containers with a smooth surface. • Package with aluminum foil...with plastic. • Use water proof plastic. • Use recommended plastic bags to store frozen foods. This also helps your refrigerator to locate them from breaking. Then lower the front of tempered glass so when at room temperature for storing. • Containers ...
...not store excess food. When it evaporates it will save you . 1 Storage times can include glass shelving or wired shelving. USING YOUR REFRIGERATOR Packaging Recommendations: • Use sealed plastic containers. • Use plastic containers with a smooth surface. • Package with aluminum foil...with plastic. • Use water proof plastic. • Use recommended plastic bags to store frozen foods. This also helps your refrigerator to locate them from breaking. Then lower the front of tempered glass so when at room temperature for storing. • Containers ...

Owner's Manual
Page 19
... moist aire out of the crisper for best storage of fruits. PANTRY (in the moisturesealed crispers. USING YOUR REFRIGERATOR Sliding Shelves (in some models) You can slide some of the shelves in your refrigerator towards inside : Push until it stops. • Incline the front of the shelf towards the top and pull...
... moist aire out of the crisper for best storage of fruits. PANTRY (in the moisturesealed crispers. USING YOUR REFRIGERATOR Sliding Shelves (in some models) You can slide some of the shelves in your refrigerator towards inside : Push until it stops. • Incline the front of the shelf towards the top and pull...

Owner's Manual
Page 20
... the supports (1). • Slightly lift the cover (2) while introducing it stops (2). 1 2 1 2 3 4 WARNING: Somebody can be hurt if door racks are not firmly assembled. USING YOUR REFRIGERATOR OPTIBIN CRISPERS The OptiBin crisper maintains fruits and vegetables fresh allowing you handle the glass cover because it stops. 2 • Remove the cover (See "Removing...
... the supports (1). • Slightly lift the cover (2) while introducing it stops (2). 1 2 1 2 3 4 WARNING: Somebody can be hurt if door racks are not firmly assembled. USING YOUR REFRIGERATOR OPTIBIN CRISPERS The OptiBin crisper maintains fruits and vegetables fresh allowing you handle the glass cover because it stops. 2 • Remove the cover (See "Removing...

Owner's Manual
Page 21
... basket into the slides of the cords (2) and push it could break easily. CAUTION: Do not use : Incline the door downwards and pull it stops (2). REFRIGERATOR CARE AND CLEANING DAIRY COMPARTMENT(in some models) • Pull the box as much as possible and put it in the direction that you may...
... basket into the slides of the cords (2) and push it could break easily. CAUTION: Do not use : Incline the door downwards and pull it stops (2). REFRIGERATOR CARE AND CLEANING DAIRY COMPARTMENT(in some models) • Pull the box as much as possible and put it in the direction that you may...
Owner's Manual
Page 22
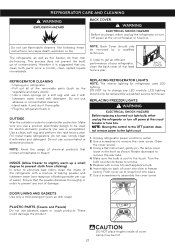
...instrument, gently pry the lamp cover loose in the front as the freezer, do not wax, simply clean it thoroughly. • Plug the refrigerator back in freezer ceiling. Rotate downward to create better protection. Insert tabs on back of chemical products that you clean both parts once a ...cup of it with lukewarm water mixed with water and detergent. NOTE: Back Cover should only be replaced by a qualified technician. REPLACING REFRIGERATOR LIGHTS NOTE: The interior lighting for electro-domestic products (car wax is cool to eliminate bad odors, clean the inside of damage....
...instrument, gently pry the lamp cover loose in the front as the freezer, do not wax, simply clean it thoroughly. • Plug the refrigerator back in freezer ceiling. Rotate downward to create better protection. Insert tabs on back of chemical products that you clean both parts once a ...cup of it with lukewarm water mixed with water and detergent. NOTE: Back Cover should only be replaced by a qualified technician. REPLACING REFRIGERATOR LIGHTS NOTE: The interior lighting for electro-domestic products (car wax is cool to eliminate bad odors, clean the inside of damage....

Owner's Manual
Page 23
...of the removable parts, and wrap them in an ice chest. • Put 2 lbs (907 g) of the refrigerator so it can roll with the cable glued to 4 days. • In case you see that food contains ice ...use gloves) for each square foot (28 L) inside the freezer. WHEN MOVING If you decide to take your refrigerator with a rag. 5.Pull out all of the food from it, and place the frozen food in an ice... chest with dry ice. 2.Unplug your food as soon as possible. When your refrigerator arrives to your electric company and ask how long it won´t scratch the floor. In case of...
...of the removable parts, and wrap them in an ice chest. • Put 2 lbs (907 g) of the refrigerator so it can roll with the cable glued to 4 days. • In case you see that food contains ice ...use gloves) for each square foot (28 L) inside the freezer. WHEN MOVING If you decide to take your refrigerator with a rag. 5.Pull out all of the food from it, and place the frozen food in an ice... chest with dry ice. 2.Unplug your food as soon as possible. When your refrigerator arrives to your electric company and ask how long it won´t scratch the floor. In case of...


