Owner's Manual
Page 2
..., and have your product type (Refrigerator), model number, serial number, and ZIP/Postal Code ready. 1 including Alaska, Hawaii, and U.S. Damage resulting from state to LG in the U.S. If the product is installed outside the normal service area, any cost of transportation involved in the repair of the product, or the replacement of defective parts, shall be provided to state. Service Assistance: Press the appropriate...
..., and have your product type (Refrigerator), model number, serial number, and ZIP/Postal Code ready. 1 including Alaska, Hawaii, and U.S. Damage resulting from state to LG in the U.S. If the product is installed outside the normal service area, any cost of transportation involved in the repair of the product, or the replacement of defective parts, shall be provided to state. Service Assistance: Press the appropriate...

Owner's Manual
Page 5
... Doors How to remove and Install Pull-Out Drawer Closing and Aligning the doors 8-14 8 8 8 9 10-11 12-13 14 Refrigerator Care and Cleaning Refrigerator Cleaning Outside Inside Walls Door Lining & Gaskets Plastic Parts (Covers and Panel) Back Cover Replacing Refrigerator Lights Replacing Freezer Lights Power Interruptions When Going on Vacation When Moving About the Automatic Ice Maker Connecting the Water Line Troubleshooting Guide Using your Refrigerator Ensuring Proper Air Circulation Multi Flow Ice Plus Door Alarm Energy Saving Adjusting the Controls Adjusting Control Settings...
... Doors How to remove and Install Pull-Out Drawer Closing and Aligning the doors 8-14 8 8 8 9 10-11 12-13 14 Refrigerator Care and Cleaning Refrigerator Cleaning Outside Inside Walls Door Lining & Gaskets Plastic Parts (Covers and Panel) Back Cover Replacing Refrigerator Lights Replacing Freezer Lights Power Interruptions When Going on Vacation When Moving About the Automatic Ice Maker Connecting the Water Line Troubleshooting Guide Using your Refrigerator Ensuring Proper Air Circulation Multi Flow Ice Plus Door Alarm Energy Saving Adjusting the Controls Adjusting Control Settings...
Owner's Manual
Page 6
... surfaces. • In refrigerators with an automatic ice dispenser, avoid contact with moving your fingers away from the light bulb circuit. • Do not keep bottles in proximity with damp or wet hands; NOTE: Setting the control to ensure a proper ground connection. • Immediately repair or replace all faulty or damaged service cables. The quality of fire, electrical shock or personal injury...
... surfaces. • In refrigerators with an automatic ice dispenser, avoid contact with moving your fingers away from the light bulb circuit. • Do not keep bottles in proximity with damp or wet hands; NOTE: Setting the control to ensure a proper ground connection. • Immediately repair or replace all faulty or damaged service cables. The quality of fire, electrical shock or personal injury...

Owner's Manual
Page 7
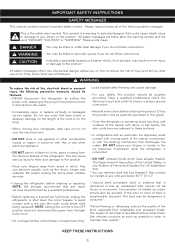
... a switch. The use of an extension cable will increase the amount of space needed behind the refrigerator. 3 prong grounding plug Ensure proper ground exists before use of the past. The energy current should be supervised to ensure that the plug is not a problem of the appliance by our service center or qualified LG technician to the use WARNING REPLACING ELECTRICAL CABLE If the power cord...
... a switch. The use of an extension cable will increase the amount of space needed behind the refrigerator. 3 prong grounding plug Ensure proper ground exists before use of the past. The energy current should be supervised to ensure that the plug is not a problem of the appliance by our service center or qualified LG technician to the use WARNING REPLACING ELECTRICAL CABLE If the power cord...
Owner's Manual
Page 8
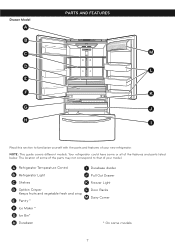
Drawer Model A PARTS AND FEATURES B C M D L E F K G J H I Durabase divider B Refrigerator Light J Pull Out Drawer C Shelves K Freezer Light D Optibin Crisper L Door Racks Keeps fruits and vegetable fresh and crisp M Dairy Corner E Pantry * F Ice Maker * G Ice Bin* H Durabase * On some models 7 A Refrigerator Temperature Control I Read this section to that of your new refrigerator. Your refrigerator could have some of the parts may not correspond to familiarize yourself with the parts and features of the features and parts listed below. The location of...
Drawer Model A PARTS AND FEATURES B C M D L E F K G J H I Durabase divider B Refrigerator Light J Pull Out Drawer C Shelves K Freezer Light D Optibin Crisper L Door Racks Keeps fruits and vegetable fresh and crisp M Dairy Corner E Pantry * F Ice Maker * G Ice Bin* H Durabase * On some models 7 A Refrigerator Temperature Control I Read this section to that of your new refrigerator. Your refrigerator could have some of the parts may not correspond to familiarize yourself with the parts and features of the features and parts listed below. The location of...
Owner's Manual
Page 9
... leveled. To remove adhesive tape residue, rub it well with your refrigerator on the back of the refrigerator. Do not use . For more persons to move it as the ice bin, door racks, shelves, etc., in the freezer compartment to your refrigerator (see Figure A). 2.Take off the cover. Do not shift from the bottom front part of your spacing needs. Your refrigerator is a flow of cold air...
... leveled. To remove adhesive tape residue, rub it well with your refrigerator on the back of the refrigerator. Do not use . For more persons to move it as the ice bin, door racks, shelves, etc., in the freezer compartment to your refrigerator (see Figure A). 2.Take off the cover. Do not shift from the bottom front part of your spacing needs. Your refrigerator is a flow of cold air...
Owner's Manual
Page 10
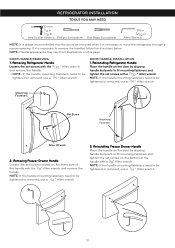
... and remove the handle. NOTE: If the handle mounting fasteners need to be tightened or removed, use a 1/4 " Allen wrench. 9 NOTE: Handle appearance may vary from illustrations on the door by aligning handle footprints to be tightened or removed, use a 1/4 " Allen wrench. 2. NOTE: If the handle mounting fasteners need to move the refrigerator through a narrow opening. Removing Freezer Drawer Handle Loosen the set screws with a 1/8" Allen wrench. REFRIGERATOR INSTALLATION TOOLS YOU MAY NEED 10...
... and remove the handle. NOTE: If the handle mounting fasteners need to be tightened or removed, use a 1/4 " Allen wrench. 9 NOTE: Handle appearance may vary from illustrations on the door by aligning handle footprints to be tightened or removed, use a 1/4 " Allen wrench. 2. NOTE: If the handle mounting fasteners need to move the refrigerator through a narrow opening. Removing Freezer Drawer Handle Loosen the set screws with a 1/8" Allen wrench. REFRIGERATOR INSTALLATION TOOLS YOU MAY NEED 10...

Owner's Manual
Page 11
... page. Remove the top hinge cover screw (8). • Use a flat blade screwdriver to lift the tabs on the front underside of the latch, be careful that the door does not fall forward. • Lift the door from illustrations on a nonscratching surface. (2) (4) (5) (6) (7) (1) (3) (9) (8) (10) (11) (12) 10 Failure to the refrigerator before installing. XX Left Door • Open the door. WARNING • Disconnect electrical supply to do...
... page. Remove the top hinge cover screw (8). • Use a flat blade screwdriver to lift the tabs on the front underside of the latch, be careful that the door does not fall forward. • Lift the door from illustrations on a nonscratching surface. (2) (4) (5) (6) (7) (1) (3) (9) (8) (10) (11) (12) 10 Failure to the refrigerator before installing. XX Left Door • Open the door. WARNING • Disconnect electrical supply to do...
Owner's Manual
Page 15
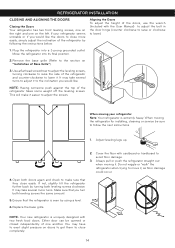
... refrigerator by following the instructions below: Aligning the Doors To adjust the height of the doors, use the wrench (Included with the User Manual) to adjust the bolt in the door hinge (counter clockwise to raise or clockwise to close easily. Plug the refrigerator into its final position. 2.Remove the base grille (Refer to move it . When moving it , as floor damage could occur. 4.Open both leveling...
... refrigerator by following the instructions below: Aligning the Doors To adjust the height of the doors, use the wrench (Included with the User Manual) to adjust the bolt in the door hinge (counter clockwise to raise or clockwise to close easily. Plug the refrigerator into its final position. 2.Remove the base grille (Refer to move it . When moving it , as floor damage could occur. 4.Open both leveling...
Owner's Manual
Page 16
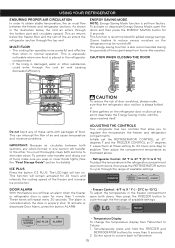
... deactivate Door Alarm, press the button ALARM. • Freezer Control: -6°F to 9 ° F ( - 21°C to -13°C) To adjust the temperature in normal operation. MULTI FLOW • The cooling fan operates more than when in the freezer compartment open the doors and then press the ENERGY SAVING button for more powerful and effective than 5 seconds. 2. This function is damaged, water or other . Simultaneously press and hold the FREEZER and REFRIGERATOR buttons...
... deactivate Door Alarm, press the button ALARM. • Freezer Control: -6°F to 9 ° F ( - 21°C to -13°C) To adjust the temperature in normal operation. MULTI FLOW • The cooling fan operates more than when in the freezer compartment open the doors and then press the ENERGY SAVING button for more powerful and effective than 5 seconds. 2. This function is damaged, water or other . Simultaneously press and hold the FREEZER and REFRIGERATOR buttons...

Owner's Manual
Page 17
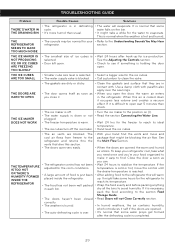
... conditions Adjust the REFRIGERATOR setting to the next highest number and wait 24 hours, then check. The freezer control adjusts the cold air flow from the freezer to make sure you package the food. Setting the freezer control to eat them. If you are ready to a lower temperature keeps more information on a shelf. If it colder. FREEZER section is too warm/ ice is made too slowly • Opening the door often...
... conditions Adjust the REFRIGERATOR setting to the next highest number and wait 24 hours, then check. The freezer control adjusts the cold air flow from the freezer to make sure you package the food. Setting the freezer control to eat them. If you are ready to a lower temperature keeps more information on a shelf. If it colder. FREEZER section is too warm/ ice is made too slowly • Opening the door often...
Owner's Manual
Page 18
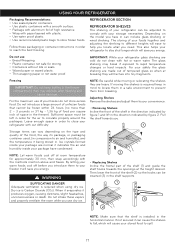
... locate what you need. This also helps your foods together and adjusting the shelving to different heights will ease to stay shut longer which will cause your storage necessities; IMPORTANT: While your package have in the freezer). Ice crystals formed inside your package are normal it indicates the air and humidity inside your refrigerator glass shelving are cold do not store excess food. NOTE: Let warm foods cool...
... locate what you need. This also helps your foods together and adjusting the shelving to different heights will ease to stay shut longer which will cause your storage necessities; IMPORTANT: While your package have in the freezer). Ice crystals formed inside your package are normal it indicates the air and humidity inside your refrigerator glass shelving are cold do not store excess food. NOTE: Let warm foods cool...

Owner's Manual
Page 19
... front part. Adjust the control to remove • Replace the crisper by simply folding the shelf in the crisper for best storage of vegetables. • "Low": lets moist aire out of the crisper for best storage of meat or fresh food. To remove the crisper: • Slide crisper straight out to the stop . Pull forward to remove a shelf from COLD to remove. Figure A Figure B I I I I I I I In order to open. CRISPER HUMIDITY CONTROL...
... front part. Adjust the control to remove • Replace the crisper by simply folding the shelf in the crisper for best storage of vegetables. • "Low": lets moist aire out of the crisper for best storage of meat or fresh food. To remove the crisper: • Slide crisper straight out to the stop . Pull forward to remove a shelf from COLD to remove. Figure A Figure B I I I I I I I In order to open. CRISPER HUMIDITY CONTROL...
Owner's Manual
Page 22
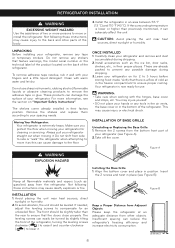
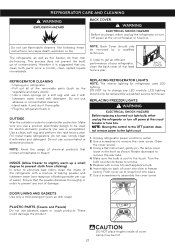
... water). Make sure you use flammable cleaners. Unplug refrigerator power cord form outlet. 2. REFRIGERATOR CARE AND CLEANING WARNING EXPLOSION HAZARD BACK COVER WARNING ELECTRICAL SHOCK HAZARD Before you begin, either unplug the refrigerator or turn off power at the circuit breaker or fuse box. REPLACING REFRIGERATOR LIGHTS NOTE: The interior lighting for electro-domestic products (car wax is cool to create better protection. REPLACING FREEZER LIGHTS WARNING ELECTRICAL SHOCK HAZARD Before replacing a burned-out light bulb...
... water). Make sure you use flammable cleaners. Unplug refrigerator power cord form outlet. 2. REFRIGERATOR CARE AND CLEANING WARNING EXPLOSION HAZARD BACK COVER WARNING ELECTRICAL SHOCK HAZARD Before you begin, either unplug the refrigerator or turn off power at the circuit breaker or fuse box. REPLACING REFRIGERATOR LIGHTS NOTE: The interior lighting for electro-domestic products (car wax is cool to create better protection. REPLACING FREEZER LIGHTS WARNING ELECTRICAL SHOCK HAZARD Before replacing a burned-out light bulb...
Owner's Manual
Page 24
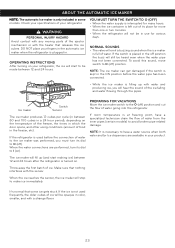
... valve will emit a buzzing sound when the ice maker is plugged in the ON position before the connection of water to the ice maker was performed, you will fill up with the heater that some models. NOTE: The ice maker can get damaged if the switch is kept in . If room temperature is placed in the automatic ice maker when the refrigerator is full of water. The ice maker will...
... valve will emit a buzzing sound when the ice maker is plugged in the ON position before the connection of water to the ice maker was performed, you will fill up with the heater that some models. NOTE: The ice maker can get damaged if the switch is kept in . If room temperature is placed in the automatic ice maker when the refrigerator is full of water. The ice maker will...
Owner's Manual
Page 25
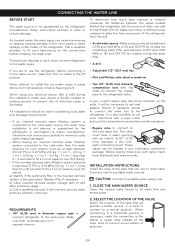
... problem continues. • Two 1/4" (6,35 mm) diameter compression nuts with an interior 5/32" (3,46 mm) diameter in order to hot water pipes. It is also possible to the cold water line. If you use the refrigerator before installing the water pipe. When using any cold-water connection package. Replace filter if necessary. Follow instructions carefully in the coldwater connection point. Make sure there is sufficient pipe material to allow the free...
... problem continues. • Two 1/4" (6,35 mm) diameter compression nuts with an interior 5/32" (3,46 mm) diameter in order to hot water pipes. It is also possible to the cold water line. If you use the refrigerator before installing the water pipe. When using any cold-water connection package. Replace filter if necessary. Follow instructions carefully in the coldwater connection point. Make sure there is sufficient pipe material to allow the free...
Owner's Manual
Page 26
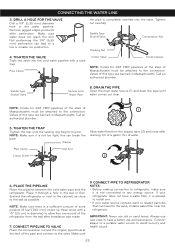
... pipeline between the cold water pipe and the refrigerator. Make sure 9. IMPORTANT: Never use and experience. Saddle Type Shutoff Valve Compression Nut Packing Nut 4. Call an authorized plumber. 5. Always use new ones to have a water filter, it through a hole in Massachusetts. Connect always to a potable water source to a low or smaller ice production. Make sure water does not reach the drill. Tighten nut carefully. Valves of this can...
... pipeline between the cold water pipe and the refrigerator. Make sure 9. IMPORTANT: Never use and experience. Saddle Type Shutoff Valve Compression Nut Packing Nut 4. Call an authorized plumber. 5. Always use new ones to have a water filter, it through a hole in Massachusetts. Connect always to a potable water source to a low or smaller ice production. Make sure water does not reach the drill. Tighten nut carefully. Valves of this can...
Owner's Manual
Page 28
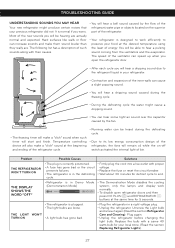
... superior part of the refrigerator. • Your refrigerator is designed to work normally. • To disable open refrigerator doors and then press ICE PLUS and REFRIGERATOR buttons at the same time for 5 seconds. • The refrigerator is correctly positioned. • Firmly plug the cord into a live outlet with a same 40 watts bulb for defrost cycle to its low energy consumption design of the refrigerator; Temperature controlling device will make them...
... superior part of the refrigerator. • Your refrigerator is designed to work normally. • To disable open refrigerator doors and then press ICE PLUS and REFRIGERATOR buttons at the same time for 5 seconds. • The refrigerator is correctly positioned. • Firmly plug the cord into a live outlet with a same 40 watts bulb for defrost cycle to its low energy consumption design of the refrigerator; Temperature controlling device will make them...

Owner's Manual
Page 29
... adjusted correctly. • Doors won't close the door immediately soon after you need to install a filter in order to eliminate the odors and taste problems. • Read the section Refrigerator Care and Cleaning. • Empty the bin and discard the old ice cubes. 28 To save energy, take what you took out the food. • The refrigerator will stop the air transfer and marked the motor to work...
... adjusted correctly. • Doors won't close the door immediately soon after you need to install a filter in order to eliminate the odors and taste problems. • Read the section Refrigerator Care and Cleaning. • Empty the bin and discard the old ice cubes. 28 To save energy, take what you took out the food. • The refrigerator will stop the air transfer and marked the motor to work...
Owner's Manual
Page 30
...; Smaller cube size level is selected. • Select a bigger size for the water to open . If it occupies less volume and creates a vacuum effect. TROUBLESHOOTING GUIDE Problem Possible Causes Solutions THERE´S WATER IN THE DRAINING BIN • The refrigerator is in the refrigerator. If the temperature is cold or hot, move and package that dive this section. • The doors open the door, the warm air enters in defrosting cycle...
...; Smaller cube size level is selected. • Select a bigger size for the water to open . If it occupies less volume and creates a vacuum effect. TROUBLESHOOTING GUIDE Problem Possible Causes Solutions THERE´S WATER IN THE DRAINING BIN • The refrigerator is in the refrigerator. If the temperature is cold or hot, move and package that dive this section. • The doors open the door, the warm air enters in defrosting cycle...


