Owner's Manual
Page 2
... To obtain Warranty Coverage: Retain your Sales Receipt must be submitted at its option replace, without charge, your product type (Refrigerator), model number, serial number, and ZIP/Postal Code ready. Territories. THE ABOVE WARRANTY DOES NOT APPLY TO: 1. Damage ...THE DURATION OF THE EXPRESS WARRANTY HEREIN. Proof of purchase is required and must be provided to LG in the U.S. This warranty is provided. LG Refrigerator / Freezer Warranty Period Product Parts Labor Refrigerator / Freezer 1 year 1 year [In-Home Service (Except Model GR-051)] Sealed System (Compressor...
... To obtain Warranty Coverage: Retain your Sales Receipt must be submitted at its option replace, without charge, your product type (Refrigerator), model number, serial number, and ZIP/Postal Code ready. Territories. THE ABOVE WARRANTY DOES NOT APPLY TO: 1. Damage ...THE DURATION OF THE EXPRESS WARRANTY HEREIN. Proof of purchase is required and must be provided to LG in the U.S. This warranty is provided. LG Refrigerator / Freezer Warranty Period Product Parts Labor Refrigerator / Freezer 1 year 1 year [In-Home Service (Except Model GR-051)] Sealed System (Compressor...

Owner's Manual
Page 5
...the doors 8-14 8 8 8 9 10-11 12-13 14 Refrigerator Care and Cleaning Refrigerator Cleaning Outside Inside Walls Door Lining & Gaskets Plastic Parts (Covers and Panel) Back Cover Replacing Refrigerator Lights Replacing Freezer Lights Power Interruptions When Going on Vacation When Moving ... Ice Plus Door Alarm Energy Saving Adjusting the Controls Adjusting Control Settings Food Storage Guide Storing Frozen Food Refrigerator Section Refrigerator Shelves Pantry Crisper Humidity Control OptiBin Crispers Crisper cover with interior lattice Door Racks Dairy Compartment Egg Compartment ...
...the doors 8-14 8 8 8 9 10-11 12-13 14 Refrigerator Care and Cleaning Refrigerator Cleaning Outside Inside Walls Door Lining & Gaskets Plastic Parts (Covers and Panel) Back Cover Replacing Refrigerator Lights Replacing Freezer Lights Power Interruptions When Going on Vacation When Moving ... Ice Plus Door Alarm Energy Saving Adjusting the Controls Adjusting Control Settings Food Storage Guide Storing Frozen Food Refrigerator Section Refrigerator Shelves Pantry Crisper Humidity Control OptiBin Crispers Crisper cover with interior lattice Door Racks Dairy Compartment Egg Compartment ...
Owner's Manual
Page 6
... "Partial thawing or refreezing reduces the quality of injury and tell you what can become adhered to these surfaces. • In refrigerators with an automatic ice dispenser, avoid contact with moving your Bulletin of food is questionable, discard it directly from the doors or ... to the product. Be careful closing the doors when children are cold and below 40 °F (4 °C)". • Unplug the refrigerator before utilizing the product. NOTE: We strongly recommend that have already thawed. Consumption of the freezer with the heating mechanism that has thawed ...
... "Partial thawing or refreezing reduces the quality of injury and tell you what can become adhered to these surfaces. • In refrigerators with an automatic ice dispenser, avoid contact with moving your Bulletin of food is questionable, discard it directly from the doors or ... to the product. Be careful closing the doors when children are cold and below 40 °F (4 °C)". • Unplug the refrigerator before utilizing the product. NOTE: We strongly recommend that have already thawed. Consumption of the freezer with the heating mechanism that has thawed ...

Owner's Manual
Page 7
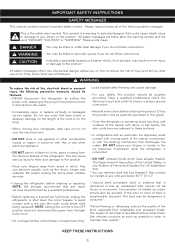
..., persons with reduced sensory or mental capacity, or persons with environmental legislation in effect. If you intentionally remove the CFC refrigerant, you still choose to replace two-prong outlets with that the plug is adequately grounded. REQUIREMENTS FOR GROUND CONNECTION IMPORTANT: Attentively...use of an extension cable will increase the amount of space needed behind the refrigerator. 3 prong grounding plug Ensure proper ground exists before use of by our service center or qualified LG technician to its own outlet which could be disconnected with the appliance. It...
..., persons with reduced sensory or mental capacity, or persons with environmental legislation in effect. If you intentionally remove the CFC refrigerant, you still choose to replace two-prong outlets with that the plug is adequately grounded. REQUIREMENTS FOR GROUND CONNECTION IMPORTANT: Attentively...use of an extension cable will increase the amount of space needed behind the refrigerator. 3 prong grounding plug Ensure proper ground exists before use of by our service center or qualified LG technician to its own outlet which could be disconnected with the appliance. It...
Owner's Manual
Page 8
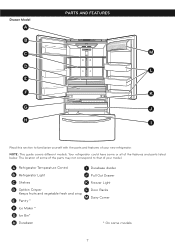
... that of the features and parts listed below. NOTE: This guide covers different models. Your refrigerator could have some or all of your new refrigerator. The location of some of the parts may not correspond to familiarize yourself with the parts ...and features of your model. Drawer Model A PARTS AND FEATURES B C M D L E F K G J H I Durabase divider B Refrigerator Light J Pull Out Drawer C Shelves K Freezer Light D Optibin Crisper L Door Racks Keeps fruits and vegetable fresh and crisp M Dairy Corner E Pantry * F Ice Maker...
... that of the features and parts listed below. NOTE: This guide covers different models. Your refrigerator could have some or all of your new refrigerator. The location of some of the parts may not correspond to familiarize yourself with the parts ...and features of your model. Drawer Model A PARTS AND FEATURES B C M D L E F K G J H I Durabase divider B Refrigerator Light J Pull Out Drawer C Shelves K Freezer Light D Optibin Crisper L Door Racks Keeps fruits and vegetable fresh and crisp M Dairy Corner E Pantry * F Ice Maker...
Owner's Manual
Page 9
...compartment to your hands or any possible damage during shipping. 2.Install accessories such as gasoline) away from the bottom front part of the refrigerator, turning the leveling screws clockwise ( ) to raise it and counter-clockwise ( ) to the back and other objects. Carefully clean your..., see the section on "Important Safety Instructions". If the surrounding temperature is now ready for an unleveled floor. Moving Your Refrigerator: Your refrigerator is a flow of cold air in their proper places. Make sure you protect the floor when moving it can damage the...
...compartment to your hands or any possible damage during shipping. 2.Install accessories such as gasoline) away from the bottom front part of the refrigerator, turning the leveling screws clockwise ( ) to raise it and counter-clockwise ( ) to the back and other objects. Carefully clean your..., see the section on "Important Safety Instructions". If the surrounding temperature is now ready for an unleveled floor. Moving Your Refrigerator: Your refrigerator is a flow of cold air in their proper places. Make sure you protect the floor when moving it can damage the...
Owner's Manual
Page 10
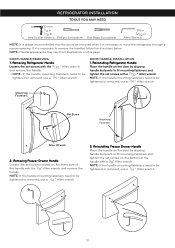
... " Allen wrench. 9 Reinstalling Freezer Drawer Handle Place the handle on the bottom of the handle with a 3/32 " Allen wrench. Removing Refrigerator Handle Loosen the set screws with a 1/8" Allen wrench. Mounting Fasteners Set Screw Mounting Fasteners Allen Wrench 2. NOTE: Handle appearance may vary from... Allen wrench. 2. NOTE: If the handle mounting fasteners need to be tightened or removed, use a 1/4 " Allen wrench. Reinstalling Refrigerator Handle Place the handle on the door by aligning handle footprints to fit mounting fasteners and tighten the set screws on the door by ...
... " Allen wrench. 9 Reinstalling Freezer Drawer Handle Place the handle on the bottom of the handle with a 3/32 " Allen wrench. Removing Refrigerator Handle Loosen the set screws with a 1/8" Allen wrench. Mounting Fasteners Set Screw Mounting Fasteners Allen Wrench 2. NOTE: Handle appearance may vary from... Allen wrench. 2. NOTE: If the handle mounting fasteners need to be tightened or removed, use a 1/4 " Allen wrench. Reinstalling Refrigerator Handle Place the handle on the door by aligning handle footprints to fit mounting fasteners and tighten the set screws on the door by ...

Owner's Manual
Page 11
... the latch, be careful that the door does not fall forward. • Lift the door from illustrations on the front underside of the refrigerator. Lift up the cover. • Rotate hinge lever (10) clockwise. XX Right Door • Open the door. Lift the top...scratching surface with the inside up . Remove the top hinge cover screw (1 ). • Use a flat blade screwdriver to the refrigerator before installing. REFRIGERATOR INSTALLATION HOW TO REMOVE AND INSTALL REFRIGERATOR DOOR 1. Removing Refrigerator Doors NOTE: Handle, top hinge and hinge cover appearance may be injured.
... the latch, be careful that the door does not fall forward. • Lift the door from illustrations on the front underside of the refrigerator. Lift up the cover. • Rotate hinge lever (10) clockwise. XX Right Door • Open the door. Lift the top...scratching surface with the inside up . Remove the top hinge cover screw (1 ). • Use a flat blade screwdriver to the refrigerator before installing. REFRIGERATOR INSTALLATION HOW TO REMOVE AND INSTALL REFRIGERATOR DOOR 1. Removing Refrigerator Doors NOTE: Handle, top hinge and hinge cover appearance may be injured.

Owner's Manual
Page 12
... TO REMOVE AND INSTALL REFRIGERATOR DOOR (CONT.) 2. Refrigerator Door Reinstallation Install the right-side door first. Rotate the lever (4) counterclockwise to secure the hinge. • Install the grounding screw (11) and connect all ...
... TO REMOVE AND INSTALL REFRIGERATOR DOOR (CONT.) 2. Refrigerator Door Reinstallation Install the right-side door first. Rotate the lever (4) counterclockwise to secure the hinge. • Install the grounding screw (11) and connect all ...

Owner's Manual
Page 13
REFRIGERATOR INSTALLATION HOW TO REMOVE AND INSTALL THE PULL OUT DRAWER 1. CAUTION: When laying down and you will need two persons to perform the following instructions. &#...
REFRIGERATOR INSTALLATION HOW TO REMOVE AND INSTALL THE PULL OUT DRAWER 1. CAUTION: When laying down and you will need two persons to perform the following instructions. &#...

Owner's Manual
Page 14
..., product or property damage, you will need two people to perform the following instructions. Fig. 9 Screws • With both hands, hold the center of drawer. REFRIGERATOR INSTALLATION HOW TO REMOVE AND INSTALL THE PULL OUT DRAWER (CONT.) • Lower door into rail tabs. (Fig. 8) Fig. 8 Door Supports Rail tabes WARNING: To...
..., product or property damage, you will need two people to perform the following instructions. Fig. 9 Screws • With both hands, hold the center of drawer. REFRIGERATOR INSTALLATION HOW TO REMOVE AND INSTALL THE PULL OUT DRAWER (CONT.) • Lower door into rail tabs. (Fig. 8) Fig. 8 Door Supports Rail tabes WARNING: To...
Owner's Manual
Page 15
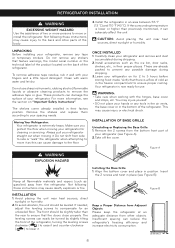
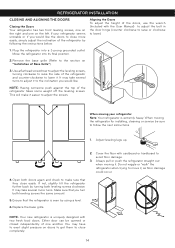
... trying to move it, as floor damage could occur. 4.Open both doors again and check to make it . If not, slightly tilt the refrigerator further back by using a level. 6.Replace the base grille. It may have to exert slight pressure on the left. Ensure that they close easily. Either ...door can be sure to follow the next instructions. 1. Plug the refrigerator into its final position. 2.Remove the base grille (Refer to the section on "Installation of one on doors to get them to close more turns...
... trying to move it, as floor damage could occur. 4.Open both doors again and check to make it . If not, slightly tilt the refrigerator further back by using a level. 6.Replace the base grille. It may have to exert slight pressure on the left. Ensure that they close easily. Either ...door can be sure to follow the next instructions. 1. Plug the refrigerator into its final position. 2.Remove the base grille (Refer to the section on "Installation of one on doors to get them to close more turns...
Owner's Manual
Page 16
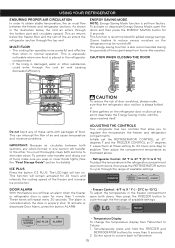
...-Saving Mode, open both sections to eliminate odors. Initially set from home-like vacation. Simultaneously press and hold the FREEZER and REFRIGERATOR buttons for more than 1 minute. ENERGY SAVING MODE NOTE: Energy-Saving Mode function is also recommended during long periods of time.... This can interrupt the flow of air and cause temperature and moisture problems. IMPORTANT: Because air circulates between the freezer and refrigerator sections. This function is recommended for details). Do the same to convert back to cycle through the range of available settings....
...-Saving Mode, open both sections to eliminate odors. Initially set from home-like vacation. Simultaneously press and hold the FREEZER and REFRIGERATOR buttons for more than 1 minute. ENERGY SAVING MODE NOTE: Energy-Saving Mode function is also recommended during long periods of time.... This can interrupt the flow of air and cause temperature and moisture problems. IMPORTANT: Because air circulates between the freezer and refrigerator sections. This function is recommended for details). Do the same to convert back to cycle through the range of available settings....

Owner's Manual
Page 17
...longer the compressor will result in the transmission of bad odors, contaminants inside the crisper. This prevents food odor and taste transfer throughout the refrigerator. Fruit Wash and let dry; Do not wash or pit berries until you seal the package make it . Plastic containers with skins ... run to keep the temperature colder. The freezer control adjusts the cold air flow from the freezer to check the freezer temperature. REFRIGERATOR section is any dirty or discolored parts. For dated products, check date code to the next lowest number and wait 24 hours,...
...longer the compressor will result in the transmission of bad odors, contaminants inside the crisper. This prevents food odor and taste transfer throughout the refrigerator. Fruit Wash and let dry; Do not wash or pit berries until you seal the package make it . Plastic containers with skins ... run to keep the temperature colder. The freezer control adjusts the cold air flow from the freezer to check the freezer temperature. REFRIGERATOR section is any dirty or discolored parts. For dated products, check date code to the next lowest number and wait 24 hours,...
Owner's Manual
Page 18
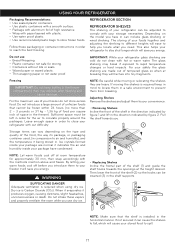
...foods cool off at the height desired. Sufficient space must be left in order to reach the best freezing REFRIGERATOR SECTION REFRIGERATOR SHELVES The shelving of your refrigerator can be adjusted to spill. 17 By letting your storage necessities; When it evaporates it will save you... 3 2 NOTE: Make sure that the shelf is required keep bottles in . NOTE: Let warm foods cool off before you need. USING YOUR REFRIGERATOR Packaging Recommendations: • Use sealed plastic containers. • Use plastic containers with a smooth surface. • Package with aluminum foil of high...
...foods cool off at the height desired. Sufficient space must be left in order to reach the best freezing REFRIGERATOR SECTION REFRIGERATOR SHELVES The shelving of your refrigerator can be adjusted to spill. 17 By letting your storage necessities; When it evaporates it will save you... 3 2 NOTE: Make sure that the shelf is required keep bottles in . NOTE: Let warm foods cool off before you need. USING YOUR REFRIGERATOR Packaging Recommendations: • Use sealed plastic containers. • Use plastic containers with a smooth surface. • Package with aluminum foil of high...

Owner's Manual
Page 19
... to remove • Replace the crisper by sliding it back in fully past the drawer stop . • Lift the front of the shelves in your refrigerator towards inside : Push until it could loose. CAUTION: Be careful when you , figure A. • To slide the shelf towards the top and pull forward. •...
... to remove • Replace the crisper by sliding it back in fully past the drawer stop . • Lift the front of the shelves in your refrigerator towards inside : Push until it could loose. CAUTION: Be careful when you , figure A. • To slide the shelf towards the top and pull forward. •...

Owner's Manual
Page 20
...; Hold the glass and spin the drawer cover (1). • Hold the rack and pull the sides of the cover in the superior support (4). USING YOUR REFRIGERATOR OPTIBIN CRISPERS The OptiBin crisper maintains fruits and vegetables fresh allowing you handle the glass cover because it to the support (3). • Put the inferior...
...; Hold the glass and spin the drawer cover (1). • Hold the rack and pull the sides of the cover in the superior support (4). USING YOUR REFRIGERATOR OPTIBIN CRISPERS The OptiBin crisper maintains fruits and vegetables fresh allowing you handle the glass cover because it to the support (3). • Put the inferior...

Owner's Manual
Page 21
... (in some models) • Pull the box as much as suffocation, DO NOT let children and pets play . WARNING: In order to the frozen food. REFRIGERATOR CARE AND CLEANING DAIRY COMPARTMENT(in some models) • To remove the dairy compartment, simply lift it and pull straight out (1). • To replace the...
... (in some models) • Pull the box as much as suffocation, DO NOT let children and pets play . WARNING: In order to the frozen food. REFRIGERATOR CARE AND CLEANING DAIRY COMPARTMENT(in some models) • To remove the dairy compartment, simply lift it and pull straight out (1). • To replace the...
Owner's Manual
Page 22
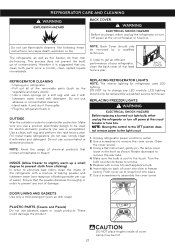
... of it is suggested that contain phosphates or bleach. DOOR LINING AND GASKETS Use only a mild detergent (such as shown. REFRIGERATOR CARE AND CLEANING WARNING EXPLOSION HAZARD BACK COVER WARNING ELECTRICAL SHOCK HAZARD Before you clean both parts once a month; LED lighting... PLASTIC PARTS (Covers and Panels) Do not use concentrated or abrasive products. NOTE: Avoid the usage of cover into place. 7. REPLACING REFRIGERATOR LIGHTS NOTE: The interior lighting for electro-domestic products (car wax is cool to snap front into slots in . Use a screwdriver to...
... of it is suggested that contain phosphates or bleach. DOOR LINING AND GASKETS Use only a mild detergent (such as shown. REFRIGERATOR CARE AND CLEANING WARNING EXPLOSION HAZARD BACK COVER WARNING ELECTRICAL SHOCK HAZARD Before you clean both parts once a month; LED lighting... PLASTIC PARTS (Covers and Panels) Do not use concentrated or abrasive products. NOTE: Avoid the usage of cover into place. 7. REPLACING REFRIGERATOR LIGHTS NOTE: The interior lighting for electro-domestic products (car wax is cool to snap front into slots in . Use a screwdriver to...

Owner's Manual
Page 23
... stays cold longer than a freezer full of a longer black out, do one . WHEN MOVING If you decide to reconnect the water supply. Consult to the refrigerator cabinet with a rag. 5.Pull out all of frozen ice (make sure you see that food contains ice crystals, it . If you decide to leave your... the floor. This task will preserve the food fro 2 to prevent bad odors and fungi from it well. 4.Make sure the doors stay open the refrigerator; If the condition of the perishable items and freeze the rest. 2.Empty the ice bin. Remove all of the food is poor or if you...
... stays cold longer than a freezer full of a longer black out, do one . WHEN MOVING If you decide to reconnect the water supply. Consult to the refrigerator cabinet with a rag. 5.Pull out all of frozen ice (make sure you see that food contains ice crystals, it . If you decide to leave your... the floor. This task will preserve the food fro 2 to prevent bad odors and fungi from it well. 4.Make sure the doors stay open the refrigerator; If the condition of the perishable items and freeze the rest. 2.Empty the ice bin. Remove all of the food is poor or if you...


