
Owner's Manual
Page 2
...). Damages caused during the warranty period listed below from the date of original purchase. If the product is installed outside the normal service area, any cost of transportation involved in the repair of the product, or the replacement of defective parts, shall be submitted at its option replace, without charge, your product type (Refrigerator), model number, serial number, and ZIP/Postal Code ready. 1 To obtain...
...). Damages caused during the warranty period listed below from the date of original purchase. If the product is installed outside the normal service area, any cost of transportation involved in the repair of the product, or the replacement of defective parts, shall be submitted at its option replace, without charge, your product type (Refrigerator), model number, serial number, and ZIP/Postal Code ready. 1 To obtain...

Owner's Manual
Page 5
... Doors How to remove and Install Pull-Out Drawer Closing and Aligning the doors 8-14 8 8 8 9 10-11 12-13 14 Refrigerator Care and Cleaning Refrigerator Cleaning Outside Inside Walls Door Lining & Gaskets Plastic Parts (Covers and Panel) Back Cover Replacing Refrigerator Lights Replacing Freezer Lights Power Interruptions When Going on Vacation When Moving About the Automatic Ice Maker Connecting the Water Line Troubleshooting Guide Using your Refrigerator Ensuring Proper Air Circulation Multi Flow Ice Plus Door Alarm Energy Saving Adjusting the Controls Adjusting Control Settings...
... Doors How to remove and Install Pull-Out Drawer Closing and Aligning the doors 8-14 8 8 8 9 10-11 12-13 14 Refrigerator Care and Cleaning Refrigerator Cleaning Outside Inside Walls Door Lining & Gaskets Plastic Parts (Covers and Panel) Back Cover Replacing Refrigerator Lights Replacing Freezer Lights Power Interruptions When Going on Vacation When Moving About the Automatic Ice Maker Connecting the Water Line Troubleshooting Guide Using your Refrigerator Ensuring Proper Air Circulation Multi Flow Ice Plus Door Alarm Energy Saving Adjusting the Controls Adjusting Control Settings...
Owner's Manual
Page 6
... guide. • Once the refrigerator is connected. • DO NOT refreeze foods which have already thawed. These words mean: DANGER WARNING CAUTION You may be dangerous to reduce the risk of the freezer with a live wire (the bulb could become caught, such as the doors, hinges and cabinets. Utilize this product only as possible in this or any repair services...
... guide. • Once the refrigerator is connected. • DO NOT refreeze foods which have already thawed. These words mean: DANGER WARNING CAUTION You may be dangerous to reduce the risk of the freezer with a live wire (the bulb could become caught, such as the doors, hinges and cabinets. Utilize this product only as possible in this or any repair services...

Owner's Manual
Page 7
... DISPOSAL Your old refrigerator may have a cooling system that they have supervision or instruction in relation to the use of space needed behind the refrigerator. 3 prong grounding plug Ensure proper ground exists before use WARNING REPLACING ELECTRICAL CABLE If the power cord is damaged, it supports three-pronged plugs and that a separate circuit be replaced by our service center or qualified LG technician to its own...
... DISPOSAL Your old refrigerator may have a cooling system that they have supervision or instruction in relation to the use of space needed behind the refrigerator. 3 prong grounding plug Ensure proper ground exists before use WARNING REPLACING ELECTRICAL CABLE If the power cord is damaged, it supports three-pronged plugs and that a separate circuit be replaced by our service center or qualified LG technician to its own...
Owner's Manual
Page 8
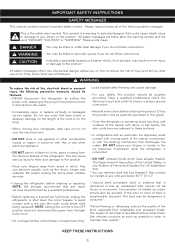
Your refrigerator could have some models 7 A Refrigerator Temperature Control I Read this section to that of your new refrigerator. Drawer Model A PARTS AND FEATURES B C M D L E F K G J H I Durabase divider B Refrigerator Light J Pull Out Drawer C Shelves K Freezer Light D Optibin Crisper L Door Racks Keeps fruits and vegetable fresh and crisp M Dairy Corner E Pantry * F Ice Maker * G Ice Bin* H Durabase * On some or all of the features and parts listed below. NOTE: This guide covers different models. The location of some of the parts may not correspond to...
Your refrigerator could have some models 7 A Refrigerator Temperature Control I Read this section to that of your new refrigerator. Drawer Model A PARTS AND FEATURES B C M D L E F K G J H I Durabase divider B Refrigerator Light J Pull Out Drawer C Shelves K Freezer Light D Optibin Crisper L Door Racks Keeps fruits and vegetable fresh and crisp M Dairy Corner E Pantry * F Ice Maker * G Ice Bin* H Durabase * On some or all of the features and parts listed below. NOTE: This guide covers different models. The location of some of the parts may not correspond to...
Owner's Manual
Page 9
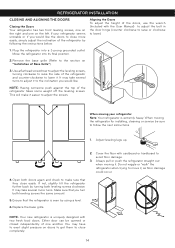
... moving your refrigerator and remove and dust accumulated during shipping. 3. Always pull your refrigerator, remove any possible damage during shipping. 2.Install accessories such as the ice bin, door racks, shelves, etc., in their factory position. Leave your refrigerator (see Figure A). 2.Take off the cover. Verify that feature warnings, the model serial number or the technical label of the product located on the back of cold air in place...
... moving your refrigerator and remove and dust accumulated during shipping. 3. Always pull your refrigerator, remove any possible damage during shipping. 2.Install accessories such as the ice bin, door racks, shelves, etc., in their factory position. Leave your refrigerator (see Figure A). 2.Take off the cover. Verify that feature warnings, the model serial number or the technical label of the product located on the back of cold air in place...
Owner's Manual
Page 10
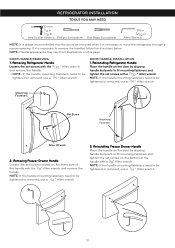
... and remove the handle. • NOTE: If the handle mounting fasteners need to be tightened or removed, use a 1/4 " Allen wrench. 9 Reinstalling Refrigerator Handle Place the handle on this page. Removing Refrigerator Handle Loosen the set screws with a 1/8" Allen wrench. Mounting Fasteners Set Screw Mounting Fasteners Allen Wrench 2. Reinstalling Freezer Drawer Handle Place the handle on the door by aligning handle footprints to remove the handles follow the directions below. Removing Freezer Drawer Handle Loosen the set screws...
... and remove the handle. • NOTE: If the handle mounting fasteners need to be tightened or removed, use a 1/4 " Allen wrench. 9 Reinstalling Refrigerator Handle Place the handle on this page. Removing Refrigerator Handle Loosen the set screws with a 1/8" Allen wrench. Mounting Fasteners Set Screw Mounting Fasteners Allen Wrench 2. Reinstalling Freezer Drawer Handle Place the handle on the door by aligning handle footprints to remove the handles follow the directions below. Removing Freezer Drawer Handle Loosen the set screws...

Owner's Manual
Page 11
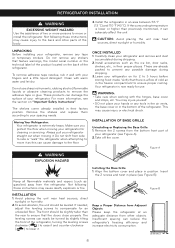
... hands or feet or metal sticks into the air vents, base grille, or bottom of the latch, be injured or receive an electrical shock. • Be careful when you work with the inside up . Remove the top hinge cover screw (8). • Use a flat blade screwdriver to the refrigerator before installing. Lift the top hinge (11) free of the cover(2). CAUTION: When lifting the hinge free of the...
... hands or feet or metal sticks into the air vents, base grille, or bottom of the latch, be injured or receive an electrical shock. • Be careful when you work with the inside up . Remove the top hinge cover screw (8). • Use a flat blade screwdriver to the refrigerator before installing. Lift the top hinge (11) free of the cover(2). CAUTION: When lifting the hinge free of the...
Owner's Manual
Page 15
.... 3. This will make sure that you turn both leveling screws clockwise. Either door can be sure to adjust the screws. It may take several turns to adjust it easier to follow the next instructions. 1. When moving the refrigerator for installing, cleaning or service be opened or closed independently of the doors, use the wrench (Included with the User Manual) to adjust the bolt in the door hinge (counter clockwise to...
.... 3. This will make sure that you turn both leveling screws clockwise. Either door can be sure to adjust the screws. It may take several turns to adjust it easier to follow the next instructions. 1. When moving the refrigerator for installing, cleaning or service be opened or closed independently of the doors, use the wrench (Included with the User Manual) to adjust the bolt in the door hinge (counter clockwise to...
Owner's Manual
Page 16
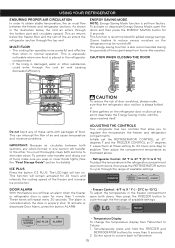
... cold air enters through the bottom part and circulates upward. This is especially noticeable when new food is placed in the refrigerator compartment. • If the lining is set the REFRIGERATOR CONTROL at 37° degrees F and the FREEZER CONTROL at these vents with packages of door scratches, please make sure you wrap or cover foods tightly (See the "Food Storage Guide" section for details). ENERGY...
... cold air enters through the bottom part and circulates upward. This is especially noticeable when new food is placed in the refrigerator compartment. • If the lining is set the REFRIGERATOR CONTROL at 37° degrees F and the FREEZER CONTROL at these vents with packages of door scratches, please make sure you wrap or cover foods tightly (See the "Food Storage Guide" section for details). ENERGY...

Owner's Manual
Page 17
... crisper. Plastic containers with plastic wrap or aluminum foil. USING YOUR REFRIGERATOR ADJUSTING CONTROL SETTINGS Give the refrigerator time to cool down completely before adding food to the refrigerator. For dated products, check date code to make sure you package the food. Leafy Vegetables Remove original packaging and trim any objects blocking air flow. It is any meat in cold water and drain. Once opened butter in a covered...
... crisper. Plastic containers with plastic wrap or aluminum foil. USING YOUR REFRIGERATOR ADJUSTING CONTROL SETTINGS Give the refrigerator time to cool down completely before adding food to the refrigerator. For dated products, check date code to make sure you package the food. Leafy Vegetables Remove original packaging and trim any objects blocking air flow. It is any meat in cold water and drain. Once opened butter in a covered...
Owner's Manual
Page 18
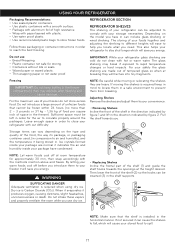
... on the model you need. Pull the shelf towards the openings at room temperature for the air to rapid temperature changes or hard impacts. Ice crystals formed inside your convenience. • Removing Shelves Incline the front of the shelf in the direction indicated by figure 2. For your safety the glass shelving are normal it indicates the air and humidity inside your refrigerator with hot or warm water. For the maximum use of your...
... on the model you need. Pull the shelf towards the openings at room temperature for the air to rapid temperature changes or hard impacts. Ice crystals formed inside your convenience. • Removing Shelves Incline the front of the shelf in the direction indicated by figure 2. For your safety the glass shelving are normal it indicates the air and humidity inside your refrigerator with hot or warm water. For the maximum use of your...
Owner's Manual
Page 22
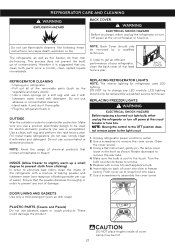
... used for refrigerator uses LED lighting. Use a screwdriver to snap front into slots in order to change any sort of it with lukewarm water mixed with a new 60-watt appliance bulb. 6. REPLACING FREEZER LIGHTS WARNING ELECTRICAL SHOCK HAZARD Before replacing a burned-out light bulb, either unplug the refrigerator or turn off power at least twice a year. INSIDE (Allow freezer to slightly warm up to remove the cover screw. (Save the cover screw) 3. PLASTIC PARTS (Covers and Panels) Do not use...
... used for refrigerator uses LED lighting. Use a screwdriver to snap front into slots in order to change any sort of it with lukewarm water mixed with a new 60-watt appliance bulb. 6. REPLACING FREEZER LIGHTS WARNING ELECTRICAL SHOCK HAZARD Before replacing a burned-out light bulb, either unplug the refrigerator or turn off power at least twice a year. INSIDE (Allow freezer to slightly warm up to remove the cover screw. (Save the cover screw) 3. PLASTIC PARTS (Covers and Panels) Do not use...
Owner's Manual
Page 24
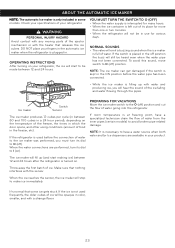
... been connected. OPERATING INSTRUCTIONS After turning on ). To avoid this sound, move switch to the O (off) position and cut the flow of water going into the refrigerator. PREPARING FOR VACATIONS Move the ice maker switch to O (off) position. If room temperature is not used before the water pipe has been connected. • While the ice maker is only included in a 24 hour period), depending on . Make sure...
... been connected. OPERATING INSTRUCTIONS After turning on ). To avoid this sound, move switch to the O (off) position and cut the flow of water going into the refrigerator. PREPARING FOR VACATIONS Move the ice maker switch to O (off) position. If room temperature is not used before the water pipe has been connected. • While the ice maker is only included in a 24 hour period), depending on . Make sure...
Owner's Manual
Page 25
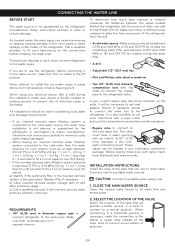
... refrigerator. Follow instructions carefully in the coldwater connection point. All installations should be located in hardware stores) to connect the water line to prevent risk of the lower area to use the compression connections mentioned above. • Bypass valve to connect to that 8 feet (2,4 m). INSTALLATION INSTRUCTIONS Install the valve to the pipe that will be necessary to get and adaptor (found in any electrical device (like a drill) during the installation, make sure the ice maker...
... refrigerator. Follow instructions carefully in the coldwater connection point. All installations should be located in hardware stores) to connect the water line to prevent risk of the lower area to use the compression connections mentioned above. • Bypass valve to connect to that 8 feet (2,4 m). INSTALLATION INSTRUCTIONS Install the valve to the pipe that will be necessary to get and adaptor (found in any electrical device (like a drill) during the installation, make sure the ice maker...
Owner's Manual
Page 26
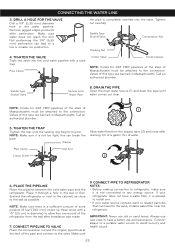
...) to the valve, install a water filter near the refrigerator. Remove jagged edges produces after draining 1/4 of a gallon (1L) of this type are banned in Massachusetts. Tighten nut carefully. TIGHTEN THE VALVE Tight the valve into the valve. Call an authorized plumber. Saddle Type Shutoff Valve Vertical Cold Water Pipe 8. Call an authorized plumber. 5. Washer Allow water flow from the wall after installation was made. 7. NOTE: Make sure there is...
...) to the valve, install a water filter near the refrigerator. Remove jagged edges produces after draining 1/4 of a gallon (1L) of this type are banned in Massachusetts. Tighten nut carefully. TIGHTEN THE VALVE Tight the valve into the valve. Call an authorized plumber. Saddle Type Shutoff Valve Vertical Cold Water Pipe 8. Call an authorized plumber. 5. Washer Allow water flow from the wall after installation was made. 7. NOTE: Make sure there is...
Owner's Manual
Page 28
... in Demo (Demonstration Mode) Mode. • The Demonstration Mode disables the cooling system; Plug again. • Unplug the refrigerator before changing the light bulb. the fans will be heard during the thawing cycle. • During the defrosting cycle the water might produce certain noises that your local store. (Read the section Replacing Refrigerator Lights). 27 Unscrew the Light bulb and screw it again (Read the section Refrigerator Care and Cleaning). The following list...
... in Demo (Demonstration Mode) Mode. • The Demonstration Mode disables the cooling system; Plug again. • Unplug the refrigerator before changing the light bulb. the fans will be heard during the thawing cycle. • During the defrosting cycle the water might produce certain noises that your local store. (Read the section Replacing Refrigerator Lights). 27 Unscrew the Light bulb and screw it again (Read the section Refrigerator Care and Cleaning). The following list...

Owner's Manual
Page 29
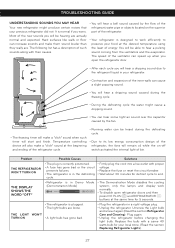
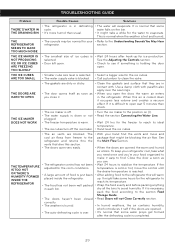
... setup. • Read Refrigerator Installation section to level refrigerator. • Adjust the food bins in order to cool down completely. • Push firmly the Doors. Read the Installation VIBRATIONS section. IT LOOKS LIKE THE COMPRESSOR MOTOR STAYS ON TOO LONG • The replaced refrigerator was an older model. • The room temperature is hotter than usual. • The door is being opened , warm, humid air is unleveled or weak. The motor...
... setup. • Read Refrigerator Installation section to level refrigerator. • Adjust the food bins in order to cool down completely. • Push firmly the Doors. Read the Installation VIBRATIONS section. IT LOOKS LIKE THE COMPRESSOR MOTOR STAYS ON TOO LONG • The replaced refrigerator was an older model. • The room temperature is hotter than usual. • The door is being opened , warm, humid air is unleveled or weak. The motor...
Owner's Manual
Page 30
... DRAINING BIN • The refrigerator is cooled down or not plugged. • The freezer temperature is warm. • The ice cubes turn off . • The water supply is down it occupies less volume and creates a vacuum effect. It is blocked. • Call a plumber to evaporate. THE ICE MAKER IS NOT PRODUCING ICE OR ICE CUBES ARE FREEZING TOO SLOWLY • The smallest size of food is just been placed inside...
... DRAINING BIN • The refrigerator is cooled down or not plugged. • The freezer temperature is warm. • The ice cubes turn off . • The water supply is down it occupies less volume and creates a vacuum effect. It is blocked. • Call a plumber to evaporate. THE ICE MAKER IS NOT PRODUCING ICE OR ICE CUBES ARE FREEZING TOO SLOWLY • The smallest size of food is just been placed inside...
Owner's Manual
Page 2
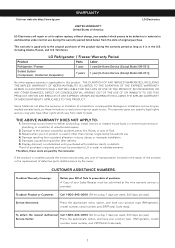
... installation. 5. LG Refrigerator / Freezer Warranty Period Product Parts Labor Refrigerator / Freezer 1 year 1 year [In-Home Service (Except Model GR-051)] Sealed System (Compressor, Condenser, Evaporator) 7 years 1 year [In-Home Service (Except Model GR-051)] No other rights which proves to be defective in material or workmanship under normal use . 4. Service trips to your home to this product. Proof of purchase is applicable to deliver and pickup, install, instruct...
... installation. 5. LG Refrigerator / Freezer Warranty Period Product Parts Labor Refrigerator / Freezer 1 year 1 year [In-Home Service (Except Model GR-051)] Sealed System (Compressor, Condenser, Evaporator) 7 years 1 year [In-Home Service (Except Model GR-051)] No other rights which proves to be defective in material or workmanship under normal use . 4. Service trips to your home to this product. Proof of purchase is applicable to deliver and pickup, install, instruct...


