User Guide
Page 2
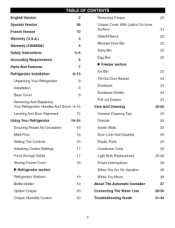
...) 4 Safety Instructions 5-6 Grounding Requirements 6 Parts And Features 7 Refrigerator Installation 8-15 Unpacking Your Refrigerator 8 Installation 8 Base Cover 8 Removing And Replacing Your Refrigerator Handles And Doors 9-14 Leveling And Door Alignment 15 Using Your Refrigerator Ensuring Proper Air Circulation Multi-Flow 16-24...The Controls 16 Adjusting Control Settings 17 Food Storage Guide 17 Storing Frozen Food 18 I_ Refrigerator section Refrigerator Shelves 19 Bottle Holder 19 Optibin Crisper 20 Crisper Humidity Control 20 Removing Crisper 20 Crisper...
...) 4 Safety Instructions 5-6 Grounding Requirements 6 Parts And Features 7 Refrigerator Installation 8-15 Unpacking Your Refrigerator 8 Installation 8 Base Cover 8 Removing And Replacing Your Refrigerator Handles And Doors 9-14 Leveling And Door Alignment 15 Using Your Refrigerator Ensuring Proper Air Circulation Multi-Flow 16-24...The Controls 16 Adjusting Control Settings 17 Food Storage Guide 17 Storing Frozen Food 18 I_ Refrigerator section Refrigerator Shelves 19 Bottle Holder 19 Optibin Crisper 20 Crisper Humidity Control 20 Removing Crisper 20 Crisper...
User Guide
Page 3
... unit's warranty period. O. NEITHER THE MANUFACTURER NOR ITS U.S. Replacement Units and Repair Parts are answered 24 hours a day, 365 days per year) and select the appropriate option from state to state. Your LG Refrigerator will be will repaired or replaced, at LG's option, if it proves to be defective in material or workmanship under...
... unit's warranty period. O. NEITHER THE MANUFACTURER NOR ITS U.S. Replacement Units and Repair Parts are answered 24 hours a day, 365 days per year) and select the appropriate option from state to state. Your LG Refrigerator will be will repaired or replaced, at LG's option, if it proves to be defective in material or workmanship under...
User Guide
Page 4
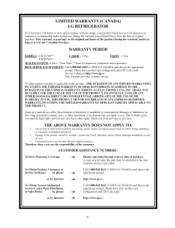
...CANADA) LG REFRIGERATOR LG Electronics wilt repair or at its option replace, without chaige, your product which proves to be submitted at http:/A_vw.lg.ca This warranty provides in any Canadian Pro+ince. WARRANTY PERIOD MODEL# : LFC21760"* LFC25760"* LABOR : 1 Year PARTS : 1Year SEALED SYSTEM : Labor/1 Year, Parts/7 Years... phone: Retain your Sales Receipt to this product. Please have product type (refrigerator) and ZIP Code ready. and evaporator) HOW SERVICE IS HANDLED : Call 1-888-542-2623 (1-888-LG-CANADA) and choose the appropriate prompt. See our website at the time warranty...
...CANADA) LG REFRIGERATOR LG Electronics wilt repair or at its option replace, without chaige, your product which proves to be submitted at http:/A_vw.lg.ca This warranty provides in any Canadian Pro+ince. WARRANTY PERIOD MODEL# : LFC21760"* LFC25760"* LABOR : 1 Year PARTS : 1Year SEALED SYSTEM : Labor/1 Year, Parts/7 Years... phone: Retain your Sales Receipt to this product. Please have product type (refrigerator) and ZIP Code ready. and evaporator) HOW SERVICE IS HANDLED : Call 1-888-542-2623 (1-888-LG-CANADA) and choose the appropriate prompt. See our website at the time warranty...
User Guide
Page 5
..., or product damage only. The food may break when being replaced.) NOTE: Setting either the plug or connector end. • When moving parts of the ejector mechanism, or with the heating element that were taped to reduce the chance of injury, and tell you what can kill or...its length or at the circuit breaker or fuse box in order to climb, stand, or hang on the power cord. They could damage the refrigerator and seriously injure themselves. • Keep fingers out of foods, particularly fruits, vegetables and prepared foods. Always read and obey all instructions before...
..., or product damage only. The food may break when being replaced.) NOTE: Setting either the plug or connector end. • When moving parts of the ejector mechanism, or with the heating element that were taped to reduce the chance of injury, and tell you what can kill or...its length or at the circuit breaker or fuse box in order to climb, stand, or hang on the power cord. They could damage the refrigerator and seriously injure themselves. • Keep fingers out of foods, particularly fruits, vegetables and prepared foods. Always read and obey all instructions before...
User Guide
Page 7
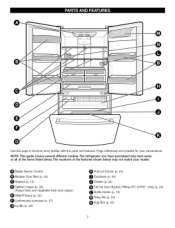
...: This guide covers several different models. Page references are included for your model. 0 Use this page to become more familiar with the parts and features. The locations of the features shown below . The refrigerator you have some or all of the items listed below may have purchased may not match your convenience.
...: This guide covers several different models. Page references are included for your model. 0 Use this page to become more familiar with the parts and features. The locations of the features shown below . The refrigerator you have some or all of the items listed below may have purchased may not match your convenience.
User Guide
Page 12
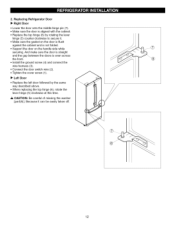
... way described above. • When replacing the top hinge (6), rotate the lever hinge (5) clockwise at this time. _, CAUTION: Be careful of missing the washer [part(8)]. Replacing Refrigerator Door • Right Door • Lower the door onto the middle hinge pin (7). • Make sure the door is not folded. • Support the door...
... way described above. • When replacing the top hinge (6), rotate the lever hinge (5) clockwise at this time. _, CAUTION: Be careful of missing the washer [part(8)]. Replacing Refrigerator Door • Right Door • Lower the door onto the middle hinge pin (7). • Make sure the door is not folded. • Support the door...
User Guide
Page 25
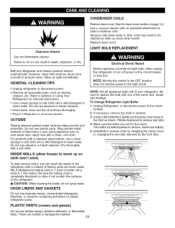
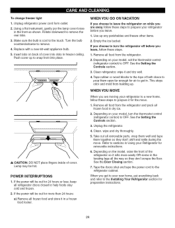
...year using appliance wax (or auto paste wax). To change Refrigerator Light Bulbs 1. Using a flat instrument, gently pry the lamp cover loose in warm water. Remove base cover. (See the base cover section on plastic refrigerator parts. However, clean both sections about once a month to ...sections in Using Your Refrigerator for removal instructions. • Use a clean sponge or soft cloth and a mild detergent in ...
...year using appliance wax (or auto paste wax). To change Refrigerator Light Bulbs 1. Using a flat instrument, gently pry the lamp cover loose in warm water. Remove base cover. (See the base cover section on plastic refrigerator parts. However, clean both sections about once a month to ...sections in Using Your Refrigerator for removal instructions. • Use a clean sponge or soft cloth and a mild detergent in ...
User Guide
Page 26
...Replacewitha new60-watat ppliancebulb. 5. When you get in the leveling legs all removable parts, wrap them well and tape them open far enough for air to get to your refrigerator to the Installing Your Refrigerator section for more than 24 hours: a) Remove all frozen food and store it ...If the power will be out for preparation instructions. 26 When you are away, follow these steps to prepare your model, turn the refrigerator off before you are moving your new home, put everything back and refer to a new home, follow these steps. 1. Insertabson ...
...Replacewitha new60-watat ppliancebulb. 5. When you get in the leveling legs all removable parts, wrap them well and tape them open far enough for air to get to your refrigerator to the Installing Your Refrigerator section for more than 24 hours: a) Remove all frozen food and store it ...If the power will be out for preparation instructions. 26 When you are away, follow these steps to prepare your model, turn the refrigerator off before you are moving your new home, put everything back and refer to a new home, follow these steps. 1. Insertabson ...
User Guide
Page 27
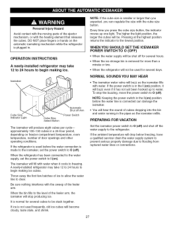
... water running in the I (on) position, it Personal Injury Hazard Avoid contact with the moving parts of the feeler arm. You will be used before the water line is normal for several cubes to the refrigerator. The icemaker will become cloudy, taste stale, and shrink. 27 It is connected can regulate the...
... water running in the I (on) position, it Personal Injury Hazard Avoid contact with the moving parts of the feeler arm. You will be used before the water line is normal for several cubes to the refrigerator. The icemaker will become cloudy, taste stale, and shrink. 27 It is connected can regulate the...
User Guide
Page 28
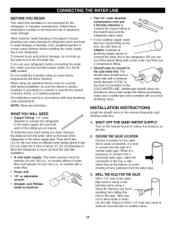
...INSTALLATION INSTRUCTIONS Install the shutoff valve on the line. , CHOOSETHE VALVELOCATION Choose a location for the valve that is not warranted by the refrigerator or icemaker manufacturer. Call a qualified plumber to correct water hammer before connecting the water line, make sure a saddle-type valve complies with...with your existing copper water line has a flared fitting at the point of 5/32" at the end, you can cause damage to refrigerator parts and lead to the cold water line. Two 1/4" outer diameter compression nuts and 2 ferrules (sleeves) to connect the copper tubing to the...
...INSTALLATION INSTRUCTIONS Install the shutoff valve on the line. , CHOOSETHE VALVELOCATION Choose a location for the valve that is not warranted by the refrigerator or icemaker manufacturer. Call a qualified plumber to correct water hammer before connecting the water line, make sure a saddle-type valve complies with...with your existing copper water line has a flared fitting at the point of 5/32" at the end, you can cause damage to refrigerator parts and lead to the cold water line. Two 1/4" outer diameter compression nuts and 2 ferrules (sleeves) to connect the copper tubing to the...


