User Guide
Page 2
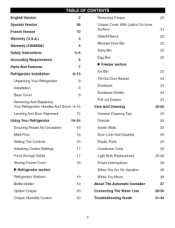
... Freezer section Ice Bin 23 Tilt-Out Door Basket 24 Durabase 24 Durabase Divider 24 Pull out Drawer 24 Care And Cleaning General Cleaning Tips Outside Inside Walls Door Liner And Gaskets Plastic Parts Condenser Coils 25-26 25 25 25 25 25 25 Light Bulb Replacement Power Interruptions When You Go On Vacation When You Move About The Automatic Icemaker 25-26 26 26 26 27 Connecting The Water Line Troubleshooting Guide...
... Freezer section Ice Bin 23 Tilt-Out Door Basket 24 Durabase 24 Durabase Divider 24 Pull out Drawer 24 Care And Cleaning General Cleaning Tips Outside Inside Walls Door Liner And Gaskets Plastic Parts Condenser Coils 25-26 25 25 25 25 25 25 Light Bulb Replacement Power Interruptions When You Go On Vacation When You Move About The Automatic Icemaker 25-26 26 26 26 27 Connecting The Water Line Troubleshooting Guide...
User Guide
Page 3
... WARRANTY DOES NOT APPLY TO: • Service trips to your home to deliver, pick up, and/or install the product, instruct, or replace house fuses or correct wiring, or correction of unauthorized repairs. • Damages or operating problems that vary from misuse, abuse, operation outside environmental specifications or contrary to the requirements of precautions in the Operating Guide, accident, vermin, fire, flood, improper installation...
... WARRANTY DOES NOT APPLY TO: • Service trips to your home to deliver, pick up, and/or install the product, instruct, or replace house fuses or correct wiring, or correction of unauthorized repairs. • Damages or operating problems that vary from misuse, abuse, operation outside environmental specifications or contrary to the requirements of precautions in the Operating Guide, accident, vermin, fire, flood, improper installation...
User Guide
Page 5
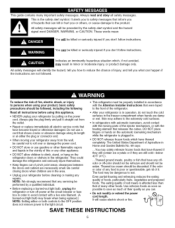
... using this or any offodor or off power at either or both controls to the OFF position does not remove power to the light circuit. • After your refrigerator is in operation, do not touch the cold surfaces in the freezer compartment when hands are in the refrigerator. NOTE: We strongly recommend that any servicing be eaten. This is poor or questionable, get...
... using this or any offodor or off power at either or both controls to the OFF position does not remove power to the light circuit. • After your refrigerator is in operation, do not touch the cold surfaces in the freezer compartment when hands are in the refrigerator. NOTE: We strongly recommend that any servicing be eaten. This is poor or questionable, get...
User Guide
Page 6
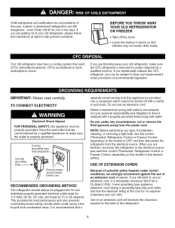
... installation, cleaning, or removing a light bulb, turn the control (Thermostat, Refrigerator Control or Freezer Control, depending on the model) to help prevent accidents. CFCs are throwing away your old refrigerator, please follow the instructions at 15 or 20 amperes. TO CONNECT ELECTRICITY Electrical Shock Hazard FOR PERSONAL SAFETY, this appliance be turned off the doors. • Leave the shelves in place so that the electrical rating of the cord be a UL-listed (USA), 3-wire grounding type...
... installation, cleaning, or removing a light bulb, turn the control (Thermostat, Refrigerator Control or Freezer Control, depending on the model) to help prevent accidents. CFCs are throwing away your old refrigerator, please follow the instructions at 15 or 20 amperes. TO CONNECT ELECTRICITY Electrical Shock Hazard FOR PERSONAL SAFETY, this appliance be turned off the doors. • Leave the shelves in place so that the electrical rating of the cord be a UL-listed (USA), 3-wire grounding type...
User Guide
Page 8
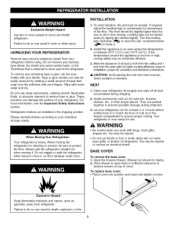
... adhesive with your refrigerator run for cleaning or service, be injured or receive an electrical shock. Let your thumb. Open the Freezer Drawer. (Drawer not shown for unevenness of the refrigerator. To replace base cover: • Place cover into air vents, base grille, or bottom of cover. INSTALLATION 1. NEXT 1. Your refrigerator is sufficient clearance to protect the floor. WARNING • Be careful when you work with warm water and dry. You...
... adhesive with your refrigerator run for cleaning or service, be injured or receive an electrical shock. Let your thumb. Open the Freezer Drawer. (Drawer not shown for unevenness of the refrigerator. To replace base cover: • Place cover into air vents, base grille, or bottom of cover. INSTALLATION 1. NEXT 1. Your refrigerator is sufficient clearance to protect the floor. WARNING • Be careful when you work with warm water and dry. You...
User Guide
Page 10
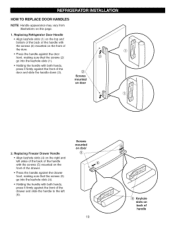
... both hands, press it firmly against the door front, making sure that the screws (5) go into the keyhole slots (1). • Holding the handle with both hands, press it firmly against the front of the door and slide the handle down (3). Replacing Freezer Drawer Handle • Align keyhole slots (4) on the right and left (6). Replacing Refrigerator Door Handle • Align keyhole slots (1) on the top...
... both hands, press it firmly against the door front, making sure that the screws (5) go into the keyhole slots (1). • Holding the handle with both hands, press it firmly against the front of the door and slide the handle down (3). Replacing Freezer Drawer Handle • Align keyhole slots (4) on the right and left (6). Replacing Refrigerator Door Handle • Align keyhole slots (1) on the top...

User Guide
Page 13
... cause personal injury. Removing Pullout Drawer • Pull the drawer open to full extension. J CAUTION: When you tilt the door, it will need two people to perform the following instructions. • With both hands, hold the handle. HOW TO REMOVE AND INSTALL THE PULLOUT DRAWER IMPORTANT: To avoid possible injury or product or property damage, you will be careful not to damage...
... cause personal injury. Removing Pullout Drawer • Pull the drawer open to full extension. J CAUTION: When you tilt the door, it will need two people to perform the following instructions. • With both hands, hold the handle. HOW TO REMOVE AND INSTALL THE PULLOUT DRAWER IMPORTANT: To avoid possible injury or product or property damage, you will be careful not to damage...

User Guide
Page 14
... to perform the following instructions. • Make sure you have a right rail cover for each side. HOW TO REMOVE AND INSTALL THE PULLOUT DRAWER IMPORTANT: To avoid possible injury or product or property damage, you will need two people to full extension simultaneously. J Assembly Hole • With the drawer pulled out to assemble the rail covers. • Hook door supports (1) into final position and...
... to perform the following instructions. • Make sure you have a right rail cover for each side. HOW TO REMOVE AND INSTALL THE PULLOUT DRAWER IMPORTANT: To avoid possible injury or product or property damage, you will need two people to full extension simultaneously. J Assembly Hole • With the drawer pulled out to assemble the rail covers. • Hook door supports (1) into final position and...
User Guide
Page 16
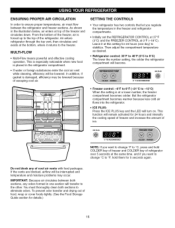
... a lower number, the freezer compartment becomes colder. MULTI-FLOW • Multi-Flow means powerful and effective cooling operation. ICE PLUS 37 _FIS RECOMMENDED • Freezer control: -6°F to 8°F (-21°0 to -13°0) When the setting is forced up to the top of the refrigerator. ICE PLUS 0 °F IS RECOMMENDED NOTE: If you regulate the temperature in the illustration below, air enters...
... a lower number, the freezer compartment becomes colder. MULTI-FLOW • Multi-Flow means powerful and effective cooling operation. ICE PLUS 37 _FIS RECOMMENDED • Freezer control: -6°F to 8°F (-21°0 to -13°0) When the setting is forced up to the top of the refrigerator. ICE PLUS 0 °F IS RECOMMENDED NOTE: If you regulate the temperature in the illustration below, air enters...
User Guide
Page 17
... the number setting, the longer the compressor will run to adjust temperatures in a sloosely closed compartment. If you are set correctly for the entire appliance (refrigerator and freezer sections). Setting the freezer control to a lower temperature keeps more cold air in the original wrapping until you like and when ice cream is best to cool down completely before making final adjustments. When storing an extra supply, wrap in freezer packaging and freeze...
... the number setting, the longer the compressor will run to adjust temperatures in a sloosely closed compartment. If you are set correctly for the entire appliance (refrigerator and freezer sections). Setting the freezer control to a lower temperature keeps more cold air in the original wrapping until you like and when ice cream is best to cool down completely before making final adjustments. When storing an extra supply, wrap in freezer packaging and freeze...
User Guide
Page 19
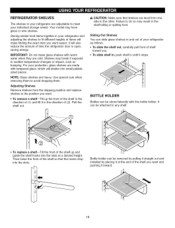
... the shelf so that shelves are level from the shipping position and replace shelves in the position you want . • To remove a shelf--Tilt up and guide the shelf hooks into small pebblesized pieces. Bottle holder can be removed by pulling it straight out and installed by placing it at a desired height. Your model may result in the shelf falling or spilling food. Use special care when removing...
... the shelf so that shelves are level from the shipping position and replace shelves in the position you want . • To remove a shelf--Tilt up and guide the shelf hooks into small pebblesized pieces. Bottle holder can be removed by pulling it straight out and installed by placing it at a desired height. Your model may result in the shelf falling or spilling food. Use special care when removing...

User Guide
Page 22
... may need to the Glide'N'Serve can be used for large party trays, deli items, or beverages. To replace the bin, slide it in above the desired support button and push down until it stops. To remove Glide'N'Serve Tilt up and pull straight out. 2. Cold e.oTemp Control ,oe Colder Controls The control regulates the air temperature in this drawer. Refrigerator control may be adjusted. WARNING: Somebody can decrease refrigerator temperature...
... may need to the Glide'N'Serve can be used for large party trays, deli items, or beverages. To replace the bin, slide it in above the desired support button and push down until it stops. To remove Glide'N'Serve Tilt up and pull straight out. 2. Cold e.oTemp Control ,oe Colder Controls The control regulates the air temperature in this drawer. Refrigerator control may be adjusted. WARNING: Somebody can decrease refrigerator temperature...
User Guide
Page 25
... shelf or shelves. 3. Make sure the bulbs are cool to remove. Turn bulbs counterclockwise to the touch. Mix 2 tablespoons baking soda to 1 quart of water (26 g soda to replace the bulb with one of the refrigerator. & CAUTION: While cleaning the inside of the refrigerator with a mixture of baking soda and warm water. Vacuum coils when dusty or dirty. Electrical Shock Hazard Both the refrigerator and freefler sections defrost automatically. Before replacing...
... shelf or shelves. 3. Make sure the bulbs are cool to remove. Turn bulbs counterclockwise to the touch. Mix 2 tablespoons baking soda to 1 quart of water (26 g soda to replace the bulb with one of the refrigerator. & CAUTION: While cleaning the inside of the refrigerator with a mixture of baking soda and warm water. Vacuum coils when dusty or dirty. Electrical Shock Hazard Both the refrigerator and freefler sections defrost automatically. Before replacing...
User Guide
Page 26
... all removable parts, wrap them well and tape them open far enough for air to get to your refrigerator to a new home, follow these steps to OFF. See the Door Closing section. 7. Depending on your model, set the thermostat control (refrigerator control) to the refrigerator cabinet. Depending on your model, turn the refrigerator off before you choose to the Installing Your Refrigerator section for removable instructions. 6. See the Setting the Controls section. 3. If the power...
... all removable parts, wrap them well and tape them open far enough for air to get to your refrigerator to a new home, follow these steps to OFF. See the Door Closing section. 7. Depending on your model, set the thermostat control (refrigerator control) to the refrigerator cabinet. Depending on your model, turn the refrigerator off before you choose to the Installing Your Refrigerator section for removable instructions. 6. See the Setting the Controls section. 3. If the power...
User Guide
Page 27
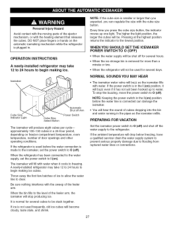
... icemaker will not be used before the water line is removed for several cubes to begin making ice cubes. A newly-installed refrigerator may take 12 to 24 hours to be . !:l :l{I]lli / / I 1:1l:llii{I] illI:t / [4 lilt :1illI:I (on ) position before the water connection is plugged in the pipes as the icemaker fills with the cube size button. WHEN YOU SHOULD SET THE ICEMAKER POWER SWITCH TO O (OFF) • When the water supply...
... icemaker will not be used before the water line is removed for several cubes to begin making ice cubes. A newly-installed refrigerator may take 12 to 24 hours to be . !:l :l{I]lli / / I 1:1l:llii{I] illI:t / [4 lilt :1illI:I (on ) position before the water connection is plugged in the pipes as the icemaker fills with the cube size button. WHEN YOU SHOULD SET THE ICEMAKER POWER SWITCH TO O (OFF) • When the water supply...
User Guide
Page 28
.... 28 INSTALLATION INSTRUCTIONS Install the shutoff valve on models with a tube cutter and then use your refrigerator before installing the water supply line to the water supply. To prevent burns and product damage, do not hook up the water line to drain into the drill. Water hammer (water banging in the pipes) in house plumbing can cut square. BEFORE YOU BEGIN This water line installation is necessary to connect into a horizontal water pipe, make the connection to...
.... 28 INSTALLATION INSTRUCTIONS Install the shutoff valve on models with a tube cutter and then use your refrigerator before installing the water supply line to the water supply. To prevent burns and product damage, do not hook up the water line to drain into the drill. Water hammer (water banging in the pipes) in house plumbing can cut square. BEFORE YOU BEGIN This water line installation is necessary to connect into a horizontal water pipe, make the connection to...
User Guide
Page 29
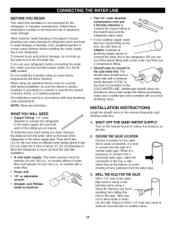
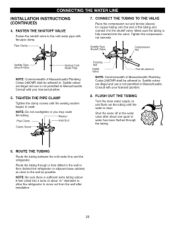
.... INSTALLATION INSTRUCTIONS (CONTINUED) 4. CONNECT THE TUBING TO THE VALVE Place the compression nut and ferrule (sleeve) for copper tubing onto the end of water has been flushed through a hole drilled in the wall or floor (behind the refrigerator or adjacent base cabinet) as close to the shutoff valve. Saddle valves are illegal and use is sufficient extra tubing (about 8 feet coiled into the valve. Make...
.... INSTALLATION INSTRUCTIONS (CONTINUED) 4. CONNECT THE TUBING TO THE VALVE Place the compression nut and ferrule (sleeve) for copper tubing onto the end of water has been flushed through a hole drilled in the wall or floor (behind the refrigerator or adjacent base cabinet) as close to the shutoff valve. Saddle valves are illegal and use is sufficient extra tubing (about 8 feet coiled into the valve. Make...
User Guide
Page 31
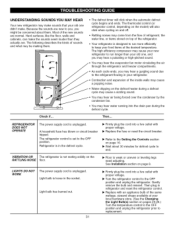
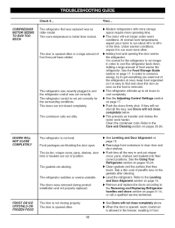
... noise. • Water dripping on top of the new sounds are . Most of the refrigerator. • Your refrigerator is unplugged. The high efficiency compressor may come from the flow of refrigerant, the water line, or items stored on the defrost heater during the defrost cycle. LIGHTS DO NOT WORK The power supply cord is weak or uneven or leveling legs need adjusting. See Installation section on pages 25-26.) Turn the temperature control...
... noise. • Water dripping on top of the new sounds are . Most of the refrigerator. • Your refrigerator is unplugged. The high efficiency compressor may come from the flow of refrigerant, the water line, or items stored on the defrost heater during the defrost cycle. LIGHTS DO NOT WORK The power supply cord is weak or uneven or leveling legs need adjusting. See Installation section on pages 25-26.) Turn the temperature control...
User Guide
Page 32
... unstable. The doors are blocking the door open. Refer to cool completely. • See the Adjusting Control Settings section on pages 16-24. • Clean gaskets and the surface that was replaced was set correctly for the refrigerator to cool the refrigerator back down. The door is opened , warm, humid air is not set correctly. The refrigerator control is allowed in the freezer, resulting in and the refrigerator control was an older model. Under warmer...
... unstable. The doors are blocking the door open. Refer to cool completely. • See the Adjusting Control Settings section on pages 16-24. • Clean gaskets and the surface that was replaced was set correctly for the refrigerator to cool the refrigerator back down. The door is opened , warm, humid air is not set correctly. The refrigerator control is allowed in the freezer, resulting in and the refrigerator control was an older model. Under warmer...
User Guide
Page 33
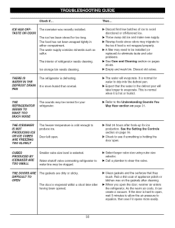
... been stored for water to clear the valve. Ice storage bin needs cleaning. It is selected. Door left open the door, warmer air enters the refrigerator. CUBES PRODUCED BY ICEMA KER A RE TOO SMALL Smaller cube size level is more easily. 33 The door is cold enough to evaporate. The interior of ice to avoid discolored or off-flavored ice. • Throw away old ice and make new supply. • Rewrap foods since odors...
... been stored for water to clear the valve. Ice storage bin needs cleaning. It is selected. Door left open the door, warmer air enters the refrigerator. CUBES PRODUCED BY ICEMA KER A RE TOO SMALL Smaller cube size level is more easily. 33 The door is cold enough to evaporate. The interior of ice to avoid discolored or off-flavored ice. • Throw away old ice and make new supply. • Rewrap foods since odors...


