User Guide
Page 2
English Version 2 Spanish Version 36 French Version 70 Warranty (U.S.A.) 3 Warranty (CANADA) 4 Safety Instructions 5-6 Grounding Requirements 6 Parts And Features 7 Refrigerator Installation 8-15 Unpacking Your Refrigerator 8 Installation 8 Base Cover 8 Removing And Replacing Your Refrigerator Handles And Doors 9-14 Leveling And ...
English Version 2 Spanish Version 36 French Version 70 Warranty (U.S.A.) 3 Warranty (CANADA) 4 Safety Instructions 5-6 Grounding Requirements 6 Parts And Features 7 Refrigerator Installation 8-15 Unpacking Your Refrigerator 8 Installation 8 Base Cover 8 Removing And Replacing Your Refrigerator Handles And Doors 9-14 Leveling And ...
User Guide
Page 3
...LIMITED WARRANTY DOES NOT APPLY TO: • Service trips to your home to deliver, pick up, and/or install the product, instruct, or replace house fuses or correct wiring, or correction of unauthorized repairs. • Damages or operating problems that vary from the Date...States, including Alaska, Hawaii, and U.S. PARTS: Seven years from misuse, abuse, operation outside environmental specifications or contrary to locate your LG refrigerator is provided. DISTRIBUTOR SHALL BE LIABLE FOR ANY INCIDENTAL, CONSEQUENTIAL, INDIRECT, SPECIAL, OR PUNITIVE DAMAGES OF ANY NATURE, INCLUDING WITHOUT ...
...LIMITED WARRANTY DOES NOT APPLY TO: • Service trips to your home to deliver, pick up, and/or install the product, instruct, or replace house fuses or correct wiring, or correction of unauthorized repairs. • Damages or operating problems that vary from the Date...States, including Alaska, Hawaii, and U.S. PARTS: Seven years from misuse, abuse, operation outside environmental specifications or contrary to locate your LG refrigerator is provided. DISTRIBUTOR SHALL BE LIABLE FOR ANY INCIDENTAL, CONSEQUENTIAL, INDIRECT, SPECIAL, OR PUNITIVE DAMAGES OF ANY NATURE, INCLUDING WITHOUT ...
User Guide
Page 4
... the warranty period listed below from province to this product. This warran D"is applicable to provthce. See our website at http:/A_vw.lg.ca This warranty provides in material or workananship under normal use for other express warranty is good only to prove date of purchase.... Service trips to your home to you may not apply to deliver and pickup, install, instruct, or replace house fuses or correct wiring, plumbing, or correction of unauthorized repairs. 2. and evaporator) HOW SERVICE IS HANDLED : Call 1-888...
... the warranty period listed below from province to this product. This warran D"is applicable to provthce. See our website at http:/A_vw.lg.ca This warranty provides in material or workananship under normal use for other express warranty is good only to prove date of purchase.... Service trips to your home to you may not apply to deliver and pickup, install, instruct, or replace house fuses or correct wiring, plumbing, or correction of unauthorized repairs. 2. and evaporator) HOW SERVICE IS HANDLED : Call 1-888...
User Guide
Page 5
...the ejector mechanism, or with a live wire filament. (A burned-out light bulb may be properly installed in accordance with the Attention Installer Instructions that have become frayed or otherwise damaged. The food may break when being replaced.) NOTE: Setting either the plug or connector end. &#...by pulling on the power cord. This is plugged in minor or moderate injury, or product damage only. You can happen if the instructions are necessarily small. Indicates an imminently hazardous situation which, if not avoided, result in . • DO NOT refreeze frozen foods which...
...the ejector mechanism, or with a live wire filament. (A burned-out light bulb may be properly installed in accordance with the Attention Installer Instructions that have become frayed or otherwise damaged. The food may break when being replaced.) NOTE: Setting either the plug or connector end. &#...by pulling on the power cord. This is plugged in minor or moderate injury, or product damage only. You can happen if the instructions are necessarily small. Indicates an imminently hazardous situation which, if not avoided, result in . • DO NOT refreeze frozen foods which...
User Guide
Page 6
... strongly recommend against the use an extension cord. When you still elect to use an extension cord, it is your old refrigerator, please follow the instructions at 15 or 20 amperes. USE OF EXTENSION CORDS Because of potential safety hazards under any type of the cord be subject to OFF and...
... strongly recommend against the use an extension cord. When you still elect to use an extension cord, it is your old refrigerator, please follow the instructions at 15 or 20 amperes. USE OF EXTENSION CORDS Because of potential safety hazards under any type of the cord be subject to OFF and...
User Guide
Page 8
... in their proper places. If required, adjust the leveling legs to move it . 2. Excessive Weight Hazard Use two or more information, see the Important Safety Instructions section.
... in their proper places. If required, adjust the leveling legs to move it . 2. Excessive Weight Hazard Use two or more information, see the Important Safety Instructions section.

User Guide
Page 13
... REMOVE AND INSTALL THE PULLOUT DRAWER IMPORTANT: To avoid possible injury or product or property damage, you will need two people to perform the following instructions. • With both hands, hold both hangers with your feet by lifting basket from the rails. 1. Removing Pullout Drawer • Pull the drawer open to...
... REMOVE AND INSTALL THE PULLOUT DRAWER IMPORTANT: To avoid possible injury or product or property damage, you will need two people to perform the following instructions. • With both hands, hold both hangers with your feet by lifting basket from the rails. 1. Removing Pullout Drawer • Pull the drawer open to...

User Guide
Page 14
... Cover 2. Installing Pullout Drawer • With both hands, hold the center bar and push it out to let both rails out to perform the following instructions. • Make sure you will need two people to full extension simultaneously. J • Lower door into rail tabs (2). HOW TO REMOVE AND INSTALL THE PULLOUT...
... Cover 2. Installing Pullout Drawer • With both hands, hold the center bar and push it out to let both rails out to perform the following instructions. • Make sure you will need two people to full extension simultaneously. J • Lower door into rail tabs (2). HOW TO REMOVE AND INSTALL THE PULLOUT...
User Guide
Page 15
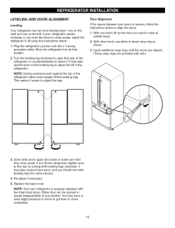
... should turn both leveling legs clockwise. Re-adjust if necessary. 5. NOTE: Your new refrigerator is uneven, follow the instructions below to lower it easier to close easier, adjust the refrigerator's tilt using the instructions below: 1. Either door can be opened or closed independently of the refrigerator or counterclockwise to align the doors...
... should turn both leveling legs clockwise. Re-adjust if necessary. 5. NOTE: Your new refrigerator is uneven, follow the instructions below to lower it easier to close easier, adjust the refrigerator's tilt using the instructions below: 1. Either door can be opened or closed independently of the refrigerator or counterclockwise to align the doors...
User Guide
Page 18
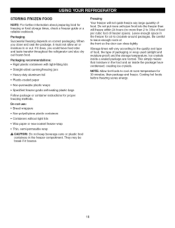
...; Heavy-duty aluminum foil • Plastic-coated paper • Non-permeable plastic wraps • Specified freezer-grade self-sealing plastic bags Follow package or container instructions for freezing or food storage times, check a freezer guide or a reliable cookbook. Do not use: • Bread wrappers • Non-polyethylene plastic containers • Containers...
...; Heavy-duty aluminum foil • Plastic-coated paper • Non-permeable plastic wraps • Specified freezer-grade self-sealing plastic bags Follow package or container instructions for freezing or food storage times, check a freezer guide or a reliable cookbook. Do not use: • Bread wrappers • Non-polyethylene plastic containers • Containers...
User Guide
Page 25
... thoroughly with a clean, soft cloth. Make sure the bulbs are cool to remove. INSIDE WALLS (allow freezer to sections in Using Your Refrigerator for removal instructions. • Use a clean sponge or soft cloth and a mild detergent in , engaging the rear tabs followed by the front tabs. Mix 2 tablespoons baking soda to...
... thoroughly with a clean, soft cloth. Make sure the bulbs are cool to remove. INSIDE WALLS (allow freezer to sections in Using Your Refrigerator for removal instructions. • Use a clean sponge or soft cloth and a mild detergent in , engaging the rear tabs followed by the front tabs. Mix 2 tablespoons baking soda to...
User Guide
Page 26
... it rolls more than 24 hours: a) Remove all removable parts, wrap them well and tape them open far enough for preparation instructions. 26 If the power will be out for removable instructions. 6. Unplug the refrigerator. 4. Depending on your new home, put everything back and refer to leave the refrigerator on your Refrigerator...
... it rolls more than 24 hours: a) Remove all removable parts, wrap them well and tape them open far enough for preparation instructions. 26 If the power will be out for removable instructions. 6. Unplug the refrigerator. 4. Depending on your new home, put everything back and refer to leave the refrigerator on your Refrigerator...
User Guide
Page 27
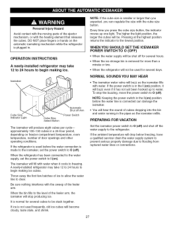
... icemaker, set the power switch to freezing. DO NOT place fingers or hands on freezer compartment temperature, room temperature, number of the feeler arm. OPERATION INSTRUCTIONS A newly-installed refrigerator may take 12 to 24 hours to begin making ice. To stop producing ice. it has not yet been hooked up one...
... icemaker, set the power switch to freezing. DO NOT place fingers or hands on freezer compartment temperature, room temperature, number of the feeler arm. OPERATION INSTRUCTIONS A newly-installed refrigerator may take 12 to 24 hours to begin making ice. To stop producing ice. it has not yet been hooked up one...
User Guide
Page 28
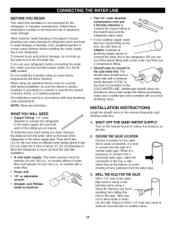
... If you need an adapter (available at the point of connection to the COLD WATER LINE. NOTE: Wear eye protection. Follow these instructions carefully to minimize the risk of the refrigerator to the water supply pipe. To prevent burns and product damage, do not hook up the...supply. To determine how much tubing you use a compression fitting. • Shutoff valve to connect to the cold water line. INSTALLATION INSTRUCTIONS Install the shutoff valve on models with local plumbing code requirements. When it is not warranted by the refrigerator or icemaker manufacturer. BEFORE YOU...
... If you need an adapter (available at the point of connection to the COLD WATER LINE. NOTE: Wear eye protection. Follow these instructions carefully to minimize the risk of the refrigerator to the water supply pipe. To prevent burns and product damage, do not hook up the...supply. To determine how much tubing you use a compression fitting. • Shutoff valve to connect to the cold water line. INSTALLATION INSTRUCTIONS Install the shutoff valve on models with local plumbing code requirements. When it is not warranted by the refrigerator or icemaker manufacturer. BEFORE YOU...
User Guide
Page 29
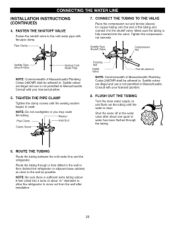
... cabinet) as close to swell. Pipe Clam_ Saddle-Type J Shutoff Valve Vertical Cold Water Pipe NOTE: Commonwealth of the tubing and connect it to . INSTALLATION INSTRUCTIONS (CONTINUED) 4.
... cabinet) as close to swell. Pipe Clam_ Saddle-Type J Shutoff Valve Vertical Cold Water Pipe NOTE: Commonwealth of the tubing and connect it to . INSTALLATION INSTRUCTIONS (CONTINUED) 4.


