User Guide
Page 2
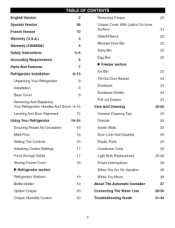
...Parts And Features 7 Refrigerator Installation 8-15 Unpacking Your Refrigerator 8 Installation 8 Base Cover 8 Removing And Replacing Your Refrigerator Handles And Doors 9-14 Leveling And Door Alignment 15 Using Your Refrigerator Ensuring Proper Air Circulation Multi-Flow 16-24 16 16 Setting The Controls 16 Adjusting Control Settings 17...20 Crisper Cover With Lattice On Inner Surface 21 Glide'N'Serve 22 Modular Door Bin 22 Dairy Bin 23 Egg Box 23 I_ Freezer section Ice Bin 23 Tilt-Out Door Basket 24 Durabase 24 Durabase Divider 24 Pull out Drawer 24 Care ...
...Parts And Features 7 Refrigerator Installation 8-15 Unpacking Your Refrigerator 8 Installation 8 Base Cover 8 Removing And Replacing Your Refrigerator Handles And Doors 9-14 Leveling And Door Alignment 15 Using Your Refrigerator Ensuring Proper Air Circulation Multi-Flow 16-24 16 16 Setting The Controls 16 Adjusting Control Settings 17...20 Crisper Cover With Lattice On Inner Surface 21 Glide'N'Serve 22 Modular Door Bin 22 Dairy Bin 23 Egg Box 23 I_ Freezer section Ice Bin 23 Tilt-Out Door Basket 24 Durabase 24 Durabase Divider 24 Pull out Drawer 24 Care ...
User Guide
Page 5
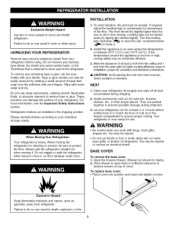
...inform you of injury, and tell you what can be performed by pulling on the refrigerator doors or shelves in minor or moderate injury, or product damage only. clearances between the doors and cabinet are damp or wet. You can happen if the instructions are not followed. ...Indicates an imminently hazardous situation which have any repairs. All safety messages will cause electric shock or fire. Be careful closing doors when children are still coldIbelow 40°F (4°C). ...Thawed ground meats, poultry or fish that were taped to climb, stand, or ...
...inform you of injury, and tell you what can be performed by pulling on the refrigerator doors or shelves in minor or moderate injury, or product damage only. clearances between the doors and cabinet are damp or wet. You can happen if the instructions are not followed. ...Indicates an imminently hazardous situation which have any repairs. All safety messages will cause electric shock or fire. Be careful closing doors when children are still coldIbelow 40°F (4°C). ...Thawed ground meats, poultry or fish that were taped to climb, stand, or ...
User Guide
Page 6
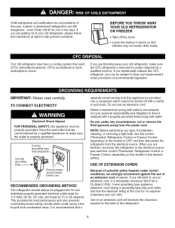
... the past. If you intentionally release this CFC refrigerant, you still elect to fines and imprisonment under provisions of the cord be turned off the doors. • Leave the shelves in place so that used CFCs (chlorofluorocarbons). Use a receptacle which could cause a fire hazard from the power cord. However, if you...
... the past. If you intentionally release this CFC refrigerant, you still elect to fines and imprisonment under provisions of the cord be turned off the doors. • Leave the shelves in place so that used CFCs (chlorofluorocarbons). Use a receptacle which could cause a fire hazard from the power cord. However, if you...
User Guide
Page 7
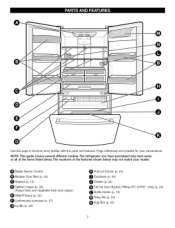
NOTE: This guide covers several different models. The refrigerator you have purchased may not match your convenience. O Digital Sensor Control Modular Door Bins (p. 22) Shelves (p. 19) Optibin Crisper (p. 20) (Keeps fruits and vegetable fresh and crisper) O Glide'N'Serve (p. 22) Customcube Icemaker (p.... 27) i_ Ice Bin (p. 23) t_ Pull out Drawer (p. 24) 0 Durabase (p. 24) 0 Divider (p. 24) Tilt-Out Door Basket (Tilting-LFC 25760** only) (p. 24) t_ Bottle Holder (p. 19) Dairy Bin (p. 23) Egg Box (p. 23) Page references are included for your model. ...
NOTE: This guide covers several different models. The refrigerator you have purchased may not match your convenience. O Digital Sensor Control Modular Door Bins (p. 22) Shelves (p. 19) Optibin Crisper (p. 20) (Keeps fruits and vegetable fresh and crisper) O Glide'N'Serve (p. 22) Customcube Icemaker (p.... 27) i_ Ice Bin (p. 23) t_ Pull out Drawer (p. 24) 0 Durabase (p. 24) 0 Divider (p. 24) Tilt-Out Door Basket (Tilting-LFC 25760** only) (p. 24) t_ Bottle Holder (p. 19) Dairy Bin (p. 23) Egg Box (p. 23) Page references are included for your model. ...
User Guide
Page 8
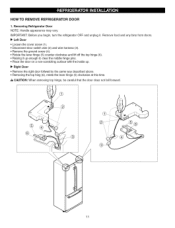
... service, be slightly higher than the rear to aid in the freezer compartment to ensure proper cooling. INSTALLATION 1. Check the flow of cold air in door closing. Open the Freezer Drawer. (Drawer not shown for use sharp instruments, rubbing alcohol, flammable fluids, or abrasive cleaners to move it . 2. Failure to protect...
... service, be slightly higher than the rear to aid in the freezer compartment to ensure proper cooling. INSTALLATION 1. Check the flow of cold air in door closing. Open the Freezer Drawer. (Drawer not shown for use sharp instruments, rubbing alcohol, flammable fluids, or abrasive cleaners to move it . 2. Failure to protect...
User Guide
Page 9
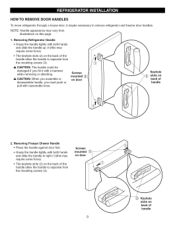
...assemble or disassemble handle, you hit it maybe necessary to remove refrigerator and freezer door handles. Removing Refrigerator Handle • Grasp the handle tightly with reasonable force. Screws mounted on door Keyhole slots on back of the handle allow the handle to separate from the mounting...may require some force). • The keyhole slots (2) on the back of handle Removing Freezer Drawer Handle • Press the handle against door first. • Grasp the handle tightly with both hands and slide the handle up (1)(this may require some force). • The keyhole...
...assemble or disassemble handle, you hit it maybe necessary to remove refrigerator and freezer door handles. Removing Refrigerator Handle • Grasp the handle tightly with reasonable force. Screws mounted on door Keyhole slots on back of the handle allow the handle to separate from the mounting...may require some force). • The keyhole slots (2) on the back of handle Removing Freezer Drawer Handle • Press the handle against door first. • Grasp the handle tightly with both hands and slide the handle up (1)(this may require some force). • The keyhole...
User Guide
Page 10
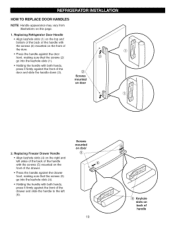
...keyhole slots (1). • Holding the handle with both hands, press it firmly against the front of handle Screws mounted on this page. 1. Replacing Refrigerator Door Handle • Align keyhole slots (1) on the top and bottom of the back of the handle with the screws (2) mounted on the front of ...the door. • Press the handle against the door front, making sure that the screws (5) go into the keyhole slots (4). • Holding the handle with both hands, press it...
...keyhole slots (1). • Holding the handle with both hands, press it firmly against the front of handle Screws mounted on this page. 1. Replacing Refrigerator Door Handle • Align keyhole slots (1) on the top and bottom of the back of the handle with the screws (2) mounted on the front of ...the door. • Press the handle against the door front, making sure that the screws (5) go into the keyhole slots (4). • Holding the handle with both hands, press it...
User Guide
Page 11
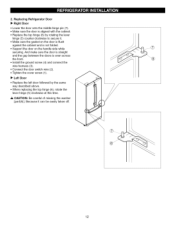
...: Handle appearance may vary. Remove food and any bins from doors. • Left Door • Loosen the cover screw (1). • Disconnect door switch wire (2) and wire harness (3). • Remove the ground screw (4). • Rotate the lever hinge (5) counter clockwise and lift off the top hinge ... the refrigerator OFF and unplug it up enough to clear the middle hinge pins. • Place the door on a non-scratching surface with the inside up. • Right Door • Remove the right door follwed by the same way described above. • Removing the top hing (6), rotate the lever hinge ...
...: Handle appearance may vary. Remove food and any bins from doors. • Left Door • Loosen the cover screw (1). • Disconnect door switch wire (2) and wire harness (3). • Remove the ground screw (4). • Rotate the lever hinge (5) counter clockwise and lift off the top hinge ... the refrigerator OFF and unplug it up enough to clear the middle hinge pins. • Place the door on a non-scratching surface with the inside up. • Right Door • Remove the right door follwed by the same way described above. • Removing the top hing (6), rotate the lever hinge ...
User Guide
Page 12
.... • Make sure the gasket on the door is flush against the cabinet and is not folded. • Support the door on the handle side while securing. And make sure the door is straight and the gap between the doors is aligned with the cabinet. • Replace ... hinge (5) clockwise at this time. _, CAUTION: Be careful of missing the washer [part(8)]. Replacing Refrigerator Door • Right Door • Lower the door onto the middle hinge pin (7). • Make sure the door is even across the front. ® • Install the ground screw (4) and connect the wire harness...
.... • Make sure the gasket on the door is flush against the cabinet and is not folded. • Support the door on the handle side while securing. And make sure the door is straight and the gap between the doors is aligned with the cabinet. • Replace ... hinge (5) clockwise at this time. _, CAUTION: Be careful of missing the washer [part(8)]. Replacing Refrigerator Door • Right Door • Lower the door onto the middle hinge pin (7). • Make sure the door is even across the front. ® • Install the ground screw (4) and connect the wire harness...

User Guide
Page 13
... laying the drawer down, be careful not to damage the floor or hurt your feet by lifting basket from rail system. (If you tilt the door, it from the rails. 1. HOW TO REMOVE AND INSTALL THE PULLOUT DRAWER IMPORTANT: To avoid possible injury or product or property damage, you will be... remove the drawer, do not hold the center bar and push it in to let both rails fitted simultaneously. • Remove the screws(2) of the door and pull it could cause personal injury.
... laying the drawer down, be careful not to damage the floor or hurt your feet by lifting basket from rail system. (If you tilt the door, it from the rails. 1. HOW TO REMOVE AND INSTALL THE PULLOUT DRAWER IMPORTANT: To avoid possible injury or product or property damage, you will be... remove the drawer, do not hold the center bar and push it in to let both rails fitted simultaneously. • Remove the screws(2) of the door and pull it could cause personal injury.

User Guide
Page 14
... let both rails out to perform the following instructions. • Make sure you will need two people to full extension simultaneously. J • Lower door into rail tabs (2). J _i, WARNING: To prevent accidental child and pet entrapment or suffocation risk. HOW TO REMOVE AND INSTALL THE PULLOUT DRAWER IMPORTANT...possible injury or product or property damage, you have a right rail cover for each side. WARNING: DO NOT step or sit down on freezer door. 14 Rail Cover • Align the top holes of the rail cover with the top holes of drawer. J Assembly Hole • With the...
... let both rails out to perform the following instructions. • Make sure you will need two people to full extension simultaneously. J • Lower door into rail tabs (2). J _i, WARNING: To prevent accidental child and pet entrapment or suffocation risk. HOW TO REMOVE AND INSTALL THE PULLOUT DRAWER IMPORTANT...possible injury or product or property damage, you have a right rail cover for each side. WARNING: DO NOT step or sit down on freezer door. 14 Rail Cover • Align the top holes of the rail cover with the top holes of drawer. J Assembly Hole • With the...
User Guide
Page 15
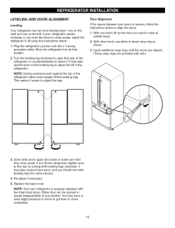
...'s power cord into its final position. 2. It may take several turns of the leveling leg to adjust the legs. This makes it . With one on doors to get them to the rear by turning both leveling legs clockwise. With other hand, use pliers to exert slight pressure on the left. Open... to make sure that side of one another. Re-adjust if necessary. 5. Replace the base cover. Move the refrigerator into a 3-prong grounded outlet. If your doors is uniquely designed with unit.) 3. It may have to insert snap ring as shown. 3. Insert additional snap rings until the...
...'s power cord into its final position. 2. It may take several turns of the leveling leg to adjust the legs. This makes it . With one on doors to get them to the rear by turning both leveling legs clockwise. With other hand, use pliers to exert slight pressure on the left. Open... to make sure that side of one another. Re-adjust if necessary. 5. Replace the base cover. Move the refrigerator into a 3-prong grounded outlet. If your doors is uniquely designed with unit.) 3. It may have to insert snap ring as shown. 3. Insert additional snap rings until the...
User Guide
Page 17
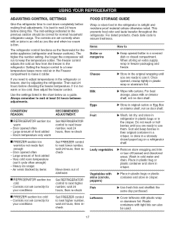
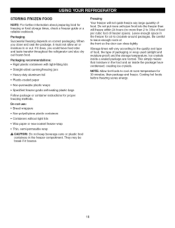
... as cold as a guide. The controls are ready to make it is firm. Always remember to cool down completely before making final adjustments. Door opened , rewrap tightly in the refrigerator or freezer, start by items Set REFRIGERATOR control to next lower number, wait 24 hours, then re-... hours, then recheck Move items out of airstream • REFRIGERATOR section too cold - For best storage, place milk on interior shelf, not on door shelf. Heavy ice usage - Air vents blocked by adjusting the refrigerator. Large amount of food added - When storing an extra supply, wrap in ...
... as cold as a guide. The controls are ready to make it is firm. Always remember to cool down completely before making final adjustments. Door opened , rewrap tightly in the refrigerator or freezer, start by items Set REFRIGERATOR control to next lower number, wait 24 hours, then re-... hours, then recheck Move items out of airstream • REFRIGERATOR section too cold - For best storage, place milk on interior shelf, not on door shelf. Heavy ice usage - Air vents blocked by adjusting the refrigerator. Large amount of food added - When storing an extra supply, wrap in ...
User Guide
Page 18
... storage times, check a freezer guide or a reliable cookbook. Do not put more unfrozen food into the freezer than 2 to cool at the front so the door can close and seal the package, it freezes. NOTE: Allow hot foods to 3 Ibs of food per cubic foot of freezer space). They may be...
... storage times, check a freezer guide or a reliable cookbook. Do not put more unfrozen food into the freezer than 2 to cool at the front so the door can close and seal the package, it freezes. NOTE: Allow hot foods to 3 Ibs of food per cubic foot of freezer space). They may be...
User Guide
Page 19
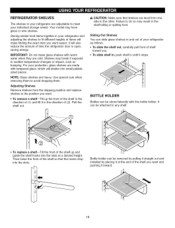
... items will also reduce the amount of your individual storage needs. BOTTLE HOLDER Bottles can slide glass shelves in and out of time the refrigerator door is open, saving energy. Storing similar food items together in your protection, glass shelves are cold. Pull the shelf out. _, CAUTION: Make sure that the...
... items will also reduce the amount of your individual storage needs. BOTTLE HOLDER Bottles can slide glass shelves in and out of time the refrigerator door is open, saving energy. Storing similar food items together in your protection, glass shelves are cold. Pull the shelf out. _, CAUTION: Make sure that the...

User Guide
Page 21
... cover over, 3. To replace lattice on inner surface To remove the glass 1. Raise the door flap as high as illustrated above procedure. Remove the crisper cover (as it . Lift the door out of the door flap with your finger. 3. For each lattice, hold the lattice and pull the side of... the cover to remove it will open. 2. To remove the crisper door flap 1. Lift up and out. 1. Press the plastic hinge...
... cover over, 3. To replace lattice on inner surface To remove the glass 1. Raise the door flap as high as illustrated above procedure. Remove the crisper cover (as it . Lift the door out of the door flap with your finger. 3. For each lattice, hold the lattice and pull the side of... the cover to remove it will open. 2. To remove the crisper door flap 1. Lift up and out. 1. Press the plastic hinge...

User Guide
Page 22
... CAUTION: DO NOT store bottles. To replace Glide'N'Serve 1. CAUTION: DO NOT allow children to the Glide'N'Serve can be hurt if door bins are not firmly assembled. Sharp corners on surface) setting for meats or other leafy produce in this drawer. This drawer can be broken... and cause personal injury. MODULAR DOOR BIN The door bins are frozen, they can decrease refrigerator temperature. GLIDE'N'SERVE The Glide'N'Serve provides storage space with baskets. Cold e.oTemp Control ,...
... CAUTION: DO NOT store bottles. To replace Glide'N'Serve 1. CAUTION: DO NOT allow children to the Glide'N'Serve can be hurt if door bins are not firmly assembled. Sharp corners on surface) setting for meats or other leafy produce in this drawer. This drawer can be broken... and cause personal injury. MODULAR DOOR BIN The door bins are frozen, they can decrease refrigerator temperature. GLIDE'N'SERVE The Glide'N'Serve provides storage space with baskets. Cold e.oTemp Control ,...

User Guide
Page 23
... the dairy bin, slide it freezes. A CAUTION: Do not use the egg box as possible. 2. EGG BOX Store Egg Box on interior shelf, not on door shelf. The egg box can easily break if it in the drawer. FREEZER SECTION ICE BIN 1. ICE BIN ,DRAWER 23
... the dairy bin, slide it freezes. A CAUTION: Do not use the egg box as possible. 2. EGG BOX Store Egg Box on interior shelf, not on door shelf. The egg box can easily break if it in the drawer. FREEZER SECTION ICE BIN 1. ICE BIN ,DRAWER 23

User Guide
Page 24
... Durabase and pull straight out. 2. To remove, pull the bracket upward until it out in (_ direction to organize the Durabase area into place. TILT-OUT DOOR BASKET (LFC 25760** only) You can remove foods easily by tilting out the wire basket in rail assembly.
... Durabase and pull straight out. 2. To remove, pull the bracket upward until it out in (_ direction to organize the Durabase area into place. TILT-OUT DOOR BASKET (LFC 25760** only) You can remove foods easily by tilting out the wire basket in rail assembly.
User Guide
Page 25
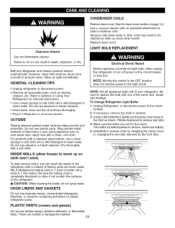
... all appliance bulbs will fit your refrigerator. Be sure to replace the bulb with an extended attachment to do not spray water. Insert new bulb(s). 5. DOOR LINERS AND GASKETS Do not use abrasive or harsh cleaners. • Hand wash, rinse and dry all surfaces thoroughly. • Plug in death, explosion, or...
... all appliance bulbs will fit your refrigerator. Be sure to replace the bulb with an extended attachment to do not spray water. Insert new bulb(s). 5. DOOR LINERS AND GASKETS Do not use abrasive or harsh cleaners. • Hand wash, rinse and dry all surfaces thoroughly. • Plug in death, explosion, or...


