Owner's Manual
Page 2
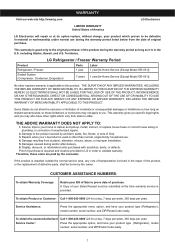
.... Service Assistance: Press the appropriate menu option, and have your Bill of Sale to prove date of purchase. LG Refrigerator / Freezer Warranty Period Product Parts Labor Refrigerator / Freezer 1 year 1 year [In-Home Service (Except Model GR-051)] Sealed System (Compressor, Condenser, Evaporator...warranty gives you specific legal rights and you . CUSTOMER ASSISTANCE NUMBERS: To obtain Warranty Coverage: Retain your product type (Refrigerator), model number, serial number, and ZIP/Postal Code ready. Damage resulting from state to state. Therefore, these limitations...
.... Service Assistance: Press the appropriate menu option, and have your Bill of Sale to prove date of purchase. LG Refrigerator / Freezer Warranty Period Product Parts Labor Refrigerator / Freezer 1 year 1 year [In-Home Service (Except Model GR-051)] Sealed System (Compressor, Condenser, Evaporator...warranty gives you specific legal rights and you . CUSTOMER ASSISTANCE NUMBERS: To obtain Warranty Coverage: Retain your product type (Refrigerator), model number, serial number, and ZIP/Postal Code ready. Damage resulting from state to state. Therefore, these limitations...
Owner's Manual
Page 4
... Compartment Freezer Section 4-5 Ice Bin 5 DuraBase Durabase Divider Glide Out Drawer 6-7 Tilting Door Refrigerator Installation Unpacking Installation Installation of Base Grille How to remove and Install the Refrigerator Doors How to remove and Install Pull-Out Drawer Closing and Aligning the doors 8-14 8...the Controls Adjusting Control Settings Food Storage Guide Storing Frozen Food Refrigerator Section Refrigerator Shelves 15-20 15 15 15 15 16 16 16-17 17-20 17-18 Refrigerator Care and Cleaning Refrigerator Cleaning Outside Inside Walls Door Lining & Gaskets Plastic Parts (...
... Compartment Freezer Section 4-5 Ice Bin 5 DuraBase Durabase Divider Glide Out Drawer 6-7 Tilting Door Refrigerator Installation Unpacking Installation Installation of Base Grille How to remove and Install the Refrigerator Doors How to remove and Install Pull-Out Drawer Closing and Aligning the doors 8-14 8...the Controls Adjusting Control Settings Food Storage Guide Storing Frozen Food Refrigerator Section Refrigerator Shelves 15-20 15 15 15 15 16 16 16-17 17-20 17-18 Refrigerator Care and Cleaning Refrigerator Cleaning Outside Inside Walls Door Lining & Gaskets Plastic Parts (...
Owner's Manual
Page 5
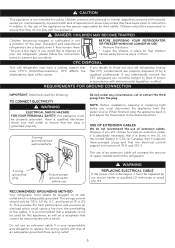
...away from the outlet. Be careful closing the doors when children are cold and below 40 °F (4 °C)". • Unplug the refrigerator before utilizing the product. Utilize this product only as explicitly expressed in minor injury or damage to climb, stand or swing from the light... to potential dangers that is the safety alert symbol. This can cause serious injury to them and damage to these surfaces. • In refrigerators with an automatic ice dispenser, avoid contact with moving your safety, this warning symbol and the word "DANGER", "CAUTION" or "WARNING"....
...away from the outlet. Be careful closing the doors when children are cold and below 40 °F (4 °C)". • Unplug the refrigerator before utilizing the product. Utilize this product only as explicitly expressed in minor injury or damage to climb, stand or swing from the light... to potential dangers that is the safety alert symbol. This can cause serious injury to them and damage to these surfaces. • In refrigerators with an automatic ice dispenser, avoid contact with moving your safety, this warning symbol and the word "DANGER", "CAUTION" or "WARNING"....
Owner's Manual
Page 6
... mental disabilities, persons with reduced sensory or mental capacity, or persons with environmental legislation in effect. CFC DISPOSAL Your old refrigerator may have supervision or instruction in relation to assure that of the appliance by the person responsible for their safety. CFC affects... replaced by our service center or qualified LG technician to dispose of 15 A and 120 V. However, if you could cause a fire from the power source. Discarded and abandoned refrigerators are properly disposed of the cables. BEFORE DISPOSING YOUR REFRIGERATOR OR FREEZER WHEN NO LONGER IN USE:...
... mental disabilities, persons with reduced sensory or mental capacity, or persons with environmental legislation in effect. CFC DISPOSAL Your old refrigerator may have supervision or instruction in relation to assure that of the appliance by the person responsible for their safety. CFC affects... replaced by our service center or qualified LG technician to dispose of 15 A and 120 V. However, if you could cause a fire from the power source. Discarded and abandoned refrigerators are properly disposed of the cables. BEFORE DISPOSING YOUR REFRIGERATOR OR FREEZER WHEN NO LONGER IN USE:...
Owner's Manual
Page 7
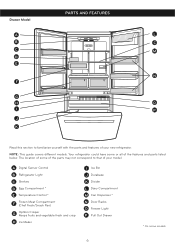
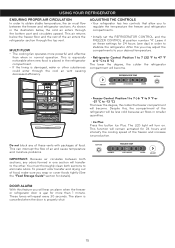
A Digital Sensor Control B Refrigerator Light C Shelves D Egg Compartment * E Temperature Control * F Frozen Meat Compartment (Chef Fresh/Snack Pan) G Optibin Crisper Keeps fruits and vegetable fresh and crisp H Ice Maker I P J K Read ... L Dairy Compartment M Can Dispenser * N Door Racks O Freezer Light P Pull Out Drawer * On some models 6 The location of some or all of your new refrigerator. NOTE: This guide covers different models. Your refrigerator could have some of the parts may not correspond to familiarize yourself with the parts and features of your model.
A Digital Sensor Control B Refrigerator Light C Shelves D Egg Compartment * E Temperature Control * F Frozen Meat Compartment (Chef Fresh/Snack Pan) G Optibin Crisper Keeps fruits and vegetable fresh and crisp H Ice Maker I P J K Read ... L Dairy Compartment M Can Dispenser * N Door Racks O Freezer Light P Pull Out Drawer * On some models 6 The location of some or all of your new refrigerator. NOTE: This guide covers different models. Your refrigerator could have some of the parts may not correspond to familiarize yourself with the parts and features of your model.
Owner's Manual
Page 8
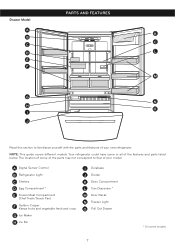
... (Chef Fresh/Snack Pan) F Optibin Crisper Keeps fruits and vegetable fresh and crisp G Ice Maker H Ice Bin I J Read this section to that of your new refrigerator. Drawer Model PARTS AND FEATURES A K B C C D L E F M G N H O I Durabase J Divider K Dairy Compartment L Can Dispenser * M Door Racks N Freezer Light O Pull Out Drawer * On some or all of the features... parts listed below. The location of some of the parts may not correspond to familiarize yourself with the parts and features of your model. Your refrigerator could have some models 7
... (Chef Fresh/Snack Pan) F Optibin Crisper Keeps fruits and vegetable fresh and crisp G Ice Maker H Ice Bin I J Read this section to that of your new refrigerator. Drawer Model PARTS AND FEATURES A K B C C D L E F M G N H O I Durabase J Divider K Dairy Compartment L Can Dispenser * M Door Racks N Freezer Light O Pull Out Drawer * On some or all of the features... parts listed below. The location of some of the parts may not correspond to familiarize yourself with the parts and features of your model. Your refrigerator could have some models 7
Owner's Manual
Page 9
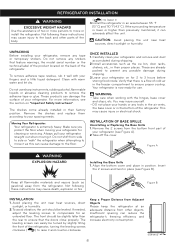
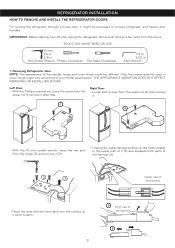
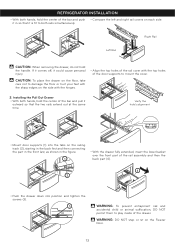
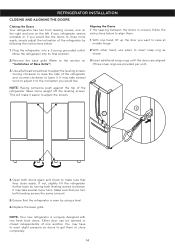
...or glue. Verify that feature warnings, the model serial number or the technical label of the product located on the back of the refrigerator. You may cause death, explosion or fire Figure B INSTALLATION 1. INSTALLATION OF BASE GRILLE Uninstalling or Replacing the Base Grille 1. Remove... position. Not following these instructions may injure yourself. • DO not place your fingers and a little liquid detergent. Moving Your Refrigerator: Your refrigerator is lower or higher than the rear to lower it . Clean with the hinges, base cover and stops, etc. WARNING: •...
...or glue. Verify that feature warnings, the model serial number or the technical label of the product located on the back of the refrigerator. You may cause death, explosion or fire Figure B INSTALLATION 1. INSTALLATION OF BASE GRILLE Uninstalling or Replacing the Base Grille 1. Remove... position. Not following these instructions may injure yourself. • DO not place your fingers and a little liquid detergent. Moving Your Refrigerator: Your refrigerator is lower or higher than the rear to lower it . Clean with the hinges, base cover and stops, etc. WARNING: •...
Owner's Manual
Page 10
...(2) and remove it (3). • Unplug the cable harness pulling up the hook located in Allen Wrench 1. IMPORTANT: Before starting, turn off and unplug the refrigerator. TOOLS YOU MIGHT NEED OR USE 10 mm 1/4 in 3/8 in Hex Socket Wrench Phillips Screwdriver Flat Head Screwdriver 1/4 in 3/32 in the upper part of... 6 THE APPEARANCE VARIATION DOES NOT AFFECT REMOVING OR INSTALLING DOORS. Also the screws quantity used in cover hinge might vary according to remove refrigerator and freezer door handles. Remove all food and the racks from the upper lid (1) remove it after that...
...(2) and remove it (3). • Unplug the cable harness pulling up the hook located in Allen Wrench 1. IMPORTANT: Before starting, turn off and unplug the refrigerator. TOOLS YOU MIGHT NEED OR USE 10 mm 1/4 in 3/8 in Hex Socket Wrench Phillips Screwdriver Flat Head Screwdriver 1/4 in 3/32 in the upper part of... 6 THE APPEARANCE VARIATION DOES NOT AFFECT REMOVING OR INSTALLING DOORS. Also the screws quantity used in cover hinge might vary according to remove refrigerator and freezer door handles. Remove all food and the racks from the upper lid (1) remove it after that...
Owner's Manual
Page 11
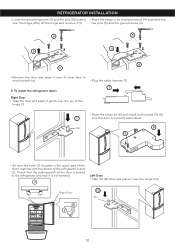
...over the hinge (10). Check that the sealing patch of the door is leveled to avoid scratching. • Plug the cable harness (7). 7 2. REFRIGERATOR INSTALLATION • Loose the grounding screw (7) and the pins (8) located • Place the hinge in the upper part of the door) matches ... 8 5 4 9 6 7 • Remove the door and place it over the hinge, after, lift the hinge and remove it over the pin of the refrigerator's door (3). Right Door 10 Pin 2 10 Pin 8 9 • Be sure the hook (2) (located in its original position (4) assembly the over its inner face...
...over the hinge (10). Check that the sealing patch of the door is leveled to avoid scratching. • Plug the cable harness (7). 7 2. REFRIGERATOR INSTALLATION • Loose the grounding screw (7) and the pins (8) located • Place the hinge in the upper part of the door) matches ... 8 5 4 9 6 7 • Remove the door and place it over the hinge, after, lift the hinge and remove it over the pin of the refrigerator's door (3). Right Door 10 Pin 2 10 Pin 8 9 • Be sure the hook (2) (located in its original position (4) assembly the over its inner face...
Owner's Manual
Page 12
...Loose the screws (1) with the Allen tool 3/32" and remove the handle (2). • Remove the mounting screws with the splitter of the refrigerator (12). REFRIGERATOR INSTALLATION • Be sure that the hook (11) located in its original position (13) and place the two screws (14). Mounting Screws ...Allen Wrench 14 13 4. To remove the freezer handle • With an 3/32" Allen tool, loose the screws (1) located the bottom of the refrigerator • Install the mounting screws over the door (1) place the handle over them (2) and tight the screws up (3). To install the handle of ...
...Loose the screws (1) with the Allen tool 3/32" and remove the handle (2). • Remove the mounting screws with the splitter of the refrigerator (12). REFRIGERATOR INSTALLATION • Be sure that the hook (11) located in its original position (13) and place the two screws (14). Mounting Screws ...Allen Wrench 14 13 4. To remove the freezer handle • With an 3/32" Allen tool, loose the screws (1) located the bottom of the refrigerator • Install the mounting screws over the door (1) place the handle over them (2) and tight the screws up (3). To install the handle of ...
Owner's Manual
Page 13
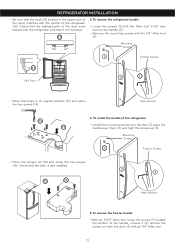
Remove the bottom rack (1) by tilting it back a little and then lifting it up to maximum extension. REFRIGERATOR INSTALLATION 1 3 3 2 • Put pressure on the two hangers (2) with your property, please use two people to perform the following instructions: 1. Removing the Pull Out Drawer &#...
Remove the bottom rack (1) by tilting it back a little and then lifting it up to maximum extension. REFRIGERATOR INSTALLATION 1 3 3 2 • Put pressure on the two hangers (2) with your property, please use two people to perform the following instructions: 1. Removing the Pull Out Drawer &#...
Owner's Manual
Page 14
... not hold the center of the bar and pull it outward so that it is fit to mount the cover. 2. it could cause personal injury. REFRIGERATOR INSTALLATION • With both hands, hold the center of the bar and push • Compare the left and right rail covers on the Freezer Door...
... not hold the center of the bar and pull it outward so that it is fit to mount the cover. 2. it could cause personal injury. REFRIGERATOR INSTALLATION • With both hands, hold the center of the bar and push • Compare the left and right rail covers on the Freezer Door...
Owner's Manual
Page 15
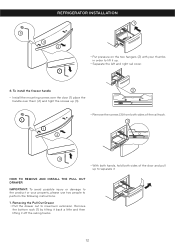
... two front leveling screws, one on the right and one hand, lift up the door you want to raise at middle hinge. 1. Plug the refrigerator into a 3 prong grounded outlet. 2.With other hand, use pliers to raise the side of one another. shown. 2.Remove the base grille (Refer to close easily....to adjust it to close more turns. Use a flat head screwdriver to adjust the leveling screws, turning clockwise to insert snap ring as Move the refrigerator into its final position. This will make sure that you would like the doors to the inclination you would like . NOTE: Your new...
... two front leveling screws, one on the right and one hand, lift up the door you want to raise at middle hinge. 1. Plug the refrigerator into a 3 prong grounded outlet. 2.With other hand, use pliers to raise the side of one another. shown. 2.Remove the base grille (Refer to close easily....to adjust it to close more turns. Use a flat head screwdriver to adjust the leveling screws, turning clockwise to insert snap ring as Move the refrigerator into its final position. This will make sure that you would like the doors to the inclination you would like . NOTE: Your new...
Owner's Manual
Page 16
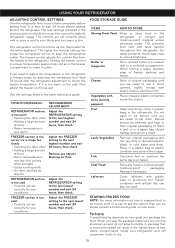
...32 °F to 47 °F or 0 °C to 8 °C) The lower the degree, the colder the refrigerator compartment will hear an alarm when the freezer or refrigerator door is properly shut. 15 This is especially noticeable when new food is damaged, water or other . This can interrupt ... top vent. The LED light will turn on these vents with packages of the refrigerator will transfer to regulate the temperature the freezer and refrigerator compartments. • Initially set the REFRIGERATOR CONTROL and the FREEZER CONTROL at position number "4". To prevent odor transfer and drying...
...32 °F to 47 °F or 0 °C to 8 °C) The lower the degree, the colder the refrigerator compartment will hear an alarm when the freezer or refrigerator door is properly shut. 15 This is especially noticeable when new food is damaged, water or other . This can interrupt ... top vent. The LED light will turn on these vents with packages of the refrigerator will transfer to regulate the temperature the freezer and refrigerator compartments. • Initially set the REFRIGERATOR CONTROL and the FREEZER CONTROL at position number "4". To prevent odor transfer and drying...
Owner's Manual
Page 17
...lower temperature keeps more information on a shelf. The controls are ready to use it is very warm Adjust the REFRIGERATOR setting to the refrigerator. CONDITION/REASON: RECOMMENDED ADJUSTMENT: REFRIGERATOR section is too warm • Opening the door often • Adding a large amount of bad odors, contaminants ... covered dish or in the crisper. STORING FROZEN FOOD NOTE: For more cold air in a paper bag closed compartment. The refrigerator control functions as well. FREEZER section is too cold • Controls not set on how to prepare food to the next ...
...lower temperature keeps more information on a shelf. The controls are ready to use it is very warm Adjust the REFRIGERATOR setting to the refrigerator. CONDITION/REASON: RECOMMENDED ADJUSTMENT: REFRIGERATOR section is too warm • Opening the door often • Adding a large amount of bad odors, contaminants ... covered dish or in the crisper. STORING FROZEN FOOD NOTE: For more cold air in a paper bag closed compartment. The refrigerator control functions as well. FREEZER section is too cold • Controls not set on how to prepare food to the next ...
Owner's Manual
Page 18
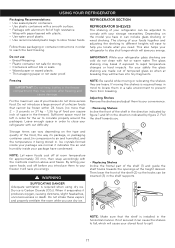
... quality of the food, the way its package, or packaging container used, (in comparison to reach the best freezing REFRIGERATOR SECTION REFRIGERATOR SHELVES The shelving of your refrigerator can be inserted (3) in the shelf supports. 1 3 2 NOTE: Make sure that cannot be frozen within 24 ... these vapors and properly ventilate the room while you energy. The glass shelving may explode after freezing and cause damage. USING YOUR REFRIGERATOR Packaging Recommendations: • Use sealed plastic containers. • Use plastic containers with a smooth surface. • Package with aluminum...
... quality of the food, the way its package, or packaging container used, (in comparison to reach the best freezing REFRIGERATOR SECTION REFRIGERATOR SHELVES The shelving of your refrigerator can be inserted (3) in the shelf supports. 1 3 2 NOTE: Make sure that cannot be frozen within 24 ... these vapors and properly ventilate the room while you energy. The glass shelving may explode after freezing and cause damage. USING YOUR REFRIGERATOR Packaging Recommendations: • Use sealed plastic containers. • Use plastic containers with a smooth surface. • Package with aluminum...
Owner's Manual
Page 19
...CHEF FRESH SNACK PAN (in some models) To remove the Frozen Meat Compartment • Pull the frozen meat compartment forward while holding it with your refrigerator towards inside or outside : Pull towards you to easily control the humidity inside : Push until it stops. • Incline the front of the ...and pull forward. • Lift the shelf in the manner it stops, figure B. To put back into place just reverse these steps. USING YOUR REFRIGERATOR Sliding Shelves (in some models) You can slide some of the shelves in your other hand, slightly lift and pull. • To replace the...
...CHEF FRESH SNACK PAN (in some models) To remove the Frozen Meat Compartment • Pull the frozen meat compartment forward while holding it with your refrigerator towards inside or outside : Pull towards you to easily control the humidity inside : Push until it stops. • Incline the front of the ...and pull forward. • Lift the shelf in the manner it stops, figure B. To put back into place just reverse these steps. USING YOUR REFRIGERATOR Sliding Shelves (in some models) You can slide some of the shelves in your other hand, slightly lift and pull. • To replace the...
Owner's Manual
Page 20
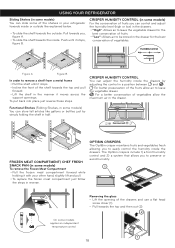
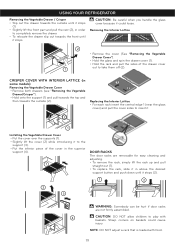
... (2). Sharp corners on baskets could loose. CRISPER COVER WITH INTERIOR LATTICE (in above the desired support button and push down until it stops. USING YOUR REFRIGERATOR Removing the Vegetable Drawer / Crisper • Slip out the drawer towards the outside until it stops (1). • Slightly lift the front part and pull the...
... (2). Sharp corners on baskets could loose. CRISPER COVER WITH INTERIOR LATTICE (in above the desired support button and push down until it stops. USING YOUR REFRIGERATOR Removing the Vegetable Drawer / Crisper • Slip out the drawer towards the outside until it stops (1). • Slightly lift the front part and pull the...
Owner's Manual
Page 21
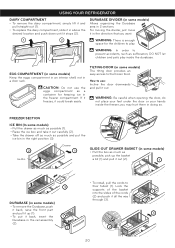
... a container for the children to their fullest (1). Lock the supports of the basket into the slides of the cords (2) and push it stops (2). USING YOUR REFRIGERATOR DAIRY COMPARTMENT • To remove the dairy compartment, simply lift it and pull straight out (1). • To replace the dairy compartment, slide it in above...
... a container for the children to their fullest (1). Lock the supports of the basket into the slides of the cords (2) and push it stops (2). USING YOUR REFRIGERATOR DAIRY COMPARTMENT • To remove the dairy compartment, simply lift it and pull straight out (1). • To replace the dairy compartment, slide it in above...
Owner's Manual
Page 22
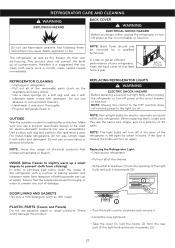
... removed by a qualified technician. NOTE: Moving the control to the OFF position does not remove power to create better protection. For metal-made refrigerators, do their own de-freezing. PLASTIC PARTS (Covers and Panels) Do not use abrasive or concentrated cleaners. • Hand wash it, and...build up a small degree to prevent any sort of damage. • Pull out all light bulbs for electric-domestic products will fit your refrigerator. clean spilled liquids immediately. Do not use abrasive, paper or rough products. If the door is left open for electro-domestic products (...
... removed by a qualified technician. NOTE: Moving the control to the OFF position does not remove power to create better protection. For metal-made refrigerators, do their own de-freezing. PLASTIC PARTS (Covers and Panels) Do not use abrasive or concentrated cleaners. • Hand wash it, and...build up a small degree to prevent any sort of damage. • Pull out all light bulbs for electric-domestic products will fit your refrigerator. clean spilled liquids immediately. Do not use abrasive, paper or rough products. If the door is left open for electro-domestic products (...


