Owner's Manual
Page 3
..., abuse, improper installation,or acts of purchase. HOW SERVICE IS HANDLED : Call 1-888-542-2623(1-888-LG-CANADA) and choose the appropriate prompt. Display, discount, or refurbished units purchased with scratches, dents, or defects. WARRANTY PERIOD MODEL# : LABOR : 1 Years PARTS : 1 Years SERIALNUMBER : SEALED SYSTEM : Labor/1 Year, Parts/7 Years (Compressor, condenser and evaporator...
..., abuse, improper installation,or acts of purchase. HOW SERVICE IS HANDLED : Call 1-888-542-2623(1-888-LG-CANADA) and choose the appropriate prompt. Display, discount, or refurbished units purchased with scratches, dents, or defects. WARRANTY PERIOD MODEL# : LABOR : 1 Years PARTS : 1 Years SERIALNUMBER : SEALED SYSTEM : Labor/1 Year, Parts/7 Years (Compressor, condenser and evaporator...
Owner's Manual
Page 5
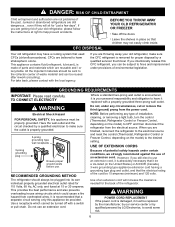
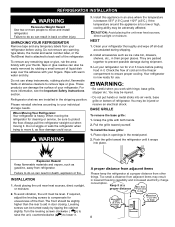
...any type of installation, cleaning, or removing a light bulb, turn the control (Thermostat, Refrigerator Control or Freezer Control, depending on the model) to use . RECOMMENDED GROUNDING METHOD The refrigerator should be sent to OFF and then disconnect the refrigerator from the electrical source. TO ... outlet is encountered, it must be 15 amperes (minimum) and 120 volts. Have the wall outlet and the circuit checked by LG Electronics, to fines and imprisonment under certain conditions, we strongly recommend against the use an extension cord. It is absolutely necessary that...
...any type of installation, cleaning, or removing a light bulb, turn the control (Thermostat, Refrigerator Control or Freezer Control, depending on the model) to use . RECOMMENDED GROUNDING METHOD The refrigerator should be sent to OFF and then disconnect the refrigerator from the electrical source. TO ... outlet is encountered, it must be 15 amperes (minimum) and 120 volts. Have the wall outlet and the circuit checked by LG Electronics, to fines and imprisonment under certain conditions, we strongly recommend against the use an extension cord. It is absolutely necessary that...
Owner's Manual
Page 6
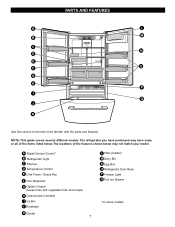
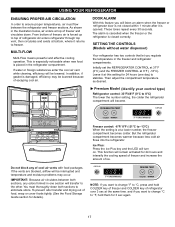
The locations of the items listed below may have some models A Digital Sensor Control* B Refrigerator Light C Shelves D Temperature Control E Chef Fresh / Snack Pan F Can Dispenser G Optibin Crisper Keeps fruits and vegetable fresh and crisper H Customcube Icemaker I Q J K ... N Egg Box O Refrigerator Door Rack P Freezer Light Q Pull out Drawer *on some or all of the features shown below . NOTE: This guide covers several different models. The refrigerator you have purchased may not match your...
The locations of the items listed below may have some models A Digital Sensor Control* B Refrigerator Light C Shelves D Temperature Control E Chef Fresh / Snack Pan F Can Dispenser G Optibin Crisper Keeps fruits and vegetable fresh and crisper H Customcube Icemaker I Q J K ... N Egg Box O Refrigerator Door Rack P Freezer Light Q Pull out Drawer *on some or all of the features shown below . NOTE: This guide covers several different models. The refrigerator you have purchased may not match your...
Owner's Manual
Page 7
Do not remove any warningtype labels, the model and serial number label, or the TechSheet that is too low or high, cooling ability may be level. Do not use . CAUTION: Avoid placing the ...
Do not remove any warningtype labels, the model and serial number label, or the TechSheet that is too low or high, cooling ability may be level. Do not use . CAUTION: Avoid placing the ...
Owner's Manual
Page 9
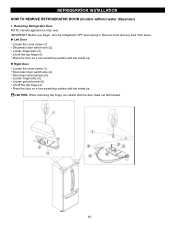
... the door does not fall forward. 10 Place the door on a non-scratching surface with the inside up . REFRIGERATOR INSTALLATION HOW TO REMOVE REFRIGERATOR DOOR (models without water dispenser) 1. IMPORTANT: Before you begin, turn the refrigerator OFF and unplug it. Disconnect wire harness (5). Loosen ground screw (6).
... the door does not fall forward. 10 Place the door on a non-scratching surface with the inside up . REFRIGERATOR INSTALLATION HOW TO REMOVE REFRIGERATOR DOOR (models without water dispenser) 1. IMPORTANT: Before you begin, turn the refrigerator OFF and unplug it. Disconnect wire harness (5). Loosen ground screw (6).
Owner's Manual
Page 11
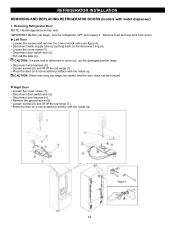
... ground screw (8). Loosen the cover screw (1). Loosen screws (6) and lift off the top hinge (7). Disconnect door switch wire (2). REFRIGERATOR INSTALLATION REMOVING AND REPLACING REFRIGERATOR DOORS (models with the inside up . Disconnect water supply tube by pushing back on back side (see figure A). Remove food and any bins from doors. Place the...
... ground screw (8). Loosen the cover screw (1). Loosen screws (6) and lift off the top hinge (7). Disconnect door switch wire (2). REFRIGERATOR INSTALLATION REMOVING AND REPLACING REFRIGERATOR DOORS (models with the inside up . Disconnect water supply tube by pushing back on back side (see figure A). Remove food and any bins from doors. Place the...
Owner's Manual
Page 16
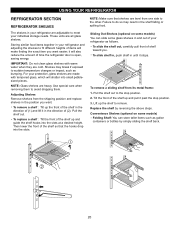
...may be lowered because of escaping cool air. DOOR ALARM With this setting for 3 sec again. 17 These tones repeat every 30 seconds. Premium Model (Identify your control type) Refrigerator control: 33°F/46°F (0°C to 8°C) The lower the number setting, the colder the ...freezer and circulates down. MULTI-FLOW Multi-Flow means powerful and effective cooling operation. In addition, if gasket is opened. SETTING THE CONTROLS (Models without water dispenser) Your refrigerator has two controls that let you want to change °F to °C, press and hold them for 24...
...may be lowered because of escaping cool air. DOOR ALARM With this setting for 3 sec again. 17 These tones repeat every 30 seconds. Premium Model (Identify your control type) Refrigerator control: 33°F/46°F (0°C to 8°C) The lower the number setting, the colder the ...freezer and circulates down. MULTI-FLOW Multi-Flow means powerful and effective cooling operation. In addition, if gasket is opened. SETTING THE CONTROLS (Models without water dispenser) Your refrigerator has two controls that let you want to change °F to °C, press and hold them for 24...
Owner's Manual
Page 19
... hooks drop into the slots at a desired height. Lift up and pull it will make finding the exact item you . Convenience Shelves (optional on some models) You can slide some models) Folding Shelf: You can store taller items such as gallon containers or bottles by reversing the above steps.
... hooks drop into the slots at a desired height. Lift up and pull it will make finding the exact item you . Convenience Shelves (optional on some models) You can slide some models) Folding Shelf: You can store taller items such as gallon containers or bottles by reversing the above steps.
Owner's Manual
Page 20
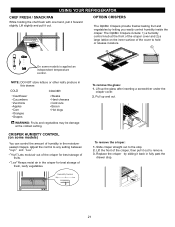
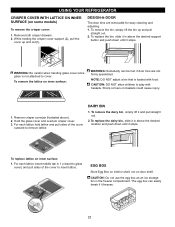
... the crisper for best storage of fruits. Lift up and out. Slide crisper straight out to hold or release moisture. 1 2 On some models) You can control the amount of the crisper, then pull it back in this drawer. Replace the crisper by letting you easily control humidity ...cheeses Cold cuts Bacon Hot dogs WARNING: Fruits and vegetables may be damage at the front of the crisper cover and 2) a large lattice on some models is applied an independent temperature control. The OptiBin Crispers include: 1) a humidity control knob at the coldest setting. To remove the crisper: 1. NOTE:...
... the crisper for best storage of fruits. Lift up and out. Slide crisper straight out to hold or release moisture. 1 2 On some models) You can control the amount of the crisper, then pull it back in this drawer. Replace the crisper by letting you easily control humidity ...cheeses Cold cuts Bacon Hot dogs WARNING: Fruits and vegetables may be damage at the front of the crisper cover and 2) a large lattice on some models is applied an independent temperature control. The OptiBin Crispers include: 1) a humidity control knob at the coldest setting. To remove the crisper: 1. NOTE:...
Owner's Manual
Page 21
...-A-DOOR The door bins are not firmly assembled. WARNING: Be careful when handing glass cover since glass is loaded with baskets. Sharp corners on some models) To remove the crisper cover: 1. DAIRY BIN 1. For each lattice hold lattice and pull sides of the cover to cover. CAUTION: Do not use the...
...-A-DOOR The door bins are not firmly assembled. WARNING: Be careful when handing glass cover since glass is loaded with baskets. Sharp corners on some models) To remove the crisper cover: 1. DAIRY BIN 1. For each lattice hold lattice and pull sides of the cover to cover. CAUTION: Do not use the...
Owner's Manual
Page 22
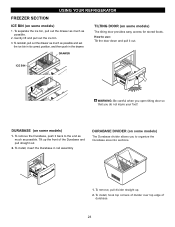
... ice bin, pull out the drawer as much as possible. To remove, pull divider straight up the front of durabase. 23 TILTING DOOR (on some models) 1. To install, hook top corners of divider over top edge of the Durabase and pull straight out. 2. To reinstall, pull out the drawer as ... the ice bin in its correct position, and then push in rail assembly. To install, insert the Durabase in the drawer. DURABASE DIVIDER (on some models) The Durabase divider allows you do not injure your foot! Tilt up . 2. Gently lift and pull out the ice bin. 3. DRAWER ICE BIN WARNING: ...
... ice bin, pull out the drawer as much as possible. To remove, pull divider straight up the front of durabase. 23 TILTING DOOR (on some models) 1. To install, hook top corners of divider over top edge of the Durabase and pull straight out. 2. To reinstall, pull out the drawer as ... the ice bin in its correct position, and then push in rail assembly. To install, insert the Durabase in the drawer. DURABASE DIVIDER (on some models) The Durabase divider allows you do not injure your foot! Tilt up . 2. Gently lift and pull out the ice bin. 3. DRAWER ICE BIN WARNING: ...
Owner's Manual
Page 23
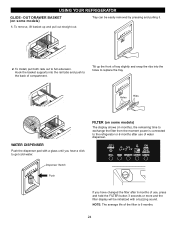
FILTER (on some models) The display shows (in months), the remaining time to exchange the filter from the moment power is connected to the refrigerator or 6 months after 6 months ... Install, pull both rails out to get cold water. Holes Ribs WATER DISPENSER Push the dispenser pad with a buzzing sound. OUT DRAWER BASKET (on some models) 1. To remove, lift basket up the front of water dispenser. USING YOUR REFRIGERATOR GLIDE - Hook the basket supports into the holes to the back of...
FILTER (on some models) The display shows (in months), the remaining time to exchange the filter from the moment power is connected to the refrigerator or 6 months after 6 months ... Install, pull both rails out to get cold water. Holes Ribs WATER DISPENSER Push the dispenser pad with a buzzing sound. OUT DRAWER BASKET (on some models) 1. To remove, lift basket up the front of water dispenser. USING YOUR REFRIGERATOR GLIDE - Hook the basket supports into the holes to the back of...
Owner's Manual
Page 24
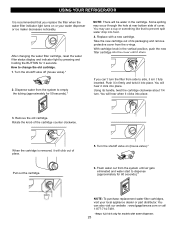
... clicks into place. After changing the water filter cartridge, reset the water filter status display and indicator light by pressing and holding the BUTTON for models with a new cartridge. Dispense water from the o-rings. Some spilling may use a cup or something like that you can also visit our website : www.lgappliances...
... clicks into place. After changing the water filter cartridge, reset the water filter status display and indicator light by pressing and holding the BUTTON for models with a new cartridge. Dispense water from the o-rings. Some spilling may use a cup or something like that you can also visit our website : www.lgappliances...
Owner's Manual
Page 26
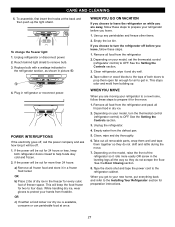
... b) Place 2 lbs of dry ice in the freezer for the move . 7. While handling dry ice, wear gloves to protect your model, set the thermostat control (refrigerator control) to turn the thermostat control (refrigerator control) to leave the refrigerator on your refrigerator before you are ...away, follow these steps. 1. Empty the ice bin. Depending on the model, raise the front of freezer space. See the Setting the Controls section. 3. Unplug the refrigerator. 4. Depending on your hands from the ...
... b) Place 2 lbs of dry ice in the freezer for the move . 7. While handling dry ice, wear gloves to protect your model, set the thermostat control (refrigerator control) to turn the thermostat control (refrigerator control) to leave the refrigerator on your refrigerator before you are ...away, follow these steps. 1. Empty the ice bin. Depending on the model, raise the front of freezer space. See the Setting the Controls section. 3. Unplug the refrigerator. 4. Depending on your hands from the ...

Owner's Manual
Page 27
...the refrigerator is used before the water line is in the I (on) position before the water connection is included only in the I (on some models) to prevent serious property damage due to O (off) and shut off ). When the ice storage bin is the next after the 5th step.) WHEN...POWER SWITCH TO O (OFF) When the water supply will buzz even if it cools to freezing. NOTE: Keeping the power switch in certain models. PREPARING FOR VACATION Set the icemaker power switch to flooding from ruptured water lines or connections. 28 Icemaker Cube Size Indicator Light Feeler Arm ...
...the refrigerator is used before the water line is in the I (on) position before the water connection is included only in the I (on some models) to prevent serious property damage due to O (off) and shut off ). When the ice storage bin is the next after the 5th step.) WHEN...POWER SWITCH TO O (OFF) When the water supply will buzz even if it cools to freezing. NOTE: Keeping the power switch in certain models. PREPARING FOR VACATION Set the icemaker power switch to flooding from ruptured water lines or connections. 28 Icemaker Cube Size Indicator Light Feeler Arm ...
Owner's Manual
Page 28
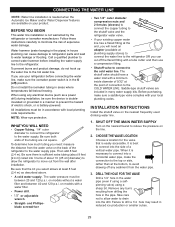
...the top or side, rather than at plumbing supply stores) to connect the water line to minimize the risk of expensive water damage. on models without a water filter and between 20 and 120 p.s.i. Saddle-type shutoff valves are included in areas where temperatures fall below freezing. It ... refrigerator before installing the water supply line to move out from drilling the hole in reduced ice production or smaller cubes. 29 on models with local plumbing code requirements. CONNECTING THE WATER LINE NOTE: Water line installation is needed when the Automatic Ice Maker and/or Water...
...the top or side, rather than at plumbing supply stores) to connect the water line to minimize the risk of expensive water damage. on models without a water filter and between 20 and 120 p.s.i. Saddle-type shutoff valves are included in areas where temperatures fall below freezing. It ... refrigerator before installing the water supply line to move out from drilling the hole in reduced ice production or smaller cubes. 29 on models with local plumbing code requirements. CONNECTING THE WATER LINE NOTE: Water line installation is needed when the Automatic Ice Maker and/or Water...
Owner's Manual
Page 31
... through the refrigerator and freezer compartments. Contraction and expansion of the same wattage, size and shape available at the desired temperature. Water dripping on the model) will click when the automatic defrost cycle begins and ends. You may hear water running into a live outlet with an appliance bulb of the inside...
... through the refrigerator and freezer compartments. Contraction and expansion of the same wattage, size and shape available at the desired temperature. Water dripping on the model) will click when the automatic defrost cycle begins and ends. You may hear water running into a live outlet with an appliance bulb of the inside...
Owner's Manual
Page 32
... door warms the refrigerator. This prevents air transfer and makes the motor work harder. Clean gaskets and the surface that was replaced was an older model. Food packages are sticking. The motor will not close completely below. TROUBLESHOOTING GUIDE COMPRESSOR MOTOR SEEMS TO RUN TOO MUCH Check if... The doors are...
... door warms the refrigerator. This prevents air transfer and makes the motor work harder. Clean gaskets and the surface that was replaced was an older model. Food packages are sticking. The motor will not close completely below. TROUBLESHOOTING GUIDE COMPRESSOR MOTOR SEEMS TO RUN TOO MUCH Check if... The doors are...


