Owner's Manual
Page 3
WARRANTY PERIOD MODEL# : LABOR : 1 Years PARTS : 1 Years SERIALNUMBER : SEALED SYSTEM : Labor/1 Year, Parts/7 Years (Compressor, condenser and evaporator). No other express warranty is provided. This warranty gives you ...,or acts of God. 3. Proof of purchase is good only to you may also have other than the intended purpose. 4. Call 1-888-542-2623(1-888-LG-CANADA) and choose the appropriate prompt. Display, discount, or refurbished units purchased with scratches, dents, or defects. Therefore, these limitationsor exclusionsmay not apply to the...
WARRANTY PERIOD MODEL# : LABOR : 1 Years PARTS : 1 Years SERIALNUMBER : SEALED SYSTEM : Labor/1 Year, Parts/7 Years (Compressor, condenser and evaporator). No other express warranty is provided. This warranty gives you ...,or acts of God. 3. Proof of purchase is good only to you may also have other than the intended purpose. 4. Call 1-888-542-2623(1-888-LG-CANADA) and choose the appropriate prompt. Display, discount, or refurbished units purchased with scratches, dents, or defects. Therefore, these limitationsor exclusionsmay not apply to the...
Owner's Manual
Page 5
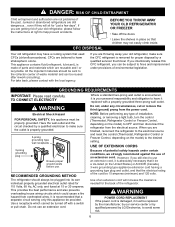
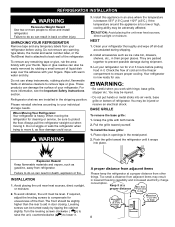
...Electrical Shock Hazard FOR PERSONAL SAFETY, this CFC refrigerant, you are still dangerous... Have the wall outlet and the circuit checked by LG Electronics, to make sure the CFC refrigerant is made of environmental legislation. Use a receptacle which could cause a fire hazard from ... rating of installation, cleaning, or removing a light bulb, turn the control (Thermostat, Refrigerator Control or Freezer Control, depending on the model) to have a cooling system that children may have it must be reused after rework (recycling). It is properly grounded. 3-prong grounding...
...Electrical Shock Hazard FOR PERSONAL SAFETY, this CFC refrigerant, you are still dangerous... Have the wall outlet and the circuit checked by LG Electronics, to make sure the CFC refrigerant is made of environmental legislation. Use a receptacle which could cause a fire hazard from ... rating of installation, cleaning, or removing a light bulb, turn the control (Thermostat, Refrigerator Control or Freezer Control, depending on the model) to have a cooling system that children may have it must be reused after rework (recycling). It is properly grounded. 3-prong grounding...
Owner's Manual
Page 6
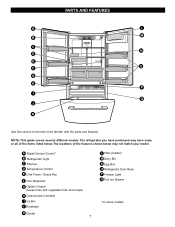
... P Freezer Light Q Pull out Drawer *on some or all of the features shown below . The locations of the items listed below may not match your model. A Digital Sensor Control* B Refrigerator Light C Shelves D Temperature Control E Chef Fresh / Snack Pan F Can Dispenser G Optibin Crisper Keeps fruits and vegetable fresh and crisper H Customcube Icemaker... I Q J K Use this section to become more familiar with the parts and features. NOTE: This guide covers several different models. The refrigerator you have purchased may have some...
... P Freezer Light Q Pull out Drawer *on some or all of the features shown below . The locations of the items listed below may not match your model. A Digital Sensor Control* B Refrigerator Light C Shelves D Temperature Control E Chef Fresh / Snack Pan F Can Dispenser G Optibin Crisper Keeps fruits and vegetable fresh and crisper H Customcube Icemaker... I Q J K Use this section to become more familiar with the parts and features. NOTE: This guide covers several different models. The refrigerator you have purchased may have some...
Owner's Manual
Page 7
...°F (43°C.) If the temperature around the appliance is attached to compensate for 2 or 3 hours before using. Do not remove any warningtype labels, the model and serial number label, or the TechSheet that is too low or high, cooling ability may result in door closing. Wipe with both hands. 2. These...
...°F (43°C.) If the temperature around the appliance is attached to compensate for 2 or 3 hours before using. Do not remove any warningtype labels, the model and serial number label, or the TechSheet that is too low or high, cooling ability may result in door closing. Wipe with both hands. 2. These...
Owner's Manual
Page 9
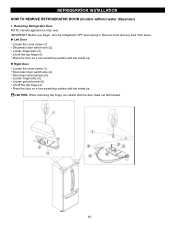
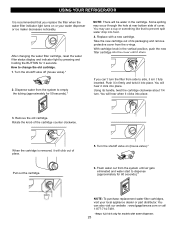
... with the inside up . Place the door on a non-scratching surface with the inside up . Loosen hinge bolts (3). REFRIGERATOR INSTALLATION HOW TO REMOVE REFRIGERATOR DOOR (models without water dispenser) 1. Left Door Loosen the cover screw (1). Disconnect door switch wire (2). Disconnect door switch wire (2).
... with the inside up . Place the door on a non-scratching surface with the inside up . Loosen hinge bolts (3). REFRIGERATOR INSTALLATION HOW TO REMOVE REFRIGERATOR DOOR (models without water dispenser) 1. Left Door Loosen the cover screw (1). Disconnect door switch wire (2). Disconnect door switch wire (2).
Owner's Manual
Page 11
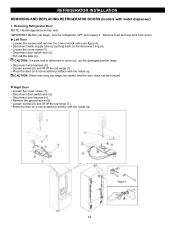
REFRIGERATOR INSTALLATION REMOVING AND REPLACING REFRIGERATOR DOORS (models with the inside up . Loosen screws (6) and lift off the top hinge (7). Place the door on a non-scratching surface with the inside up . 12 CAUTION: ...
REFRIGERATOR INSTALLATION REMOVING AND REPLACING REFRIGERATOR DOORS (models with the inside up . Loosen screws (6) and lift off the top hinge (7). Place the door on a non-scratching surface with the inside up . 12 CAUTION: ...
Owner's Manual
Page 16
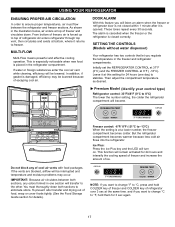
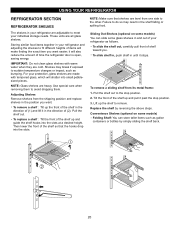
...the Food Storage Guide section for 3 sec again. 17 MULTI-FLOW Multi-Flow means powerful and effective cooling operation. SETTING THE CONTROLS (Models without water dispenser) Your refrigerator has two controls that let you want to change °F to °C, press and hold them for ...details). Then adjust the compartment temperature as desired. Premium Model (Identify your control type) Refrigerator control: 33°F/46°F (0°C to freezer. This function will become. You must flow ...
...the Food Storage Guide section for 3 sec again. 17 MULTI-FLOW Multi-Flow means powerful and effective cooling operation. SETTING THE CONTROLS (Models without water dispenser) Your refrigerator has two controls that let you want to change °F to °C, press and hold them for ...details). Then adjust the compartment temperature as desired. Premium Model (Identify your control type) Refrigerator control: 33°F/46°F (0°C to freezer. This function will become. You must flow ...
Owner's Manual
Page 19
... falling or spilling food. Lift up and pull it will make finding the exact item you . Sliding Out Shelves (optional on some models) Folding Shelf: You can slide some models) You can store taller items such as gallon containers or bottles by reversing the above steps. USING YOUR REFRIGERATOR REFRIGERATOR SECTION REFRIGERATOR...
... falling or spilling food. Lift up and pull it will make finding the exact item you . Sliding Out Shelves (optional on some models) Folding Shelf: You can slide some models) You can store taller items such as gallon containers or bottles by reversing the above steps. USING YOUR REFRIGERATOR REFRIGERATOR SECTION REFRIGERATOR...
Owner's Manual
Page 20
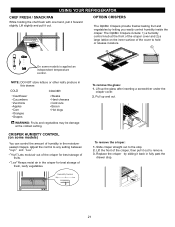
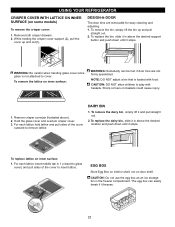
...cuts Bacon Hot dogs WARNING: Fruits and vegetables may be damage at the front of the crisper cover and 2) a large lattice on some models) You can control the amount of the cover to the stop . 21 NOTE: DO NOT store lettuce or other leafy produce in the ...the crisper. Adjust the control to remove. 3. To remove the glass: 1. Slide crisper straight out to hold or release moisture. 1 2 On some models is applied an independent temperature control. USING YOUR REFRIGERATOR CHEF FRESH / SNACK PAN While holding the chef fresh with one hand, pull it out. Lift...
...cuts Bacon Hot dogs WARNING: Fruits and vegetables may be damage at the front of the crisper cover and 2) a large lattice on some models) You can control the amount of the cover to the stop . 21 NOTE: DO NOT store lettuce or other leafy produce in the ...the crisper. Adjust the control to remove. 3. To remove the glass: 1. Slide crisper straight out to hold or release moisture. 1 2 On some models is applied an independent temperature control. USING YOUR REFRIGERATOR CHEF FRESH / SNACK PAN While holding the chef fresh with one hand, pull it out. Lift...
Owner's Manual
Page 21
... button and push down until it stops. While holding the crisper cover support (2), pull the cover up and pull straight out. 2. Sharp corners on some models) To remove the crisper cover: 1.
... button and push down until it stops. While holding the crisper cover support (2), pull the cover up and pull straight out. 2. Sharp corners on some models) To remove the crisper cover: 1.
Owner's Manual
Page 22
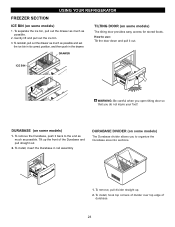
... and pull it back to organize the Durabase area into sections. 12 1. Tilt up . 2. TILTING DOOR (on some models) 1. DURABASE DIVIDER (on some models) 1. USING YOUR REFRIGERATOR FREEZER SECTION ICE BIN (on some models) The tilting door provides easy access for stored foods. To separate the ice bin, pull out the drawer as... out. 2. DRAWER ICE BIN WARNING: Be careful when you open tilting door so that you to the end as much as possible. 2. DURABASE (on some models) The Durabase divider allows you do not injure your foot!
... and pull it back to organize the Durabase area into sections. 12 1. Tilt up . 2. TILTING DOOR (on some models) 1. DURABASE DIVIDER (on some models) 1. USING YOUR REFRIGERATOR FREEZER SECTION ICE BIN (on some models) The tilting door provides easy access for stored foods. To separate the ice bin, pull out the drawer as... out. 2. DRAWER ICE BIN WARNING: Be careful when you open tilting door so that you to the end as much as possible. 2. DURABASE (on some models) The Durabase divider allows you do not injure your foot!
Owner's Manual
Page 23
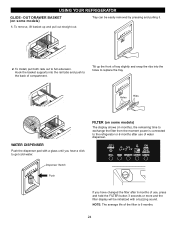
NOTE: The average life of compartment. OUT DRAWER BASKET (on some models) 1. FILTER (on some models) The display shows (in months), the remaining time to exchange the filter from the moment power is 6 months. 24 To remove, lift basket up the ...
NOTE: The average life of compartment. OUT DRAWER BASKET (on some models) 1. FILTER (on some models) The display shows (in months), the remaining time to exchange the filter from the moment power is 6 months. 24 To remove, lift basket up the ...
Owner's Manual
Page 24
... knob of cover. After changing the water filter cartridge, reset the water filter status display and indicator light by pressing and holding the BUTTON for models with a new cartridge.
... knob of cover. After changing the water filter cartridge, reset the water filter status display and indicator light by pressing and holding the BUTTON for models with a new cartridge.
Owner's Manual
Page 26
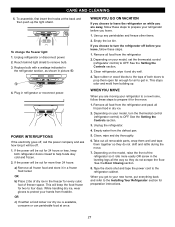
... at the back and then push up . See the Setting the Controls section. 3. Clean refrigerator, wipe it for air to get to your model, turn the refrigerator off . 1. Empty water from the refrigerator. 2. Depending on your new home, put everything back and refer to the refrigerator.... Depending on while you choose to turn the thermostat control (refrigerator control) to prepare it and dry well. 4. If you are moving your model, set the thermostat control (refrigerator control) to remove bulb. 3. While handling dry ice, wear gloves to four days. Use up any perishables...
... at the back and then push up . See the Setting the Controls section. 3. Clean refrigerator, wipe it for air to get to your model, turn the refrigerator off . 1. Empty water from the refrigerator. 2. Depending on your new home, put everything back and refer to the refrigerator.... Depending on while you choose to turn the thermostat control (refrigerator control) to prepare it and dry well. 4. If you are moving your model, set the thermostat control (refrigerator control) to remove bulb. 3. While handling dry ice, wear gloves to four days. Use up any perishables...

Owner's Manual
Page 27
... included only in water pressure.) Every time you can damage the icemaker. Please check your product specification. DO NOT place fingers or hands on some models) to prevent serious property damage due to I (on , the larger cubes will be used for several days. If the refrigerator is used frequently,... old ice cubes will not be shut off ). Be sure nothing interferes with the cube size button. (nomally caused by variations in certain models. The higher position light is on ) position before the water connection is not used before the water line is the next after the 5th ...
... included only in water pressure.) Every time you can damage the icemaker. Please check your product specification. DO NOT place fingers or hands on some models) to prevent serious property damage due to I (on , the larger cubes will be used for several days. If the refrigerator is used frequently,... old ice cubes will not be shut off ). Be sure nothing interferes with the cube size button. (nomally caused by variations in certain models. The higher position light is on ) position before the water connection is not used before the water line is the next after the 5th ...
Owner's Manual
Page 28
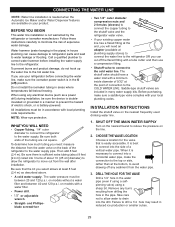
...select allows at least 8 feet (2.4 m) as a power drill) during installation, be sure the device is doubleinsulated or grounded in the pipe. on models without a water filter and between 20 and 120 p.s.i. CONNECTING THE WATER LINE NOTE: Water line installation is necessary to connect into a horizontal water pipe,... p.s.i. If your local plumbing codes. SHUT OFF THE MAIN WATER SUPPLY Turn on the nearest faucet to connect into the drill. on models with your existing copper water line has a flared fitting at the end, you can cause damage to refrigerator parts and lead to move...
...select allows at least 8 feet (2.4 m) as a power drill) during installation, be sure the device is doubleinsulated or grounded in the pipe. on models without a water filter and between 20 and 120 p.s.i. CONNECTING THE WATER LINE NOTE: Water line installation is necessary to connect into a horizontal water pipe,... p.s.i. If your local plumbing codes. SHUT OFF THE MAIN WATER SUPPLY Turn on the nearest faucet to connect into the drill. on models with your existing copper water line has a flared fitting at the end, you can cause damage to refrigerator parts and lead to move...
Owner's Manual
Page 31
... cycle to you, you might be making them . The power supply cord is unplugged. Refer to replacement. 32 Floor is not resting solidly on the model) will click when the automatic defrost cycle begins and ends. Because the sounds are new to end. Hard surfaces, like the floor, walls and cabinets...
... cycle to you, you might be making them . The power supply cord is unplugged. Refer to replacement. 32 Floor is not resting solidly on the model) will click when the automatic defrost cycle begins and ends. Because the sounds are new to end. Hard surfaces, like the floor, walls and cabinets...
Owner's Manual
Page 32
... air is opened often or a large amount of the time. Adding food and opening the door warms the refrigerator. The refrigerator control was an older model. The refrigerator is not closing properly. Rub a thin coat of food warms the refrigerator. The room temperature is opened often. Adding a large amount of paraffin...
... air is opened often or a large amount of the time. Adding food and opening the door warms the refrigerator. The refrigerator control was an older model. The refrigerator is not closing properly. Rub a thin coat of food warms the refrigerator. The room temperature is opened often. Adding a large amount of paraffin...


