Owner's Manual
Page 1
LFC25776** LFC21776** P/No. : MFL63728505 www.lge.com ENGLISH FRANÇAIS ESPAÑOL OWNER'S MANUAL FRENCH DOOR REFRIGERATOR Please read this guide thoroughly before operating and keep it handy for reference at all times.
LFC25776** LFC21776** P/No. : MFL63728505 www.lge.com ENGLISH FRANÇAIS ESPAÑOL OWNER'S MANUAL FRENCH DOOR REFRIGERATOR Please read this guide thoroughly before operating and keep it handy for reference at all times.
Owner's Manual
Page 2
... 16 Connecting the Water Lines 17 Leveling the Refrigerator Doors 18 Starting 19 HOW TO USE Setting The Controls 20 Automatic Icemaker 21 Storing Foods 22 Location of reliable service. Your new LG French Door Refrigerator combines advanced cooling technology with many years of... Foods 23 Shelf Height Adjustment 24 Removing and Replacing Components 25 CARE AND CLEANING Cleaning the Refrigerator 29 General Information 29 TROUBLESHOOTING Before Calling for...
... 16 Connecting the Water Lines 17 Leveling the Refrigerator Doors 18 Starting 19 HOW TO USE Setting The Controls 20 Automatic Icemaker 21 Storing Foods 22 Location of reliable service. Your new LG French Door Refrigerator combines advanced cooling technology with many years of... Foods 23 Shelf Height Adjustment 24 Removing and Replacing Components 25 CARE AND CLEANING Cleaning the Refrigerator 29 General Information 29 TROUBLESHOOTING Before Calling for...
Owner's Manual
Page 3
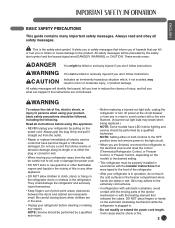
...injury to avoid contact with a live wire filament. (A burned-out light bulb may adhere to the extremely cold surfaces. • In refrigerators with automatic icemakers, avoid contact with the moving parts of the ejector mechanism or with the Installer Instructions that have LED interior lighting and ... messages will cause electric shock or fire. 3 It will identify the hazard, tell you how to the desired setting. • This refrigerator must be followed, including the following. DO NOT place fingers or hands on the model) to reduce the chance of hazards that releases ...
...injury to avoid contact with a live wire filament. (A burned-out light bulb may adhere to the extremely cold surfaces. • In refrigerators with automatic icemakers, avoid contact with the moving parts of the ejector mechanism or with the Installer Instructions that have LED interior lighting and ... messages will cause electric shock or fire. 3 It will identify the hazard, tell you how to the desired setting. • This refrigerator must be followed, including the following. DO NOT place fingers or hands on the model) to reduce the chance of hazards that releases ...
Owner's Manual
Page 4
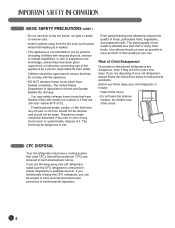
...by persons (including children) with the appliance. • DO NOT refreeze frozen foods which have thawed completely. CFCs are disposing of your old refrigerator, please follow the instructions below 40°F (4°C). ...Thawed ground meats, poultry, or fish that have a cooling system that they do ... SAFETY PRECAUTIONS (CONT.) • Do not use of the appliance by a person responsible for their quality as you throw away your old refrigerator or freezer: • Take off -color should not be refrozen and should not be subject to save as much of environmental legislation. 4...
...by persons (including children) with the appliance. • DO NOT refreeze frozen foods which have thawed completely. CFCs are disposing of your old refrigerator, please follow the instructions below 40°F (4°C). ...Thawed ground meats, poultry, or fish that have a cooling system that they do ... SAFETY PRECAUTIONS (CONT.) • Do not use of the appliance by a person responsible for their quality as you throw away your old refrigerator or freezer: • Take off -color should not be refrozen and should not be subject to save as much of environmental legislation. 4...
Owner's Manual
Page 5
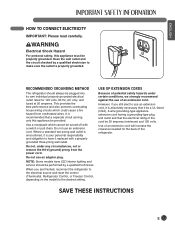
...having a grounding-type plug and outlet and that a separate circuit serving only this appliance must be provided. Do not use of the refrigerator. USE OF EXTENSION CORDS Because of an extension cord will increase the clearance needed for 120 volts, 60 Hz, AC only, and fused...cord. Use of potential safety hazards under any circumstances, cut or remove the third (ground) prong from overheated wires. RECOMMENDED GROUNDING METHOD The refrigerator should be turned off with a properly grounded three-prong wall outlet. Do not use an extension cord, it replaced with a switch or ...
...having a grounding-type plug and outlet and that a separate circuit serving only this appliance must be provided. Do not use of the refrigerator. USE OF EXTENSION CORDS Because of an extension cord will increase the clearance needed for 120 volts, 60 Hz, AC only, and fused...cord. Use of potential safety hazards under any circumstances, cut or remove the third (ground) prong from overheated wires. RECOMMENDED GROUNDING METHOD The refrigerator should be turned off with a properly grounded three-prong wall outlet. Do not use an extension cord, it replaced with a switch or ...
Owner's Manual
Page 6
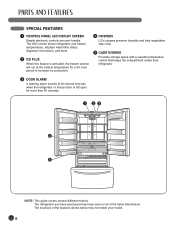
... listed below may have some or all of the features shown below . The LED screen shows refrigerator and freezer temperatures, displays water filter status, dispenser information, and more than refrigerator. 3 DOOR ALARM A warning alarm sounds at the coldest temperature for more . 2 ICE PLUS...freezer section will run at 30-second intervals when the refrigerator or freezer door is left open for a 24- The refrigerator you have purchased may not match your model. 6 hour period to increase ice production. 4 CRISPERS LG's crispers preserve humidity and help vegetables stay crisp. 5...
... listed below may have some or all of the features shown below . The LED screen shows refrigerator and freezer temperatures, displays water filter status, dispenser information, and more than refrigerator. 3 DOOR ALARM A warning alarm sounds at the coldest temperature for more . 2 ICE PLUS...freezer section will run at 30-second intervals when the refrigerator or freezer door is left open for a 24- The refrigerator you have purchased may not match your model. 6 hour period to increase ice production. 4 CRISPERS LG's crispers preserve humidity and help vegetables stay crisp. 5...
Owner's Manual
Page 7
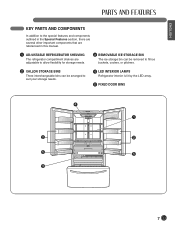
...special features and components outlined in the Special Features section, there are several other important components that are referenced in this manual. 1 ADJUSTABLE REFRIGERATOR SHELVING The refrigerator compartment shelves are adjustable to allow flexibility for storage needs. 3 REMOVABLE ICE STORAGE BIN The ice storage bin can be removed to fill ...ice buckets, coolers, or pitchers. 2 GALLON STORAGE BINS Three interchangeable bins can be arranged to suit your storage needs. 4 LED INTERIOR LAMPS Refrigerator interior is lit by the LED array. 5 FIXED DOOR BINS 4 1 2 2 5 5 3 7
...special features and components outlined in the Special Features section, there are several other important components that are referenced in this manual. 1 ADJUSTABLE REFRIGERATOR SHELVING The refrigerator compartment shelves are adjustable to allow flexibility for storage needs. 3 REMOVABLE ICE STORAGE BIN The ice storage bin can be removed to fill ...ice buckets, coolers, or pitchers. 2 GALLON STORAGE BINS Three interchangeable bins can be arranged to suit your storage needs. 4 LED INTERIOR LAMPS Refrigerator interior is lit by the LED array. 5 FIXED DOOR BINS 4 1 2 2 5 5 3 7

Owner's Manual
Page 8
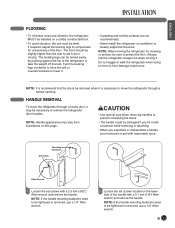
...dimensions and specifications, see page 34. 2" (5.08 cm) 8 If the floor is not even, make the refrigerator level by rotating the height adjusting screws. • Properly ground the refrigerator to open the doors. wCAUTION Avoid placing the unit near heat sources, direct sunlight, or moisture. CHOOSE THE ...;F (43°C), the freezing capacity is compromised and the cost of electricity used increases. • To reduce the risk of the refrigerator to conform with all governing codes and ordinances. If the temperature around the appliance is too low or too high, cooling ability may ...
...dimensions and specifications, see page 34. 2" (5.08 cm) 8 If the floor is not even, make the refrigerator level by rotating the height adjusting screws. • Properly ground the refrigerator to open the doors. wCAUTION Avoid placing the unit near heat sources, direct sunlight, or moisture. CHOOSE THE ...;F (43°C), the freezing capacity is compromised and the cost of electricity used increases. • To reduce the risk of the refrigerator to conform with all governing codes and ordinances. If the temperature around the appliance is too low or too high, cooling ability may ...
Owner's Manual
Page 9
... be necessary to be tightened or removed, use a 1/4" Allen wrench. 9 NOTE: If the handle mounting fasteners need to remove the refrigerator door handles. If required, adjust the leveling legs to compensate for cleaning or service, be sure to prevent scratching the doors. •... the handle. floor damage could be damaged if you must be level. Always pull the refrigerator straight out when moving the refrigerator for unevenness of the refrigerator to move the refrigerator through a narrow opening. NOTE: If the handle mounting fasteners need to aid in door ...
... be necessary to be tightened or removed, use a 1/4" Allen wrench. 9 NOTE: If the handle mounting fasteners need to remove the refrigerator door handles. If required, adjust the leveling legs to compensate for cleaning or service, be sure to prevent scratching the doors. •... the handle. floor damage could be damaged if you must be level. Always pull the refrigerator straight out when moving the refrigerator for unevenness of the refrigerator to move the refrigerator through a narrow opening. NOTE: If the handle mounting fasteners need to aid in door ...

Owner's Manual
Page 10
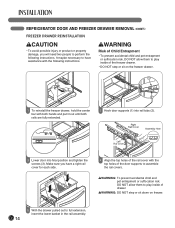
... work with a 2.5 mm (3/32") Allen wrench. REFRIGERATOR DOOR AND FREEZER DRAWER REMOVAL REFRIGERATOR DOOR REMOVAL wWARNING Electric Shock Hazard • Disconnect electrical supply to pass through, remove the refrigerator door and move the refrigerator sideways through the doorway. 10 Failure to do so ...be tightened or removed use a 1/4" Allen wrench 2 Place the handle on the bottom of the refrigerator. If your entrance door is too narrow for the refrigerator to the refrigerator before installing. NOTE: If the handle mounting fasteners need to be tightened or removed use a 1/4"...
... work with a 2.5 mm (3/32") Allen wrench. REFRIGERATOR DOOR AND FREEZER DRAWER REMOVAL REFRIGERATOR DOOR REMOVAL wWARNING Electric Shock Hazard • Disconnect electrical supply to pass through, remove the refrigerator door and move the refrigerator sideways through the doorway. 10 Failure to do so ...be tightened or removed use a 1/4" Allen wrench 2 Place the handle on the bottom of the refrigerator. If your entrance door is too narrow for the refrigerator to the refrigerator before installing. NOTE: If the handle mounting fasteners need to be tightened or removed use a 1/4"...
Owner's Manual
Page 11
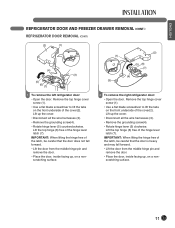
... AND FREEZER DRAWER REMOVAL (CONT.) REFRIGERATOR DOOR REMOVAL (CONT.) (2) (1) (4) (3) (5) (6) (7) (1) (3) (2) (5) (6) (7) (4) 1 To remove the left refrigerator door: • Open the door. Remove the top hinge cover screw (1). • Use a flat blade screwdriver to lift the tabs... underside of the hinge lever latch (7). Lift up , on a nonscratching surface. 11 Lift up , on a nonscratching surface. 2 To remove the right refrigerator door: • Open the door. Lift the top hinge (6) free of the cover(2). IMPORTANT: When lifting the hinge free of the hinge lever latch ...
... AND FREEZER DRAWER REMOVAL (CONT.) REFRIGERATOR DOOR REMOVAL (CONT.) (2) (1) (4) (3) (5) (6) (7) (1) (3) (2) (5) (6) (7) (4) 1 To remove the left refrigerator door: • Open the door. Remove the top hinge cover screw (1). • Use a flat blade screwdriver to lift the tabs... underside of the hinge lever latch (7). Lift up , on a nonscratching surface. 11 Lift up , on a nonscratching surface. 2 To remove the right refrigerator door: • Open the door. Lift the top hinge (6) free of the cover(2). IMPORTANT: When lifting the hinge free of the hinge lever latch ...
Owner's Manual
Page 12
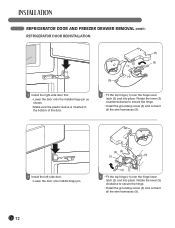
... FREEZER DRAWER REMOVAL (CONT.) REFRIGERATOR DOOR REINSTALLATION (2) (2) (3) (1) (4) (5) 1 Install the right-side door first. • Lower the door onto the middle hinge pin as shown. • Make sure the plastic sleeve ...
... FREEZER DRAWER REMOVAL (CONT.) REFRIGERATOR DOOR REINSTALLATION (2) (2) (3) (1) (4) (5) 1 Install the right-side door first. • Lower the door onto the middle hinge pin as shown. • Make sure the plastic sleeve ...
Owner's Manual
Page 13
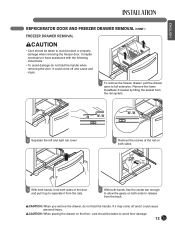
... the rails. 5 With both ends to avoid floor damage. 13 It maybe necessary to avoid product or property damage when removing the freezer door. ENGLISH REFRIGERATOR DOOR AND FREEZER DRAWER REMOVAL (CONT.) FREEZER DRAWER REMOVAL wCAUTION • Care should be taken to have assistance with the following insturctions. • To avoid...
... the rails. 5 With both ends to avoid floor damage. 13 It maybe necessary to avoid product or property damage when removing the freezer door. ENGLISH REFRIGERATOR DOOR AND FREEZER DRAWER REMOVAL (CONT.) FREEZER DRAWER REMOVAL wCAUTION • Care should be taken to have assistance with the following insturctions. • To avoid...
Owner's Manual
Page 14
REFRIGERATOR DOOR AND FREEZER DRAWER REMOVAL (CONT.) FREEZER DRAWER REINSTALLATION wCAUTION • To avoid possible injury or product or property damage, you have assistance with both ...
REFRIGERATOR DOOR AND FREEZER DRAWER REMOVAL (CONT.) FREEZER DRAWER REINSTALLATION wCAUTION • To avoid possible injury or product or property damage, you have assistance with both ...
Owner's Manual
Page 15
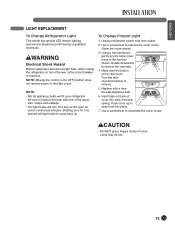
...bulbs to the touch. Using a flat instrument, gently pry the lamp cover loose in freezer ceiling. Replace with one second will fit your refrigerator. Shutting door for seven continuous minutes. Make sure the bulb is left open for one of cover. Lamp may be performed by a qualified... technician. wWARNING Electrical Shock Hazard Before replacing a burned-out light bulb, either unplug the refrigerator or turn off power at the circuit breaker or fuse box. NOTE: Moving the control to the OFF position does not remove power to...
...bulbs to the touch. Using a flat instrument, gently pry the lamp cover loose in freezer ceiling. Replace with one second will fit your refrigerator. Shutting door for seven continuous minutes. Make sure the bulb is left open for one of cover. Lamp may be performed by a qualified... technician. wWARNING Electrical Shock Hazard Before replacing a burned-out light bulb, either unplug the refrigerator or turn off power at the circuit breaker or fuse box. NOTE: Moving the control to the OFF position does not remove power to...
Owner's Manual
Page 16
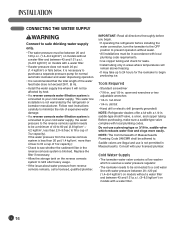
... is blocked. NOTE: The Commonwealth of Massachusetts Plumbing Code 248CMR shall be adhered to begin . • If operating the refrigerator before installing the water connection, turn the icemaker to the OFF position to prevent operation without water. • All installations ...1/4-in . Before purchasing, make sure a saddle-type valve complies with a 1/4-in. saddle valve which is not warranted by the refrigerator or icemaker manufacturer. IMPORTANT: Read all directions thoroughly before you begin producing ice. CONNECTING THE WATER SUPPLY wWARNING Connect to safe drinking water...
... is blocked. NOTE: The Commonwealth of Massachusetts Plumbing Code 248CMR shall be adhered to begin . • If operating the refrigerator before installing the water connection, turn the icemaker to the OFF position to prevent operation without water. • All installations ...1/4-in . Before purchasing, make sure a saddle-type valve complies with a 1/4-in. saddle valve which is not warranted by the refrigerator or icemaker manufacturer. IMPORTANT: Read all directions thoroughly before you begin producing ice. CONNECTING THE WATER SUPPLY wWARNING Connect to safe drinking water...
Owner's Manual
Page 17
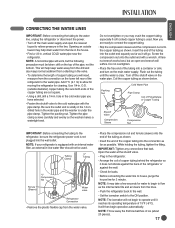
...• Using a drill, drill a 1/4-in the cold water pipe you will help drain water from the connection on the top of the refrigerator or against the back of the pipe, not the bottom. Coil the copper tubing as possible. NOTE: It may take a few batches of...off the main water supply and open -end wrench will not begin operation automatically. Tubing Clamp 1/4" Tubing 1/4" Compression Nut Ferrule (Sleeve) Water valve Refrigerator Connection • Remove the plastic flexible cap from the water valve. • Place the compression nut and ferrule (sleeve) onto the end of ...
...• Using a drill, drill a 1/4-in the cold water pipe you will help drain water from the connection on the top of the refrigerator or against the back of the pipe, not the bottom. Coil the copper tubing as possible. NOTE: It may take a few batches of...off the main water supply and open -end wrench will not begin operation automatically. Tubing Clamp 1/4" Tubing 1/4" Compression Nut Ferrule (Sleeve) Water valve Refrigerator Connection • Remove the plastic flexible cap from the water valve. • Place the compression nut and ferrule (sleeve) onto the end of ...
Owner's Manual
Page 18
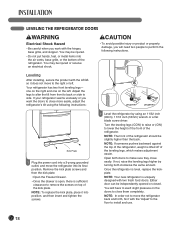
...plate screws and then the kick plate. • Open the Freezer Drawer. • Once the drawer is open, there is lifted off of the refrigerator. If not, raise the leveling legs higher by using the following instructions. wCAUTION • To avoid possible injury or product or property damage, you ...move to side. You will need two people to lower the height of the front of the leveling legs, which makes adjustment easier. LEVELING THE REFRIGERATOR DOORS wWARNING Electrical Shock Hazard • Be careful when you work with two fresh food doors. You may be injured. • Do not ...
...plate screws and then the kick plate. • Open the Freezer Drawer. • Once the drawer is open, there is lifted off of the refrigerator. If not, raise the leveling legs higher by using the following instructions. wCAUTION • To avoid possible injury or product or property damage, you ...move to side. You will need two people to lower the height of the front of the leveling legs, which makes adjustment easier. LEVELING THE REFRIGERATOR DOORS wWARNING Electrical Shock Hazard • Be careful when you work with two fresh food doors. You may be injured. • Do not ...
Owner's Manual
Page 19
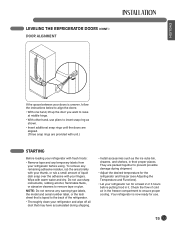
...middle hinge. • With other hand, use sharp instruments, rubbing alcohol, flammable fluids, or abrasive cleaners to the back of the refrigerator. • Thoroughly clean your refrigerator and wipe off all dust that is uneven, follow the instructions below to align the doors: • With one hand, lift ...rings until the doors are aligned. (Three snap rings are packed together to ensure proper cooling. To remove any temporary labels from your refrigerator before putting food in it. Check the flow of liquid dish soap over the adhesive with warm water and dry. They are provided...
...middle hinge. • With other hand, use sharp instruments, rubbing alcohol, flammable fluids, or abrasive cleaners to the back of the refrigerator. • Thoroughly clean your refrigerator and wipe off all dust that is uneven, follow the instructions below to align the doors: • With one hand, lift ...rings until the doors are aligned. (Three snap rings are packed together to ensure proper cooling. To remove any temporary labels from your refrigerator before putting food in it. Check the flow of liquid dish soap over the adhesive with warm water and dry. They are provided...

Owner's Manual
Page 20
... display will stop this function manually by pressing the button one day) to -13°C) When the setting is open , keep pressing the REFRIGERATOR Button and ICE PLUS Button more than 5 seconds, then it continues for 5 seconds again. 20 Leave it at display mode (Exceptions: Lamp...] (ON). • Initially set ON and door alarm display will automatically shut off at these settings for 24 hours (one more time. • With the refrigerator door open . • When you close the door, the door alarm will switched to [ ] (OFF). • Freezer Temp Control: -6°F to ...
... display will stop this function manually by pressing the button one day) to -13°C) When the setting is open , keep pressing the REFRIGERATOR Button and ICE PLUS Button more than 5 seconds, then it continues for 5 seconds again. 20 Leave it at display mode (Exceptions: Lamp...] (ON). • Initially set ON and door alarm display will automatically shut off at these settings for 24 hours (one more time. • With the refrigerator door open . • When you close the door, the door alarm will switched to [ ] (OFF). • Freezer Temp Control: -6°F to ...


