Owner's Manual
Page 2
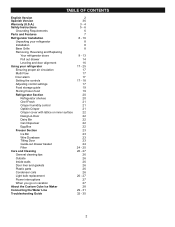
...Warranty (U.S.A.) Safety Instructions Grounding Requirements Parts and Features Refrigerator Installation Unpacking your refrigerator Installation Base Grille Removing, Reversing and Replacing Your refrigerator doors Pull out drawer Leveling and door alignment Using your refrigerator Ensuring proper air circulation Multi Flow Door alarm Setting ...the controls Adjusting control settings Food storage guide Storing frozen food Refrigerator Section Refrigerator shelves Chef Fresh Crisper humidity control Optibin Crisper Crisper cover with lattice on inner surface Design...
...Warranty (U.S.A.) Safety Instructions Grounding Requirements Parts and Features Refrigerator Installation Unpacking your refrigerator Installation Base Grille Removing, Reversing and Replacing Your refrigerator doors Pull out drawer Leveling and door alignment Using your refrigerator Ensuring proper air circulation Multi Flow Door alarm Setting ...the controls Adjusting control settings Food storage guide Storing frozen food Refrigerator Section Refrigerator shelves Chef Fresh Crisper humidity control Optibin Crisper Crisper cover with lattice on inner surface Design...
Owner's Manual
Page 3
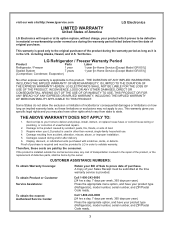
...per year) Press the appropriate option, and have your home to prove date of God. 3. including Alaska, Hawaii, and U.S. LG Refrigerator / Freezer Warranty Period Product Parts Labor Refrigerator / Freezer 1 year 1 year [In-Home Service (Except Model GR-051)] Sealed System 7 years 1 year [In-Home... Service (Except Model GR-051)] (Compressor, Condenser, Evaporator) No other rights which proves to LG in other than normal,...
...per year) Press the appropriate option, and have your home to prove date of God. 3. including Alaska, Hawaii, and U.S. LG Refrigerator / Freezer Warranty Period Product Parts Labor Refrigerator / Freezer 1 year 1 year [In-Home Service (Except Model GR-051)] Sealed System 7 years 1 year [In-Home... Service (Except Model GR-051)] (Compressor, Condenser, Evaporator) No other rights which proves to LG in other than normal,...
Owner's Manual
Page 5
... will identify the hazard, tell you how to climb, stand or hang on the automatic icemaking mechanism while the refrigerator is plugged in the refrigerator. they are necessarily small. Have the wall outlet and the circuit checked by a qualified individual. Always read and... end. For personal safety, this appliance. Read all safety messages. Use this use gasoline or other appliance. After your refrigerator before using your refrigerator away from the outlet. Skin may be discarded. The United States Department of the ejector mechanism, or with a live wire...
... will identify the hazard, tell you how to climb, stand or hang on the automatic icemaking mechanism while the refrigerator is plugged in the refrigerator. they are necessarily small. Have the wall outlet and the circuit checked by a qualified individual. Always read and... end. For personal safety, this appliance. Read all safety messages. Use this use gasoline or other appliance. After your refrigerator before using your refrigerator away from the outlet. Skin may be discarded. The United States Department of the ejector mechanism, or with a live wire...
Owner's Manual
Page 6
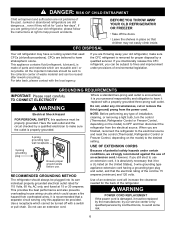
...removed for 115 Volts, 60 Hz, AC only, and fused at right to help prevent accidents. Have the wall outlet and the circuit checked by LG Electronics, to avoid some risk. 6 Use a receptacle which cannot be 15 amperes (minimum) and 120 volts. Do not use . Use of...we strongly recommend against the use an extension cord, it is made of installation, cleaning, or removing a light bulb, turn the control (Thermostat, Refrigerator Control or Freezer Control, depending on the model) to the desired setting. If you are still dangerous... DANGER: RISK OF CHILD ENTRAPMENT Child entrapment...
...removed for 115 Volts, 60 Hz, AC only, and fused at right to help prevent accidents. Have the wall outlet and the circuit checked by LG Electronics, to avoid some risk. 6 Use a receptacle which cannot be 15 amperes (minimum) and 120 volts. Do not use . Use of...we strongly recommend against the use an extension cord, it is made of installation, cleaning, or removing a light bulb, turn the control (Thermostat, Refrigerator Control or Freezer Control, depending on the model) to the desired setting. If you are still dangerous... DANGER: RISK OF CHILD ENTRAPMENT Child entrapment...
Owner's Manual
Page 7
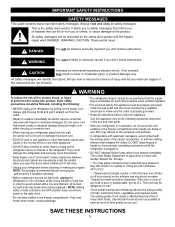
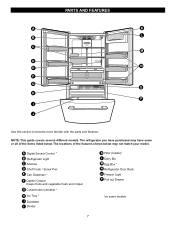
...fresh and crisper G Customcube Icemaker * H Ice Tray * I J Use this section to become more familiar with the parts and features. The refrigerator you have purchased may not match your model. The locations of the items listed below may have some models 7 NOTE: This guide covers several ...different models. PARTS AND FEATURES A K L B C M D N E F G O H P I Durabase J Divider K Filter (Inside)* L Dairy Bin M Egg Box * N Refrigerator Door Rack O Freezer Light P Pull out Drawer *on some or all of the features shown below .
...fresh and crisper G Customcube Icemaker * H Ice Tray * I J Use this section to become more familiar with the parts and features. The refrigerator you have purchased may not match your model. The locations of the items listed below may have some models 7 NOTE: This guide covers several ...different models. PARTS AND FEATURES A K L B C M D N E F G O H P I Durabase J Divider K Filter (Inside)* L Dairy Bin M Egg Box * N Refrigerator Door Rack O Freezer Light P Pull out Drawer *on some or all of the features shown below .
Owner's Manual
Page 8
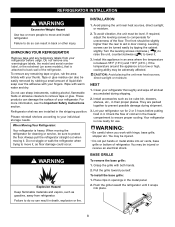
...affected. Wipe with both hands. 2. Check the flow of the floor. Do not put hands or metal sticks into place. 8 REFRIGERATOR INSTALLATION WARNING Excessive Weight Hazard INSTALLATION 1. Tape or glue residue can damage the surface of liquid dish soap over the adhesive with your...toward yourself. Turn the leveling screws clockwise ( ) to raise the unit, counterclockwise ( ) to do so can result in it. Your refrigerator is heavy. Use two or more information, see the Important Safety Instructions section. These products can also be turned easily by rubbing a small...
...affected. Wipe with both hands. 2. Check the flow of the floor. Do not put hands or metal sticks into place. 8 REFRIGERATOR INSTALLATION WARNING Excessive Weight Hazard INSTALLATION 1. Tape or glue residue can damage the surface of liquid dish soap over the adhesive with your...toward yourself. Turn the leveling screws clockwise ( ) to raise the unit, counterclockwise ( ) to do so can result in it. Your refrigerator is heavy. Use two or more information, see the Important Safety Instructions section. These products can also be turned easily by rubbing a small...
Owner's Manual
Page 9
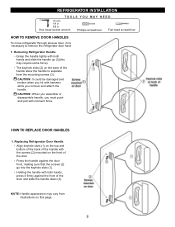
... you remove and attach the handle. Press the handle against the front of the handle allow the handle to remove the refrigerator door handles. 1. Holding the handle with moment force. REFRIGERATOR INSTALLATION TOOLS YOU MAY NEED 10 mm 1/4 in 3/8 in Hex head socket wrench Phillips screwdriver Flat head screwdriver HOW TO... ahouse door, it firmly against the door front, making sure that the screws (2) go into the keyhole slots (1). Removing Refrigerator Handle Grasp the handle tightly with both hands, press it may be damaged and broken when you hit with hammer while you must ...
... you remove and attach the handle. Press the handle against the front of the handle allow the handle to remove the refrigerator door handles. 1. Holding the handle with moment force. REFRIGERATOR INSTALLATION TOOLS YOU MAY NEED 10 mm 1/4 in 3/8 in Hex head socket wrench Phillips screwdriver Flat head screwdriver HOW TO... ahouse door, it firmly against the door front, making sure that the screws (2) go into the keyhole slots (1). Removing Refrigerator Handle Grasp the handle tightly with both hands, press it may be damaged and broken when you hit with hammer while you must ...
Owner's Manual
Page 10
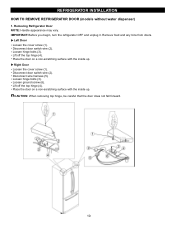
... top hinge, be careful that the door does not fall forward. 10 IMPORTANT: Before you begin, turn the refrigerator OFF and unplug it. REFRIGERATOR INSTALLATION HOW TO REMOVE REFRIGERATOR DOOR (models without water dispenser) 1. Removing Refrigerator Door NOTE: Handle appearance may vary. Remove food and any bins from doors. Left Door Loosen the cover...
... top hinge, be careful that the door does not fall forward. 10 IMPORTANT: Before you begin, turn the refrigerator OFF and unplug it. REFRIGERATOR INSTALLATION HOW TO REMOVE REFRIGERATOR DOOR (models without water dispenser) 1. Removing Refrigerator Door NOTE: Handle appearance may vary. Remove food and any bins from doors. Left Door Loosen the cover...
Owner's Manual
Page 11
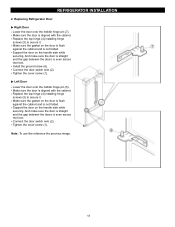
...image. 11 Replace the top hinge (4) installing hinge screws (3) to secure it . Replace the top hinge (4) installing hinge screws (3) to secure it . REFRIGERATOR INSTALLATION 2. Connect the door switch wire (2). Support the door on the handle side while securing. Make sure the door is not folded. Make sure the... gasket on the door is flush against the cabinet and is aligned with the cabinet. Replacing Refrigerator Door Right Door Lower the door onto the middle hinge pin (7). Make sure the door is not folded. Support the door on the...
...image. 11 Replace the top hinge (4) installing hinge screws (3) to secure it . Replace the top hinge (4) installing hinge screws (3) to secure it . REFRIGERATOR INSTALLATION 2. Connect the door switch wire (2). Support the door on the handle side while securing. Make sure the door is not folded. Make sure the... gasket on the door is flush against the cabinet and is aligned with the cabinet. Replacing Refrigerator Door Right Door Lower the door onto the middle hinge pin (7). Make sure the door is not folded. Support the door on the...

Owner's Manual
Page 12
...Disconnect door switch wire (2). Place the door on a non-scratching surface with the inside up . IMPORTANT: Before you begin, turn the refrigerator OFF and unplug it. Disconnect water supply tube by pushing back on back side (see figure A). Loosen screws (6) and lift off ... screw (1). Disconnect wire harness (4). CAUTION: If a tube end is deformed or worn out, cut the damaged portion away. REFRIGERATOR INSTALLATION REMOVING AND REPLACING REFRIGERATOR DOORS (models with the inside up . 12 Disconnect door switch wire (2). Place the door on a non-scratching surface with ...
...Disconnect door switch wire (2). Place the door on a non-scratching surface with the inside up . IMPORTANT: Before you begin, turn the refrigerator OFF and unplug it. Disconnect water supply tube by pushing back on back side (see figure A). Loosen screws (6) and lift off ... screw (1). Disconnect wire harness (4). CAUTION: If a tube end is deformed or worn out, cut the damaged portion away. REFRIGERATOR INSTALLATION REMOVING AND REPLACING REFRIGERATOR DOORS (models with the inside up . 12 Disconnect door switch wire (2). Place the door on a non-scratching surface with ...
Owner's Manual
Page 13
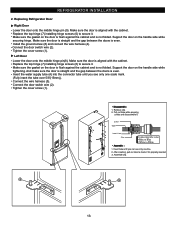
... the gap between the doors is aligned with the cabinet. Install the ground screw (8) and connect the wire harness (4). Replacing Refrigerator Door Right Door Lower the door onto the middle hinge pin (9). REFRIGERATOR INSTALLATION 2. Insert the water supply tube (4) into the connector tube until you see only one scale mark. (Fully insert...
... the gap between the doors is aligned with the cabinet. Install the ground screw (8) and connect the wire harness (4). Replacing Refrigerator Door Right Door Lower the door onto the middle hinge pin (9). REFRIGERATOR INSTALLATION 2. Insert the water supply tube (4) into the connector tube until you see only one scale mark. (Fully insert...
Owner's Manual
Page 14
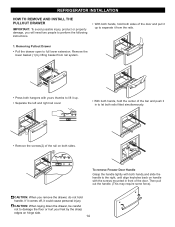
... it comes off, it up to separate it from rail system. 1 • Press both hangers with yours thumbs to lift it could cause personal injury. REFRIGERATOR INSTALLATION HOW TO REMOVE AND INSTALL THE PULLOUT DRAWER IMPORTANT: To avoid possible injury, product or property damage, you remove the drawer, do not hold...
... it comes off, it up to separate it from rail system. 1 • Press both hangers with yours thumbs to lift it could cause personal injury. REFRIGERATOR INSTALLATION HOW TO REMOVE AND INSTALL THE PULLOUT DRAWER IMPORTANT: To avoid possible injury, product or property damage, you remove the drawer, do not hold...

Owner's Manual
Page 15
... (4) in the rail assembly. 4 • Lower door into final position and tighten the screws (3) 3 WARNING: To prevent accidental child and pet entrapment or suffocation risk. REFRIGERATOR INSTALLATTIIOONN HOW TO REMOVE AND INSTALL THE PULLOUT DRAWER IMPORTANT: To avoid possible injur or product or property damage, you have a right rail cover for...
... (4) in the rail assembly. 4 • Lower door into final position and tighten the screws (3) 3 WARNING: To prevent accidental child and pet entrapment or suffocation risk. REFRIGERATOR INSTALLATTIIOONN HOW TO REMOVE AND INSTALL THE PULLOUT DRAWER IMPORTANT: To avoid possible injur or product or property damage, you have a right rail cover for...

Owner's Manual
Page 16
... counterclockwise to raise at middle hinge. 2. It may take several more to raise that they close easily. Replace the base cover. Move the refrigerator into a 3-prong grounded outlet. This makes it . With other hand, use pliers to adjust the screws. Open both leveling screws the same amount. 4...., lift up the door you want the doors to adjust the tilt of the leveling screw to close completely. 16 REFRIGERATOR INSTALLATION LEVELING AND DOOR ALIGNMENT Leveling Your refrigerator has two front leveling screws one on the right and one on doors to get them to align the doors: 1....
... counterclockwise to raise at middle hinge. 2. It may take several more to raise that they close easily. Replace the base cover. Move the refrigerator into a 3-prong grounded outlet. This makes it . With other hand, use pliers to adjust the screws. Open both leveling screws the same amount. 4...., lift up the door you want the doors to adjust the tilt of the leveling screw to close completely. 16 REFRIGERATOR INSTALLATION LEVELING AND DOOR ALIGNMENT Leveling Your refrigerator has two front leveling screws one on the right and one on doors to get them to align the doors: 1....
Owner's Manual
Page 17
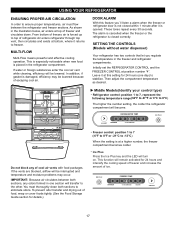
... operation. This is especially noticeable when new food is damaged, efficiency may occur. The alarm is cancelled when the freezer or the refrigerator is closed within 1 minute after it at a higher number, the freezer compartment becomes colder. IMPORTANT: Because air circulates between the... PROPER AIR CIRCULATION In order to ensure proper temperatures, air must thoroughly clean both sections, any of ice. As shown in the refrigerator compartment. From bottom of freezer, air is not closed correctly. If water or foreign substances enter the cool air vent while cleaning, ...
... operation. This is especially noticeable when new food is damaged, efficiency may occur. The alarm is cancelled when the freezer or the refrigerator is closed within 1 minute after it at a higher number, the freezer compartment becomes colder. IMPORTANT: Because air circulates between the... PROPER AIR CIRCULATION In order to ensure proper temperatures, air must thoroughly clean both sections, any of ice. As shown in the refrigerator compartment. From bottom of freezer, air is not closed correctly. If water or foreign substances enter the cool air vent while cleaning, ...
Owner's Manual
Page 18
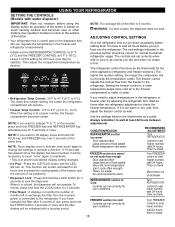
...then re-check FREEZER section too cold Controls not set correctly when milk or juice is as cold as the thermostat for the entire appliance (refrigerator and freezer sections.) The higher the number setting, the longer the compressor will become. • Freezer Temp Control: -6°F to 8&#...sensing method and becomes slow or other buttons may operate if moisture is locked, the dispenser will remain activated for normal household refrigerator usage. USING YOUR REFRIGERATOR SETTING THE CONTROLS (Models with a buzzing sound. This function will not operate. It is too warm or too cold,...
...then re-check FREEZER section too cold Controls not set correctly when milk or juice is as cold as the thermostat for the entire appliance (refrigerator and freezer sections.) The higher the number setting, the longer the compressor will become. • Freezer Temp Control: -6°F to 8&#...sensing method and becomes slow or other buttons may operate if moisture is locked, the dispenser will remain activated for normal household refrigerator usage. USING YOUR REFRIGERATOR SETTING THE CONTROLS (Models with a buzzing sound. This function will not operate. It is too warm or too cold,...
Owner's Manual
Page 19
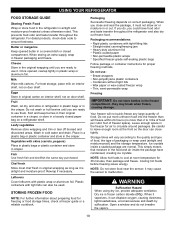
...packaging and freeze. they may cause the sensor to ensure freshness. Ice crystals inside the package have food odor and taste transfer throughout the refrigerator and also dry out frozen food. Cheese Store in the crisper. For best storage, place milk on interior shelf, not on correct packaging.... wrapping and trim or tear off bruised and discolored areas. Cooling hot foods before freezing saves energy. Fruit Wash, let dry, and store in refrigerator in plastic bags or in or out. When you could have condensed, creating ice crystals. Open a window and do , you close tightly. ...
...packaging and freeze. they may cause the sensor to ensure freshness. Ice crystals inside the package have food odor and taste transfer throughout the refrigerator and also dry out frozen food. Cheese Store in the crisper. For best storage, place milk on interior shelf, not on correct packaging.... wrapping and trim or tear off bruised and discolored areas. Cooling hot foods before freezing saves energy. Fruit Wash, let dry, and store in refrigerator in plastic bags or in or out. When you could have condensed, creating ice crystals. Open a window and do , you close tightly. ...
Owner's Manual
Page 20
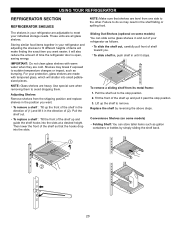
... item you . Pull the shelf out. Tilt the front of (2). USING YOUR REFRIGERATOR REFRIGERATOR SECTION REFRIGERATOR SHELVES The shelves in your refrigerator are adjustable to meet your refrigerator as follows. For your refrigerator and adjusting the shelves to fit different heights of time the refrigerator door is open, saving energy. To slide the shelf out, carefully pull...
... item you . Pull the shelf out. Tilt the front of (2). USING YOUR REFRIGERATOR REFRIGERATOR SECTION REFRIGERATOR SHELVES The shelves in your refrigerator are adjustable to meet your refrigerator as follows. For your refrigerator and adjusting the shelves to fit different heights of time the refrigerator door is open, saving energy. To slide the shelf out, carefully pull...
Owner's Manual
Page 21
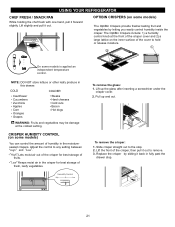
... to any setting between " " and " ". Lift slightly and pull it forward slightly. Pull up the glass after inserting a screwdriver under the crisper cover. 2. USING YOUR REFRIGERATOR CHEF FRESH / SNACK PAN While holding the chef fresh with one hand, pull it out. The OptiBin Crispers include: 1) a humidity control knob at the coldest...
... to any setting between " " and " ". Lift slightly and pull it forward slightly. Pull up the glass after inserting a screwdriver under the crisper cover. 2. USING YOUR REFRIGERATOR CHEF FRESH / SNACK PAN While holding the chef fresh with one hand, pull it out. The OptiBin Crispers include: 1) a humidity control knob at the coldest...
Owner's Manual
Page 22
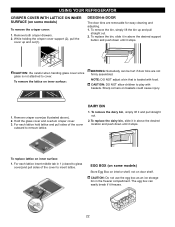
USING YOUR REFRIGERATOR CRISPER COVER WITH LATTICE ON INNER SURFACE (on some models) Store Egg Box on interior shelf, not on door shelf. DESIGN-A-DOOR The door bins ...
USING YOUR REFRIGERATOR CRISPER COVER WITH LATTICE ON INNER SURFACE (on some models) Store Egg Box on interior shelf, not on door shelf. DESIGN-A-DOOR The door bins ...


