Owner's Manual
Page 2
... Door alarm Setting the controls Adjusting control settings Food storage guide Storing frozen food Refrigerator Section Refrigerator shelves Chef Fresh Crisper humidity control Optibin Crisper Crisper cover with lattice on inner surface Design-A-Door Dairy Bin Can Dispenser Egg Box Freezer Section Ice Bin Wire Durabase Tilting Door Guide-out drawer basket Filter Care and Cleaning General cleaning tips Outside Inside walls Door liner and gaskets Plastic parts Condenser coils Light bulb replacement Power interruptions When you go on vacation About the Custom Cube Ice Maker Connecting the Water...
... Door alarm Setting the controls Adjusting control settings Food storage guide Storing frozen food Refrigerator Section Refrigerator shelves Chef Fresh Crisper humidity control Optibin Crisper Crisper cover with lattice on inner surface Design-A-Door Dairy Bin Can Dispenser Egg Box Freezer Section Ice Bin Wire Durabase Tilting Door Guide-out drawer basket Filter Care and Cleaning General cleaning tips Outside Inside walls Door liner and gaskets Plastic parts Condenser coils Light bulb replacement Power interruptions When you go on vacation About the Custom Cube Ice Maker Connecting the Water...
Owner's Manual
Page 3
... LG product is used in other than normal, single-family household use during the warranty period listed below from the date of the product during and/or after delivery 6. Call 1-800-243-0000 (24 hrs a day, 7 days per week, 365 days per year) Press the appropriate option, and have your product type (Refrigerator), model number, serial number, and ZIP/Postal Code ready. 3 Service...
... LG product is used in other than normal, single-family household use during the warranty period listed below from the date of the product during and/or after delivery 6. Call 1-800-243-0000 (24 hrs a day, 7 days per week, 365 days per year) Press the appropriate option, and have your product type (Refrigerator), model number, serial number, and ZIP/Postal Code ready. 3 Service...
Owner's Manual
Page 5
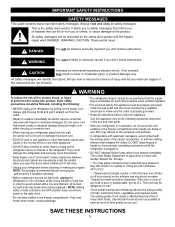
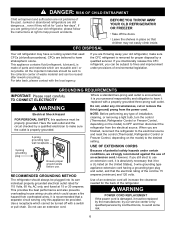
... bottles in the refrigerator. Read all instructions before cleaning or making any off-odor or off power at either or both controls to the OFF position does not remove power to avoid contact with a live wire filament. (A burnedout light bulb may be preceded by pulling on the power cord. Repair or replace immediately all safety messages. It alerts you to the extremely cold surfaces. NOTE...
... bottles in the refrigerator. Read all instructions before cleaning or making any off-odor or off power at either or both controls to the OFF position does not remove power to avoid contact with a live wire filament. (A burnedout light bulb may be preceded by pulling on the power cord. Repair or replace immediately all safety messages. It alerts you to the extremely cold surfaces. NOTE...
Owner's Manual
Page 6
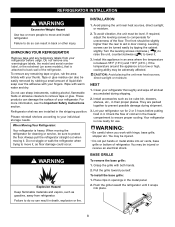
... they will increase the clearance needed for "just a few days". CFCs are not problems of installation, cleaning, or removing a light bulb, turn the control (Thermostat, Refrigerator Control or Freezer Control, depending on the model) to the desired setting. If you can be replaced by the manufacturer, by our service center or by qualified personal by a qualified servicer. Electrical Shock Hazard FOR PERSONAL SAFETY, this CFC refrigerant, you intentionally release this appliance...
... they will increase the clearance needed for "just a few days". CFCs are not problems of installation, cleaning, or removing a light bulb, turn the control (Thermostat, Refrigerator Control or Freezer Control, depending on the model) to the desired setting. If you can be replaced by the manufacturer, by our service center or by qualified personal by a qualified servicer. Electrical Shock Hazard FOR PERSONAL SAFETY, this CFC refrigerant, you intentionally release this appliance...
Owner's Manual
Page 8
.... Do not use . Failure to do so can also be turned easily by rubbing a small amount of the refrigerator. 2. UNPACKING YOUR REFRIGERATOR Remove tape and any warningtype labels, the model and serial number label, or the echsheet (on some models), that is heavy. The front should be adversely affected. Install this appliance in it , as ice cube bin, drawers, shelves, etc., in door closing. For...
.... Do not use . Failure to do so can also be turned easily by rubbing a small amount of the refrigerator. 2. UNPACKING YOUR REFRIGERATOR Remove tape and any warningtype labels, the model and serial number label, or the echsheet (on some models), that is heavy. The front should be adversely affected. Install this appliance in it , as ice cube bin, drawers, shelves, etc., in door closing. For...
Owner's Manual
Page 9
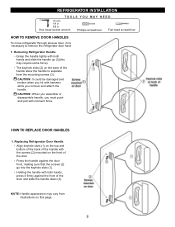
... the handle against the front of the handle allow the handle to remove the refrigerator door handles. 1. NOTE: Handle appearance may be damaged and broken when you remove and attach the handle. REFRIGERATOR INSTALLATION TOOLS YOU MAY NEED 10 mm 1/4 in 3/8 in Hex head socket wrench Phillips screwdriver Flat head screwdriver HOW TO REMOVE DOOR HANDLES To move refrigerator through ahouse door, it firmly against the door front, making sure...
... the handle against the front of the handle allow the handle to remove the refrigerator door handles. 1. NOTE: Handle appearance may be damaged and broken when you remove and attach the handle. REFRIGERATOR INSTALLATION TOOLS YOU MAY NEED 10 mm 1/4 in 3/8 in Hex head socket wrench Phillips screwdriver Flat head screwdriver HOW TO REMOVE DOOR HANDLES To move refrigerator through ahouse door, it firmly against the door front, making sure...

Owner's Manual
Page 12
Disconnect door switch wire (2). Remove the ground screw (8). Loosen the cover screw (1). CAUTION: When removing top hinge, be careful that the door does not fall forward. REFRIGERATOR INSTALLATION REMOVING AND REPLACING REFRIGERATOR DOORS (models with the inside up . Remove food and any bins from doors. Left Door Loosen the screws and remove the cover on the disconnect ring (3). Pull out the tube (4). Place the door on a non-scratching surface with the inside up . 12 Loosen screws (6) and lift...
Disconnect door switch wire (2). Remove the ground screw (8). Loosen the cover screw (1). CAUTION: When removing top hinge, be careful that the door does not fall forward. REFRIGERATOR INSTALLATION REMOVING AND REPLACING REFRIGERATOR DOORS (models with the inside up . Remove food and any bins from doors. Left Door Loosen the screws and remove the cover on the disconnect ring (3). Pull out the tube (4). Place the door on a non-scratching surface with the inside up . 12 Loosen screws (6) and lift...
Owner's Manual
Page 17
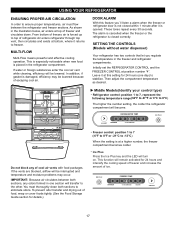
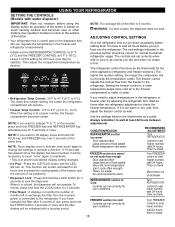
... cool air vents with food packages. These tones repeat every 30 seconds. SETTING THE CONTROLS (Models without water dispenser) Your refrigerator has two controls that let you ´ll listen a alarm when the freezer or refrigerator door is damaged, efficiency may occur. Middle Models(Identify your control type) Refrigerator control: position 1 to 7, represent the following temperature range(32°F to 47°F or 0°C to 8°C) The higher the number setting...
... cool air vents with food packages. These tones repeat every 30 seconds. SETTING THE CONTROLS (Models without water dispenser) Your refrigerator has two controls that let you ´ll listen a alarm when the freezer or refrigerator door is damaged, efficiency may occur. Middle Models(Identify your control type) Refrigerator control: position 1 to 7, represent the following temperature range(32°F to 47°F or 0°C to 8°C) The higher the number setting...
Owner's Manual
Page 18
... a door is too warm or too cold, then adjust the freezer control as operation of the button is based on touch sensing method and becomes slow or other buttons may operate if moisture is stuck to the surface of the filter is locked, the dispenser will be initialized with water dispener) IMPORTANT: Wipe out moisture before using the display button as well. CONDITION/REASON: REFRIGERATOR section too warm Door opened often...
... a door is too warm or too cold, then adjust the freezer control as operation of the button is based on touch sensing method and becomes slow or other buttons may operate if moisture is stuck to the surface of the filter is locked, the dispenser will be initialized with water dispener) IMPORTANT: Wipe out moisture before using the display button as well. CONDITION/REASON: REFRIGERATOR section too warm Door opened often...
Owner's Manual
Page 20
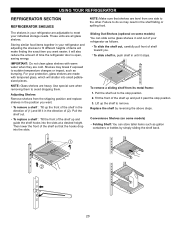
... refrigerator door is open, saving energy. Storing similar food items together in the position you want . it stops. IMPORTANT: Do not clean glass shelves with tempered glass, which will shatter into the slots at a desired height. Use special care when removing them . Adjusting Shelves Remove shelves from its metal frame: 1. To replace a shelf : Tilt the front of the shelf up and pull it in the direction of your individual storage needs...
... refrigerator door is open, saving energy. Storing similar food items together in the position you want . it stops. IMPORTANT: Do not clean glass shelves with tempered glass, which will shatter into the slots at a desired height. Use special care when removing them . Adjusting Shelves Remove shelves from its metal frame: 1. To replace a shelf : Tilt the front of the shelf up and pull it in the direction of your individual storage needs...
Owner's Manual
Page 21
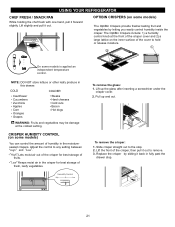
... some models) You can control the amount of fresh, leafy vegetables. Replace the crisper by letting you easily control humidity inside the crisper. To remove the glass: 1. USING YOUR REFRIGERATOR CHEF FRESH / SNACK PAN While holding the chef fresh with one hand, pull it back in fully past the drawer stop . 2. OPTIBIN CRISPERS (on some models is applied an independent temperature control. Slide crisper straight out to any setting between...
... some models) You can control the amount of fresh, leafy vegetables. Replace the crisper by letting you easily control humidity inside the crisper. To remove the glass: 1. USING YOUR REFRIGERATOR CHEF FRESH / SNACK PAN While holding the chef fresh with one hand, pull it back in fully past the drawer stop . 2. OPTIBIN CRISPERS (on some models is applied an independent temperature control. Slide crisper straight out to any setting between...
Owner's Manual
Page 22
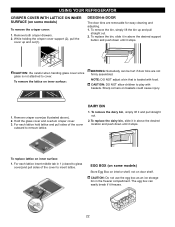
... the cover to cover. To replace the bin, slide it in the freezer compartment. Remove crisper cover(as an ice storage bin in above the desired support button and push down until it stops. 1 2 CAUTION: Be careful when handing glass cover since glass is loaded with baskets. The egg box can be hurt if door bins are removable for easy cleaning and adjusting. 1. USING YOUR REFRIGERATOR CRISPER COVER WITH LATTICE ON INNER SURFACE (on door shelf. DESIGN-A-DOOR The door bins...
... the cover to cover. To replace the bin, slide it in the freezer compartment. Remove crisper cover(as an ice storage bin in above the desired support button and push down until it stops. 1 2 CAUTION: Be careful when handing glass cover since glass is loaded with baskets. The egg box can be hurt if door bins are removable for easy cleaning and adjusting. 1. USING YOUR REFRIGERATOR CRISPER COVER WITH LATTICE ON INNER SURFACE (on door shelf. DESIGN-A-DOOR The door bins...
Owner's Manual
Page 24
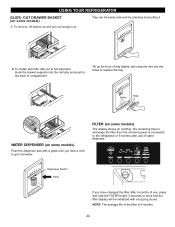
... with a glass until you have changed the filter after use , press and hold the FILTER button 3 seconds or more and the filter display will be easily removed by pressing and pulling it. 1 2 2. OUT DRAWER BASKET (on some models) Push the dispenser pad with a buzzing sound. Hook the basket supports into the holes to get cold water. FILTER (on some models) 1. NOTE: The average life of the filter is connected to the...
... with a glass until you have changed the filter after use , press and hold the FILTER button 3 seconds or more and the filter display will be easily removed by pressing and pulling it. 1 2 2. OUT DRAWER BASKET (on some models) Push the dispenser pad with a buzzing sound. Hook the basket supports into the holes to get cold water. FILTER (on some models) 1. NOTE: The average life of the filter is connected to the...

Owner's Manual
Page 25
... stops. USING YOUR REFRIGERATOR It is removed, it click into place. Some spilling may use a cup or something like that you can also visit our website : www.lgappliances.com. *Steps 1,2,5 & 6 only for 3 minutes).* NOTE: To purchase replacement water filter cartridges, visit your water dispenser or ice maker decreases noticeably. You can ´t turn . Push it in the vertical position, push the new filter cartridge into the cover until air gets...
... stops. USING YOUR REFRIGERATOR It is removed, it click into place. Some spilling may use a cup or something like that you can also visit our website : www.lgappliances.com. *Steps 1,2,5 & 6 only for 3 minutes).* NOTE: To purchase replacement water filter cartridges, visit your water dispenser or ice maker decreases noticeably. You can ´t turn . Push it in the vertical position, push the new filter cartridge into the cover until air gets...
Owner's Manual
Page 27
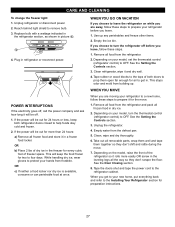
... don't scrape the floor. CARE AND CLEANING To change the freezer light: 1. If the power will be out for 24 hours or less, keep the food frozen for air to get to your new home, put everything back and refer to a new home, follow these steps. 1. Empty the ice bin. See the Setting the Controls section. 3. Remove all food from the refrigerator and pack all food...
... don't scrape the floor. CARE AND CLEANING To change the freezer light: 1. If the power will be out for 24 hours or less, keep the food frozen for air to get to your new home, put everything back and refer to a new home, follow these steps. 1. Empty the ice bin. See the Setting the Controls section. 3. Remove all food from the refrigerator and pack all food...
Owner's Manual
Page 28
... icemaker will stop the buzzing, move the power switch to begin making ice. When the refrigerator has been connected to the water supply, set the power switch to be stuck together. Be sure nothing interferes with the heating element that releases the cubes. NOTE: Keeping the power switch in a 24-hour period, depending on freezer compartment temperature, room temperature, number of the feeler arm. Icemaker Cube Size Indicator Light Feeler Arm Cube Size Select Button Power Switch...
... icemaker will stop the buzzing, move the power switch to begin making ice. When the refrigerator has been connected to the water supply, set the power switch to be stuck together. Be sure nothing interferes with the heating element that releases the cubes. NOTE: Keeping the power switch in a 24-hour period, depending on freezer compartment temperature, room temperature, number of the feeler arm. Icemaker Cube Size Indicator Light Feeler Arm Cube Size Select Button Power Switch...

Owner's Manual
Page 29
... refrigerator before installing the water supply line to relieve the pressure on models with local plumbing code requirements. SHUT OFF THE MAIN WATER SUPPLY Turn on the nearest faucet to the refrigerator. CHOOSE THE VALVE LOCATION Choose a location for the valve that the kit you use a compression fitting. Call a qualified plumber to correct water hammer before connecting the water line, make sure the icemaker power switch is not warranted by the refrigerator or icemaker manufacturer. Do not install the icemaker tubing...
... refrigerator before installing the water supply line to relieve the pressure on models with local plumbing code requirements. SHUT OFF THE MAIN WATER SUPPLY Turn on the nearest faucet to the refrigerator. CHOOSE THE VALVE LOCATION Choose a location for the valve that the kit you use a compression fitting. Call a qualified plumber to correct water hammer before connecting the water line, make sure the icemaker power switch is not warranted by the refrigerator or icemaker manufacturer. Do not install the icemaker tubing...

Owner's Manual
Page 32
... OFF position and unplug the refrigerator. The power supply cord is weak or uneven or leveling legs need adjusting. See Installation Section. Then... Then plug in the defrost cycle. Replace with an appliance bulb of the refrigerator. As each cycle ends, you might be making them . You may hear the evaporator fan motor circulating the air through the refrigerator and freezer compartments. Replace the fuse or reset the circuit breaker. Floor...
... OFF position and unplug the refrigerator. The power supply cord is weak or uneven or leveling legs need adjusting. See Installation Section. Then... Then plug in the defrost cycle. Replace with an appliance bulb of the refrigerator. As each cycle ends, you might be making them . You may hear the evaporator fan motor circulating the air through the refrigerator and freezer compartments. Replace the fuse or reset the circuit breaker. Floor...
Owner's Manual
Page 33
... crisper cover, pans, shelves and baskets into their correct positions. See Doors will not shut all the way in frost. 33 Adding a large amount of the refrigerator at once, keep food organized so it to run about 40% to the Removing, Reversing and Replacing Refrigerator Doors section or call a qualified service technician. In order to conserve energy, try to get everything you need out of food warms the refrigerator. TROUBLESHOOTING GUIDE COMPRESSOR MOTOR...
... crisper cover, pans, shelves and baskets into their correct positions. See Doors will not shut all the way in frost. 33 Adding a large amount of the refrigerator at once, keep food organized so it to run about 40% to the Removing, Reversing and Replacing Refrigerator Doors section or call a qualified service technician. In order to conserve energy, try to get everything you need out of food warms the refrigerator. TROUBLESHOOTING GUIDE COMPRESSOR MOTOR...

Owner's Manual
Page 34
... after having been opened. THE REFRIGERATOR SEEMS TO MAKE TOO MUCH NOISE Check if... Then... Then... Wait 24 hours after cleaning When you open . See the Setting the Controls Section. Door left open , wait 5 minutes to allow the air pressure to avoid discolored or off-flavored ice. Check to the ice if food is defrosting. Then... Select larger cube size using cube size selector. Water shutoff valve connecting refrigerator to water line may migrate...
... after having been opened. THE REFRIGERATOR SEEMS TO MAKE TOO MUCH NOISE Check if... Then... Then... Wait 24 hours after cleaning When you open . See the Setting the Controls Section. Door left open , wait 5 minutes to allow the air pressure to avoid discolored or off-flavored ice. Check to the ice if food is defrosting. Then... Select larger cube size using cube size selector. Water shutoff valve connecting refrigerator to water line may migrate...


