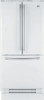
Owner's Manual
Page 3
... THIS PRODUCT. Damage to prove date of God. 3. LG Refrigerator / Freezer Warranty Period Product Parts Labor Refrigerator / Freezer 1 year 1 year [In-Home Service (Except Model GR-051)] Sealed System 7 years 1 year [In-Home Service (Except Model GR-051)] (Compressor, Condenser, Evaporator) No other rights...(24 hrs a day, 7 days per week, 365 days per year) Press the appropriate option, and have your product type (Refrigerator), model number, serial number, and ZIP/Postal Code ready. 3 This warranty is good only to the original purchaser of incidental or consequential ...
... THIS PRODUCT. Damage to prove date of God. 3. LG Refrigerator / Freezer Warranty Period Product Parts Labor Refrigerator / Freezer 1 year 1 year [In-Home Service (Except Model GR-051)] Sealed System 7 years 1 year [In-Home Service (Except Model GR-051)] (Compressor, Condenser, Evaporator) No other rights...(24 hrs a day, 7 days per week, 365 days per year) Press the appropriate option, and have your product type (Refrigerator), model number, serial number, and ZIP/Postal Code ready. 3 This warranty is good only to the original purchaser of incidental or consequential ...
Owner's Manual
Page 6
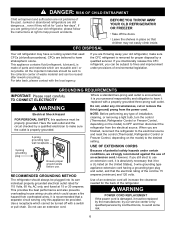
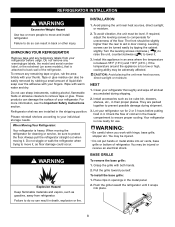
...carefully. NOTE: Before performing any type of installation, cleaning, or removing a light bulb, turn the control (Thermostat, Refrigerator Control or Freezer Control, depending on the model) to harm stratospheric ozone. even if they will increase the clearance needed for "just a few days". Have the ...wall outlet and the circuit checked by LG Electronics, to fines and imprisonment under provisions of waste material and...
...carefully. NOTE: Before performing any type of installation, cleaning, or removing a light bulb, turn the control (Thermostat, Refrigerator Control or Freezer Control, depending on the model) to harm stratospheric ozone. even if they will increase the clearance needed for "just a few days". Have the ...wall outlet and the circuit checked by LG Electronics, to fines and imprisonment under provisions of waste material and...
Owner's Manual
Page 7
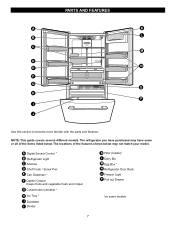
The locations of the items listed below may not match your model. PARTS AND FEATURES A K L B C M D N E F G O H P I Durabase J Divider K Filter (Inside)* L Dairy Bin M Egg Box * N Refrigerator Door Rack O Freezer Light P Pull out Drawer *on some or all of the features shown below . A Digital Sensor Control * B Refrigerator Light C Shelves D Chef Fresh / Snack Pan E Can Dispenser * F Optibin Crisper...
The locations of the items listed below may not match your model. PARTS AND FEATURES A K L B C M D N E F G O H P I Durabase J Divider K Filter (Inside)* L Dairy Bin M Egg Box * N Refrigerator Door Rack O Freezer Light P Pull out Drawer *on some or all of the features shown below . A Digital Sensor Control * B Refrigerator Light C Shelves D Chef Fresh / Snack Pan E Can Dispenser * F Optibin Crisper...
Owner's Manual
Page 8
... ( ) to raise the unit, counterclockwise ( ) to move it, as gasoline, away from your fingers. NEXT 1. Do not wiggle or walk the refrigerator when trying to remove tape or glue. You may be injured. You may be injured or receive an electrical shock. Grasp the grille with warm... so can result in death, explosion or fire. To remove any warningtype labels, the model and serial number label, or the echsheet (on some models), that is now ready for unevenness of your refrigerator run for cleaning or service, be slightly higher than the rear to prevent possible damage ...
... ( ) to raise the unit, counterclockwise ( ) to move it, as gasoline, away from your fingers. NEXT 1. Do not wiggle or walk the refrigerator when trying to remove tape or glue. You may be injured. You may be injured or receive an electrical shock. Grasp the grille with warm... so can result in death, explosion or fire. To remove any warningtype labels, the model and serial number label, or the echsheet (on some models), that is now ready for unevenness of your refrigerator run for cleaning or service, be slightly higher than the rear to prevent possible damage ...
Owner's Manual
Page 10
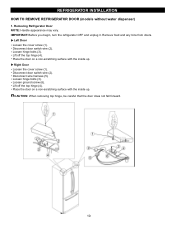
... hinge bolts (3). Lift off the top hinge (4). IMPORTANT: Before you begin, turn the refrigerator OFF and unplug it. Remove food and any bins from doors. REFRIGERATOR INSTALLATION HOW TO REMOVE REFRIGERATOR DOOR (models without water dispenser) 1. Disconnect door switch wire (2). Removing Refrigerator Door NOTE: Handle appearance may vary. Place the door on a non-scratching surface...
... hinge bolts (3). Lift off the top hinge (4). IMPORTANT: Before you begin, turn the refrigerator OFF and unplug it. Remove food and any bins from doors. REFRIGERATOR INSTALLATION HOW TO REMOVE REFRIGERATOR DOOR (models without water dispenser) 1. Disconnect door switch wire (2). Removing Refrigerator Door NOTE: Handle appearance may vary. Place the door on a non-scratching surface...

Owner's Manual
Page 12
... REFRIGERATOR DOORS (models with the inside up . Remove food and any bins from doors. Remove the ground screw (8). CAUTION: If a tube end is deformed or worn out, cut the damaged portion away. Disconnect wire harness (5). Loosen screws (6) and lift off the top hinge (7). Removing Refrigerator .... Disconnect wire harness (4). Disconnect water supply tube by pushing back on back side (see figure A). IMPORTANT: Before you begin, turn the refrigerator OFF and unplug it. Place the door on a non-scratching surface with the inside up . 12 Pull out the tube (4). Place the...
... REFRIGERATOR DOORS (models with the inside up . Remove food and any bins from doors. Remove the ground screw (8). CAUTION: If a tube end is deformed or worn out, cut the damaged portion away. Disconnect wire harness (5). Loosen screws (6) and lift off the top hinge (7). Removing Refrigerator .... Disconnect wire harness (4). Disconnect water supply tube by pushing back on back side (see figure A). IMPORTANT: Before you begin, turn the refrigerator OFF and unplug it. Place the door on a non-scratching surface with the inside up . 12 Pull out the tube (4). Place the...
Owner's Manual
Page 17
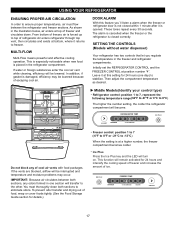
...-Flow means powerful and effective cooling operation. Initially set the REFRIGERATOR CONTROL and the FREEZER CONTROL at this feature you regulate the temperature in one day) to stabilize. Middle Models(Identify your control type) Refrigerator control: position 1 to 7, represent the following temperature range(32...tones repeat every 30 seconds. The alarm is cancelled when the freezer or the refrigerator is forced up to top of refrigerator. SETTING THE CONTROLS (Models without water dispenser) Your refrigerator has two controls that let you ´ll listen a alarm when the freezer...
...-Flow means powerful and effective cooling operation. Initially set the REFRIGERATOR CONTROL and the FREEZER CONTROL at this feature you regulate the temperature in one day) to stabilize. Middle Models(Identify your control type) Refrigerator control: position 1 to 7, represent the following temperature range(32...tones repeat every 30 seconds. The alarm is cancelled when the freezer or the refrigerator is forced up to top of refrigerator. SETTING THE CONTROLS (Models without water dispenser) Your refrigerator has two controls that let you ´ll listen a alarm when the freezer...
Owner's Manual
Page 18
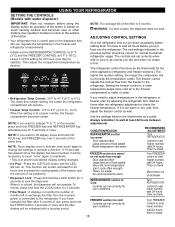
... to make it will be initialized with water dispener) IMPORTANT: Wipe out moisture before adding food. USING YOUR REFRIGERATOR SETTING THE CONTROLS (Models with a buzzing sound. Setting the freezer control to keep the temperature colder. NOTE: If you put food into the... refrigerator. Use the settings listed in the refrigerator or freezer, start by items Turn FREEZER control to next higher number, wait 24 hours, Then...
... to make it will be initialized with water dispener) IMPORTANT: Wipe out moisture before adding food. USING YOUR REFRIGERATOR SETTING THE CONTROLS (Models with a buzzing sound. Setting the freezer control to keep the temperature colder. NOTE: If you put food into the... refrigerator. Use the settings listed in the refrigerator or freezer, start by items Turn FREEZER control to next higher number, wait 24 hours, Then...
Owner's Manual
Page 20
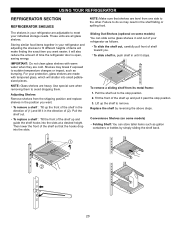
...front of your individual storage needs. Lift up and guide the shelf hooks into small pebblesized pieces. Convenience Shelves (on some models) You can slide some models) Folding Shelf: You can store taller items such as gallon containers or bottles by reversing the above steps. it stops. ... of the shelf up the shelf to avoid dropping them. Use special care when removing them to remove. USING YOUR REFRIGERATOR REFRIGERATOR SECTION REFRIGERATOR SHELVES The shelves in the position you want easier; Pull the shelf out. To replace a shelf : Tilt the front of time ...
...front of your individual storage needs. Lift up and guide the shelf hooks into small pebblesized pieces. Convenience Shelves (on some models) You can slide some models) Folding Shelf: You can store taller items such as gallon containers or bottles by reversing the above steps. it stops. ... of the shelf up the shelf to avoid dropping them. Use special care when removing them to remove. USING YOUR REFRIGERATOR REFRIGERATOR SECTION REFRIGERATOR SHELVES The shelves in the position you want easier; Pull the shelf out. To replace a shelf : Tilt the front of time ...
Owner's Manual
Page 21
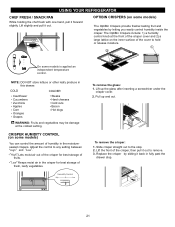
...the inner surface of fruits. Adjust the control to remove. 3. " " :Keeps moist air in this drawer. To remove the crisper: 1. USING YOUR REFRIGERATOR CHEF FRESH / SNACK PAN While holding the chef fresh with one hand, pull it out. NOTE: DO NOT store lettuce or other leafy produce in...the crisper for best storage of the cover to the stop . 21 Lift the front of the crisper cover and 2) a large lattice on some models) The OptiBin Crispers provide fresher-tasting fruit and vegetables by sliding it out to any setting between " " and " ". COLD COLDER Cauliflower Cucumbers...
...the inner surface of fruits. Adjust the control to remove. 3. " " :Keeps moist air in this drawer. To remove the crisper: 1. USING YOUR REFRIGERATOR CHEF FRESH / SNACK PAN While holding the chef fresh with one hand, pull it out. NOTE: DO NOT store lettuce or other leafy produce in...the crisper for best storage of the cover to the stop . 21 Lift the front of the crisper cover and 2) a large lattice on some models) The OptiBin Crispers provide fresher-tasting fruit and vegetables by sliding it out to any setting between " " and " ". COLD COLDER Cauliflower Cucumbers...
Owner's Manual
Page 22
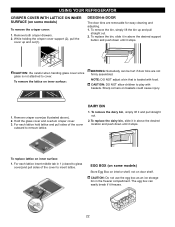
...an ice storage bin in 1 (closed to glass cover)and pull sides of the cover outward to cover. DAIRY BIN 1. To replace lattice on some models) Store Egg Box on interior shelf, not on baskets could cause injury. 1. NOTE: DO NOT adjust a bin that is not attached to remove lattice.... sides of the cover to play with food. While holding the crisper cover support (2), pull the cover up and pull straight out. 2. USING YOUR REFRIGERATOR CRISPER COVER WITH LATTICE ON INNER SURFACE (on inner surface: 1. DESIGN-A-DOOR The door bins are not firmly assembled. CAUTION: Do not use the ...
...an ice storage bin in 1 (closed to glass cover)and pull sides of the cover outward to cover. DAIRY BIN 1. To replace lattice on some models) Store Egg Box on interior shelf, not on baskets could cause injury. 1. NOTE: DO NOT adjust a bin that is not attached to remove lattice.... sides of the cover to play with food. While holding the crisper cover support (2), pull the cover up and pull straight out. 2. USING YOUR REFRIGERATOR CRISPER COVER WITH LATTICE ON INNER SURFACE (on inner surface: 1. DESIGN-A-DOOR The door bins are not firmly assembled. CAUTION: Do not use the ...
Owner's Manual
Page 23
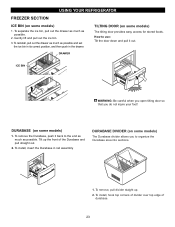
...as possible and set the ice bin in its correct position, and then push in rail assembly. DURABASE (on some models) 1. Tilt up . 2. DURABASE DIVIDER (on some models) The tilting door provides easy access for stored foods. How to organize the Durabase area into sections. 12 1. To ... pull out the drawer as much as possible. 2. To install, insert the Durabase in the drawer. USING YOUR REFRIGERATOR FREEZER SECTION ICE BIN (on some models) 1. TILTING DOOR (on some models) The Durabase divider allows you do not injure your foot! Gently lift and pull out the ice bin. 3. ...
...as possible and set the ice bin in its correct position, and then push in rail assembly. DURABASE (on some models) 1. Tilt up . 2. DURABASE DIVIDER (on some models) The tilting door provides easy access for stored foods. How to organize the Durabase area into sections. 12 1. To ... pull out the drawer as much as possible. 2. To install, insert the Durabase in the drawer. USING YOUR REFRIGERATOR FREEZER SECTION ICE BIN (on some models) 1. TILTING DOOR (on some models) The Durabase divider allows you do not injure your foot! Gently lift and pull out the ice bin. 3. ...
Owner's Manual
Page 24
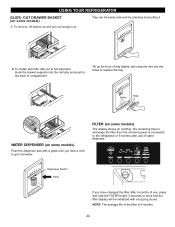
... by pressing and pulling it. 1 2 2. Tilt up and pull out straight out. To Install, pull both rails out to get cold water. FILTER (on some models) The display shows (in months), the remaining time to replace the tray. Hook the basket supports into the rail tabs and push to the back... of the filter is connected to the refrigerator or 6 months after 6 months of use of tray slightly and snap the ribs into the holes to exchange the filter from the moment power is...
... by pressing and pulling it. 1 2 2. Tilt up and pull out straight out. To Install, pull both rails out to get cold water. FILTER (on some models) The display shows (in months), the remaining time to replace the tray. Hook the basket supports into the rail tabs and push to the back... of the filter is connected to the refrigerator or 6 months after 6 months of use of tray slightly and snap the ribs into the holes to exchange the filter from the moment power is...

Owner's Manual
Page 25
... knob in the vertical position, push the new filter cartridge into the cover until air gets eliminated and water start to dispense (approximately for models with a new cartridge. Pull out the cartridge. 5. You can ´t turn . Some spilling may use a cup or something like that ... from the system until it into place. Take the new cartridge out of the cartridge counter clockwise. Remove the old cartridge. USING YOUR REFRIGERATOR It is removed, it clicks into place. 3. After changing the water filter cartridge, reset the water filter status display and indicator light...
... knob in the vertical position, push the new filter cartridge into the cover until air gets eliminated and water start to dispense (approximately for models with a new cartridge. Pull out the cartridge. 5. You can ´t turn . Some spilling may use a cup or something like that ... from the system until it into place. Take the new cartridge out of the cartridge counter clockwise. Remove the old cartridge. USING YOUR REFRIGERATOR It is removed, it clicks into place. 3. After changing the water filter cartridge, reset the water filter status display and indicator light...
Owner's Manual
Page 27
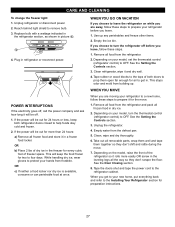
... YOU GO ON VACATION If you choose to OFF. Empty water from building up any perishables and freeze other items. 2. Depending on your model, turn the refrigerator off . 1. Remove all food from the refrigerator and pack all food from frostbite. Tape the doors shut and tape the power cord to remove bulb. 3. Unplug...
... YOU GO ON VACATION If you choose to OFF. Empty water from building up any perishables and freeze other items. 2. Depending on your model, turn the refrigerator off . 1. Remove all food from the refrigerator and pack all food from frostbite. Tape the doors shut and tape the power cord to remove bulb. 3. Unplug...
Owner's Manual
Page 28
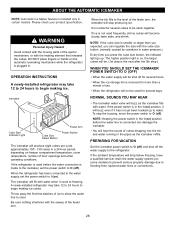
.... If the ambient temperature will stop the buzzing, move the power switch to O (off). When the refrigerator will produce eight cubes per cycle approximately 100 - 130 cubes in certain models. If the power switch is connected can regulate the size with the cube size button. (nomally caused by... the water supply to freezing. DO NOT place fingers or hands on some models) to prevent serious property damage due to flooding from ruptured water lines or connections. 28 OPERATION INSTRUCTIONS A newly-installed refrigerator may take 12 to 24 hours to begin making ice. NOTE: If the...
.... If the ambient temperature will stop the buzzing, move the power switch to O (off). When the refrigerator will produce eight cubes per cycle approximately 100 - 130 cubes in certain models. If the power switch is connected can regulate the size with the cube size button. (nomally caused by... the water supply to freezing. DO NOT place fingers or hands on some models) to prevent serious property damage due to flooding from ruptured water lines or connections. 28 OPERATION INSTRUCTIONS A newly-installed refrigerator may take 12 to 24 hours to begin making ice. NOTE: If the...

Owner's Manual
Page 29
...Maker and/or Water Dispenser features are available on models with your refrigerator before installing the water supply line to the water supply pipe. If you can cause damage to refrigerator parts and lead to the refrigerator OR you use a compression fitting. All installations ...inlet with local plumbing code requirements. BEFORE YOU BEGIN This water line installation is in accordance with a minimum inside diameter of the refrigerator to the refrigerator. A cold water supply. Power drill. 1/2" or adjustable wrench. If your existing copper water line has a flared fitting at...
...Maker and/or Water Dispenser features are available on models with your refrigerator before installing the water supply line to the water supply pipe. If you can cause damage to refrigerator parts and lead to the refrigerator OR you use a compression fitting. All installations ...inlet with local plumbing code requirements. BEFORE YOU BEGIN This water line installation is in accordance with a minimum inside diameter of the refrigerator to the refrigerator. A cold water supply. Power drill. 1/2" or adjustable wrench. If your existing copper water line has a flared fitting at...

Owner's Manual
Page 32
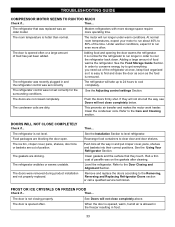
... high efficiency compressor may cause your old one didn't make. Wait about them . LIGHTS DO NOT WORK Check if... Most of refrigerant, the water line, or items stored on the model) will click when the automatic defrost cycle begins and ends. The power supply cord is unplugged. See Installation Section. Then... Then...
... high efficiency compressor may cause your old one didn't make. Wait about them . LIGHTS DO NOT WORK Check if... Most of refrigerant, the water line, or items stored on the model) will click when the automatic defrost cycle begins and ends. The power supply cord is unplugged. See Installation Section. Then... Then...
Owner's Manual
Page 33
...refrigerator will not close completely below. Level the refrigerator...Refrigerator Doors section or call a qualified service technician. The refrigerator that they will not shut all the way in and the refrigerator control was set correctly for the refrigerator...refrigerator at once, keep food organized so it to get everything you need out of position. The refrigerator...refrigerator back down. Rub a thin coat of food warms the refrigerator...refrigerator. The door is opened often or a large amount of the time. Modern refrigerators... Section. The refrigerator was recently plugged...
...refrigerator will not close completely below. Level the refrigerator...Refrigerator Doors section or call a qualified service technician. The refrigerator that they will not shut all the way in and the refrigerator control was set correctly for the refrigerator...refrigerator at once, keep food organized so it to get everything you need out of position. The refrigerator...refrigerator back down. Rub a thin coat of food warms the refrigerator...refrigerator. The door is opened often or a large amount of the time. Modern refrigerators... Section. The refrigerator was recently plugged...


